




- sales/support
Google Chat:---
- sales
+86-0755-88291180
- sales01
sales@spotpear.com
- sales02
dragon_manager@163.com
- support
tech-support@spotpear.com
- CEO-Complaints
zhoujie@spotpear.com
- Only Tech-Support
WhatsApp:13246739196
- Purchase/Shipping/Refund
WhatsApp:13424403025
Pi5-PCIe-Fish-Board-A User Guide
Step 1 Enabling PCIe】
By default the PCIe connector is not enabled. To enable it you should add the following option into /boot/firmware/config.txt and reboot:
# Enable the PCIe External connector.
dtparam=pciex1
A more memorable alias for pciex1 exists, so you can alternatively add dtparam=nvme to the /boot/firmware/config.txt file.
NOTE
Enumeration of PCIe devices behind a switch is not currently supported.
Step 2 PCIe Gen 3.0】
The connection is certified for Gen 2.0 speeds (5 GT/sec), but you can force it to Gen 3.0 (10 GT/sec) if you add the following lines to your /boot/firmware/config.txt.
# Enable the PCIe external connector
dtparam=pciex1
# Force Gen 3.0 speeds
dtparam=pciex1_gen=3
WARNING
The Raspberry Pi 5 is not certified for Gen 3.0 speeds, and connections to PCIe devices at these speeds may be unstable.
You should then reboot your Raspberry Pi for these settings to take effect.
Step 3 Booting from PCIe】
Once enabled, and after you reboot, an NVMe disk attached via the PCIe should be visible. However, your Raspberry Pi won’t try to boot off the NVMe drive. If you wish to enable boot support you will need to change the BOOT_ORDER in the bootloader configuration. Edit the EEPROM configuration by,
sudo rpi-eeprom-config --edit
and change the BOOT_ORDER line to be as below.
BOOT_ORDER=0xf416
after saving your changes, reboot your Raspberry Pi to update the EEPROM.
NOTE】
Your Raspberry Pi will not boot from an attached NVMe drive unless you have the external PCIe port enabledd, and there’s a NVMe drive with a valid boot partition attached to the PCIe bus.
Step 4 Control the on-board LED and Extra Power】
Note: This step is not necessary. The module can work normally without these connections
Connect as the following picture
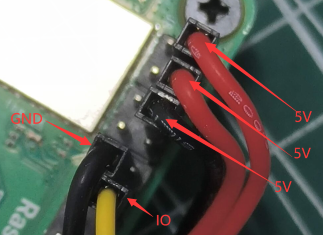
RUN LED-code
Note: This step is not necessary. The module can work normally without these connections
Connect as the following picture
RUN LED-code
TAG:
ESP32-S3 1.28inch Round LCD
Solar
Jetson Nano Expansion Board
Raspberry Pi CSI-to-HDMI
ESP32 ST7789 configuration
Spotpear
Luckfox Pico Pro
800×480
Raspberry Pi Game
Raspberry Pi LCD
NVIDIA
Raspberry Pi 5 Argon-NEO-M.2-NVME-PCIE-Expansion-Board Only For Argon NEO 5 Case (Not include)
ESP32 S3 AI 1.75 inch Development Board with 1.75inch AMOLED Touchscreen Round Screen Deepseek
ESP32-P4-NANO Development Board RISC-V WiFi6 MIPI CSI Camera / 10.1 inch DSI Display / USB / RJ45 Ethernet / POE / Audio Buzzer
Luckfox PicoKVM KVM NanoKVM RV1106 Pico Remote Control /Power /Desktop Maintenance Server HDMI USB For PiKVM Raspberry Pi
Pi5 Active Cooler
Raspberry Pi 5 RTC
Raspberry Pi Touch Display 2 Official Original Capacitive TouchScreen 7 inch LCD TFT 720x1280
Raspberry Pi 1.44inch LCD display HAT
ESP32 S3 4inch LCD Development Board 480x480 TouchScreen Display TVBOX LVGL HMI Sensor CAN RS485
TAG:
Raspberry Pi 5 PD Trigger
ESP32-S3
Industrial Isolated USB TO 4CH RS485 BConverter UART CH344L
D-Robotics RDK X3
15.6 inch Dual Double LCD Computer PC Monitor Display Secondary Screen TypeC Mini HDMI Windows MacOS
SpotPear
Luckfox Core3576 Rockchip RK3576
10.1 inch LCD DSI MIPI TouchScreen Display 1280x800 ESP32 P4 Luckfox Titan RK3576 Lyra RK3506
ESP32 C3
Industrial-grade isolated 2-way RS485 hub repeater One RS485 TO Two RS485
Industrial-grade isolated 4-way RS485 hub repeater One RS485 TO Four RS485
electronic Tag
Raspberry Pi 15.6 inch QLED Quantum Dot Display 1920x1080 Capacitive Touchscreen Computer PC Jetson Game
Screen
Raspberry Pi UPS HAT E 21700 Li battery (NOT included) 5V 6A Uninterruptible Power Supply
DeepSeek AI Voice Chat Robot ESP32 S3 Camera Object Recognition Development Board N16R8 For Xiaozhi Dual microphone interruption
1.47 inch LCD AXS5106L TouchScreen JD9853 Display 172x320 For Arduino/Raspberry Pi/Pico/ESP32
ESP32-S3 Industrial 8-CH Relay IOT LAN WiFi /Bluetooth /CAN /RJ45 Ethernet /POE
Pi5 Fan
Raspberry Pi 7.5 inch e-Paper link (H) RYBW 800x480 For Arduino / Jetson Nano / STM32