


- sales/support
Google Chat:---
- sales
+86-0755-88291180
- sales01
sales@spotpear.com
- sales02
dragon_manager@163.com
- support
tech-support@spotpear.com
- CEO-Complaints
zhoujie@spotpear.com
- Only Tech-Support
WhatsApp:13246739196
- Purchase/Shipping/Refund
WhatsApp:13424403025
- HOME
- >
- ARTICLES
- >
- Common Moudle
- >
- LCD
2.8inch-USB-Monitor User Guide
Working with PC Windows
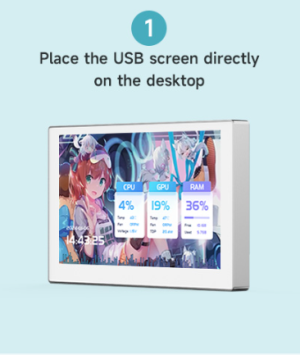
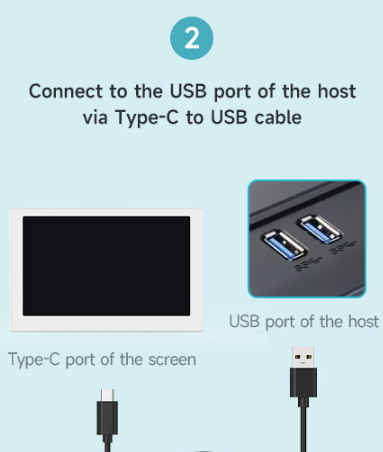
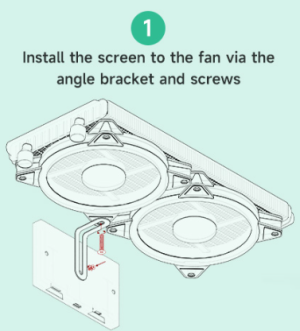
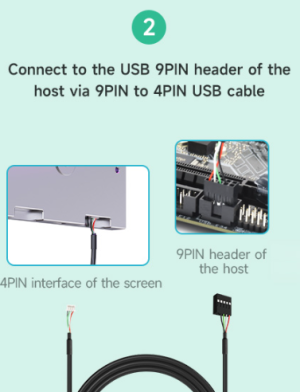
Hardware Connection
Method 1: USB Type-C Connection
Method 2: USB 4PIN Connection
Software Settings
Install K-Lite Codec Pack Decoder
- 1. Download K-Lite Codec Pack decoder
- 2. Unzip the "K-Lite_Codec_Pack.exe" and run it.
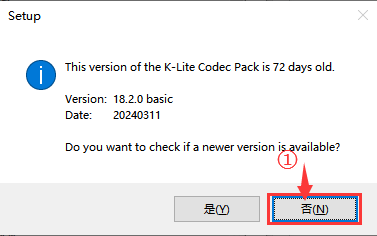
① Select "NO", install the current version by default
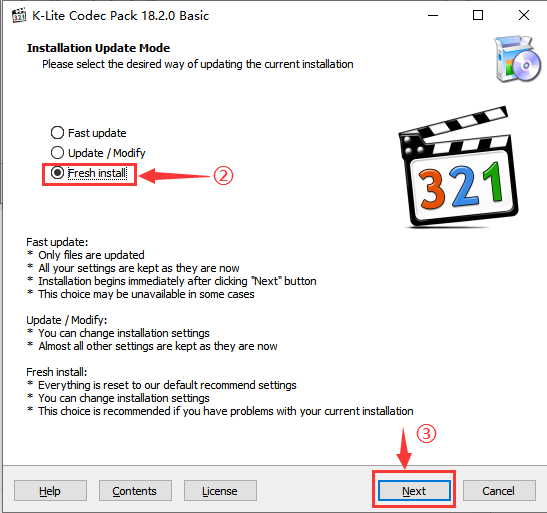
 ② Select "Fresh install"
 ③ All options remain the default settings, select "Next" for all
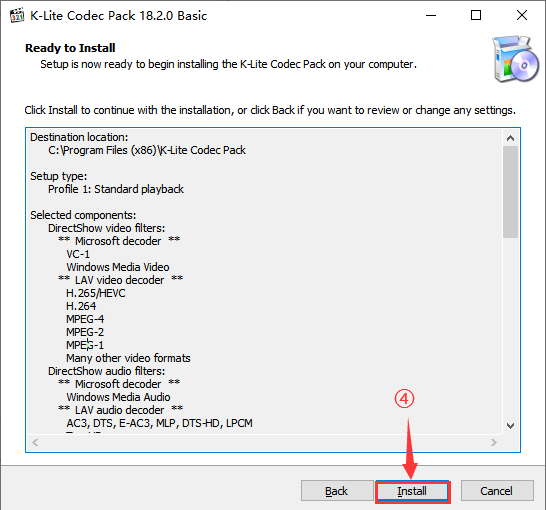
④ Click "Install" to install the driver
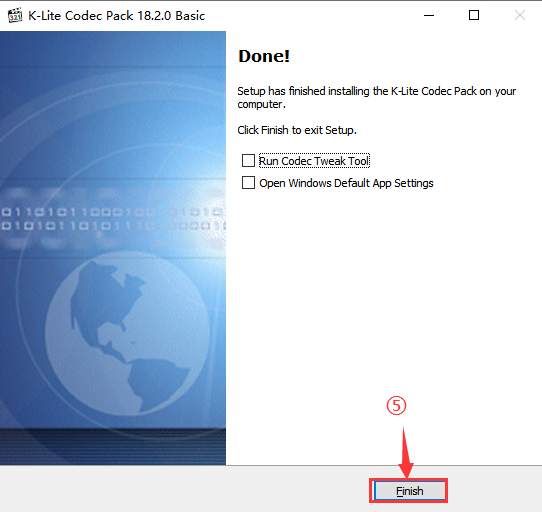
⑤ Click "Finish" to complete the driver installation
Download Software
Please select the correct software version based on the SD card image version in your device to avoid black screen due to using the wrong version.
If you have any questions, please contact customer service, and we will provide you with assistance.
- PCMonitor-V2.25 Software → For devices with the "V2" label (containing V2.25 image)
- PCMonitor-V2.22 Software → For unlabeled old version devices (containing V2.22 image)
- 1. Click #Resources to download the image file of your corresponding model, and unzip it into an .img file.
2. Pull out the TF card that comes with the screen, insert the TF card into the card reader and connect it to the Windwos PC, format the TF card with SDFormatter software.
3. Open the Win32DiskImager software, select the .img image prepared in step 1, and click Write to flash the system image.
4. After the flashing is completed, insert the TF card back into the screen card slot, and then connect the USB to boot it.
Software Version Differences Description
| Version number | Update content |
|---|---|
| V2.25 | Album and clock controls have been added, and the latest database is used, which is more compatible |
| V2.22 | Software compatibility has been optimized to improve crashes caused by system compatibility |
Run Theme with PCMonitor
- 1. Download #Waveshare-PC-Monitor Software and unzip it
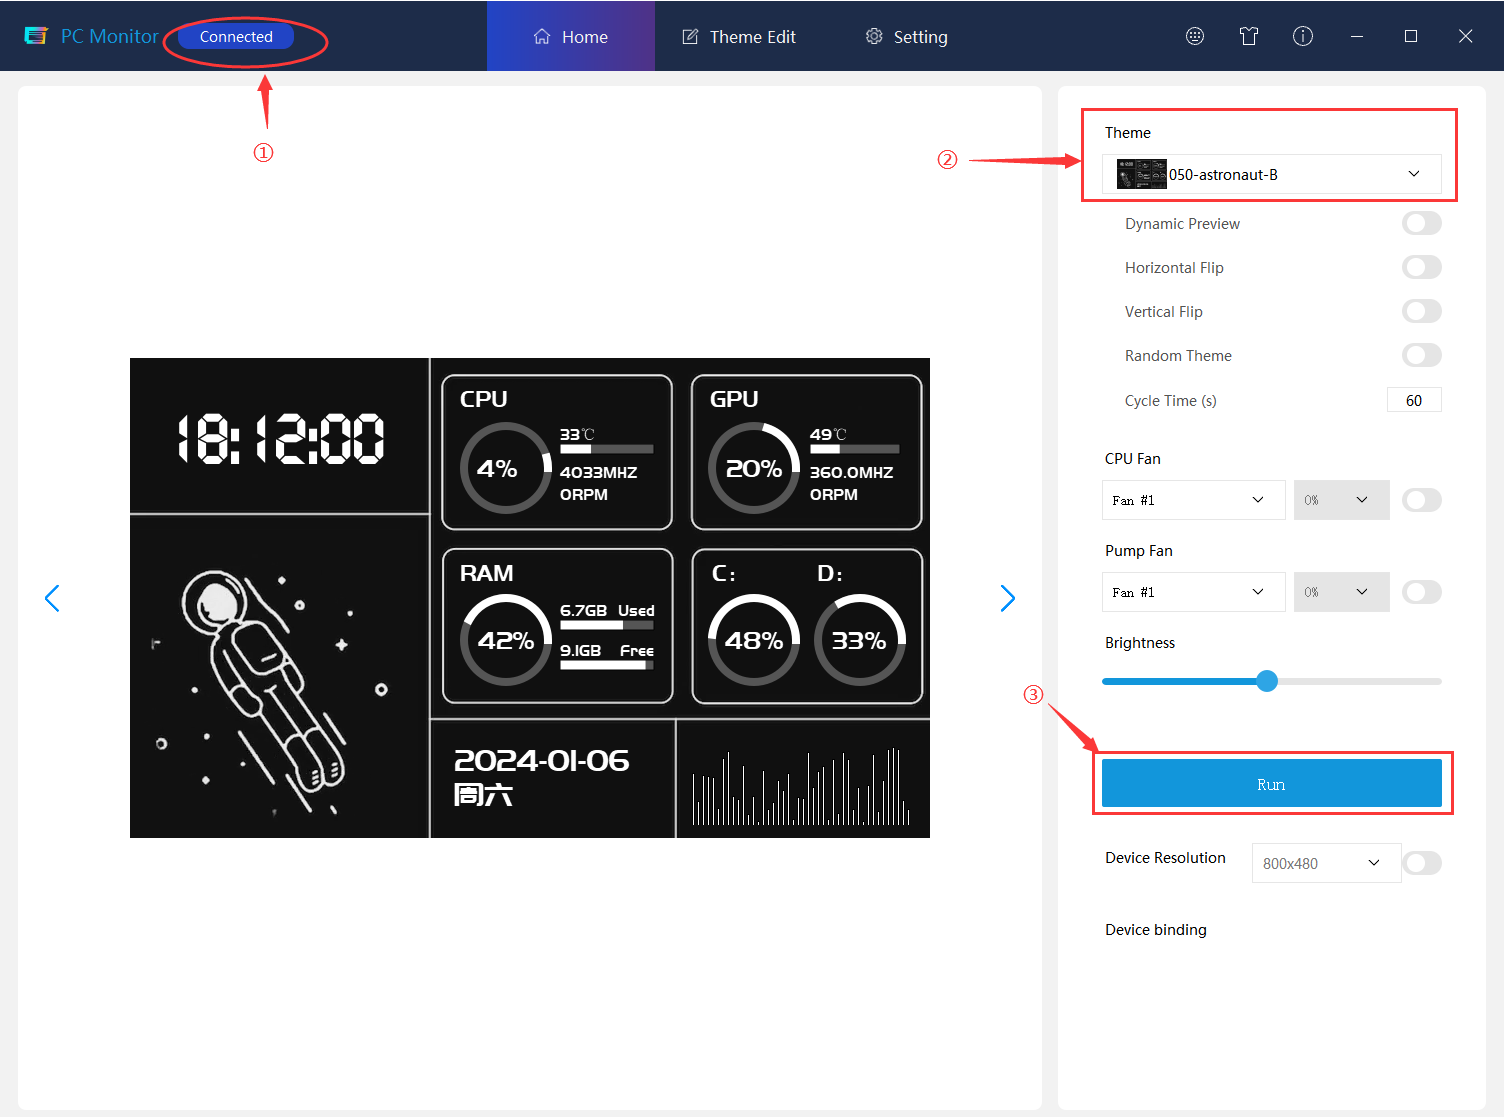
- 2. Run the PCMonitor.exe application and ensure that "Connected" is displayed in the upper left corner
- 3. Select your favorite theme on the right side and click "Run" to display it on the screen
Theme Customization (Optional Operation)
1. Enter Edit Theme Interface

2. Set Video Widget
① Click "+Video" to set the starting coordinates (X, Y) and video size.
② Set the correct video path, place the video file you have made in the /video/480x480 directory and select it. (PS: H264 encoding format file required)
③ Click Save, and the corresponding video preview will appear in the canvas area. (If you need to modify it, you can edit it by right-clicking on the layer)
For example, if the starting coordinates are set to (0,0) and the video size is set to 480x480, the theme will present a full-screen effect.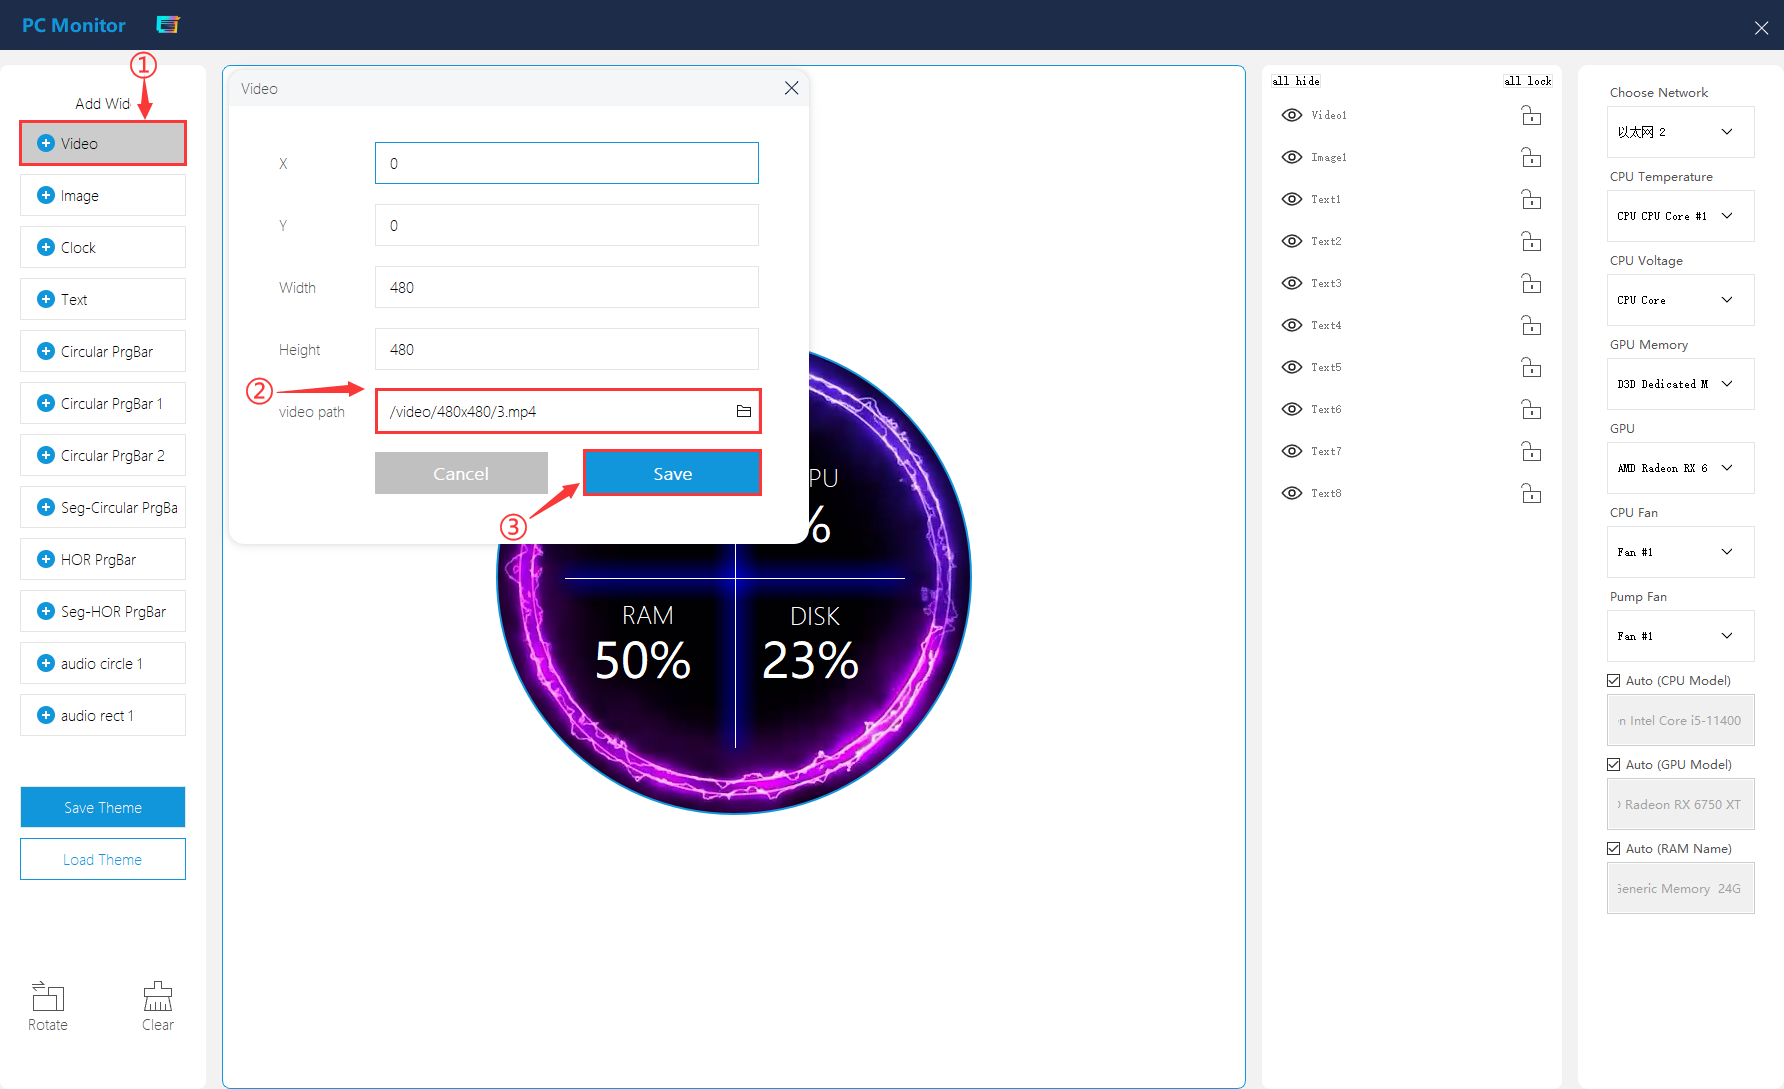
3. Set Image Widget
① Click "+Image", set the center coordinates of the image. The default setting is centered at (240,240).
② Set the correct image path, place the prepared image in the /image/480x480 directory and select it.
③ Click Save, and the corresponding image preview will appear in the canvas area. (If you need to modify it, you can edit it by right-clicking on the layer)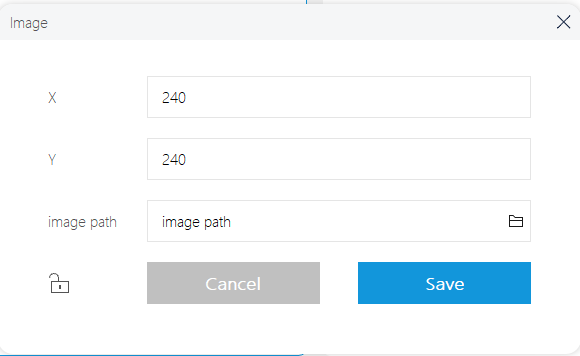
4. Set Clock Widget
① Click "+Clock", place the images corresponding to "hour", "minute" and "second" in the "/image/480x480" directory and select them.
② Set the relative positions of three-pointer images and rotate them around the central origin.
③ Open system data and set them separately as "hour", "minute" and "second".
④ Set the Max Data Value, with "hour" set to 60, and "minute" and "second" set to 60.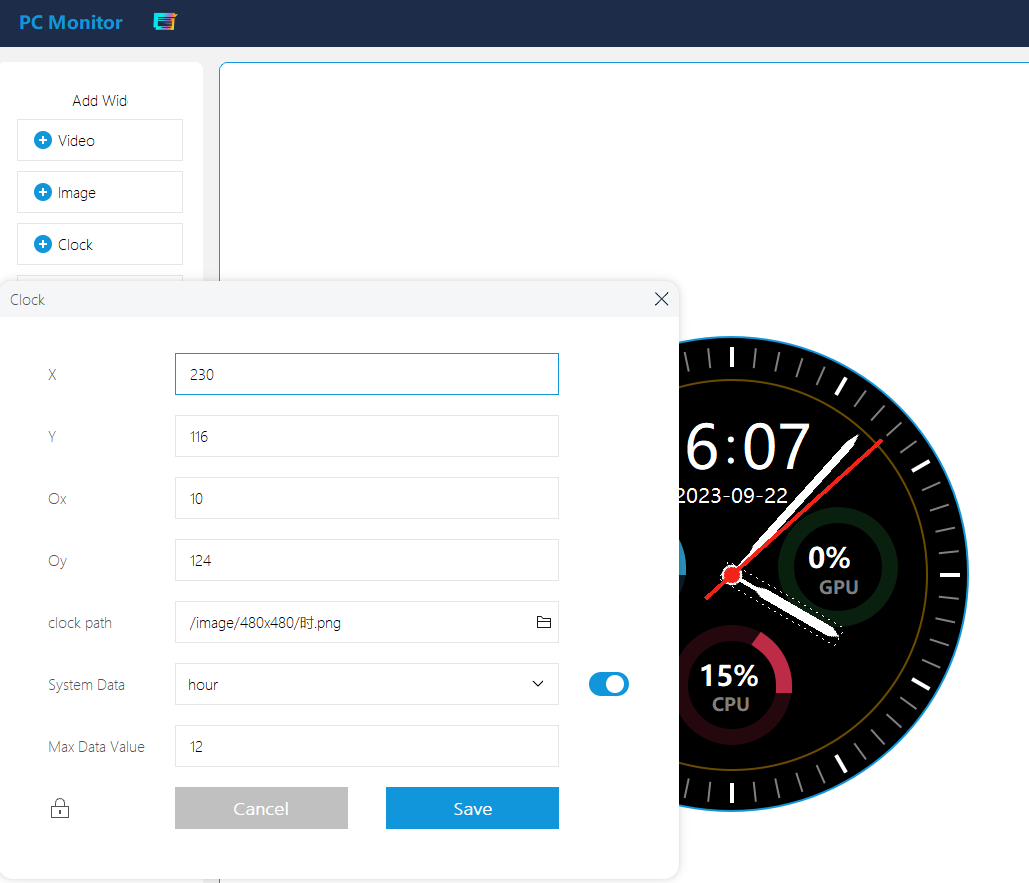
5. Set Text Widget
① Click on "+ Text" to set the coordinates of text ((240,240) is centered by default, and draggable using the mouse).
② Set the text content, foreground color, and font, and click Save to take effect
③ After checking "System Data", the corresponding dynamic values of the system data will be displayed.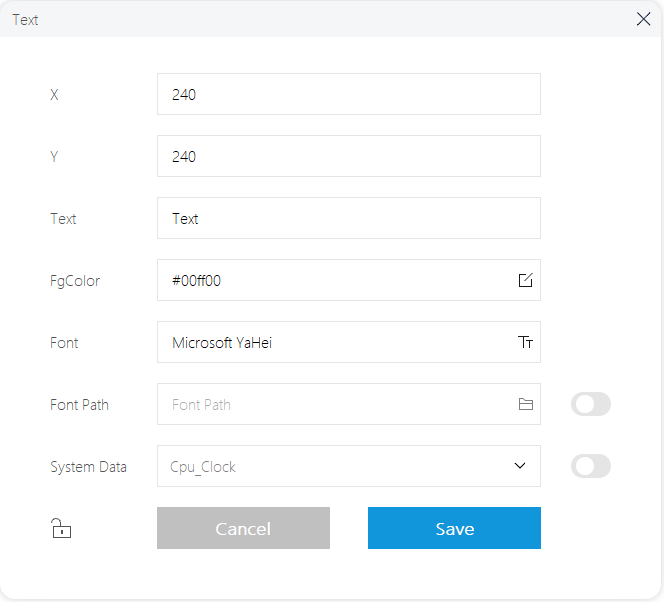
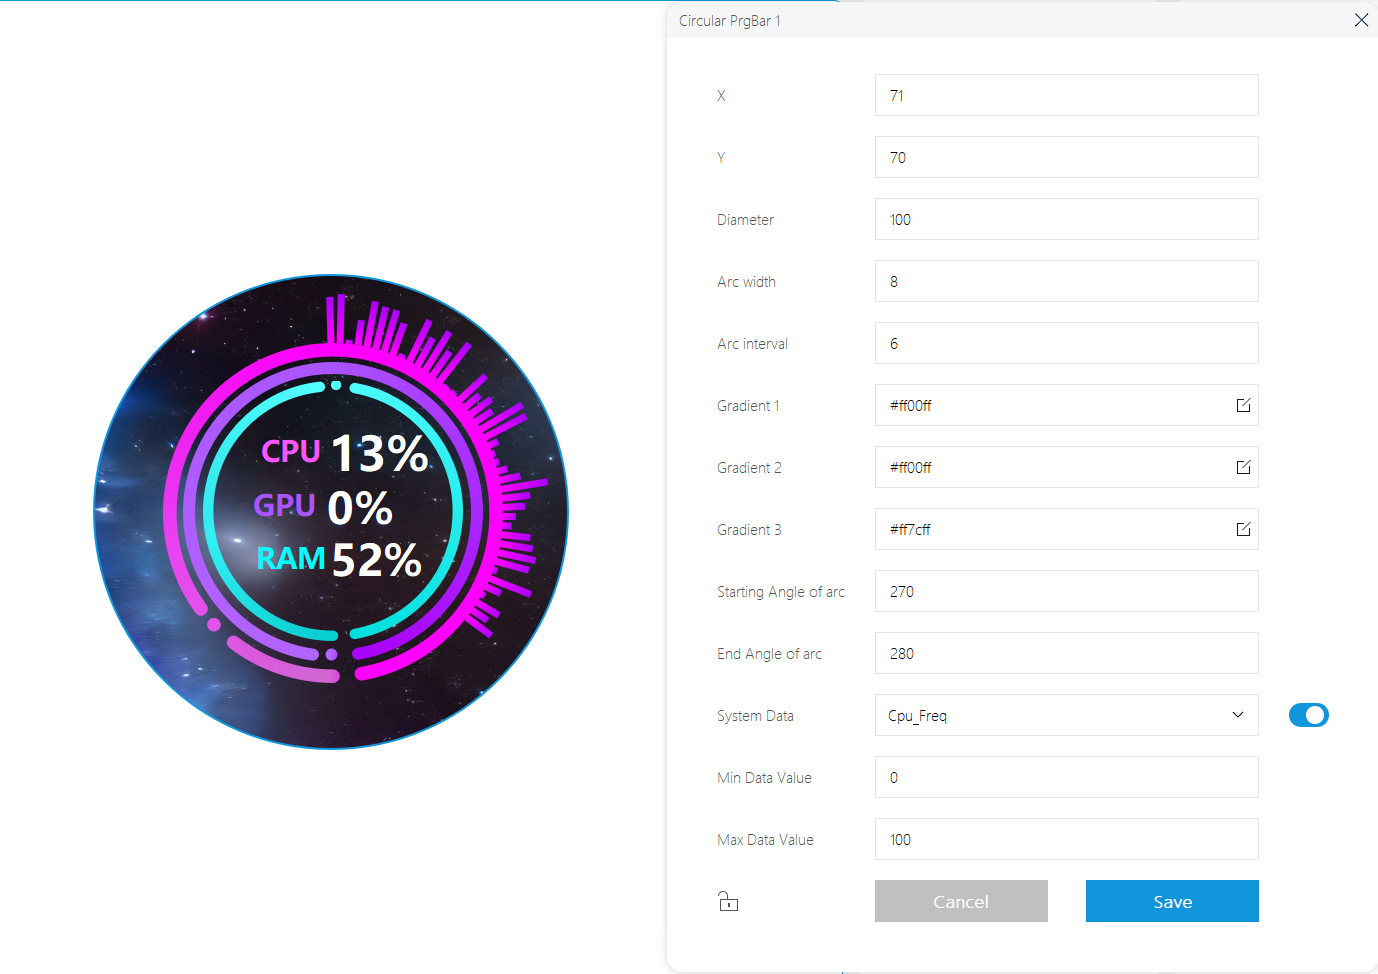
6. Set Circular PrgBar Widget
① Click "+ Circular PrgBar" to set up the basic parameters of the circle such as the coordinates, diameter, arc width and arc spacing.
② Set the color, and it supports three gradient colors (or display one color).
③ Set the starting and ending angles of the arc to control the display direction and arc length.
④ After checking the system data and setting the upper and lower data limits, the corresponding system data will be converted into the dynamic effect of the Circular PrgBar.
7. Set HOR PrgBar Widget
① Click on "+ HOR PrgBar" to set the basic parameters of the horizontal progress bar, such as its coordinates, width, height, corner radius and border width.
② Set the border color, the BgColor of the HOR PrgBar and the FgColor of the content, supporting gradient foreground display. (If not checked, it will display the same color.)
③④ After checking "System Data", the corresponding system data will be converted into dynamic effects for the HOR PrgBar.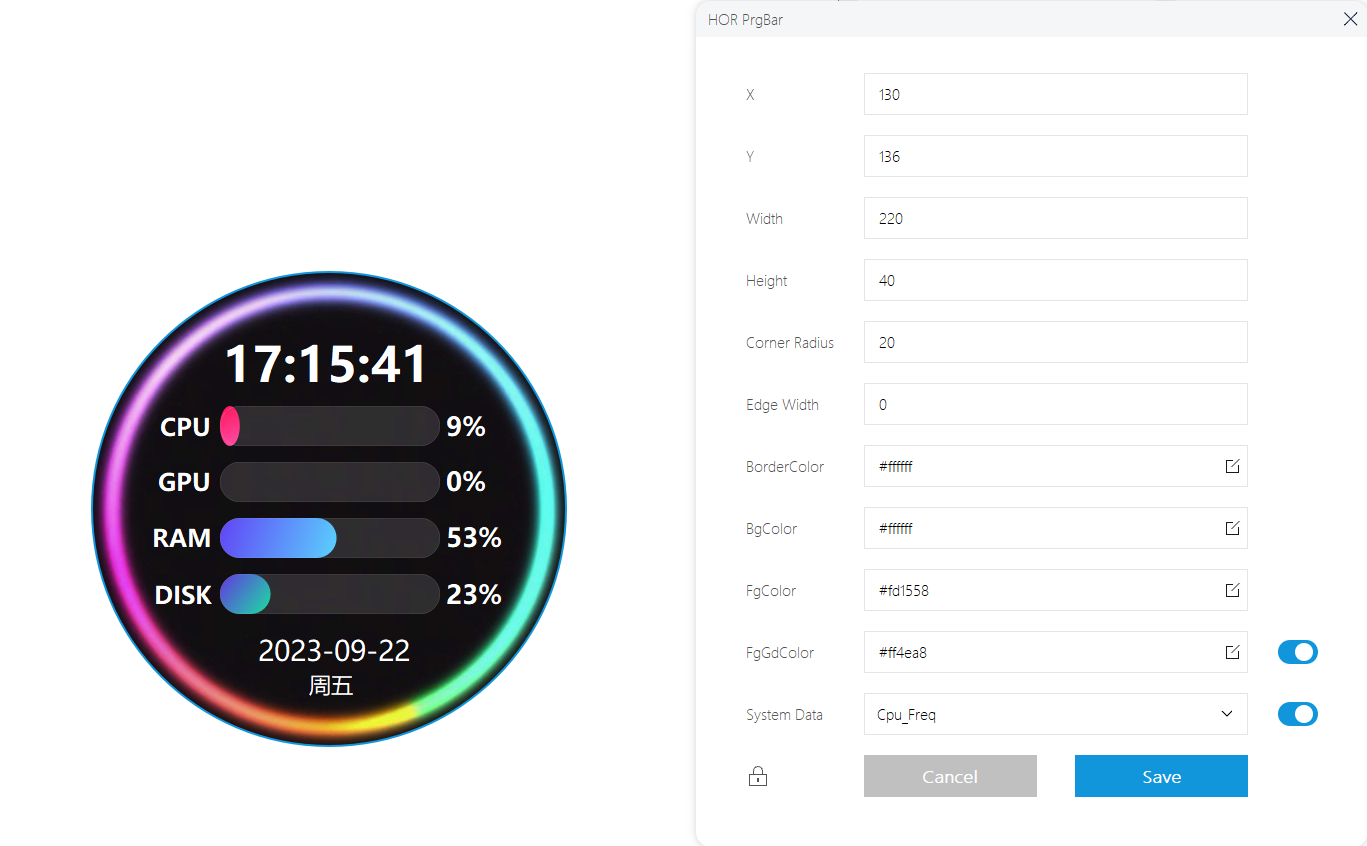
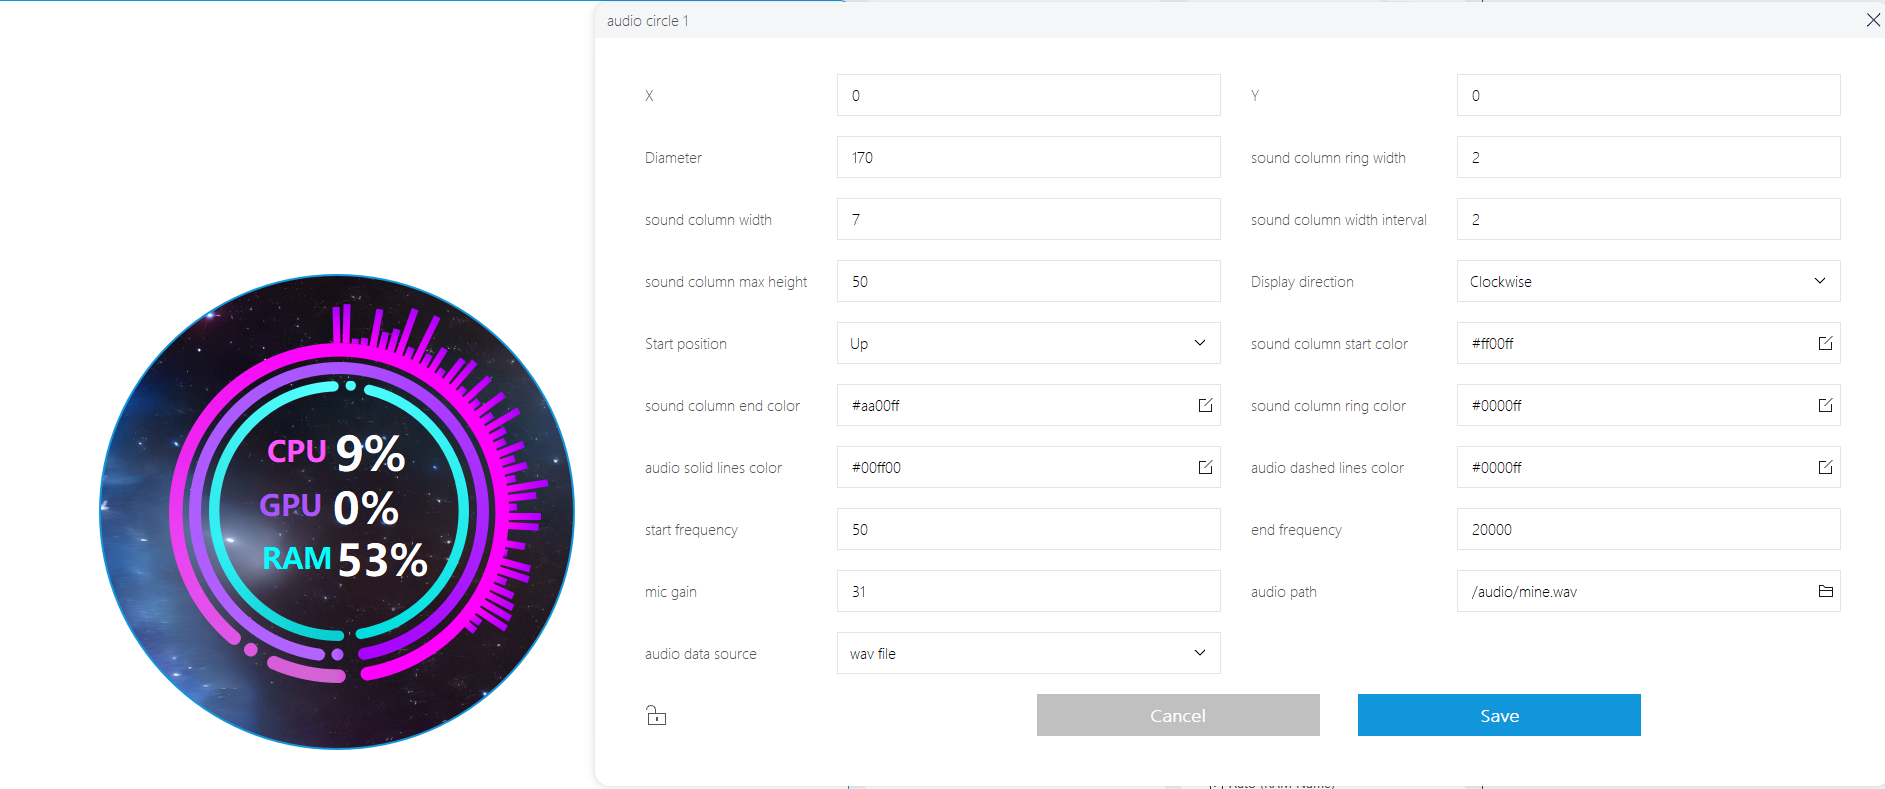
8. Set Audio Arc Widget
① Click "+ Audio arc" to set the basic parameters such as the circle coordinates and the diameter.
② Sound Column Ring Width: The carrier for all sound columns will be displayed in the outer ring of the audio circle;
③ Sound Column Width: Indicates the width value of each individual sound column, value = 7 is recommended;
④ Sound Column Width Interval: Indicates the interval width value of each individual sound column, value = 2 is recommended;
⑤ Sound Column Max Height: Indicates the max height value of each individual sound column, value = 50 is recommended;
⑥ Display Direction: Set the rotation direction of the sound column ring, clockwise or anticlockwise;
⑦ Start Position: Set the starting position of the sound column ring, up/down/left/right;
⑧ Sound Column Start Color: All column colors are generated by gradient colors, and the starting color represents the gradient starting color of the first independent sound column;
⑨ Sound Column End Color: All column colors are generated by gradient colors, and the ending color represents the gradient ending color of the last independent sound column;
⑩ Sound Column Ring Color: Indicates the color of the outer sound column ring;
⑪ Audio Solid Lines Color: Indicates the color of the middle solid line of the sound column ring;
⑫ Audio Dashed Lines Color: Indicates the color of the solid line of the internal sound column ring;
⑬ Start Frequency: Set the starting frequency of the microphone or .wav file spectrum; (spectrum range: 1-20000);
⑭ End Frequency: Set the ending frequency of the microphone or .wav file spectrum; (spectrum range: 1-20000);
⑮ Mic Gain: Sets the degree of amplification for the microphone to acquire the ambient sound input signal and controls the sensitivity to the sound signal; (gain value range: 0-31);
⑯ Audio Path: Set the path of .wav audio file, and only take effect when the audio data source is "wav file";
⑰ Audio Data Source: Set the data source of the audio signal for the audio circle.
- "randomNumbers": use the random data spectrum.
- "audio mic": use the mic to get the ambient sound spectrum.
- "wav file": use the spectrum of the .wav audio file.
Wallpaper Dynamic Background Setting (Optional Operation)
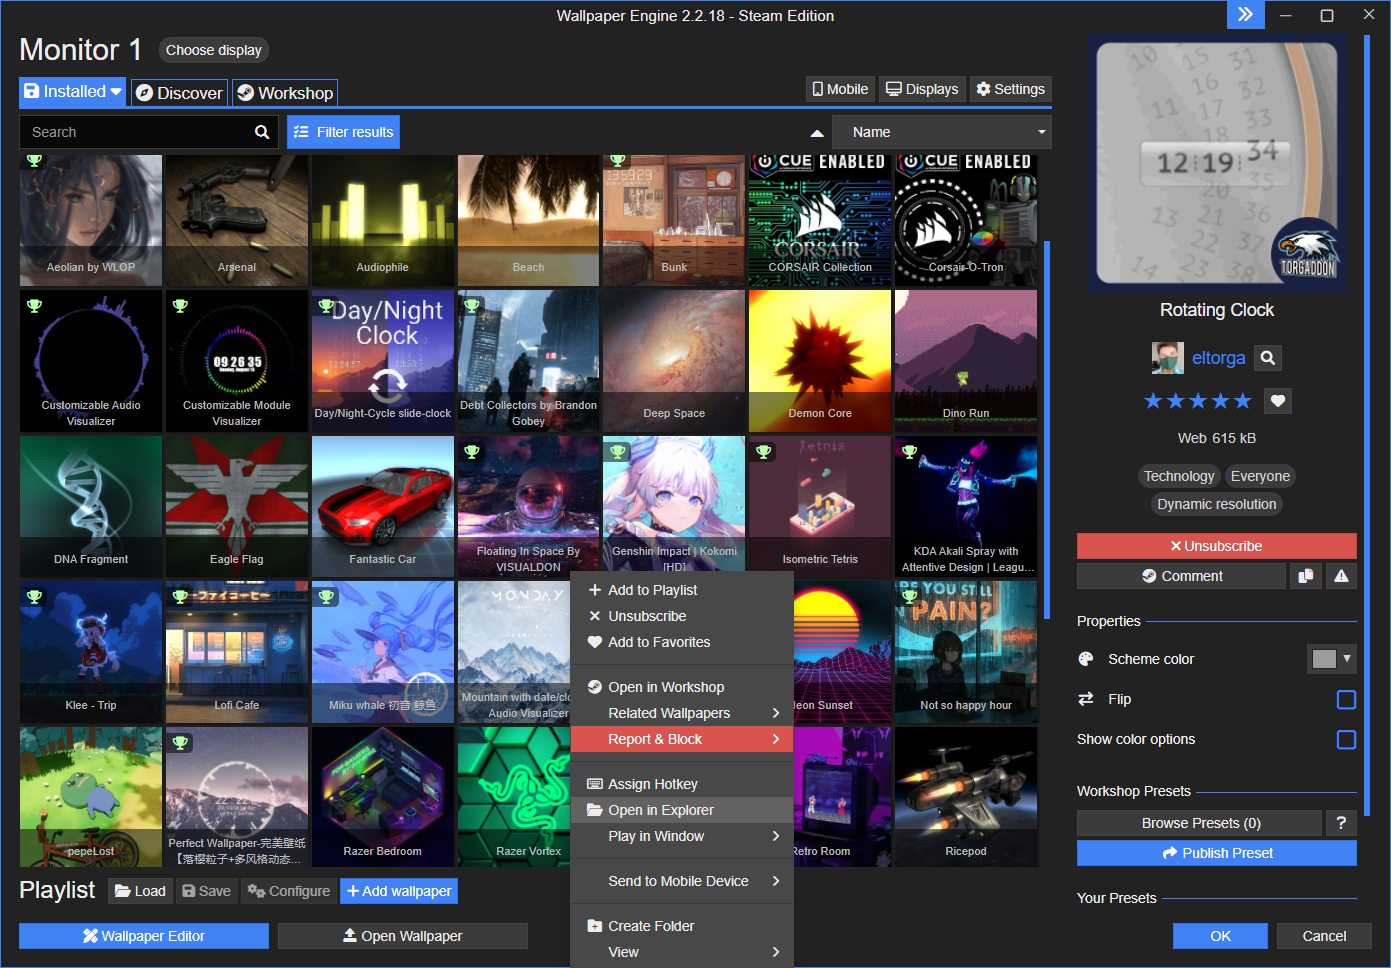
- 1. Download Steam software, install the Wallpaper Engine application (this application is not free), open Wallpaper Engine, and download your favorite dynamic wallpaper from Workshop. Right-click to select "Open in Explorer", and you can see the downloaded MP4 file in the corresponding file folder.
- 2. Open the following website to convert the format: https://video.online-convert.com/convert-to-mp4
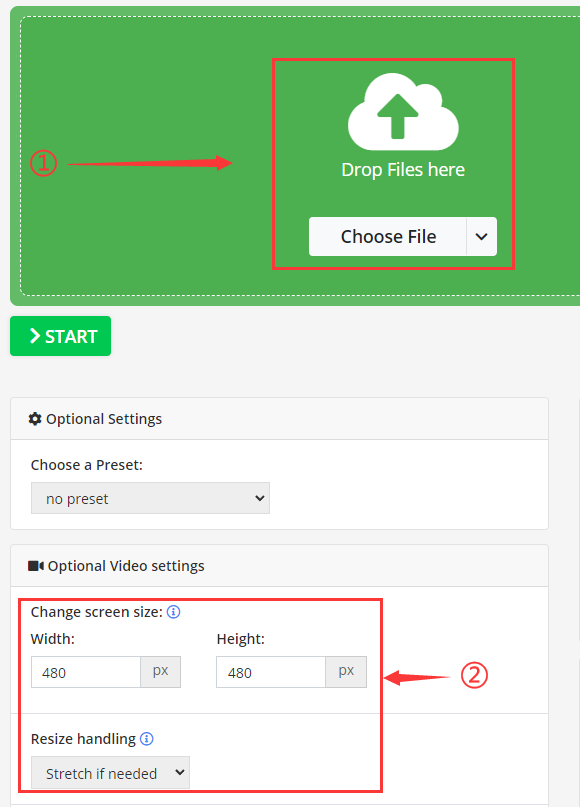
① Import the downloaded MP4 wallpaper;
② Set the exported video size to 480x480 pixels and set the "Resize handling" as Stretch if needed;
③ Click "Start" to export the video.

- 3. Place the processed video with the resolution of 480x480 to "PCMonitor\video\480x480" file path.
- 4. Open the PCMonitor.exe application (reboot to take effect if it is enabled).
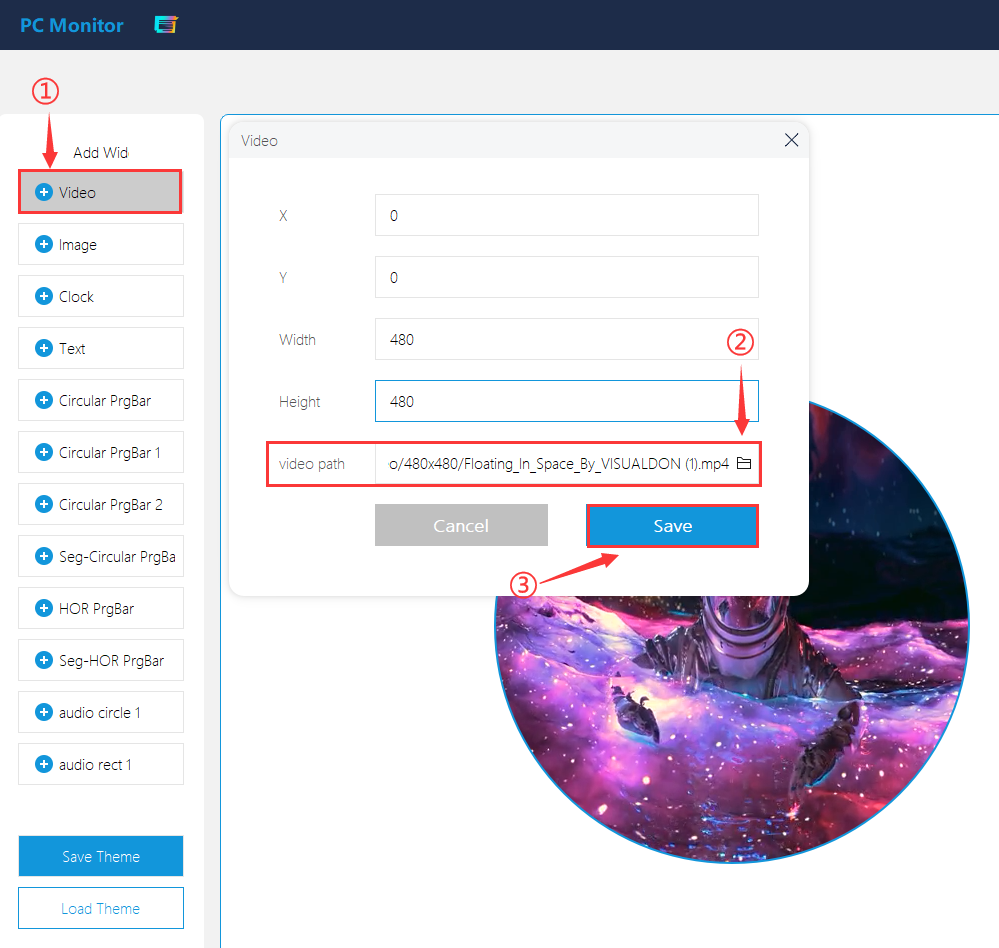
- 5. Click "Edit Theme" -> Add "Video" -> Input "Video Path" -> Click on "Save", and name it ".theme".
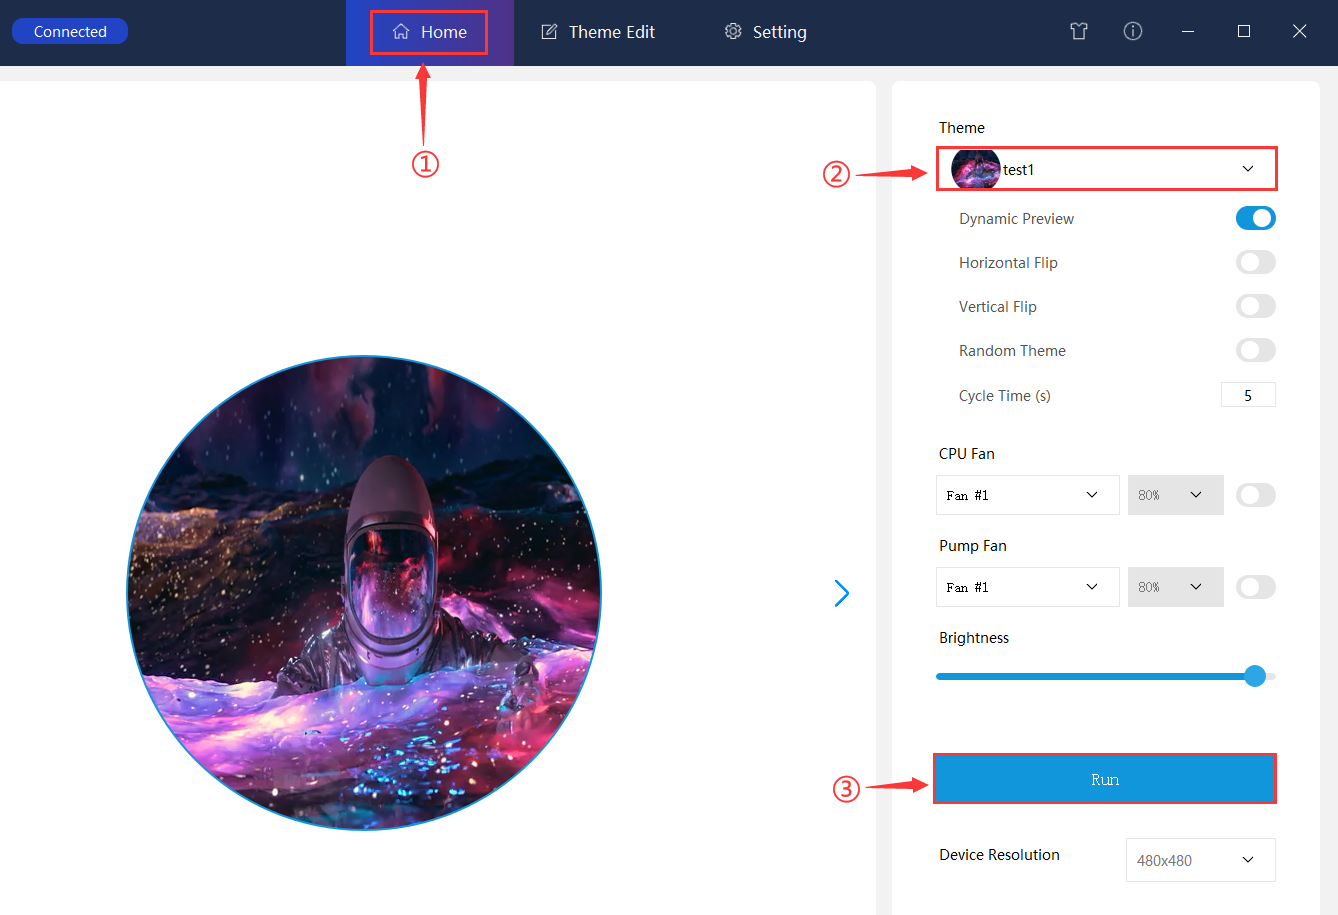
- 6. Return to the "Home" -> Click on "Theme" -> Check the corresponding .theme file in the drop-down box -> Click on "Run".
Resources
More Theme Files Download
PCMonitor-V2.22 Software
V2.22-TF Card Image File
2.1inch-USB-Monitor-windows-V2.22 image file
2.8inch-USB-Monitor-windows-V2.22 image file
3.4inch-USB-Monitor-windows-V2.22 image file
4inch-USB-Monitor-windows-V2.22 image file
5inch-USB-Monitor-windows-V2.22 image file
7inch-USB-Monitor-windows-V2.22 image file
8inch-USB-Monitor-windows-V2.22 image file
8.8inch-USB-Monitor-windows-V2.22 image file
PCMonitor-V2.25 Software
V2.25-TF Card Image File
2.1inch-USB-Monitor-Windows-V2.25 image file
2.8inch-USB-Monitor-Windows-V2.25 image file
3.4inch-USB-Monitor-Windows-V2.25 image file
4inch-USB-Monitor-Windows-V2.25 image file
5inch-USB-Monitor-Windows-V2.25 image file
7inch-USB-Monitor-Windows-V2.25 image file
8inch-USB-Monitor-Windows-V2.25 image file
8.8inch-USB-Monitor-Windows-V2.25 image file
FAQ
Note: The laptop may have compatibility issues such as fan control, it is recommended to download the software for simulation before purchasing
1. Click #V2.25-TF Card Image File to download the image file of your corresponding model, and unzip it into an .img file.
2. Click #PCMonitor-V2.25 Software to download and unzip into the latest application.
3. Pull out the TF card that comes with the screen, insert the TF card into the card reader and connect it to the Windwos PC, format the TF card with SDFormatter software.
4. Open the Win32DiskImager software, select the .img image prepared in step 1, and click Write to flash the system image.
5. After the flashing is completed, insert the TF card back into the screen card slot, and then connect the USB to boot it.
6. Run the PCMonitor-V2.25.exe application and perform the following actions:
① Place the album folder you want to display under the directory path: PCMonitor\image\480x480\PhotoAlbum. The supported album file formats can be JPG/PNG/GIF/MP4, and set the playback interval for each album, as shown in the following figure:
② Go to the "Theme Edit" page of PCMonitor, click on the "Album" function bar on the left, click on the folder icon in the image, import the album folder you just placed, and then save it as a new theme;
③ Go back to the "Home" page of PCMonitor, select the new theme you just saved, and run it. (The default interval is 3 seconds, which can be customized.)
Open PCMonitor, go to the Setting interface, and check Auto Start box;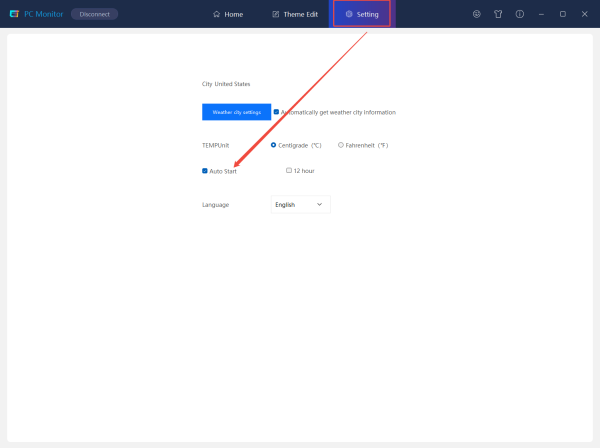
Note:
1. After restarting the computer, the PCMonitor software will normally start in a minimized manner. Please pay attention to the software icon in the lower right corner.
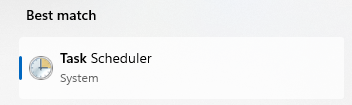
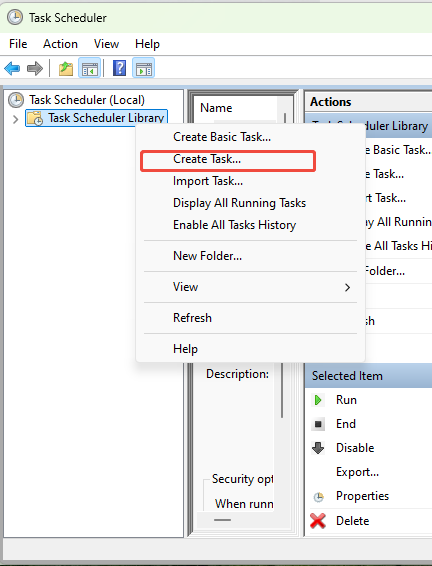
2. Due to differences in computer system permissions, if you encounter a situation where the system cannot start automatically after checking the box, please manually add the startup plan to the system task plan list by following the steps below:
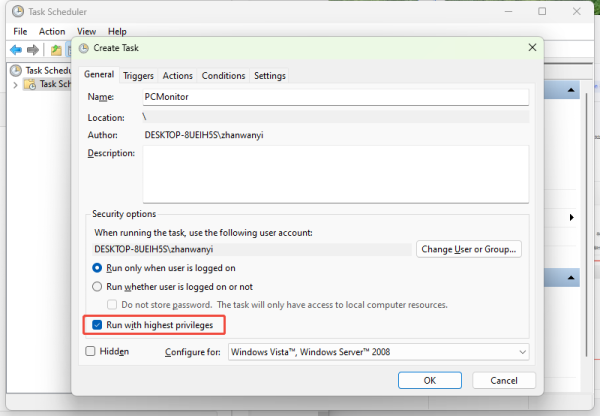
① Open the "Task Scheduler" application in the system
② Create a task
③ Add task name as PCMonitor
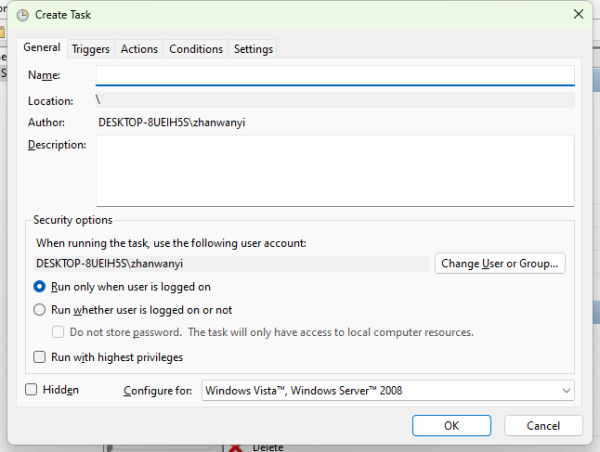
④ Check "Run with highest privileges"
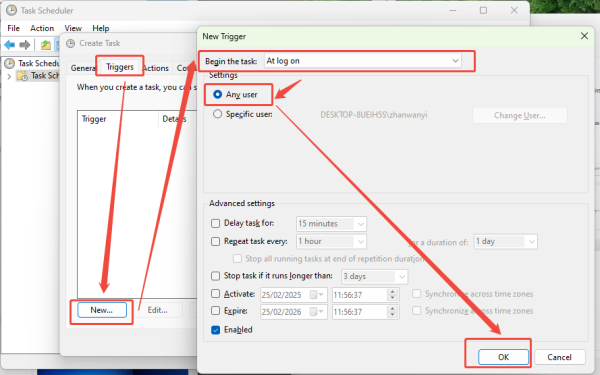
⑤ Create a new trigger action that is triggered when all users log in
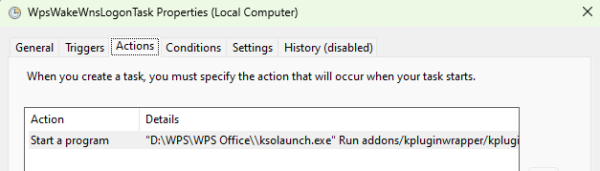
⑥ Add the boot auto-start operation, set the startup program, and check the PCMonitor.exe application path
⑦ Restart the system after saving
Support
Monday-Friday (9:30-6:30) Saturday (9:30-5:30)
Email: services01@spotpear.com
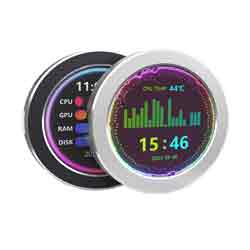
2.8inch Round LCD USB Monitor Computer Monitor Display Screen USB Type C Secondary Screen PC CPU GPU
[Tutorial Navigation]
- Working with PC Windows
- Hardware Connection
- Software Settings
- Theme Customization (Optional Operation)
- 1. Enter Edit Theme Interface
- 2. Set Video Widget
- 3. Set Image Widget
- 4. Set Clock Widget
- 5. Set Text Widget
- 6. Set Circular PrgBar Widget
- 7. Set HOR PrgBar Widget
- 8. Set Audio Arc Widget
- Wallpaper Dynamic Background Setting (Optional Operation)
- Resources
- More Theme Files Download
- PCMonitor-V2.22 Software
- V2.22-TF Card Image File
- PCMonitor-V2.25 Software
- V2.25-TF Card Image File
- FAQ
- Question: What device systems are currently supported?
- Question: What is the TF card slot for?
- Question: How to resolve the issue of PCMonitor.exe software crashing upon opening?
- Question: Does it support Apple macOS?
- Question: What video formats does it support? What is the maximum video size? How big a video can be?
- Question: How to customize and modify the boot image logo?
- Question: How to use the latest electronic album function?
- Question: How do I set PCMonitor to start automatically at boot?
- Support