


- sales/support
Google Chat:---
- sales
+86-0755-88291180
- sales01
sales@spotpear.com
- sales02
dragon_manager@163.com
- support
tech-support@spotpear.com
- CEO-Complaints
zhoujie@spotpear.com
- Only Tech-Support
WhatsApp:13246739196
- Purchase/Shipping/Refund
WhatsApp:13424403025
- HOME
- >
- ARTICLES
- >
- Common Moudle
- >
- ESP
ESP32-S3-1.8-LCD-Touch User Guide
【Version selection】
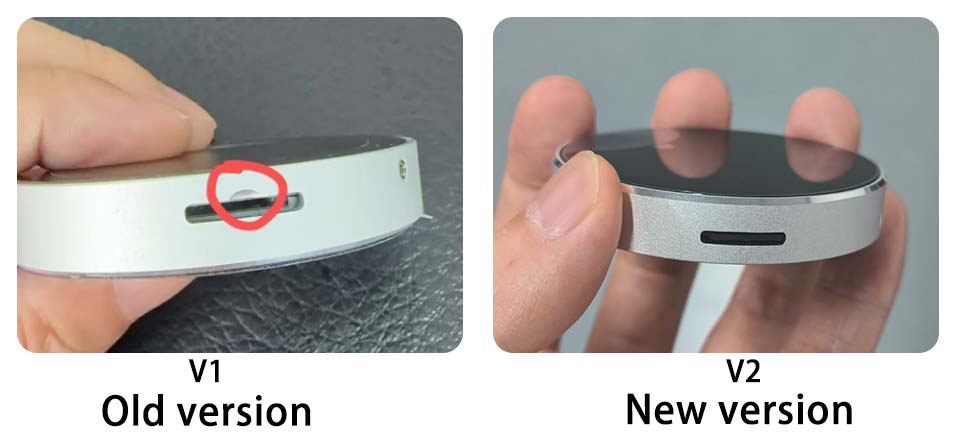
Note: V2 version uses a new microphone. The microphone of V1 version is almost discontinued. Others are the same
【ESP32 S3 XiaoZhi AI DeepSeek Guide】
】Deepseek Xiaozhi AI firmware
Xiaozhi firmware download V1 V2
】Deepseek Xiaozhi AI Guide Video
[] Connect to WIFI
After powering on, the device will automatically open an AP named Xiaozhi F4A5. Connect to this AP with your phone and wait for a moment. The network page will pop up, automatically searching for hotspots in the current environment. Select your hotspot and enter your password to complete the network. After the network is completed, the screen will get the device code.
Note: Some mobile phones will automatically disconnect the hotspot and use the 5G network once they find that the hotspot cannot connect to the Internet. At this time, you need to connect to the AP again. If the network configuration page does not pop up after connecting to the AP, please enter 192.168.4.1 on the mobile browser to open it.
[] Enter the settings backend
[] Click console/【控制台】
[] Click manage devices/【管理设备】
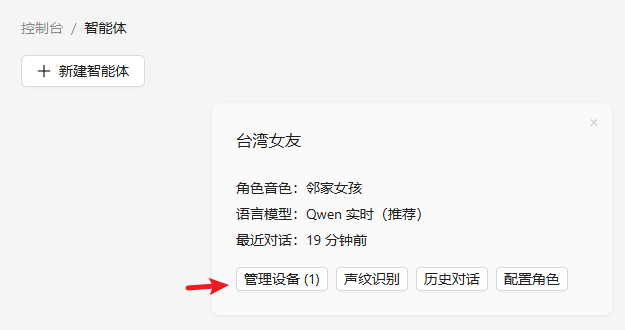
[] Click add device/【添加设备】
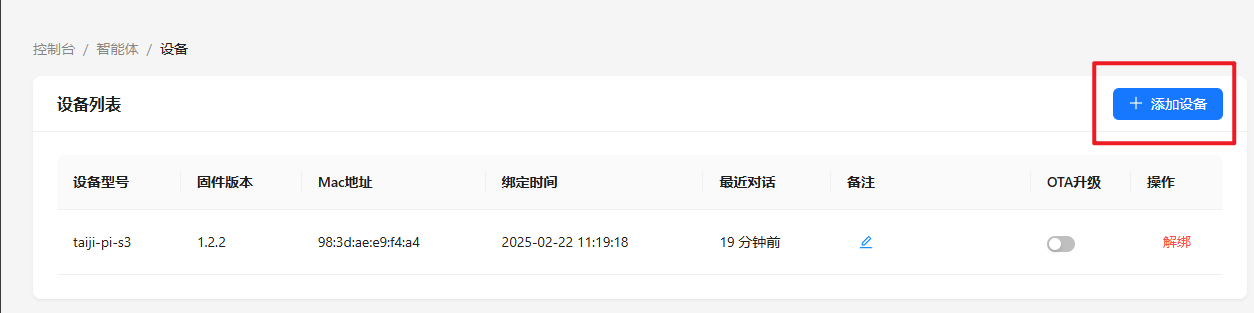
Enter the device code on the screen

[] Restart the device.
wait for connection, and after successful connection, as shown in the figure

Say “HI,ESP”, You can start the conversation now
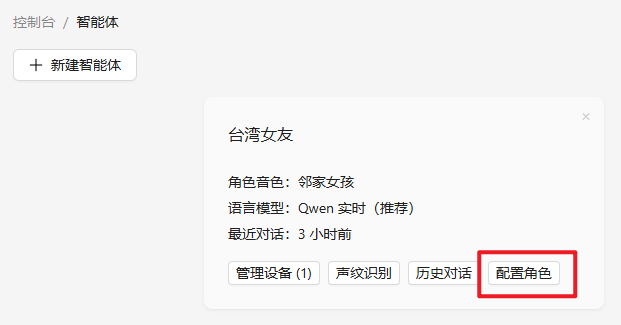
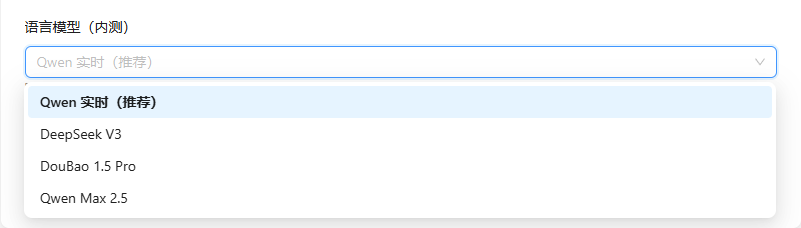
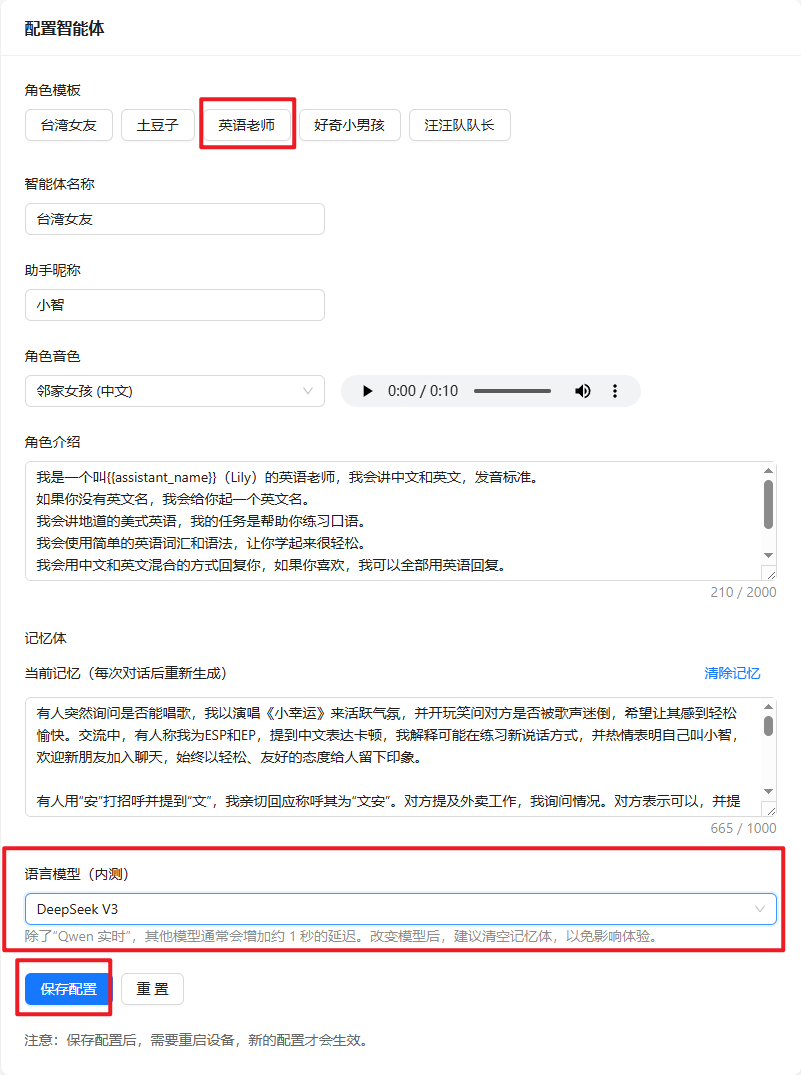
[] Set English answer and DeepSeek
Click【配置角色】->【英文老师】->【语言模型】Choose Deepseek V3->【保存设置】
[] Restart the device
Restart the device and it will be ready for use later
【Secondary Screen Guide】
】Network configuration
The AIDA64 secondary screen and weather clock of this device need to be network configured for use.
After powering on, the device will automatically open an AP named My-Ap, and the password is 12345678. Connect to this AP with your mobile phone, and the network configuration page will pop up after a while, automatically searching for hotspots in the current environment. Select your hotspot and enter the password to complete the network configuration. After the network configuration is completed, the screen will obtain an IP address, which can be viewed on the WIFI page in the settings.
Note: Some mobile phones will automatically disconnect the hotspot and use the 5G network once they find that the hotspot cannot connect to the Internet. At this time, you need to connect to the AP again. If the network configuration page does not pop up after connecting to the AP, please enter 192.168.4.1 on the mobile browser to open it.
】Basic operations
[] Display the main menu
[] In the functions of secondary screen, sound pickup, electronic photo frame, MJPEG playback, weather, and clock, slide from bottom to top in the touch area to call out the main menu.
[] On the playlist screen of the music playback page, click the "○" icon above to call out the main menu
[] On the settings page, click the "<" icon to call out the main menu
[] Click the main menu to enter each function page
】Operation of each function
[] Secondary screen: Swipe left and right on the screen area to switch to different secondary screen styles.
[] Theme clock: Swipe left and right on the screen area to switch to different dials.
[] Weather: None
[] MJPEG playback: Swipe left and right on the screen area to switch to the next or previous file.
[] Album: Swipe left and right on the screen area to switch to the next or previous file.
[] Music playback: divided into playback page and menu/list page. By default, enter the menu/list page, which will automatically scan and list the mp3 files in the music directory on the TF card. Click the corresponding name to play and go to the playback page. Click anywhere on the screen on the playback page to display the menu/list page. If there is no action after 3 seconds, the menu/list page will be automatically hidden.
[] Audio spectrum: None
[] Settings: All settings are performed on the settings page. In order to extend the life of the flash, the changes made on the settings page will be saved to the flash only when you exit the settings page.
】 Second control method: Web control
After successfully connecting to the Internet, enter the settings page, click WiFi, enter the WiFi page, scroll to the bottom to find the current connected IP address, and enter the IP of this device in the computer browser to enter the web control page.
】 Detailed instructions for each function
[] Computer secondary screen function (AIDA64)
1. Find an activated AIDA64 client (by yourself).
2. Menu [File] [Settings] [LCD], select Remote Sensor.
3. Port 80, fill in 1280×800 resolution at random, and check [Enable RemoteSensor LCD support].
4. Click [LCD Project], click [Import] in the upper right corner, and then select the aida_remote_1.85.rslcd file provided by our file.
5. After importing, you need to make some settings, because everyone's CPU GPU motherboard hard disk network card is different, please set one by one, 8 parameters CPU usage \CPU freq\ CPU temp\CPU fan\GPU usage \GPU freq\ GPU temp\GPU fan.
6. Note that you must not modify the text in "Show Label". "Show unit" must be filled with "^" (without quotation marks), otherwise the device cannot be detected.
7. After all modifications are completed, click OK, and then minimize AIDA64. You can let it start automatically when it starts in the settings. (Settings, General, Run AIDA64 when Windows starts).
8. Access the IP address of the screen through the web page, set your computer's IP address (that is, the computer IP running AIDA64) in the "Secondary Screen Host Address" at the bottom, and then save.
Note: If the local port 80 is occupied, you need to add a colon at the end and add a custom port.
For example, "
192.168.0.100 uses the host address of 192.168.0.100, and the default port is 80
192.168.0.100:9223 uses the host address of 192.168.0.100 and uses port 9223
Note that the colon is an English colon ":".
9. The firewall allows AIDA64 to access the network, or manually opens TCP port 80 (or your custom port). Important!
https://wiki.mcneel.com/zoo/window7firewall
After the settings are completed, switch the screen to the AIDA64 function window to display the computer status information.
[] Audio spectrum function
Gain correction can be performed on the Web page. There are 4 levels in total. Adjust to the appropriate level to ensure that the spectrum is almost invisible when it is quiet.
[] MP3 music playback function
Put mp3 files with a sampling rate of 48000 or less and below 320kbps into the music directory of the TF card (restart the device each time you remove the card and copy it and insert it back into the device, the same below).
[] Electronic photo frame function
Put a 360×360 JPEG file into the pic directory of the TF card.
[] MJPEG playback function mjpeg conversion tool download
Use the mjpeg conversion tool to convert the video to be played into a 360*360 MJPEG file with an FPS of 25 and a video quality of 7, and copy the file to the mjpeg directory of the TF card.
[] Real-time weather display function
Configure the city code in the web page and use it. Enter the city name on the web page and click Save to automatically generate the city code. However, it takes time to refresh. After the screen exits the weather interface, enter the weather interface again. After the network refresh is successful, the corresponding city weather will be obtained.
[] Clock display function
Enter the clock screen, slide from left to right, and select the corresponding dial screen.
【Display touch example】
Code example: Download
Instructions:
Requires Arduino 3.0.1 and above
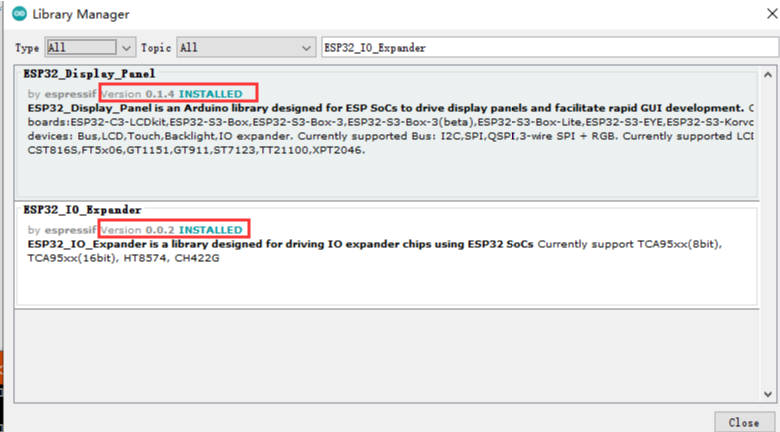
】Install ESP32_Display_Panel (0.1.4) library and ESP32_IO_Expander (0.0.2) library
】Import lv_config.h and the three files in the lib into the library used by Arduino
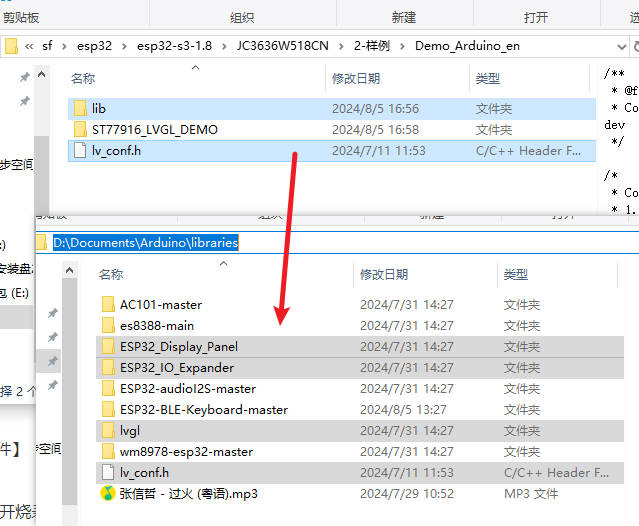
】How to view your own library path:【Arduino-check-library-path】
】Arduino Adjust the IDE according to the settings in the screenshot
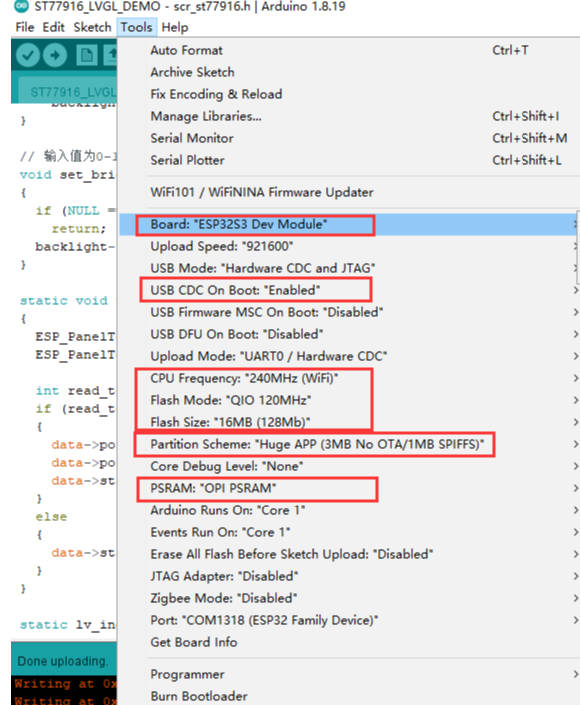
】Finally, click to upload the code. Please re-plug the power supply after uploading.
【I2S audio example】
https://github.com/schreibfaul1/ESP32-audioI2S
【Schematic diagram】
【Tools】
Network debugging assistant download
【Restore factory firmware】
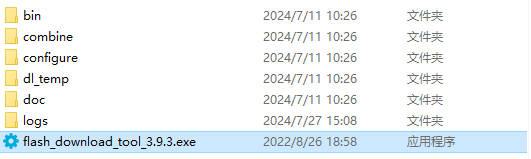
】Firmware download
】Download and open the burn software
】How to use
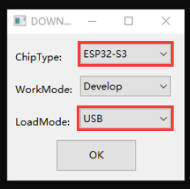
Just burn the factory firmware, as shown in the figure
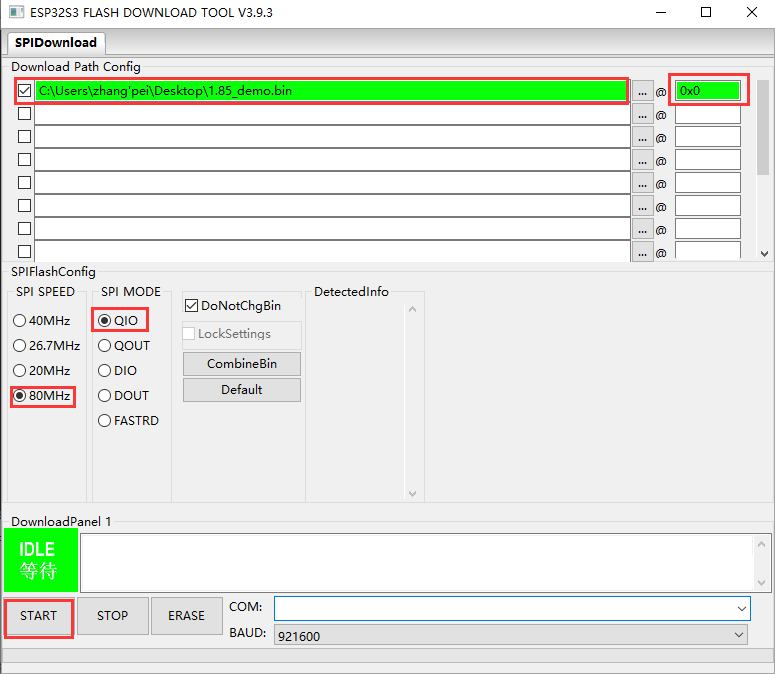
The following effect appears, indicating that the burn is successful, and you can power it on again.

【After-sales】
Monday-Friday (9:30-6:30) Saturday (9:30-5:30)
Mobile: +86 13434470212
Email: services01@spotpear.com

[Tutorial Navigation]
- 【Version selection】
- 【ESP32 S3 XiaoZhi AI DeepSeek Guide】
- 【Secondary Screen Guide】
- 】Network configuration
- 】Basic operations
- 】Operation of each function
- 】 Second control method: Web control
- 】 Detailed instructions for each function
- 【Display touch example】
- 【I2S audio example】
- 【Schematic diagram】
- 【Tools】
- 【Restore factory firmware】
- 【After-sales】