


- sales/support
Google Chat:---
- sales
+86-0755-88291180
- sales01
sales@spotpear.com
- sales02
dragon_manager@163.com
- support
tech-support@spotpear.com
- CEO-Complaints
zhoujie@spotpear.com
- Only Tech-Support
WhatsApp:13246739196
- Purchase/Shipping/Refund
WhatsApp:13424403025
Displaying a new image on PICO-1.3LCD
Step 1】Save the photo you want to display in 240x240 size and 16-bit BMP format using Photoshop software.

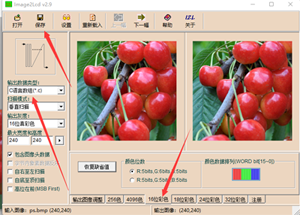
To save a BMP photo as a 16-bit code .c file using Image2LCD:

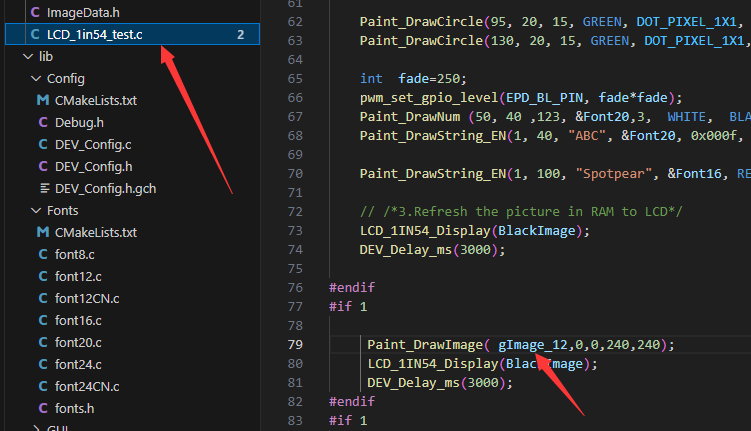
Step 3】To open the "imageData.c" program from the downloaded Pico-1.3LCD folder in Visual Studio Code:
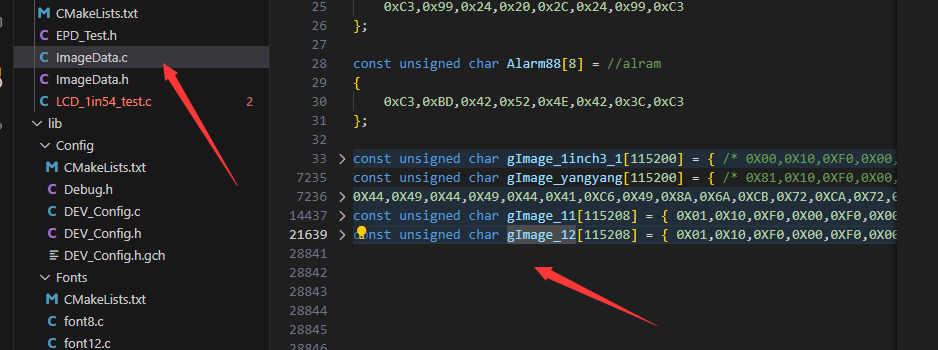
Update the image code in the imageData.c file, then replace the gImage function or variable in the main program. After re-running the Pico, the new image will be displayed."
TAG:
Sipeed NanoKVM Cube KVM HDMI Remote OS Control Manager Install /Power Control /Remote Desktop Server UART
Raspberry Pi 5
Program
RV1103
Milk V Duo
Raspberry Pi Triple Screen HAT
Raspberry Pi LCD
Spotpear
Raspberry Pi 64MP Camera
ESP32 1.5inch LCD
USB to CAN
Raspberry Pi 3.5 inch e-Paper link (G) RYBW 384x184 For Arduino / Jetson Nano / STM32
Spotpear
Raspberry Pi 5 / 4B UPS With PD Trigger Activation Uninterruptible Power Bank Supply 9600mAh 5V/5A 25W Also For Phone/Mini Computer PC
RS485 to CAN
Raspberry Pi Pico 2 RP2350 USB A Development Board RP2350A
RV1106
Raspberry Pi 5 Sound
Raspberry Pi screen
Image extraction User Guide

Raspberry Pi LCD Display Screen 1.3inch LCD with Game Button AND Audio Buzzer For Zero 2W /3B/4B/PI5
TAG:
Radxa-Zero
Jetson Nano 1.54inch OLED
Raspberry Pi Pico 2 RP2350 LCD 0.96 inch Displayscreen RP2350A
Metal Case
Raspberry Pi 5 Audio Card
Banana Pi BPI-M4 Berry
RTL8723 WIFI SDIO Expansion Module Board For Luckfox Pico Mini B /Luckfox Pico Plus /Luckfox Pico Pro /Luckfox Pico Max
ESP32 S3 4inch LCD 480x480 Captive TouchScreen Display LVGL HMI Sensor CAN I2C RS485 TVBOX Development Board
Supports 6V~24V Solar Panel
2.8inch USB Monitor Screen
SpotPear
LuckFox Pico SC3336
RISC-V
Milk-V Duo RJ45
Raspberry Pi Pico 2 RP2350B 7inch Capacitive TouchScreen 7 inch LCD Display Development Board 800×480
Arducam 64MP Camera
Raspberry Pi Pico 2 RP2350/RP2040 W5100S-EVB-Pico W6300-EVB-Pico2 Ethernet Development Board ETH RJ45
Modbus
Raspberry Pi 5 Model - 2GB / 4GB / 8GB / 16GB RAM
Jetson Xavier NX Kit