- sales/support
Google Chat:---
- sales
+86-0755-88291180
- sales01
sales@spotpear.com
- sales02
dragon_manager@163.com
- support
tech-support@spotpear.com
- CEO-Complaints
zhoujie@spotpear.com
- Only Tech-Support
WhatsApp:13246739196
- Purchase/Shipping/Refund
WhatsApp:13424403025
- HOME
- >
- ARTICLES
- >
- Jetson Series
- >
- Jetson Kits
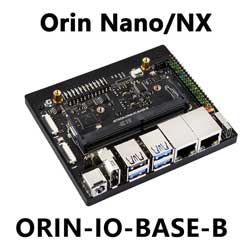
JETSON-ORIN-IO-BASE-B User Guide
Overview
Introduction
Module
NVIDIA® Jetson Orin™ NX module delivers up to 100 TOPS of compute power, 5 times the performance of the previous generation, suitable for multiple concurrent AI inference pipelines. In addition, it can connect multiple sensors via high-speed interfaces, thus providing an ideal solution for the new era of robots. The Jetson Orin NX module is extremely compact, yet it can provide up to 100 TOPS of AI performance, with power configurable between 10W and 25W. This module's performance can reach up to 3 times that of the Jetson AGX Xavier and 5 times that of the Jetson Xavier NX. Currently, there are two memory versions available for users to choose from, namely 8GB and 16GB. The parameters of the two are slightly different, so please pay attention to the parameters before making a choice.
Usage Guide
If you purchased a kit with a screen, you only need to connect the screen and turn on the computer for configuration.
If you turn it on after receiving it and find that a username and password have already been set, and the username is jetson, then the password is also jetson.
If there is no screen, there is no username and password by default. You need to install putty and use the port to log in to configure the username and password.
Connect the device to the power supply and connect the Type-C data cable to the computer.
Open the Device Manager and check the new port number.
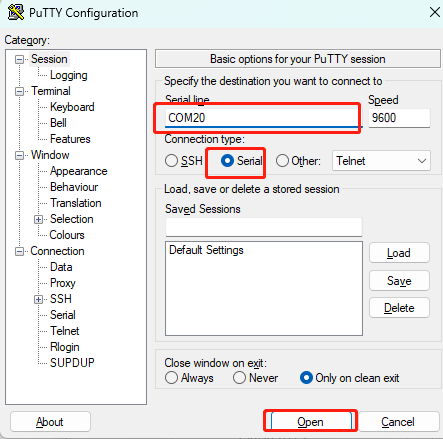
Then follow the prompts to power on and configure.
Jetson Orin Nano/NX Upgrade to Super
The Jetson Orin Nano Developer Kit has been renamed the NVIDIA Jetson Orin Nano Super Developer Kit to demonstrate the performance and accessibility of advanced AI.
For the official kit, you can directly download the latest Jetpack6.1 (rev1) version of the system to upgrade the Super performance. For the core module and the corresponding Waveshare kit, you need to wait for the official upgrade firmware provided by NVIDIA after January before the device can be upgraded to Jetson Orin Nano/NX Super.
For more information on performance improvements, see the following table: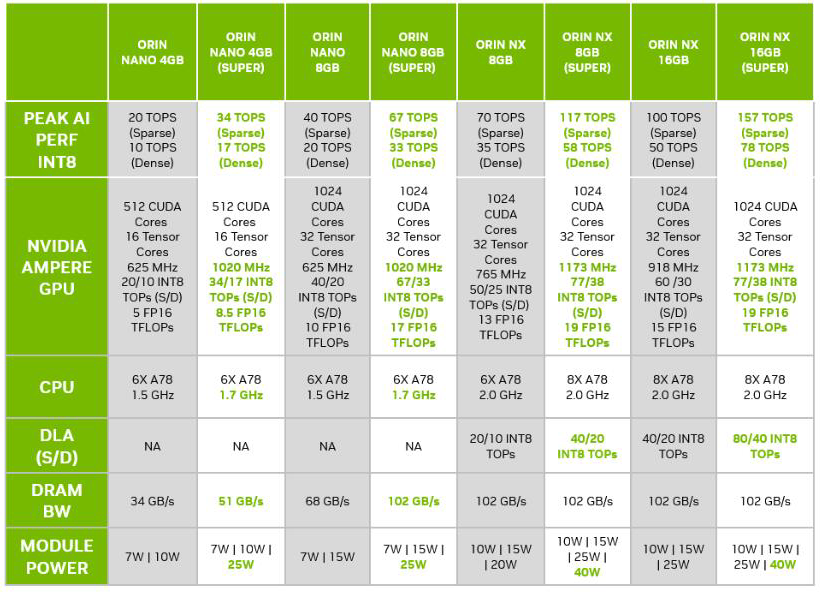
Update Firmware
- Flashing the system requires an Ubuntu 20.04 or Ubuntu 22.04 host or virtual machine.
- The core module and the corresponding Weixue kit need to be upgraded by using a script to refresh the image of Jetpack version 6.2, and cannot be upgraded through the SDK Manager.
Components Preparation
- Jetson Orin Nano Developer Kit
- Power adapter
- Jumper caps (or cable)
- USB cable (Type-C interface for data transmission)
Hardware Configuration (Enter Recovery Mode)
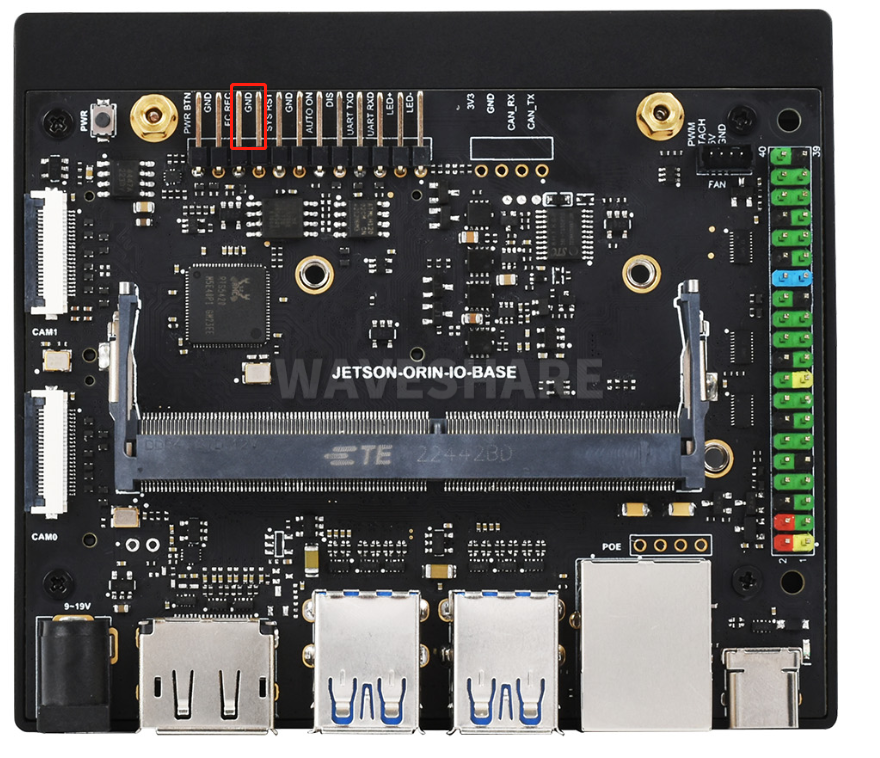
- Short the FC REC and GND pins with jumper caps or jumper cables, positioned as shown above, located under the module
- Connect the DC power supply to the round power port, wait a moment
- Connect the Type-C port of the Jetson board to the Ubuntu host with a USB cable (note that it is a data cable)
Software Cofiguration
- Open the Ubuntu system and open the browser to download SDK Manager
- After downloading, we enter the download path to install, and input the following content on the terminal:
sudo dpkg -i sdkmanager_1.6.1-8175_amd64.deb (Enter according to your version)
- After installing, the system may report the dependency file can not be found, and you can input the following command to settle this issue:
sudo apt --fix-broken install
- Open Ubuntu on your computer and run SDK Manager to open the software
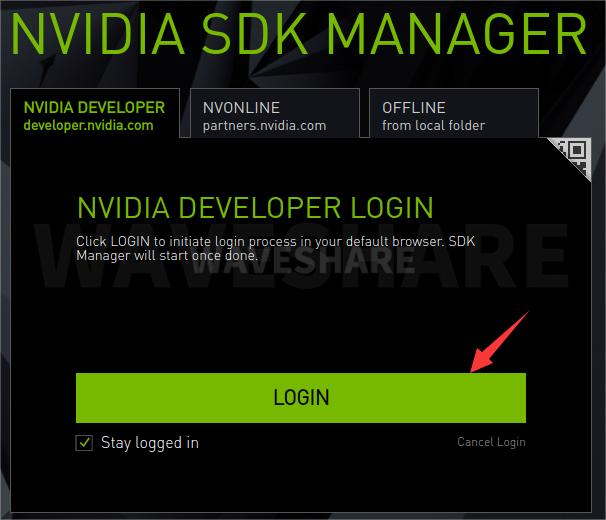
- Click LOGIN, log in to your NVIDIA account, the browser pops up the link, and enter your registered email and password to log in
- Then we successfully log in to SDK Manager

Method 1: System Installation (SDK Manager)
- Open the Ubuntu computer terminal and run sdkmanager to open the software
- Log in to your account
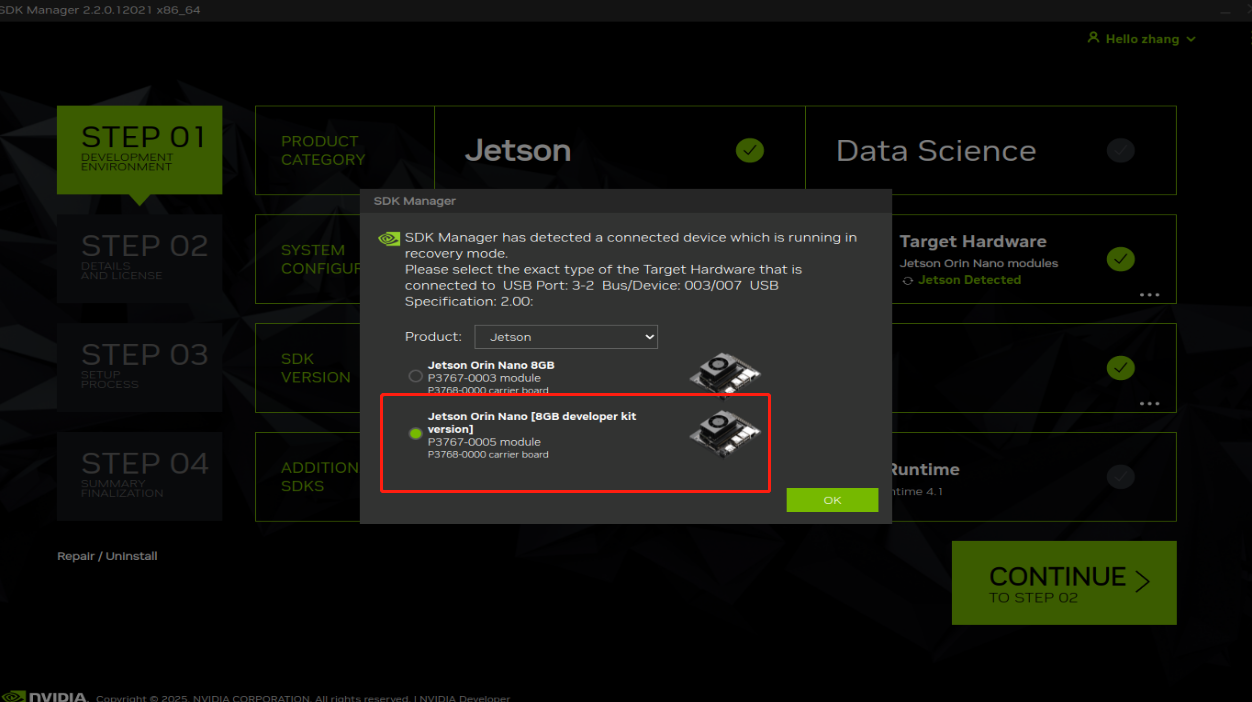
- If the Jetson board is properly recognized as shown in the following figure, if it is connected but not displayed, please click Refresh

- Select the Jetson Orin Nano [8GB developer kit version] option for the development board type, and click OK
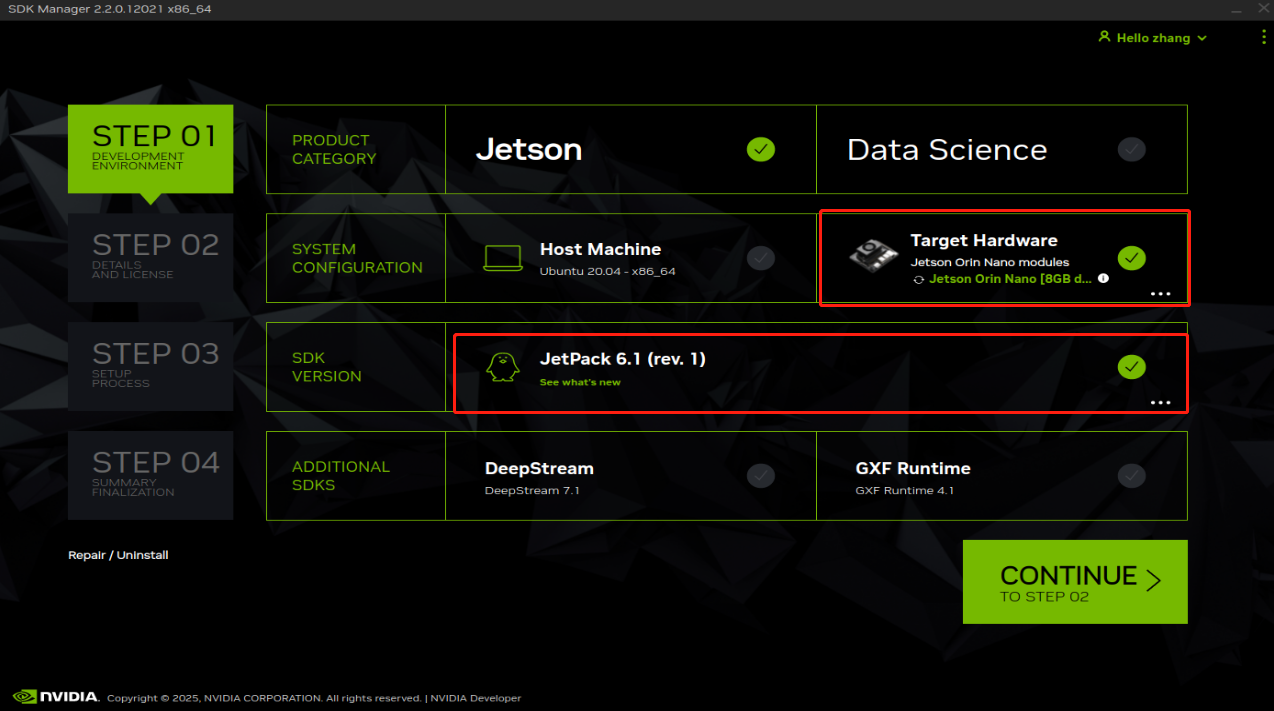
- In the JetPack option, select the supported latest jetpack 6.1(rev1) system, do not check other SDKs, and then click Continue
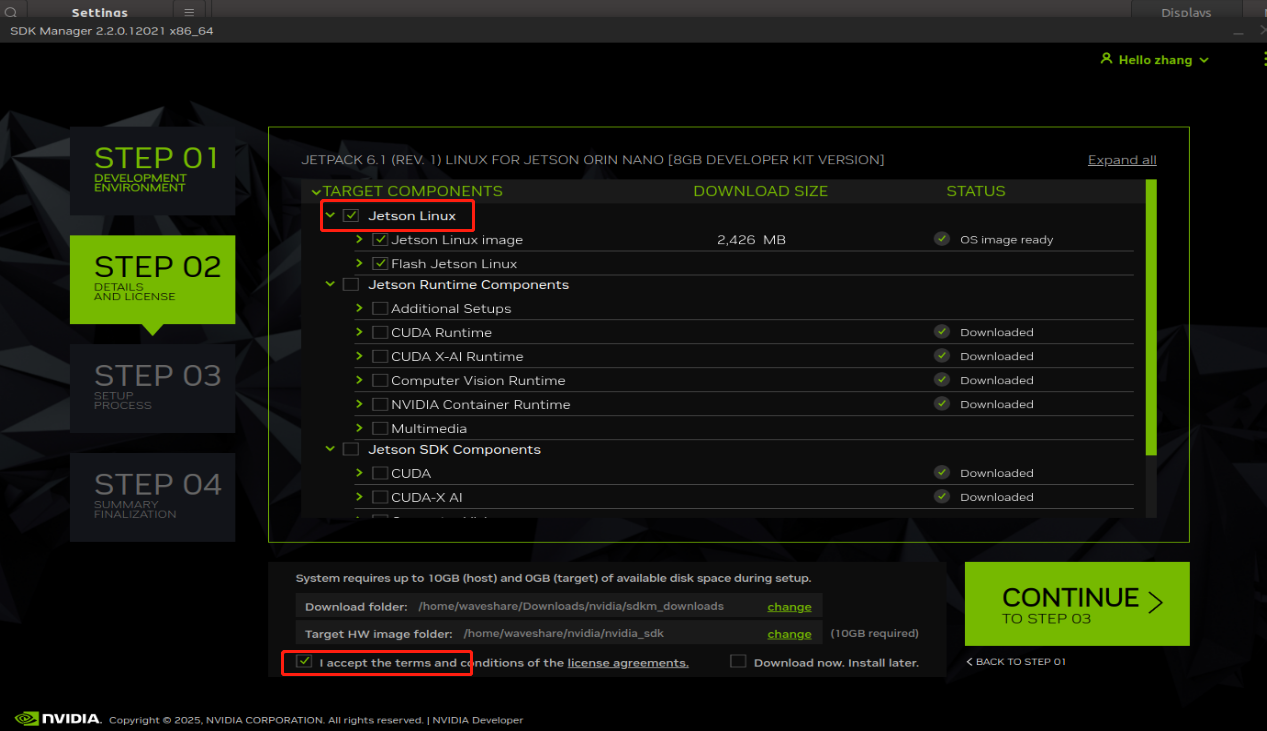
- Select Jetson OS and remove the option for Jetson SDK Components. Check the first protocol at the bottom, finally click Continue
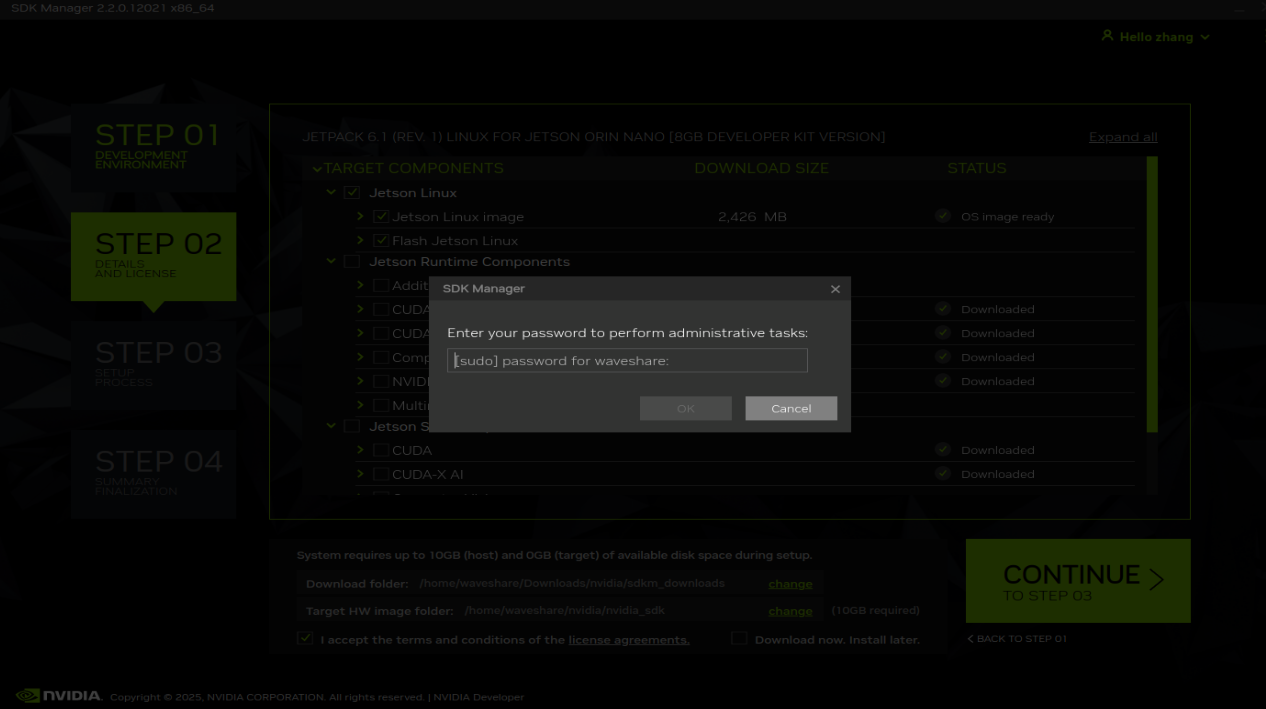
- After performing the above operation, a pop-up window will appear, and you can input the password
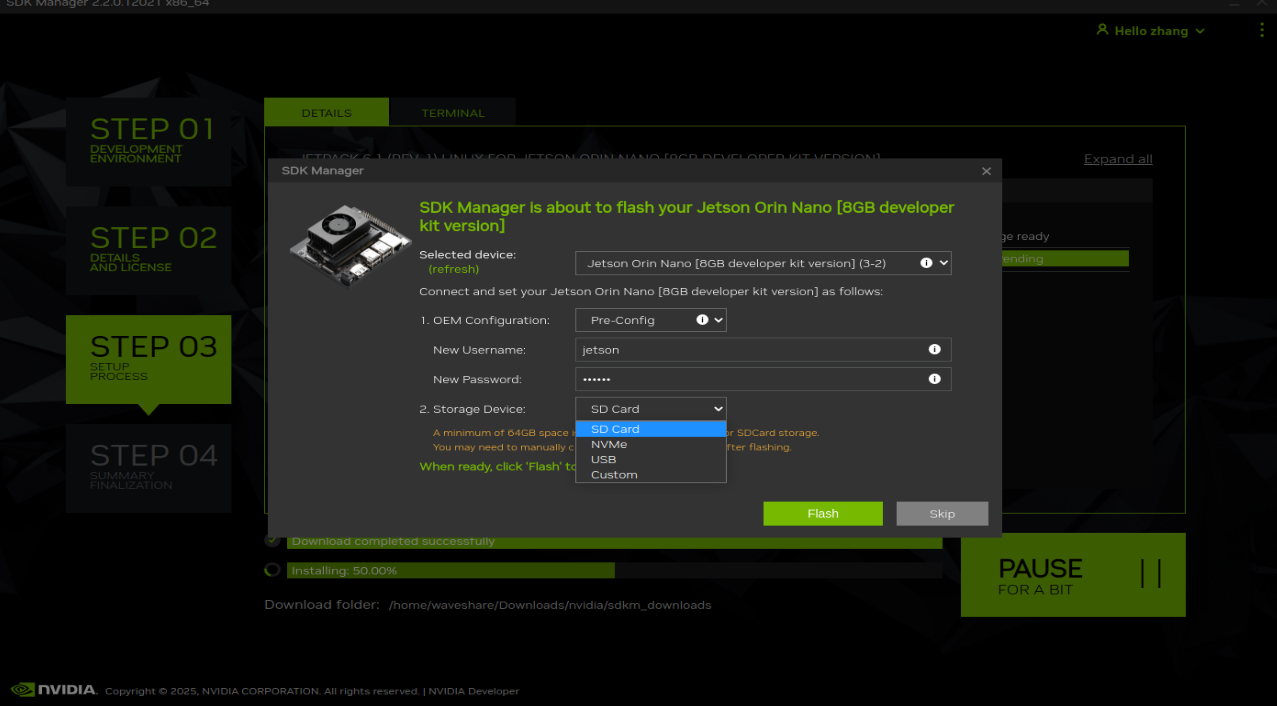
- When the progress bar of the second line reaches 50%, a pop-up window will pop up, please select as needed
- Here, the development board type is selected by default. Be careful not to make a mistake when selecting the type of development board earlier.
- Here you can choose runtime or preconfig. If you choose runtime, you need to manually configure the system (username, password, language, etc.) later. If you choose preconfig, you can fill in the username and password (you can define it yourself), and nano will be automatically configured during the startup process.
- For Storage Device, you can choose TF Card or NVME (hard disk) as the storage location.
Note: After the above operations are completed, a pop-up window will pop up for the virtual machine user, and the host user needs to connect in time, but the host user does not have this operation.
- After the flashing is completed, remove the jumper cap of the baseboard, connect to the monitor, power on again, and follow the prompts to configure the boot (if it is pre-config set, it will directly enter the system after power on).
Method 2: System Installation (script)
- Open ubuntu system, open the browser to download the BSP driver and file system.
- To facilitate user operations, here are the terminal commands to download the Jetpack 6.2 resource package and refresh it. Users can open the terminal and directly copy the commands to operate. There will be a new version in the future, please refer to the relevant instructions
- Run the command to create a new folder for storage
sudo mkdir orin_nano
cd orin_nano
- Download the BSP and file system package
wget https://developer.nvidia.com/downloads/embedded/l4t/r36_release_v4.3/release/Jetson_Linux_r36.4.3_aarch64.tbz2
wget https://developer.nvidia.com/downloads/embedded/l4t/r36_release_v4.3/release/Tegra_Linux_Sample-Root-Filesystem_r36.4.3_aarch64.tbz2
- Extract the resource package and configure the environment
- The decompression process will take some time, please wait for it to complete before running other commands
- During the configuration process, please pay attention to the error messages. Some user systems may be missing components. Please install the relevant components according to the error messages
sudo tar xf Jetson_Linux_r36.4.3_aarch64.tbz2
sudo tar xpf Tegra_Linux_Sample-Root-Filesystem_r36.4.3_aarch64.tbz2 -C Linux_for_Tegra/rootfs/
cd Linux_for_Tegra/
sudo ./tools/l4t_flash_prerequisites.sh
sudo ./apply_binaries.sh
- Preset username and password (optional)
- Here use the command to pre-set the username and password of the motherboard. Users can also skip this step, connect the screen, keyboard and mouse for manual configuration after the flashing
- In the command, jetson is the user name set and jetson1 is the password set. Users can change it according to their own needs. -a is the setting to log in automatically. Without this parameter, you need to enter the user name and password to log in after the system starts
sudo ./tools/l4t_create_default_user.sh -u jetson -p jetson1 -a
- Flash the system to the motherboard
- Please make sure that the motherboard is connected to the Ubuntu host computer and set to flash mode
sudo ./tools/kernel_flash/l4t_initrd_flash.sh --external-device nvme0n1p1 -p "-c ./bootloader/generic/cfg/flash_t234_qspi.xml" -c ./tools/kernel_flash/flash_l4t_t234_nvme.xml --showlogs --network usb0 jetson-orin-nano-devkit-super external
- After the flashing is successful, complete the system configuration and enter the motherboard desktop.
If you need to install SDK components, connect to the Internet on the motherboard (orin motherboard), open the terminal and enter the following command to install it:
sudo apt-get update -y
sudo apt-get install nvidia-jetpack -y
Flashing Instructions
- The system requires a host or virtual machine running Ubuntu 20.04 or 22.04 for burning.
Components Preparation
- Jetson Orin NX motherboard and JETSON-ORIN-IO-BASE baseboard
- Ubuntu20.04 or Ubuntu 22.04 virtual machine (or computer host)
- Power adapter
- Jumper caps (or jumper cables)
- USB cable (Type-C interface for data transmission)
Hardware Configuration (Enter Recovery Mode)

- Short the FC REC and GND pins with jumper caps or jumper cables, positioned as shown above, located under the module
- Connect the DC power supply to the round power port, wait a moment
- Connect the Type-C port of the Jetson board to the Ubuntu host with a USB cable (note that it is a data cable)
Software Configuration
- Open the Ubuntu system and open the browser to download SDK Manager
- After downloading, we enter the download path to install, and input the following content on the terminal:
sudo dpkg -i sdkmanager_1.6.1-8175_amd64.deb (Enter according to your version)
- After installing, the system may report the dependency file can not be found, and you can input the following command to settle this issue:
sudo apt --fix-broken install
- Open Ubuntu on your computer and run SDK Manager to open the software.
- Click LOGIN, log in to your NVIDIA account, the browser pops up the link, and enter your registered email and password to log in

- Then we successfully log into SDK Manager

System Installation
- Open Ubuntu on your computer and run SDK Manager to open the software===
- Log in to your account
- If the Jetson board is properly recognized as shown in the following figure, if it is connected but not displayed, please click Refresh
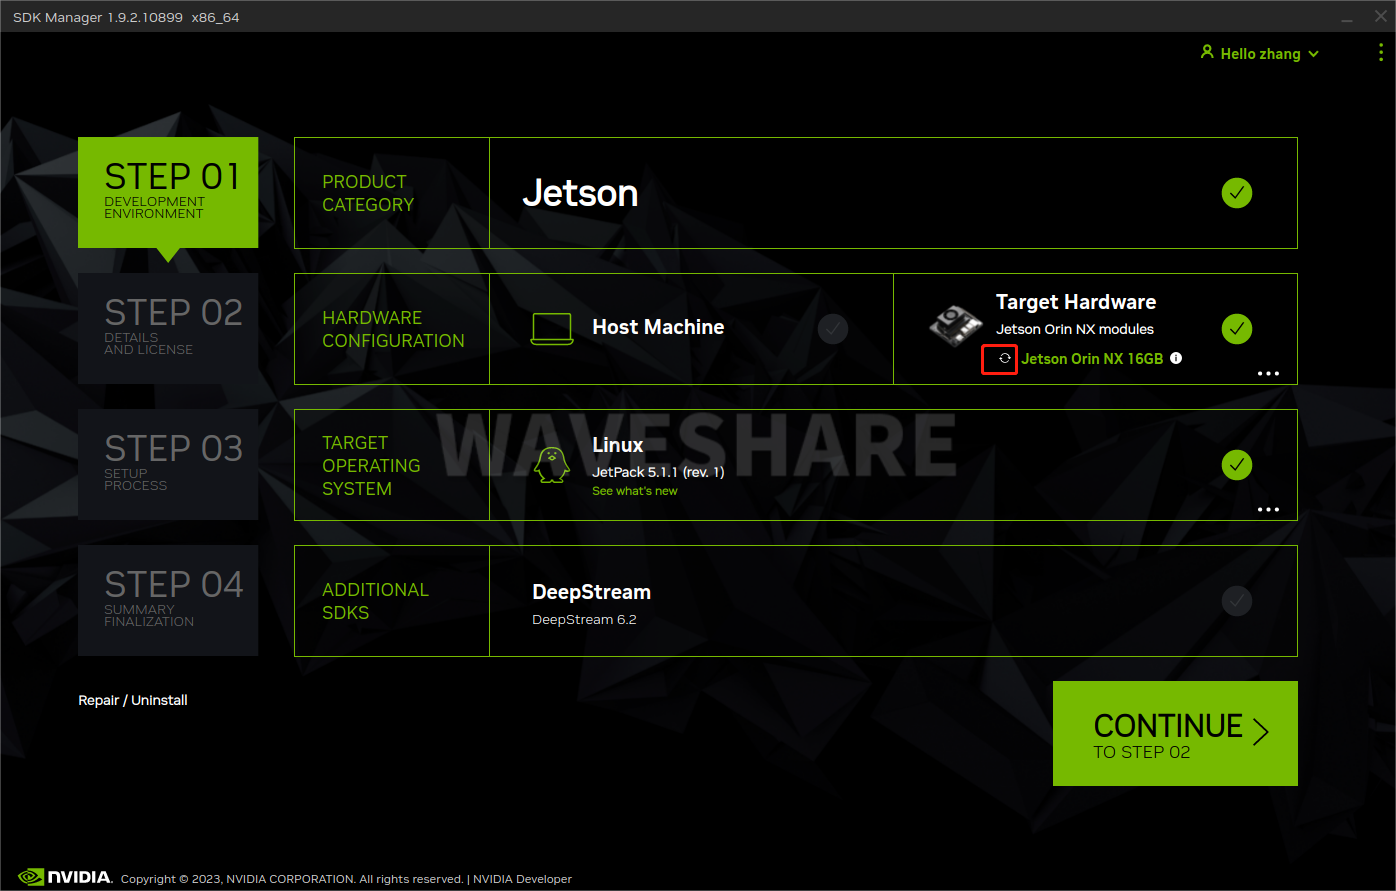
- Select the Jetson Orin NX board type option, choose the 16GB version or the 8GB version based on the actual situation (if you are using the official kit, select the developer Kit)
- In the JetPack option, select the supported latest system, do not check other SDKs, and then click Continue
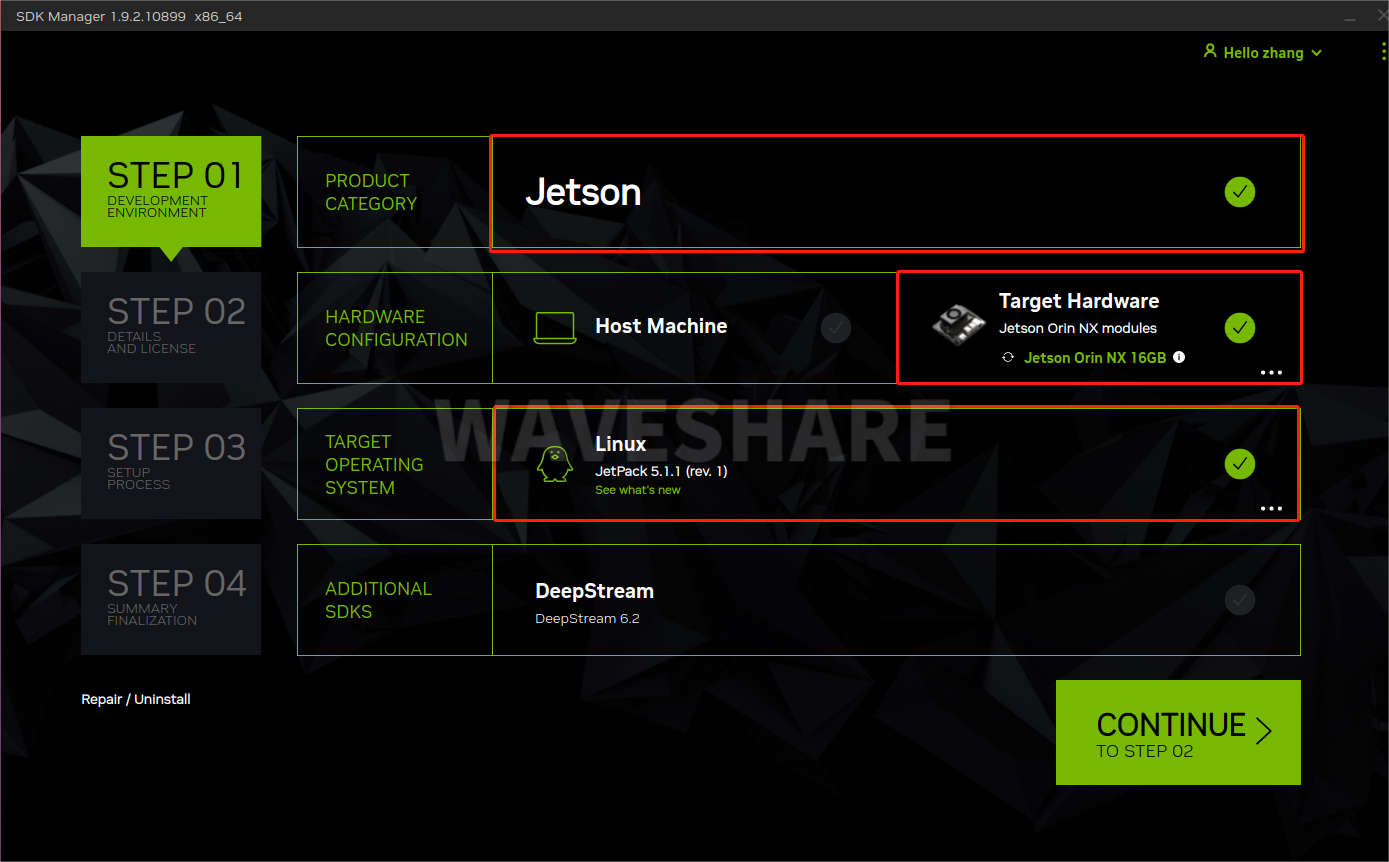
- Select Jetson OS and remove the option for Jetson SDK Components Check the first protocol at the bottom
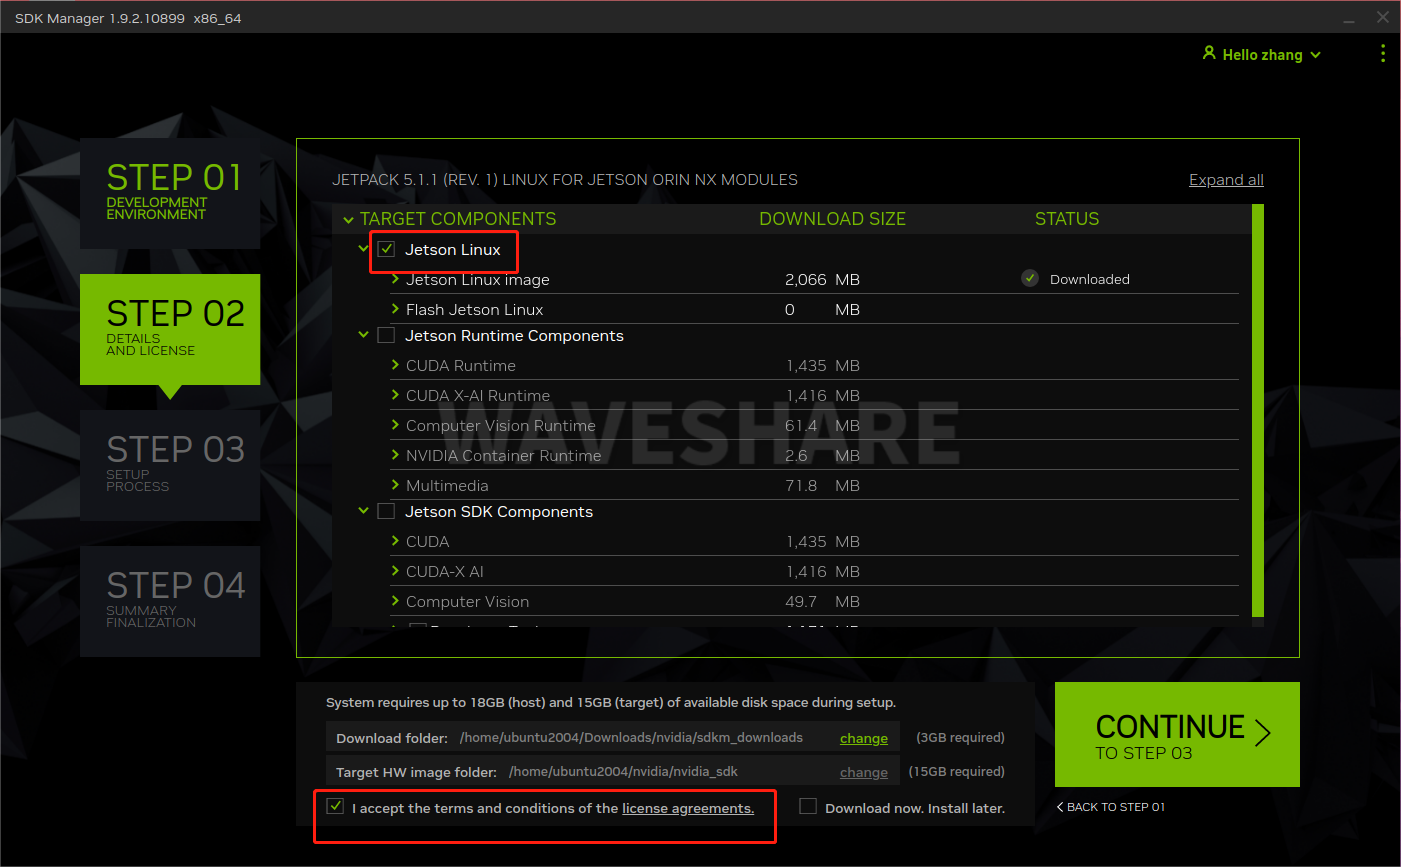
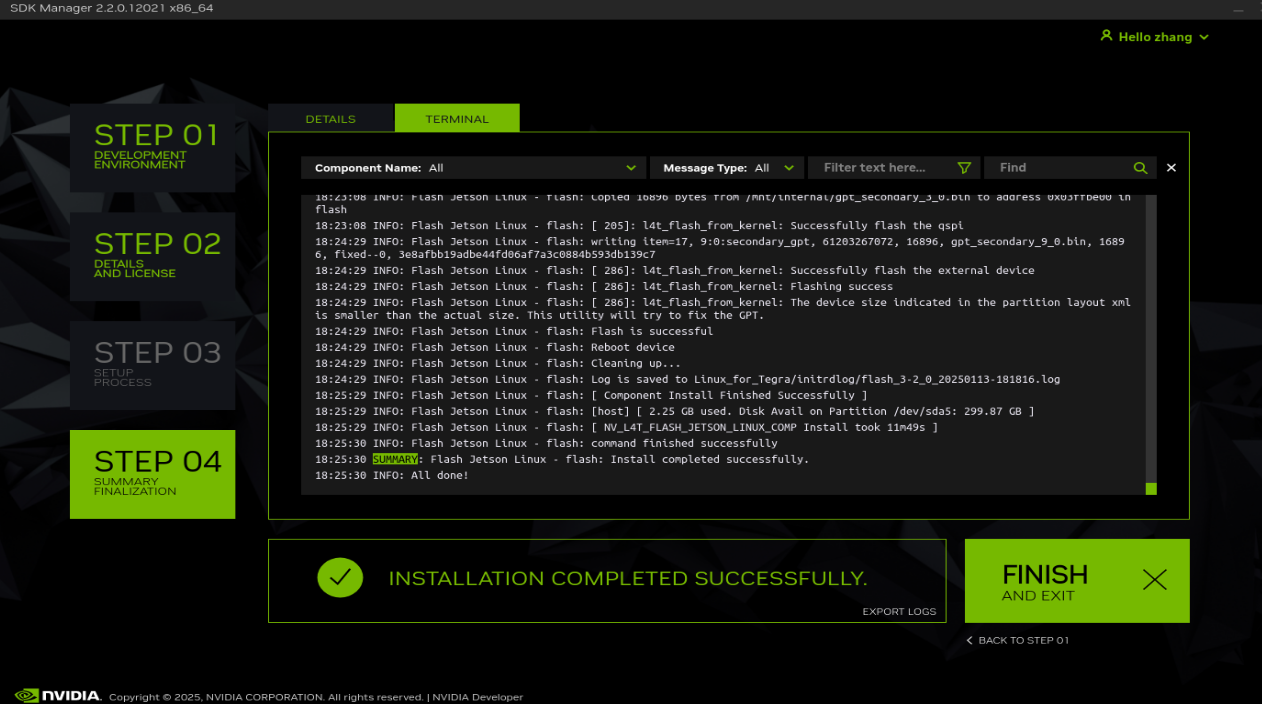
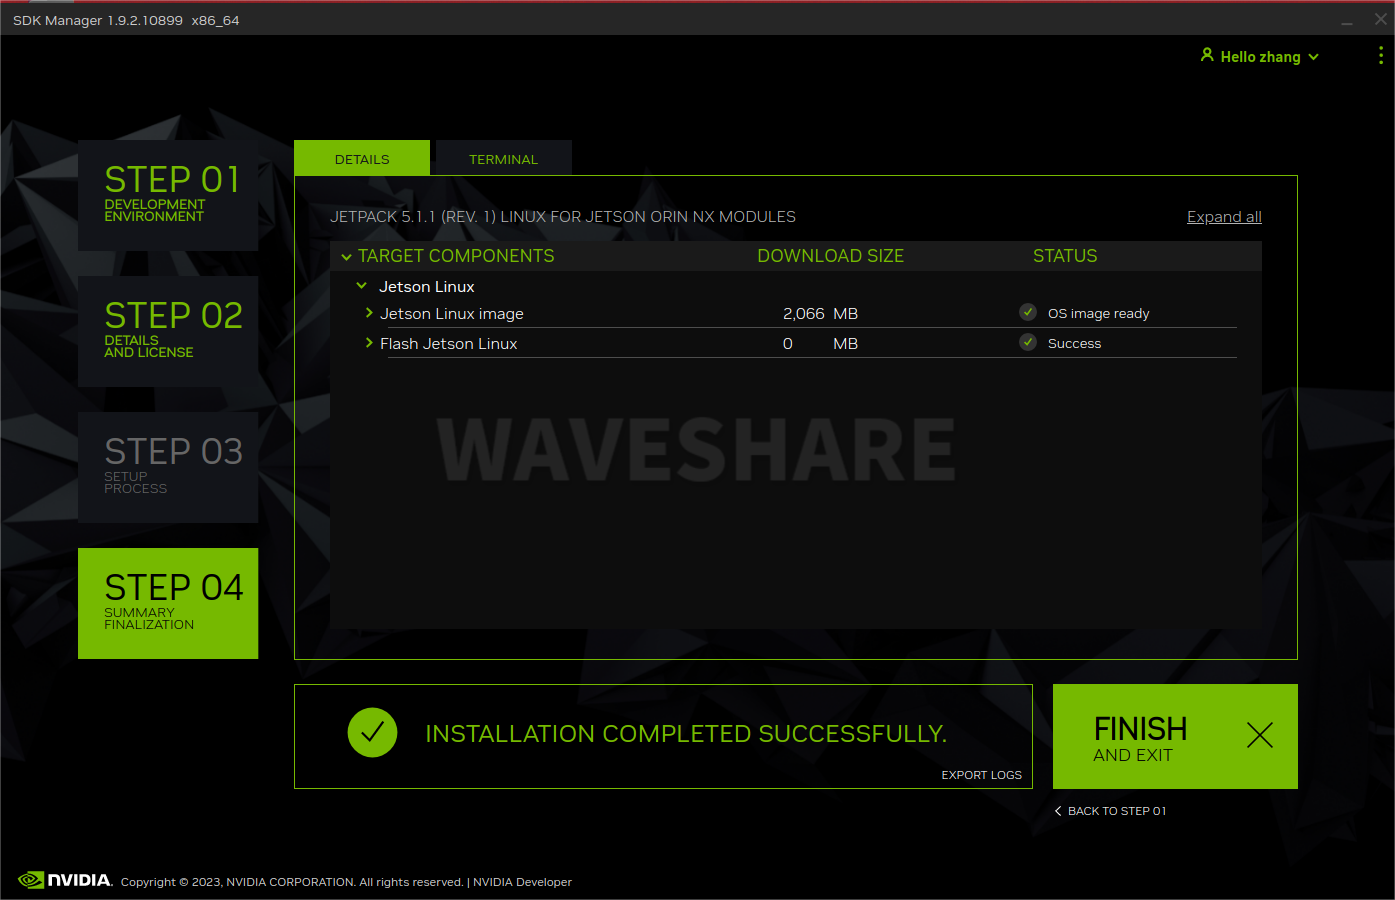
- Finally click Continue and wait for the flashing to complete
- Here, the development board type will be selected by default. Be careful not to make a mistake when selecting the type of development board earlier
- Here select Manual Setup - Jetson ... (suffix prompts differ for different mainboards)
- Here select NVME
- Here you can choose runtime or preconfig. If you choose runtime, you need to manually configure the system (username, password, language, etc.) later. If you choose preconfig, you can fill in the username and password (you can define it yourself), and the board will be automatically configured during the startup process.
- After the programming is completed, remove the jumper cap of the baseboard, connect to the monitor, power on again, and follow the prompts to configure the boot (if it is pre-config set, it will directly enter the system after power on).
SDK Installation
Jetpack mainly includes system images, libraries, APIs, developer tools, examples, and some documentation.
The SDK includes TensorRT, cuDNN, CUDA, Multimedia API, Computer Vision, and Developer Tools.
- TensorRT: A high-performance deep learning inference operation for image classification, segmentation, and object detection neural networks, which accelerates the speed of deep learning inference and reduces the runtime memory consumption of convolutional and deconvolution neural networks.
- cuDNN: The CUDA deep neural network library provides high-performance primitives for deep learning frameworks, including support for convolution, activation functions, and tensor transformations.
- CUDA : The CUDA Toolkit provides a comprehensive development environment for C and C++ developers to build GPU-accelerated applications. The toolkit includes compilers, mathematical libraries for NVIDIA GPUs, and tools for debugging and optimizing application performance.
- ultimedia API: The Jetson Multimedia API provides a low-level API for flexible application development.
- Computer Vision: VPI (Visual Programming Interface) is a software library that provides computer vision/image processing algorithms implemented on PVA1 (Programmable Vision Accelerator), GPU, and CPU, where OpenCV is the leading open-source library for computer vision, image processing, and machine learning, now with GPU acceleration for real-time operations, and VisionWorks2 is a software development package for computer vision (CV) and image processing.
- Developer Tools: The Developer Tools CUDA toolkit provides a comprehensive development environment for C and C++ developers to build GPU-accelerated applications. The toolkit includes compilers, mathematical libraries for NVIDIA GPUs, and tools for debugging and optimizing application performance.
The above are some of the functions of the SDK.
Install SDK with Command
sudo apt update
sudo apt install nvidia-jetpack
FAN
Install jtop
sudo apt install python3-pip
sudo pip3 install jetson-stats
sudo reboot
Power on and enter
jtop
Maximize the window, select 6CTRL with the mouse, choose the manual option in profiles, and then click the [+] sign next to speed to adjust the fan speed.
NVIDIA Official Resources
- Jetson Development User Guide
- Jetson Download Center
- Resources Download Link
- SDK Manager Download Link
- Jetson Orin NX Series Datasheet V1.0
FAQ
Support
Monday-Friday (9:30-6:30) Saturday (9:30-5:30)
Email: services01@spotpear.com