


- sales/support
Google Chat:---
- sales
+86-0755-88291180
- sales01
sales@spotpear.com
- sales02
dragon_manager@163.com
- support
tech-support@spotpear.com
- CEO-Complaints
zhoujie@spotpear.com
- Only Tech-Support
WhatsApp:13246739196
- Purchase/Shipping/Refund
WhatsApp:13424403025
Raspberry Pi 8inch DSI LCD User Guide
Introduction
8inch Capacitive Touch Display for Raspberry Pi, 800×480, MIPI DSI Interface
Features
- 8inch capacitive touch screen. 800x480 hardware resolution
- Capacitive touch panel, support 5-point touch
- Supports Pi 4B/3B+/3A+/3B/2B/B+/A+. Another adapter cable is required for CM3/3+/4a:DSI-Cable-15cm
- Directly drive LCD through DSI interface of Raspberry Pi, refresh rate up to 60Hz
- Working with Raspberry Pi, supports Raspberry Pi OS/Ubuntu/Kali and WIN 10 IoT, driver-free.
- Support backlight adjusts by software.
Featured design
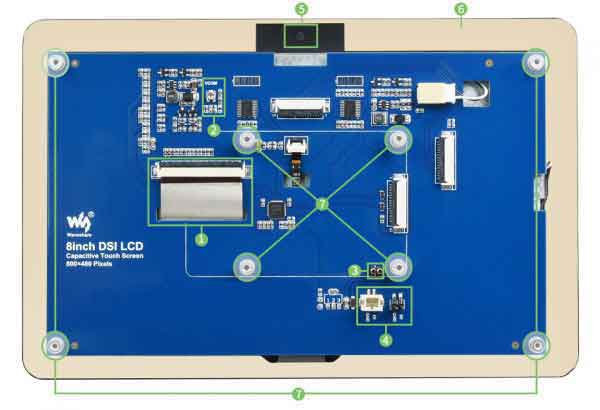
1. The anti-interference design of LCD FFC line makes it more stable for industrial use.
2. The VCOM voltage adjustment resistor can adjust the VCOM voltage to achieve the best display effect.
3. The thimble can be used for power supply, reducing tedious wiring.
4. Two types of 5V power output interfaces are convenient for users to connect cooling fans or supply power to other low-power devices.
5. The camera hole is reserved on the touch panel, which is convenient for users to integrate an external camera.
6. The large cover design makes it easy to design the case and is easy to be embedded in various equipment.
7. The chip nuts support and fix the Raspberry Pi mainboard to the back of the LCD, and the structure is more compact.
Working with Raspberry Pi
Hardware connection
1)Use the 15PIN FPC cable to connect the DSI interface of the 8inch DSI LCD to the DSI interface of the Raspberry Pi.
2)For ease of use, you can attach the Raspberry Pi to the back of the 8inch DSI LCD fixed with screws, and assemble the copper pillars. (The Raspberry Pi GPIO interface will power the LCD through the thimble)
The connection as below: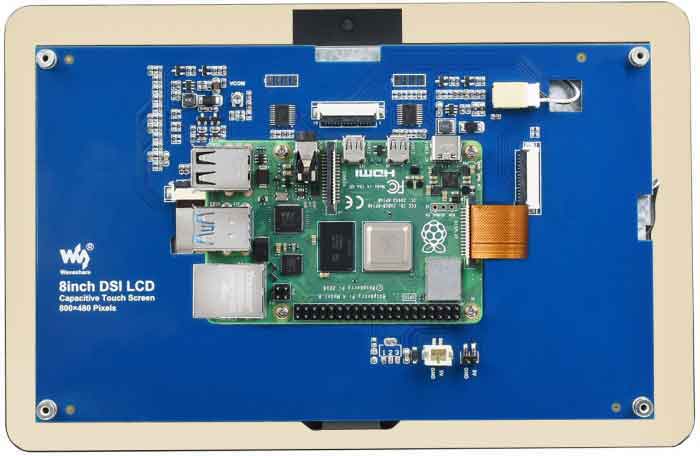
Software settings
Support Raspberry Pi OS / Ubuntu / Kali / Retropie and WIN10 IoT systems for Raspberry Pi.
1) Download image (Raspbian, Ubuntu, Kali, or WIN 10 IOT) from the Raspberry Pi website.
2) Download the compressed file to the PC, and unzip it to get the .img file.
3) Connect the TF card to the PC, use SDFormatter software to format the TF card.
4) Open the Win32DiskImager software, select the system image downloaded in step 2, and click‘Write’ to write the system image.
5) After the image has finished writing, save, and quit the TF card safely.
6) Power on the Raspberry Pi and wait for a few seconds until the LCD displays normally. And the touch function can also work after the system starts.
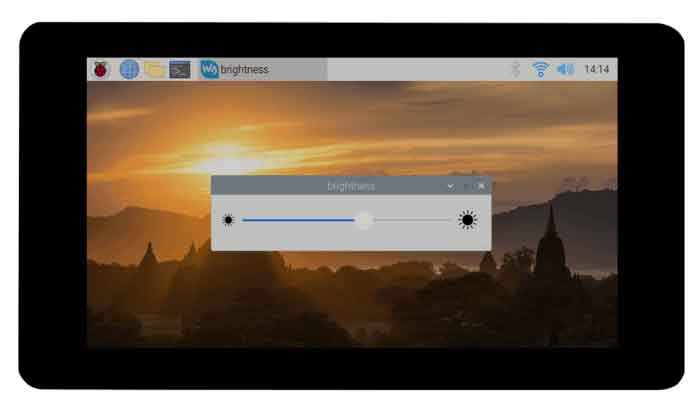
Backlight Controlling
- Open a terminal and type the following command to adjust the brightness.
sudo su
echo X > /sys/class/backlight/rpi_backlight/brightness
- X can be value in range 0~255. The backlight is darkest if you set it to 0 and the backlight is set to lightest if you set it to 255
echo 100 > /sys/class/backlight/rpi_backlight/brightness
echo 0 > /sys/class/backlight/rpi_backlight/brightness
echo 255 > /sys/class/backlight/rpi_backlight/brightness
- We also provide a example for brightness adjusting, you can download and install it by following commands:
wget https://www.waveshare.net/w/upload/3/39/Brightness.tar.gz
tar -xzf Brightness.tar.gz
cd brightness
./install.sh
Note: If you use the 2021-10-30-raspios-bullseye-armhf image or the laster version, please add the line dtoverlay=rpi-backlight to the config.txt file and reboot.
Disable touching
If you want to disable the touch function, you can modify the config.txt file, add the following line to the file and reboot the system.
disable_touchscreen=1
