


- sales/support
Google Chat:---
- sales
+86-0755-88291180
- sales01
sales@spotpear.com
- sales02
dragon_manager@163.com
- support
tech-support@spotpear.com
- CEO-Complaints
zhoujie@spotpear.com
- Only Tech-Support
WhatsApp:13246739196
- Purchase/Shipping/Refund
WhatsApp:13424403025
Raspberry Pi RPi Relay Board User Guide
Introduction
Raspberry Pi Expansion Board, Power Relay
Interface description
- Correspondence between relay channel and RPi Pin
| Channel No. | RPi Pin No. | wiringPi | BCM | Descriptions |
|---|---|---|---|---|
| CH1 | 37 | P25 | 26 | Channel 1 |
| CH2 | 38 | P28 | 20 | Channel 2 |
| CH3 | 40 | P29 | 21 | Channel 3 |
Notices: The labels on the PCB are corresponding to the wiringPi code.
- Relay_JMP (6P jumpeer) usage:
Relay_JMP is the relay control pin selecting jumper. When this jumper is connected, the relay can be controlled by the Raspberry Pi.
- Relay screw terminal description:
This board integrates three screw terminals, and each has three pins for connecting external circuits.
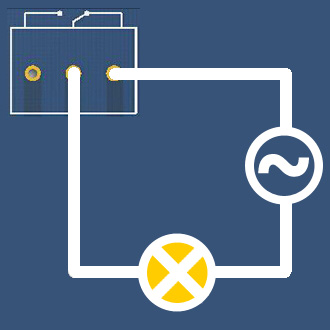
All the terminals are low active. When the Raspberry Pi outputs Low Level from its IO, the LED related to the corresponding channel lights up. At the same time, the relay NO (normally open contacts) close and the NC (normally close contacts) open, so as to change the ON/OFF status of the external circuit.
(PS: Remember to connect the jumper Relay_JMP!)
Before the relay action: After the relay action: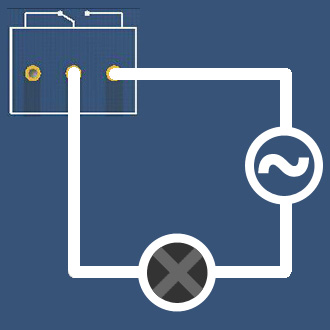
Sample programs
The sample programs of this board include Shell, bcm2835, WiringPi, python and Webiopi.
Development environment
Before using this expansion board, you should install some libraries to Raspberry Pi, such as bcm2835, wiringPi and python. For more information about the installation and configuration of the RPi library functions, please refer to Libraries Installation for RPi.
When finished the configurations above, you need to download the sample programs, and then copy and extract them to the system. For example, input the linetar -zxvf RPi_Relay_Board.tar.gz ~to extract the downloaded program to the directory of /home/pi. Some of the sample programs can be implemented via different ways, such as the libraries of bcm2835, wiringPi, sysfs, python and so on. That means you can implement a same function by using different libraries. Therefore, the libraries of bcm2835, wiringPi, python and Webiopi should be installed to the RPi before used. If the sample programs presented in the next section are unable to be performed after installing the libraries, you can try to apply the command
chmod +x filenameto grant the program the executable permission.
Operations and results
Shell program
Enter the Linux terminal, and input the following line: Execute the code:
pi@raspberrypi ~/RPi_Relay_Board/shell $ sudo ./Relay.sh CH1 ON
Expected result: The LED of relay channel 1 is ON, and you can hear the relay closes. The two parameters at the end of this line are configurable. For example, when you change these parameters to CH2 ON, the relay 2 will connect; and then to CH3 OFF, the relay 3 will disconnect.
pi@raspberrypi ~/RPi_Relay_Board/shell $ sudo ./Relay.sh CH2 ON
pi@raspberrypi ~/RPi_Relay_Board/shell $ sudo ./Relay.sh CH3 OFF
Bcm2835 program
Compile the program:
pi@raspberrypi ~/RPi_Relay_Board/bcm2835 $ make
And execute the following line under the terminal:
pi@raspberrypi ~/RPi_Relay_Board/bcm2835 $ sudo ./Relay_Module
Expected result: Three LEDs light up by turns and the relays switch back and forth between the NC contacts and NO contacts by turns. In the meantime, the terminal will show the contacts that the current relay stays at.
Press the Keys Ctrl + C to end the program.
wiringPi program
Compile the program:
pi@raspberrypi ~/RPi_Relay_Board/wiringPi $ make
And execute the following line under the terminal:
pi@raspberrypi ~/RPi_Relay_Board/wiringPi $ sudo ./Relay_Module
Expected result: Three LEDs light up by turns and the relays switch back and forth between the NC node and NO node. In the meantime, the terminal will show the node that the current relay stays at.
Press the keys Ctrl + C to end the program.
Python program
Execute the following line under the terminal:
pi@raspberrypi ~/RPi_Relay_Board/python $ sudo python Relay_Module.py
Expected result: Three LEDs light up by turns and the relays switch back and forth between the NC node and NO node. In the meantime, the terminal will show the node that the current relay stays at.
Press the keys Ctrl + C to end the program.
Webiopi program
The webpage remote control in this sample program is based on the WebioPi software architecture to control the relay.
- Environment installation:
Enter the directory of Webiopi, and then unzip and install the library file.
pi@raspberrypi ~/RPi_Relay_Board/Webiopi $ tar -zxvf WebIOPi-0.7.1-raspi2.tar.gz
pi@raspberrypi ~/RPi_Relay_Board/Webiopi $ cd WebIOPi-0.7.1-raspi2
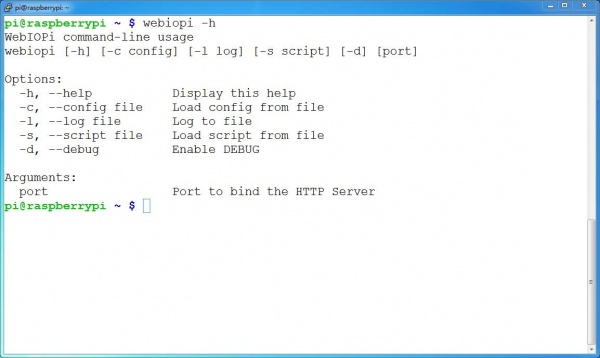
pi@raspberrypi ~/RPi_Relay_Board/WebioPi/WebIOPi-0.7.1-raspi2 $ sudo ./setupRun the command
webiopi -hunder the terminal; if the library is installed successfully, the screen will display the information as the figure below shows.
Enter the terminal, and execute the code:
pi@raspberrypi ~ $ sudo webiopi -d -c /etc/webiopi/config
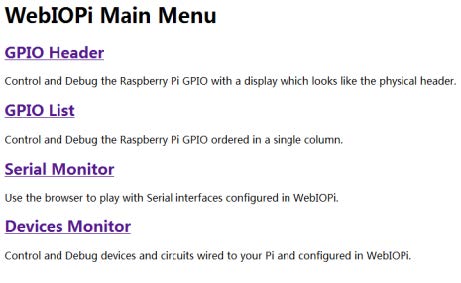
Then, open the browser on your PC or cell phone, and enter the IP address of RPi into the address bar and end with the port number: 8000. For example, input http://192.168.1.16:8000/ (the address can be changeable according to your actual condition). To login the website, you should enter your account and password. The default account name is webiopi, and the original password is raspberry. When finished the steps above, if you can enter the webpage WebIOPi Main Menu, it means the environment is configured well.
- Operations and results:
Return to the terminal, and press the keys Ctrl + C to end the program. And then, execute the code:
cd ~/RPi_Relay_Board/Webiopi
pi@raspberrypi ~/RPi_Relay_Board/Webiopi $ sudo webiopi -d -c config
Then, open the browser on your PC or cell phone, and enter the IP address of RPi into the address bar and end with the port number: 8000. Or you can reload the webpage.
If you still cannot enter this webpage, we recommend you to use the Chrome browser or the Firefox browser. Furthermore, please make sure the current directory of Raspberry Pi is ~/RPi_Relay_Board/Webiopi, and there should be a file index.html under this directory. And then, input the code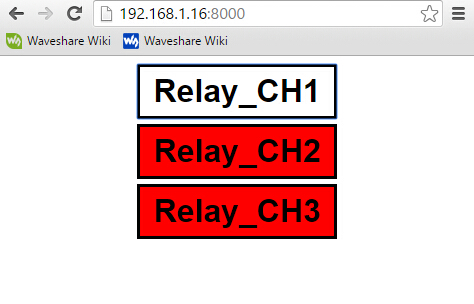
sudo webiopi -d -c configto enter the index.html. Or else, you will go to the WebIOPi Main Menu webpage.
After entering this webpage, you can control the relays by clicking the controls of different relay channels on the webpage.
