- sales/support
Google Chat:---
- sales
+86-0755-88291180
- sales01
sales@spotpear.com
- sales02
dragon_manager@163.com
- support
tech-support@spotpear.com
- CEO-Complaints
zhoujie@spotpear.com
- sales/support
WhatsApp:13246739196
Raspberry Pi IMX462-99/127 2MP Starlight Camera User Guide
Introduction
Onboard 1/2.8 inch Sony starlight camera sensor, IMX462 2MP Starlight Camera adopts back-illuminated pixel technology, which can realize high-quality imaging in visible light and near-infrared band. Onboard IR-CUT, IXM462 2MP Starlight Camera can be switched to day or night mode freely with the resolution up to 1920 x 1080. With ISP, the camera has a better imaging effect. Also, we provide 99° and 127° field of view options, you can choose according to your needs.
Specification
| IMX462-99 | IMX462-127 | |
|---|---|---|
| Image Sensor | ||
| Sensor | SONY IMX462LQR-C STARVIS | |
| pixel | 2.07MP | |
| Resolution | 1920×1080 | |
| pixel size | 2.9um×2.9um | |
| Shutter | Rolling Shutter | |
| ISP image processing | ||
| Frame rate | 1080p@25fps、1080p@30fps | |
| Exposure | AE (Auto Exposure)/Manual | |
| white balance | AWB(Auto White Balance), Manual | |
| Shutter | 1/25(1/30)s to 1/50,000s (support slow shutter) | |
| Noise reduction | 2D/3D Noise Reduction | |
| Image settings | Brightness, Contrast, Sharpness, Saturation, Adjustable GAMMA, Image Flip, Image Mirror | |
| Image enhancement | Backlight compensation, DOL-WDR, defogging | |
| Day and night switch | External trigger synchronous switch, manually switch to RGB and monochrome. | |
| Lens | ||
| Field of View (FOV) | 99.1°(D) / 83.5°(H) / 44.6°(V) | 127.9°(D) / 106.9°(H) / 56.9°(V) |
| Aperture | F1.0 | F1.61 |
| Focal length | 4.0mm | 3.18mm |
| Distortion | -33.8% | -51% |
| Focus method | Manual | |
| Working Parameters | ||
| Operating temperature | -10℃~60℃ | |
| Working humidity | <=95% no condensation | |
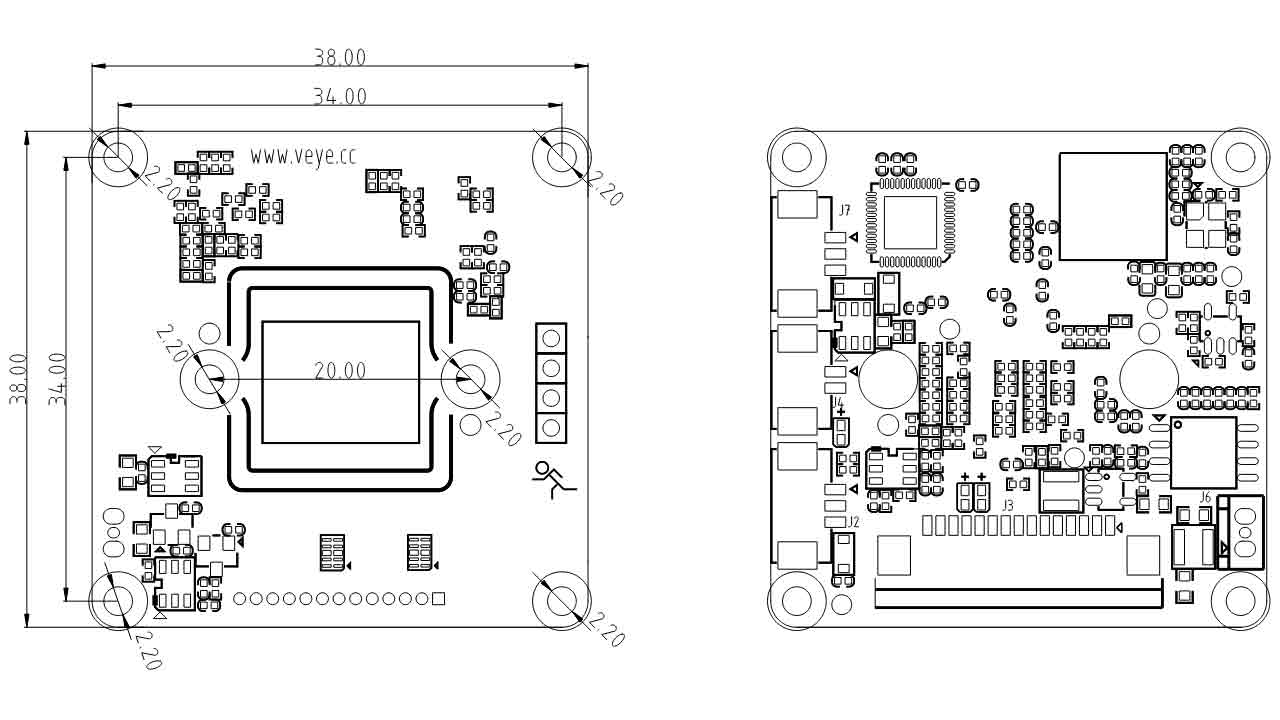
Dimensions

Working with Raspberry Pi
Note
As IMX462 is not the default camera for the Raspberry Pi, it can not compatible with the libcamera or raspciam library in Raspberry Pi. Hence you need to install another driver and control script.
The driver provided only supports the Raspberry Pi OS system, and other systems are not currently supported.
Configure I2C
Open the terminal of Raspberry Pi and enter the following command:
sudo raspi-config
Choose Interface Options -> I2c -> Yes.
Download and Install Driver
Before downloading the driver, you need to make sure that the latest Raspberry Pi system has been programmed well. Connect the camera and complete the boot configuration. Open the terminal of the Raspberry Pi and enter the following command:
wget https://github.com/veyeimaging/raspberrypi_v4l2/releases/latest/download/raspberrypi_v4l2.tgz
tar -xzvf raspberrypi_v4l2.tgz
cd raspberrypi_v4l2/release/
chmod +x *
sudo ./install_driver.sh veyecam2m
Unload the Driver (Optional)
If you want to replace it with another camera driver, you can unload the current driver:
sudo ./uninstall_driver.sh veyecam2m
Camera Test
Note: if you want to control the camera by the remote terminal, please enter the command "export DISPLAY=:0" to specify the screen output before using the preview command.
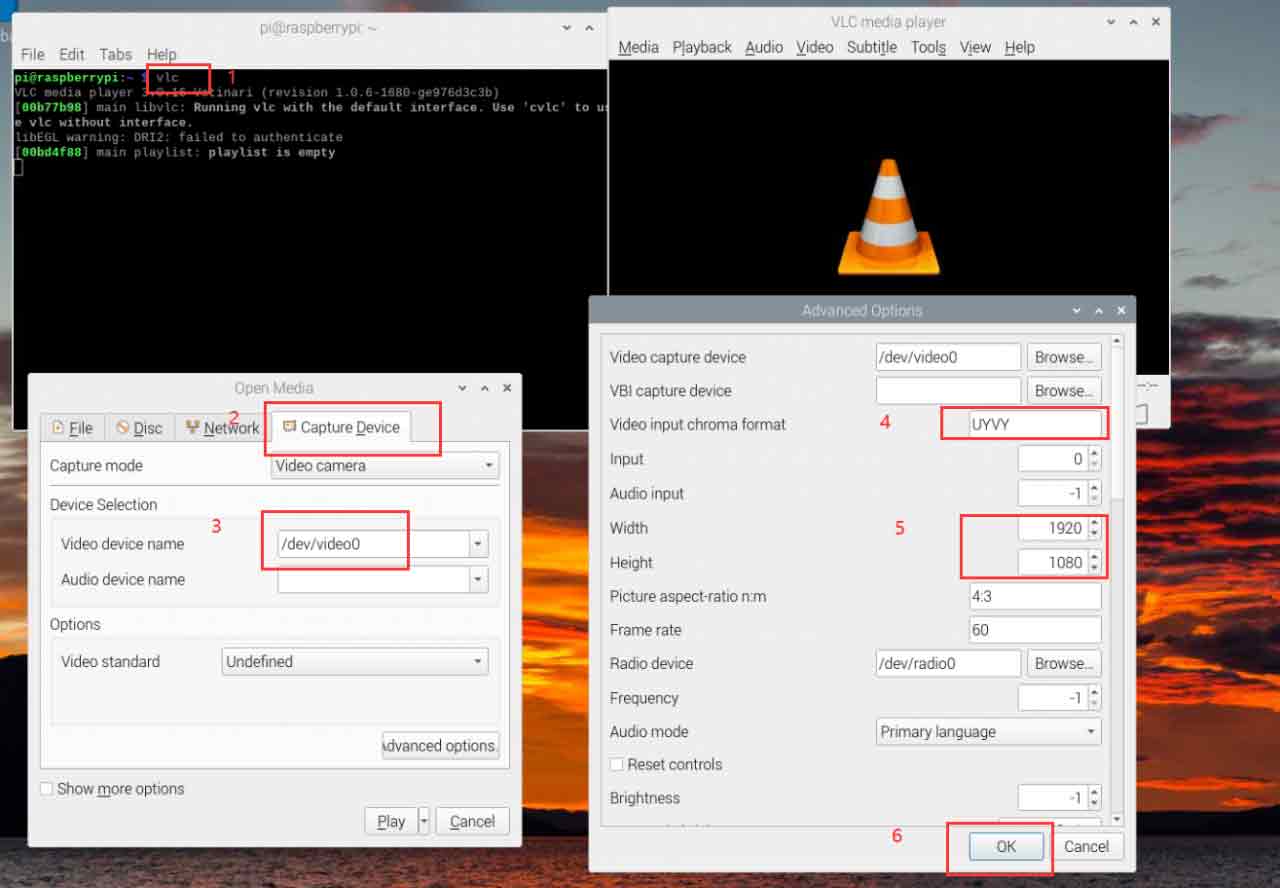
Preview with VLC
- Open VLC software in the main menu of Raspberry Pi or enter "VLC" in the terminal.
- Click the "▶" button to open the window.
- Choose "Capture Device -> Device Selection -> Video device name" and select the camera node. If you connect the camera directly, the node is "/dev/video0".
- Click the "Advanced Option..." button.
- Select "Video input chroma format" as UYUV.
- Select input resolution as 1920 and 1080 in "width" and "height" respectively.
- Finally click "OK" to save the settings and play.
Preview with Gstreamer
Install Gstreamer
- Open the terminal of the Raspberry Pi and enter the following commands to install:
sudo apt-get install gstreamer1.0-tools
sudo apt-get install libx264-dev libjpeg-dev
sudo apt-get install libgstreamer1.0-dev libgstreamer-plugins-base1.0-dev libgstreamer-plugins-bad1.0-dev gstreamer1.0-plugins-ugly gstreamer1.0-tools gstreamer1.0-gl gstreamer1.0-gtk3 gstreamer1.0-plugins-good gstreamer1.0-plugins-bad
Snap a Picture
gst-launch-1.0 v4l2src num-buffers=1 device=/dev/video0 ! 'video/x-raw, format=(string)UYVY, width=1920,height=1080' ! jpegenc ! filesink location=test_image.jpg
Video Preview
gst-launch-1.0 v4l2src io-mode=dmabuf device=/dev/video0 ! "video/x-raw,format=(string)UYVY, width=(int)1920, height=(int)1080,framerate=(fraction)30/1" ! v4l2convert capture-io-mode=dmabuf output-io-mode=dmabuf ! autovideosink sync=false -v
Video Preview (Add timestamp)
gst-launch-1.0 v4l2src device=/dev/video0 ! "video/x-raw,format=(string)UYVY, width=(int)1920, height=(int)1080,framerate=(fraction)30/1" ! videoconvert ! videoscale ! clockoverlay time-format="%D %H:%M:%S" ! video/x-raw, width=640, height=360 ! autovideosink sync=false -v
Video Record (mkv)
gst-launch-1.0 -e v4l2src io-mode=dmabuf device=/dev/video0 num-buffers=300 ! "video/x-raw,format=(string)UYVY, width=(int)1920, height=(int)1080,framerate=(fraction)30/1" ! v4l2h264enc capture-io-mode=dmabuf output-io-mode=dmabuf extra-controls="controls, h264_profile=4, video_bitrate=6200000" ! 'video/x-h264, profile=high, level=(string)4' ! h264parse ! matroskamux ! filesink location=output.mkv
Video Record (mp4)
gst-launch-1.0 -e v4l2src io-mode=dmabuf device=/dev/video0 num-buffers=300 ! "video/x-raw,format=(string)UYVY, width=(int)1920, height=(int)1080,framerate=(fraction)30/1" ! v4l2h264enc capture-io-mode=dmabuf output-io-mode=dmabuf extra-controls="controls, h264_profile=4, video_bitrate=6200000" ! 'video/x-h264, profile=high, level=(string)4' ! h264parse ! mp4mux ! filesink location=video.mp4
TCP Video Streaming
- In the Raspberry Pi terminal, the monitoring port is 5000.
gst-launch-1.0 -v v4l2src device=/dev/video0 num-buffers=-1 ! "video/x-raw,format=(string)UYVY, width=(int)1920, height=(int)1080,framerate=(fraction)30/1" ! v4l2h264enc extra-controls="controls, h264_profile=4, video_bitrate=4000000" ! 'video/x-h264, profile=high, level=(string)4' ! h264parse ! rtph264pay config-interval=1 pt=96 ! gdppay ! tcpserversink host=x.x.x.x port=5000
- Get from the terminal.
gst-launch-1.0 -v tcpclientsrc host=x.x.x.x port=5000 ! gdpdepay ! rtph264depay ! avdec_h264 ! autovideosink sync=false
- Note: x.x.x.x needs to be replaced according to the actual Raspberry Pi IP address, such as "gst-launch-1.0 -v tcpclientsrc host=192.168.1.10 port=5000 ! gdpdepay ! rtph264depay ! avdec_h264 ! autovideosink sync=false".
Get video with Opencv
gst-launch-1.0 v4l2src device=/dev/video0 ! "video/x-raw,format=(string)UYVY, width=(int)1920, height=(int)1080,framerate=(fraction)30/1" ! videoscale ! "video/x-raw,width=640,height=480" ! videoconvert ! "video/x-raw, format=(string)BGR" ! appsink
Note: This demo is not directly run in the Raspberry Pi but as a parameter of "video. Capture(str) str" for calling.
Compute Module
If you use Raspberry Pi CM3 or CM4, "dtb" and device tree are required.
Loading Device Tree
sudo wget https://datasheets.raspberrypi.com/cmio/dt-blob-dualcam.bin -O /boot/dt-blob.bin
sudo cp ~/raspberrypi_v4l2/release/driver_bin/$(uname -r)/veyecam2m.dtbo /boot/overlays/veyecam2m.dtbo
sudo reboot
Device Description
CM4 adopts two-channel I2C to connect two cameras respectively: i2c-0 and i2c10.
If you connect the two-channel cameras at the same time, the system will recognize them as video0 and video2.
CAM0 Preview
gst-launch-1.0 v4l2src io-mode=dmabuf device=/dev/video0 ! "video/x-raw,format=(string)UYVY, width=(int)1920, height=(int)1080,framerate=(fraction)30/1" ! v4l2convert capture-io-mode=dmabuf output-io-mode=dmabuf ! autovideosink sync=false -v
CAM1 Preview
gst-launch-1.0 v4l2src io-mode=dmabuf device=/dev/video2 ! "video/x-raw,format=(string)UYVY, width=(int)1920, height=(int)1080,framerate=(fraction)30/1" ! v4l2convert capture-io-mode=dmabuf output-io-mode=dmabuf ! autovideosink sync=false -v
Parameter Configuration
As the IMX462 camera features ISP circuit, you can configure it according to the script we provided.
Download & Configure
- Download the script.
git clone https://github.com/veyeimaging/raspberrypi.git
cd raspberrypi/i2c_cmd/bin/
- Configure:
cd raspberrypi/i2c_cmd/bin/
./enable_i2c_vc.sh
- If you use the Raspberry Pi series board:
./camera_i2c_config
- If you use the Raspberry Pi Compute Module:
./camera_i2c_config 0 #CAM0
./camera_i2c_config 1 #CAM1
Configure the Camera
Set wdrmode
- Read the current wdrmode
./veye_mipi_i2c.sh -r -f wdrmode
- Modify the current wdrmode
./veye_mipi_i2c.sh -w -f wdrmode -p1 [value]
[value] can be:
0x00: Backlight mode off
0x01: low backlight mode
0x02: High backlight mode
0x03: Enable DOL WDR wide dynamic mode
videoformat
- Read the current video format.
./veye_mipi_i2c.sh -r -f videoformat
- Set the video format.
./veye_mipi_i2c.sh -w -f videoformat -p1 [value]
[value] parameter:
PAL: Set to PAL (50Hz) mode, in this mode, the frame rate is 25fps.
NTSC: Set to NTSC (60Hz) mode, in this mode, the frame rate is 30fps.
mirrormode
- Read the mirror mode
./veye_mipi_i2c.sh -r -f mirrormode
- Set the mirror mode
./veye_mipi_i2c.sh -w -f mirrormode -p1 [value]
[value] parameter:
0x00: Normal
0x01: mirror image
0x02: Flip vertically (rotate 180 degrees)
0x03: Mirror and flip vertically (rotate 180 degrees)
denoise
- Read the denoise mode
./veye_mipi_i2c.sh -r -f denoise
- Set the denoise mode
./veye_mipi_i2c.sh -w -f denoise -p1 [value]
[value] parameter:
0x00: NR 2D Mode = OFF; NR 3D Mode = OFF
0x01: NR 2D Mode = OFF; NR 3D Mode = LOW
0x02: NR 2D Mode = OFF; NR 3D Mode = MIDDLE
0x03: NR 2D Mode = OFF; NR 3D Mode = HIGH
0x04: NR 2D Mode = LOW; NR 3D Mode = OFF
0x05: NR 2D Mode = LOW; NR 3D Mode = LOW
0x06: NR 2D Mode = LOW; NR 3D Mode = MIDDLE
0x07: NR 2D Mode = LOW; NR 3D Mode = HIGH
0x08: NR 2D Mode =MIDDLE; NR 3D Mode = OFF
0x09: NR 2D Mode =MIDDLE; NR 3D Mode = LOW
0x0A: NR 2D Mode = MIDDLE; NR 3D Mode = MIDDLE
0x0B: NR 2D Mode = MIDDLE; NR 3D Mode = HIGH
0x0C: NR 2D Mode =HIGH; NR 3D Mode = OFF
0x0D: NR 2D Mode =HIGH; NR 3D Mode = LOW
0x0E: NR 2D Mode = HIGH; NR 3D Mode = MIDDLE
0x0F: NR 2D Mode = HIGH; NR 3D Mode = HIGH
agc
- Read agc parameter:
./veye_mipi_i2c.sh -r -f agc
- Set agc parameter (gain limit).
./veye_mipi_i2c.sh -w -f agc -p1 [value]
[value] parameter:
0x00 ~ 0x0F : AGC
lowlight
- Read the low light parameter.
./veye_mipi_i2c.sh -r -f lowlight
- Set the low light mode.
In the low-light mode, you can extend the camera exposure time and reduce the frame rate by configuring the parameters to obtain a higher low-light imaging effect.
./veye_mipi_i2c.sh -w -f lowlight -p1 [value]
[value] parameter;
0x01: 1/2* (frame rate)
0x03: 1/4* (frame rate)
0x05: 1/6* (frame rate)
0x07: 1/8* (frame rate)
0x09: 1/10* (frame rate)
0x0B: 1/15* (frame rate)
0x0D: 1/20* (frame rate)
0x0F: 1/25* (frame rate)
0x11: 1/30* (frame rate)
0x00: fixed frame rate (25/30)
daynightmode
- Read the daynight mode.
./veye_mipi_i2c.sh -r -f daynightmode
- Set the daynight mode.
./veye_mipi_i2c.sh -w -f daynightmode -p1 [value]
[value] parameter;
0xFF: Color mode, in this mode, the camera is in color mode, cut IR-CUT to block the infrared band.
0xFE: black and white mode, in this mode, the camera is in color mode, and IR-CUT can pass infrared light.
0xFC: External trigger mode, in this mode, the user can switch the camera to the color mode or black and white mode through the onboard control pins.
ircutdir
- Read the level direction of IR-CUT control pin.
./veye_mipi_i2c.sh -r -f ircutdir
- Set IR-CUT control level direction.
./veye_mipi_i2c.sh -w -f ircutdir -p1 [value]
Set IR-CUT control level, and [value] could be 0/1.
irtrigger
- Read the polarity setting of the external trigger mode pin for day and night switching.
./veye_mipi_i2c.sh -r -f irtrigger
- Set the polarity setting of the external trigger mode pin for day and night switching.
./veye_mipi_i2c.sh -w -f irtrigger -p1 [value]
[value] parameter:
0x00: default
0x01: Invert
mushutter
- Read exposure time.
./veye_mipi_i2c.sh -r -f mshutter
- Set exposure time (turn off auto exposure).
./veye_mipi_i2c.sh -w -f mshutter -p1 [value]
The unit of [value] is s. When the value is greater than 0x4B, the camera enters the low frame rate mode.
| Value | Description |
|---|---|
| NTSC (PAL) | |
| 0x40 | Auto Exposure |
| 0x41 | 1/30(25) |
| 0x42 | 1/60(50) |
| 0x43 | 1/120(100) |
| 0x44 | 1/240(200) |
| 0x45 | 1/480(400) |
| 0x46 | 1/1000 |
| 0x47 | 1/2000 |
| 0x48 | 1/5000 |
| 0x49 | 1/10000 |
| 0x4A | 1/50000 |
| 0x4B | 1/30(25)*2 |
| 0x4C | 1/30(25)*4 |
| 0x4D | 1/30(25)*6 |
| 0x4E | 1/30(25)*8 |
| 0x4F | 1/30(25)*10 |
| 0x50 | 1/30(25)*15 |
| 0x51 | 1/30(25)*20 |
| 0x52 | 1/30(25)*25 |
| 0x53 | 1/30(25)*30 |
cameramode
- Read the camera mode.
./veye_mipi_i2c.sh -r -f cameramode
- Set the camera mode only requires "hdver >=0x03".
./veye_mipi_i2c.sh -w -f cameramode -p1 [value]
[value] parameter:
0x0: stream mode
0x01: capture mode


