


- sales/support
Google Chat:---
- sales
+86-0755-88291180
- sales01
sales@spotpear.com
- sales02
dragon_manager@163.com
- support
tech-support@spotpear.com
- CEO-Complaints
zhoujie@spotpear.com
- Only Tech-Support
WhatsApp:13246739196
- Purchase/Shipping/Refund
WhatsApp:13424403025
- HOME
- >
- ARTICLES
- >
- Raspberry Pi
- >
- Raspberry Pi LCD
- >
- e-Paper
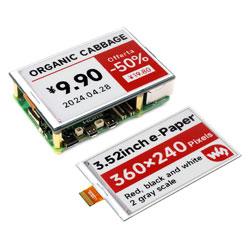
3.52inch-e-Paper-B User Guide
Parameters
| Size | 3.52inch |
| Driver Board Size | 86.5mm × 57mm |
| Display Size | 74.51mm × 49.67mm |
| Outline Dimensions (bare panel) | 84.7mm × 54.41mm × 0.85mm |
| Operating Voltage | 3.3V / 5V (IO level voltage should be the same as the supply voltage) |
| Communication Interface | SPI |
| Dot Pitch | 0.207mm × 0.207mm |
| Resolution | 360 × 240 |
| Display Color | Black, White, Red |
| Grayscale | 2 |
| Refresh Time | 16s |
| Refresh Power | <25mW(typ.) |
| Sleep Current | <0.01uA (close to 0) |
| Operating Temperature | 0 ~ 40 ℃ |
| Storage Temperature | 0 ~ 40 ℃ |
- Refresh time: The refresh time is based on experimental test data, and there may be errors in the actual refresh time. The actual results shall prevail. There will be a flickering effect during the global refresh process, which is a normal phenomenon.
- Refresh power consumption: The power consumption data is experimental test data, and the actual power consumption may have certain errors due to the presence of the driver board and actual usage. The actual results shall prevail.
- Refresh at low temperatures may cause a color cast, and it is necessary to stand still at 25°C for 6 hours before refreshing.
Communication Method

CSB (CS): Slave chip selection signal, low active. When CS is low level, the chip is enabled.
SCL (SCK/SCLK): Serial clock signal.
D/C (DC): Data/Command control signal, writes commands at a low level; writes data/parameter at a high level.
SDA (DIN): Serial data signal.
Timing sequence: CPHL=0, CPOL=0 (that is, SPI mode 0).
Working Principle
This product is an e-Paper device adopting the image display technology of Microencapsulated Electrophoretic Display, MED. The basic principle is that the charged nanoparticles suspended in the liquid are subjected to the electric field to produce migration. The e-Paper screen display patterns by reflecting the ambient light, so it has no background light requirement. Under ambient light, the e-Paper screen still has high visibility with a wide viewing angle of almost 180 degrees. It is the ideal choice for e-reading.
Programming Principle
- For black and white images, we can define it as 0 if it is black and 1 if it is white, so there is a way to represent colors:
- White: □, corresponding to 1
- Black: ■, corresponding to 0
- White: □, corresponding to 1
- A dot is generally called a pixel on the graph, and the color is either 1 or 0, that is, 1 bit can identify the color: 1Pixel = 1bit, then a byte contains 8 pixels.
- Take 16 pixels as an example. We assume that the first 8 pixels are black and the last 8 pixels are white. Then it can be thought that pixels 1-16 correspond to bits 0 to 15, and 0 means black. 1 means white:

- For the computer, the way it stores data is that the high bits come first and the low bits come last, and each byte only has 8 bits, so there may be a slight change:

- In this way, only 2 bytes are required to represent 16 pixels.
- For the 3.52inch e-paper B, which has three colors of red, black, and white, we need to split the image into two parts: one black and white image, and one red and white image. During transmission, one register controls the black and white display, while the other controls the red and white display. One byte for the black and white part controls 8 pixels, and one byte for the red and white part controls 8 pixels
- Suppose there are 8 pixels, the first 4 are red and the back 4 are black, then you need to split them into a black and white picture, a red and white picture. Both of which are 8 pixels, but the first four pixels of the black and white picture are white, the last 4 pixels are black, and the first 4 pixels of the red and white picture are red, and the last four pixels are white.
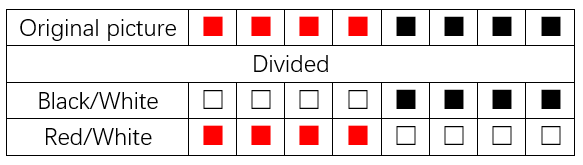
- If we specify that white is stored as 1 and red or black is stored as 0, then we have the following representation:
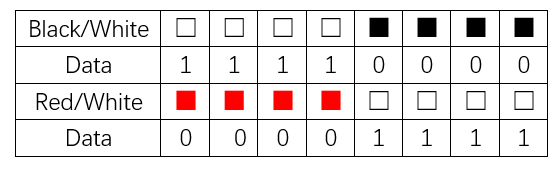
- One byte for the black and white part controls 8 pixels, and one byte for the red and white part controls 8 pixels, then it can be expressed as follows:

Precautions
- The screen supports partial refresh. Please note that when using it, you cannot always use partial refresh to refresh the screen. You need to perform a full refresh of the screen after several partial refreshes. Otherwise, the screen display effect will be abnormal.
- When three-color or multi-color ink screens are produced in batches, there will be a certain color difference. This is a normal phenomenon. It is recommended to store the screen with the white side facing up. Before use, power on and do several whitening operations.
- Note that the screen cannot be powered on for a long time. When the screen does not refresh, the screen must be set to sleep mode or power off. Otherwise, the screen will remain in a high voltage state for a long time, which will damage the diaphragm and cannot be repaired.
- When using the e-paper screen, it is recommended that the refresh interval is at least 180s, and refreshed at least every 24 hours. If the e-paper screen is not used for a long time, it should be whitened and stored. (Refer to the data sheet for specific storage environment requirements)
- After the screen enters sleep mode, the image data sent will be ignored, and it can only be refreshed normally after re-initialization.
- Control the 0x3C or 0x50 (refer to the data sheet for details) register to adjust the border color. In the example demo, you can adjust the Border Waveform Control register or VCOM AND DATA INERTVAL SETTING to set it.
- If you find that the data of the created image is displayed incorrectly on the screen, it is recommended to check whether the image size is set correctly, and try again by changing the width and height settings.
- The working voltage requirement for an ink screen is 3.3V. If you purchase a raw display and need to work in a 5V environment when designing the circuit, it is recommended to perform level conversion processing. The new version of the driver board (Rev2.1 and subsequent versions) has added a level processing circuit, which can support both 3.3V and 5V working environments simultaneously. The old version can only support 3.3V working environment. When using it, you can first confirm the version number (which is under the board name).
- The FPC cable of the screen is relatively fragile. Please note: do not bend the cable in the vertical direction of the screen to avoid the cable being torn; do not repeatedly bend the cable excessively to avoid the cable breaking; do not bend the cable toward the front of the screen to prevent the cable from being disconnected from the panel. During debugging and R&D, it is recommended to fix the wiring before use.
- The ink screen screen is relatively fragile, so be careful to avoid falling, colliding, or pressing hard.
- We recommend that customers first use the sample demo we provide and use the corresponding development board to test after getting the screen.
Raspberry Pi
Hardware connection
When connecting to the Raspberry Pi, you can directly plug the board into the 40PIN pin header of the Raspberry Pi, and be careful to align the pins.
If you choose to use an 8PIN cable to connect, please refer to the pin corresponding table below:
| e-Paper | Raspberry Pi | |
| BCM2835 encoding | Board physical pin number | |
| VCC | 3.3V | 3.3V |
| GND | GND | GND |
| DIN | MOSI | 19 |
| CLK | SCLK | 23 |
| CS | CE0 | 24 |
| DC | 25 | 22 |
| RST | 17 | 11 |
| BUSY | 24 | 18 |
Enable SPI Interface
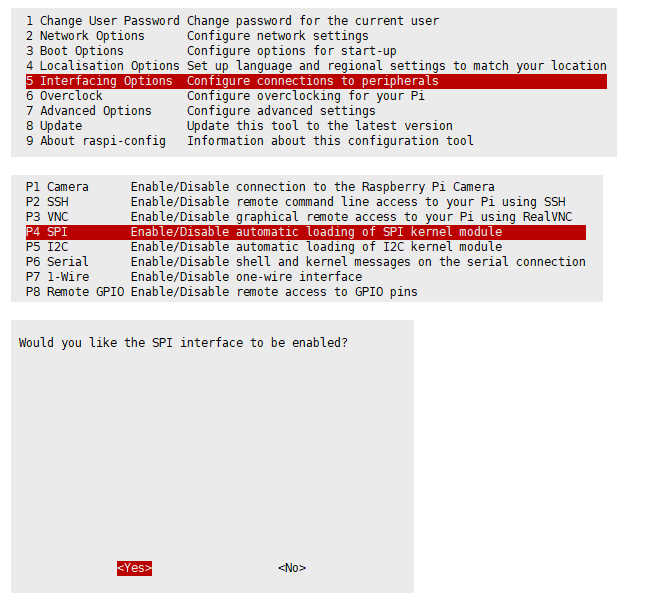
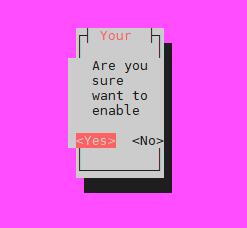
- Open the Raspberry Pi terminal and enter the following command to enter the configuration interface:
sudo raspi-config
Select Interfacing Options -> SPI -> Yes to enable the SPI interface
- Restart Raspberry Pi:
sudo reboot
- Check /boot/config.txt and you can see that 'dtparam=spi=on' has been written to

- To ensure that SPI is not occupied, it is recommended that other driver overlays be temporarily turned off. You can use ls /dev/spi* to check the SPI occupancy. The terminal output /dev/spidev0.0 and /dev/spidev0.1 indicates that the SPI situation is normal

Run C demo
- Install lg library
#Open the Raspberry Pi terminal and run the following commands:
wget https://github.com/joan2937/lg/archive/master.zip
unzip master.zip
cd lg-master
make
sudo make install
# For more information, please refer to the source code: https://github.com/gpiozero/lg
- Install gpiod library (optional)
#Open the Raspberry Pi terminal and run the following commands:
sudo apt-get update
sudo apt install gpiod libgpiod-dev
- Install BCM2835 (optional)
#Open the Raspberry Pi terminal and run the following commands:
wget http://www.airspayce.com/mikem/bcm2835/bcm2835-1.71.tar.gz
tar zxvf bcm2835-1.71.tar.gz
cd bcm2835-1.71/
sudo ./configure && sudo make && sudo make check && sudo make install
# For more information, please refer to the official website: http://www.airspayce.com/mikem/bcm2835/
- Install wiringPi (optional)
#Open the Raspberry Pi terminal and run the following commands:
sudo apt-get install wiringpi
#For Raspberry Pi systems after May 2019 (those earlier may not require execution), an upgrade may be necessary:
wget https://project-downloads.drogon.net/wiringpi-latest.deb
sudo dpkg -i wiringpi-latest.deb
gpio -v
# Run gpio -v and version 2.52 will appear. If it does not appear, there is an installation error.

#Bullseye branch system uses the following command:
git clone https://github.com/WiringPi/WiringPi
cd WiringPi
./build
gpio -v
# Run gpio -v and version 2.60 will appear. If it does not appear, there is an installation error.
- Download the demo (you can skip it if you have already downloaded it)
wget https://files.waveshare.com/wiki/3.52inch%20e-Paper%20HAT%20(B)/3in52_e-Paper_B.zip
unzip 3in52_e-Paper_B.zip -d 3in52_e-Paper_B
cd e-Paper/RaspberryPi_JetsonNano/
- Alternate decompression method
sudo apt-get install p7zip-full
7z x 3in52_e-Paper_B.zip -O./3in52_e-Paper_B
cd e-Paper/RaspberryPi_JetsonNano/
- Download the demo via GitHub (alternative method, skip if already downloaded)
Currently, accessing GitHub is not very smooth. It is recommended to use the above method to download from our official website.
git clone https://github.com/waveshare/e-Paper.git
cd e-Paper/E-paper_Separate_Program/3in52_e-Paper_B/RaspberryPi_JetsonNano/
- Compile the demo (Note: -j4 means using 4 threads for compilation, the number can be modified by yourself)
# It is now in 3in52_e-Paper_B/RaspberryPi_JetsonNano
cd c
sudo make clean
sudo make -j4
- Run the demo
sudo ./epd
Run python demo
- Install function library
sudo apt-get update
sudo apt-get install python3-pip
sudo apt-get install python3-pil
sudo apt-get install python3-numpy
sudo pip3 install spidev
- Install function library (python2)
sudo apt-get update
sudo apt-get install python-pip
sudo apt-get install python-pil
sudo apt-get install python-numpy
sudo pip install spidev
- Install gpiozero library (the system has installed it by default, if it is not installed, please follow the following command to install it)
sudo apt-get update
# python3
sudo apt install python3-gpiozero
# python2
sudo apt install python-gpiozero
- Download the demo (you can skip it if you have already downloaded it)
wget https://files.waveshare.com/wiki/3.52inch%20e-Paper%20HAT%20(B)/3in52_e-Paper_B.zip
unzip 3in52_e-Paper_B.zip -d 3in52_e-Paper_B
cd e-Paper/RaspberryPi_JetsonNano/
- Alternate decompression method
sudo apt-get install p7zip-full
7z x 3in52_e-Paper_B.zip -O./3in52_e-Paper_B
cd e-Paper/RaspberryPi_JetsonNano/
- Download the demo via GitHub (alternative method, skip if already downloaded)
Currently, accessing GitHub is not very smooth. It is recommended to use the above method to download from our official website.
git clone https://github.com/waveshare/e-Paper.git
cd e-Paper/E-paper_Separate_Program/3in52_e-Paper_B/RaspberryPi_JetsonNano/
- Run the demo
# Make sure it is in e-Paper/RaspberryPi_JetsonNano/
cd python/examples/
python3 epd_3in52b_test.py
Arduino
Hardware connection
Use an 8PIN cable to connect, please refer to the pin correspondence table below:
| e-Paper | Arduino UNO R4 | Mega2560 |
| VCC | 5V | 5V |
| GND | GND | GND |
| DIN | D11 | D51 |
| CLK | D13 | D52 |
| CS | D10 | D10 |
| DC | D9 | D9 |
| RST | D8 | D8 |
| BUSY | D7 | D7 |
Install IDE
Arduino IDE Windows Installation Tutorial
Run the Demo
- In the data interface download the demo, then unzip it and enter the 3in52_e-Paper_B directory to see the following contents:
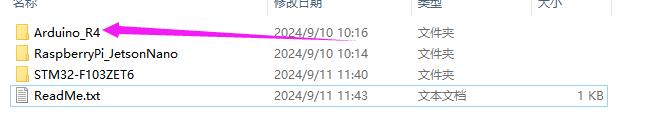
Open the test demo: 3in52_e-Paper_B\Arduino_R4\Arduino_R4.ino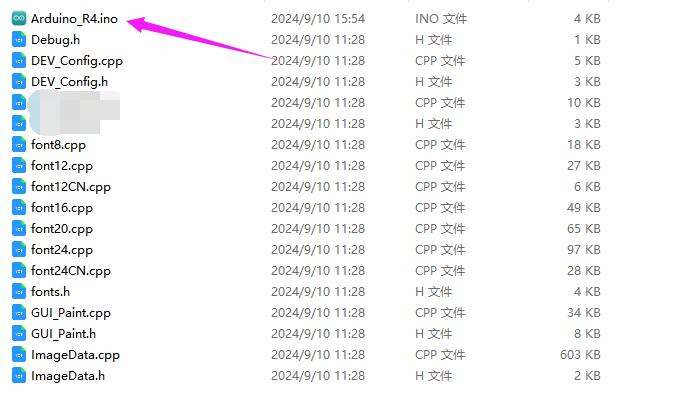
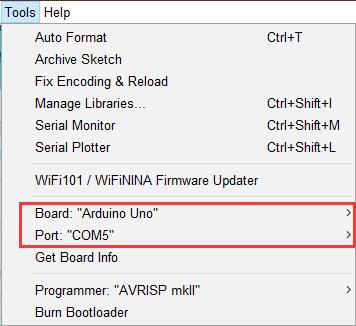
- In the Tools tab of the Arduino IED, select the corresponding board and port
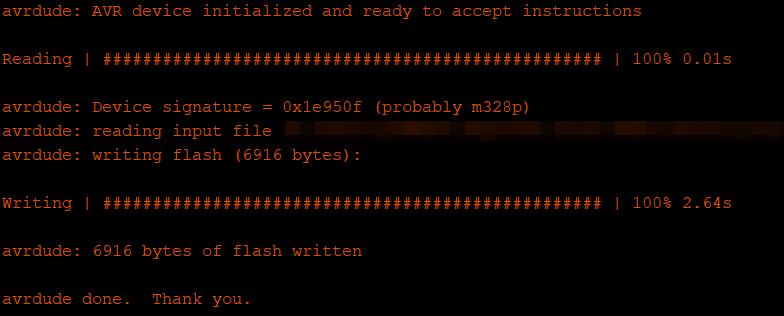
- Finally, click Upload, and the upload is as follows (Arduino 1.8.13)
Jetson Nano
Hardware connection
The 40PIN pin of Jetson Nano is compatible with the 40PIN pin of Raspberry Pi, and it provides a Jetson.GPIO library that is consistent with the API of RPI.GPIO library of Raspberry Pi, so the serial number connected here is the same as that of Raspberry Pi. When using the 40PIN interface, you can directly insert the module into the 40Pin header of the Jetson Nano.
If you choose to use an 8PIN cable to connect, please refer to the pin corresponding table below:
| e-Paper | Jetson Nano Developer Kit | |
| BCM2835 encoding | Board physical pin number | |
| VCC | 3.3V | 3.3V |
| GND | GND | GND |
| DIN | 10(SPI0_MOSI) | 19 |
| CLK | 11(SPI0_SCK) | 23 |
| CS | 8(SPI0_CS0) | 24 |
| DC | 25 | 22 |
| RST | 17 | 11 |
| BUSY | 24 | 18 |
Run C demo
- Download the demo (you can skip it if you have already downloaded it)
wget https://files.waveshare.com/wiki/3.52inch%20e-Paper%20HAT%20(B)/3in52_e-Paper_B.zip
unzip 3in52_e-Paper_B.zip -d 3in52_e-Paper_B
cd e-Paper/RaspberryPi_JetsonNano/
- Alternate decompression method
sudo apt-get install p7zip-full
7z x 3in52_e-Paper_B.zip -O./3in52_e-Paper_B
cd e-Paper/RaspberryPi_JetsonNano/
- Download the demo via GitHub (alternative method, skip if already downloaded)
Currently, accessing GitHub is not very smooth. It is recommended to use the above method to download from our official website.
git clone https://github.com/waveshare/e-Paper.git
cd e-Paper/E-paper_Separate_Program/3in52_e-Paper_B/RaspberryPi_JetsonNano/
- Compile the demo (Note: JETSON specifies the device as jetson nano, if not specified, the default is Raspberry Pi; -j4 means using 4 threads for compilation, the number can be modified by yourself)
# It is now in 3in52_e-Paper_B/RaspberryPi_JetsonNano
cd c
sudo make clean
sudo make JETSON -j4
- Run the demo
sudo ./epd
Run python demo
- Install function library
sudo apt-get update
sudo apt-get install python3-numpy
sudo apt-get install python3-pip
sudo pip3 install Jetson.GPIO
- Download the demo (you can skip it if you have already downloaded it)
wget https://files.waveshare.com/wiki/3.52inch%20e-Paper%20HAT%20(B)/3in52_e-Paper_B.zip
unzip 3in52_e-Paper_B.zip -d 3in52_e-Paper_B
cd e-Paper/RaspberryPi_JetsonNano/
- Alternate decompression method
sudo apt-get install p7zip-full
7z x 3in52_e-Paper_B.zip -O./3in52_e-Paper_B
cd e-Paper/RaspberryPi_JetsonNano/
- Download the demo via GitHub (alternative method, skip if already downloaded)
Currently, accessing GitHub is not very smooth. It is recommended to use the above method to download from our official website.
git clone https://github.com/waveshare/e-Paper.git
cd e-Paper/E-paper_Separate_Program/3in52_e-Paper_B/RaspberryPi_JetsonNano/
- Run the demo
# Make sure it is in 3in52_e-Paper_B/RaspberryPi_JetsonNano/
cd python/examples/
python3 epd_3in52b_test.py
Sunrise X3 Pi
Hardware connection
When connecting to the Sunrise, you can directly plug the board into the Sunrise's 40PIN pin header, and be careful to align the pins.
If you choose to use an 8PIN cable to connect, please refer to the pin corresponding table below:
| e-Paper | Sunrise X3 Pi | |
| BCM encoding | Board physical pin number | |
| VCC | 3.3V | 3.3V |
| GND | GND | GND |
| DIN | MOSI | 19 |
| CLK | SCLK | 23 |
| CS | CE0 | 24 |
| DC | 25 | 22 |
| RST | 17 | 11 |
| BUSY | 24 | 18 |
Enable SPI
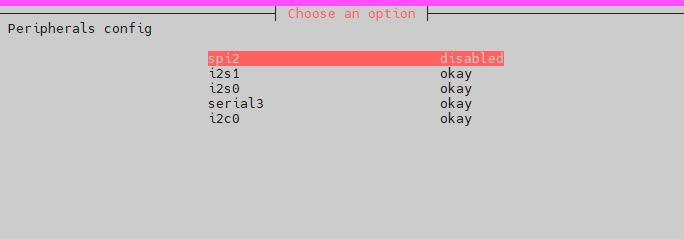
- SPI is turned on by default. If it is turned off accidentally, please follow the following methods to turn it on.
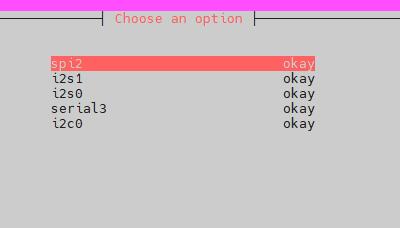
- Enter command: sudo srpi-config
Run python demo
- The corresponding library has been installed in the function. If you accidentally uninstall it, please use the following command to install it.
sudo apt-get update
sudo apt-get install python-pip
sudo apt-get install python-pil
sudo apt-get install python-numpy
sudo pip install Hobot.GPIO
sudo pip install spidev
- Download the demo (you can skip it if you have already downloaded it)
wget https://files.waveshare.com/wiki/3.52inch%20e-Paper%20HAT%20(B)/3in52_e-Paper_B.zip
unzip 3in52_e-Paper_B.zip -d 3in52_e-Paper_B
cd e-Paper/RaspberryPi_JetsonNano/
- Alternate decompression method
sudo apt-get install p7zip-full
7z x 3in52_e-Paper_B.zip -O./3in52_e-Paper_B
cd e-Paper/RaspberryPi_JetsonNano/
- Download the demo via GitHub (alternative method, skip if already downloaded)
Currently, accessing GitHub is not very smooth. It is recommended to use the above method to download from our official website.
git clone https://github.com/waveshare/e-Paper.git
cd e-Paper/E-paper_Separate_Program/3in52_e-Paper_B/RaspberryPi_JetsonNano/
- Run the demo
# Make sure it is in e-Paper/RaspberryPi_JetsonNano/
cd python/examples/
python3 epd_3in52b_test.py
STM32
Hardware connection
Use an 8PIN cable to connect, please refer to the pin corresponding table below:
| e-Paper | STM32 |
| VCC | 3.3V |
| GND | GND |
| DIN | PA7 |
| CLK | PA5 |
| CS | PA4 |
| DC | PA2 |
| RST | PA1 |
| BUSY | PA3 |
Run the demo
- Click to download the demo, then unzip it and enter the 3in52_e-Paper_B directory to see the following content
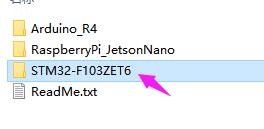
- Use Keil to open epd-demo.uvprojx in the 3in52_e-Paper_B\STM32-F103ZET6\MDK-ARM directory
- Open Keil's compilation toolbar (which is generally open) < br/>

- Click Compile

- Make sure the appropriate programmer is connected, then click LOAD to download the demo to the microcontroller
ESP32/8266
ESP32
For more details, please click on the url below to view
https://www.waveshare.com/wiki/E-Paper_ESP32_Driver_Board
ESP8266
For more details, please click on the url below to view
https://www.waveshare.com/wiki/E-Paper_ESP8266_Driver_Board
Resources
Documents
Demos
FAQ
Software Issues
Question: The following occurs when Raspberry Pi runs a python demo

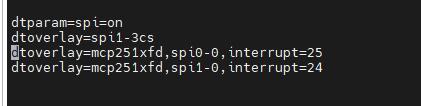
- Enter command: ls /dev/spi*
- The result may appear as shown in the figure
-

- This is because the SPI interface is occupied in the /boot/config.txt file
-
- The solution is as follows:
- Remove the occupation of spi0-0 in the /boot/config.txt file
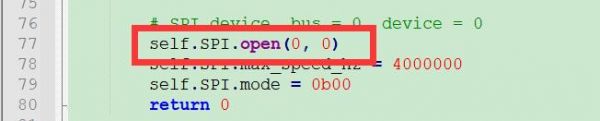
- Modify the position of the image in the /e-Paper/RaspberryPi_JetsonNano/lib/waveshare_epd/epdconfig.py file to 0,1
Question: STM32 drives the e-Paper, but the MDK compilation display space is not enough?
- Our example demo uses STM32f103ZET6, if the customer modifies to other model in the MDK, such as STM32F103RBT6, the RAM space becomes smaller, and you need to modify the stack size and heap size in the startup file on the original basis.
Question: Questions about data sheet. When does the font transmit Data Start Transmission 1, and when does it use Data Start Transmission 2?
- When transmitting B/W data, use Data Start Transmission 1; When transmitting RED data, use Data Start Transmission 2.
Question: Why can't I display Chinese on the e-Paper?
- The Chinese font library of our example demo uses GB2312 encoding. Please change your xxx_test.c file to GB2312 encoding format, compile and download it, and it will display normally.
Question: Why does e-Paper display a black border?
- The border display color can be set through the Border Waveform Control register or the VCOM AND DATA INTERVAL SETTING register.
Question: Multiple locations are partially refreshed, how many times does the font appear lighter after being refreshed?
- In this case, the customer needs to reduce the number of refreshing positions and perform a screen clearing after refreshing 5 times.
Question: When the e-Paper is in deep sleep mode, there may be an issue that the screen refresh will not be clean when waking up for the first time. How can I solve this problem?
- The process of waking up the e-Paper is actually a process of re-powering on, so when the EPD wakes up, it needs to perform a screen clearing action first to minimize residual images.
Question: When testing the demo, the demo keeps getting stuck at e-Paper busy?
- May be caused by SPI driver failure:
- 1. First check if the wiring is correct.
- 2. Check if SPI is enabled and if the parameters are configured correctly. (Baud rate, mode and other parameters)
Question: Why can't the image be displayed after partial refresh and then full refresh?
- When switching from partial refresh to full refresh on the e-Paper, a full refresh initialization function needs to be added.
Question: Why does the printing information work normally but the e-Paper does not respond when running the python demo?
- It may be that a C language demo based on the BCM2835 library has been run before. At this time, you need to restart the Raspberry Pi and then run the python demo.
Question: Error ImportError: No module named Image when running python demo?
- Use the command "sudo apt-get install python-imaging" to install the imaging function library.
Hardware Issues
Question: Can the Arduino 5V drive the e-Paper?
- Yes, there is now a level translation chip onboard that supports 5V drive.
Question: What should we pay attention to when designing a driver board?
- The rated input voltage of the e-Paper is 2.3~3.6V. If it is a 5V system, level conversion is required. In addition, the voltage should not be lower than 2.5V to avoid affecting the display effect of the e-Paper.
- For device selection, you can use the model in the schematic diagram we provide or select according to the data sheet.
Question: Can I use analog SPI?
- Yes, please note that the timing needs to be correct.
Question: Why is the BUSY pin always busy?
- Confirm if SPI communication is normal.
- Confirm if the BUSY pin is properly initialized to input mode.
- It may be that there is no normal reset. Try to shorten the duration of the low level during the reset. (Due to the addition of a power-off switch in the driver circuit, resetting the low level for too long can cause the driver board to lose power and result in reset failure.)
- If the busy function has a send 0x71 command, you can try to comment it out.
Question: What are the specifications of the e-Paper cable interface?
- 1.64 inch, 2.36 inch, 3 inch, 0.5mm pitch, 26pin
- 1.02inch, 0.5mm pitch, 30pin
- 4.37inch, 7.3inch, 0.5mm pitch, 50pin
- The rest (non-parallel port) are 0.5mm pitch, 24pin
Question: What type of connector does the e-Paper use?
- Cable socket 0.5-XXpin rear flip 2.0H (FPC connector).
Screen Issues
Question: What is the usage environment of the e-Paper?
- [Working conditions] Temperature range: 0~40°C (the seven-color screen is: 15~35°C); humidity range: 35%~65%RH.
- [Storage conditions]: Temperature range: below 30°C; Humidity range: below 55%RH; Maximum storage time: 6 months.
- [Transportation conditions]: temperature range: -25~50°C; Maximum shipping time: 10 days.
- [After unpacking]: Temperature range: 20°C±5°C; Humidity range: 50±5%RH; Maximum storage time: Complete assembly within 72 hours.
Question: Precautions for refreshing the e-Paper
- Refresh mode:
- Full refresh: The e-Paper will flash multiple times during the refresh process (the number of flashes depends on the refresh time). The flashing is to remove residual images to achieve the best display effect.
- Partial refresh: The e-Paper screen has no flickering effect during the refresh process. Users who use the partial refresh function should pay attention to performing a "full refresh" operation to clear the residual images after refreshing several times. Otherwise, the residual image problem will become more and more serious and even damage the screen. (Currently, only some black and white e-Paper screens support partial refresh, please refer to the product page description for details.)
- Refresh frequency:
- During use, it is recommended that customers set the refresh interval of the e-Paper screen to at least 180 seconds. (Except for products that support partial refresh function)
- During the standby process (that is, after the refresh operation), it is recommended that customers set the e-Paper screen to sleep mode or power off (the power supply of the e-Paper can be disconnected with an analog switch) to reduce power consumption and extend the life of the e-Paper screen. (If some e-ink screens are powered on for a long time, the screen may be damaged and cannot be repaired.)
- During the use of multi-color e-Paper screen, it is recommended that customers update the display screen at least once every 24 hours. (If the screen remains the same image for a long time, it may burn out and be difficult to repair.)
- Usage Scenarios:
- The e-Paper screen is recommended for indoor use, not for outdoor use.
- If the usage scenario is outdoors, we cannot guarantee its display effect. If the screen is damaged due to outdoor use, we do not provide warranty service.
- The following are some protections for outdoor use. We do not guarantee that the e-Paper can be used normally after taking these protections.
- Avoid direct sunlight on the e-Paper screen, and at the same time take ultraviolet protection measures, because charged particles will dry out under strong light for a long time, resulting in inactivation and cannot be refreshed, which is irreversible.
- Use 3M tape to completely cover the white plastic part on the e-Paper connection cable. Complete coverage or no tape will have different reactions under ultraviolet light.
- Place the e-Paper in a relatively cool area, such as under the shade of trees or under the shadow of eaves.
- When designing e-Paper products, customers should determine whether the use environment meets the requirements of e-Paper screens.
Question: What is the number of refresh times/lifespan of the e-Paper screen?
- Ideally, with normal use, it can be refreshed 1,000,000 times (1 million times).
Question: Why does the screen refresh (full refresh) has a serious residual image problem that cannot be fixed after a period of use?
- When the development board is powered on for a long time, after each refresh operation, it is recommended to set the screen to sleep mode or directly cut off the power, otherwise the screen may be burned when the e-Paper is in a high voltage state for a long time.
Question: Can the e-Paper screen be refreshed again after entering deep sleep mode?
- Yes, but you need to redo the e-paper initialization operation with the software.
Question: Why does it show image offset?
- The SPI rate may be too high, causing data loss, try to reduce the SPI rate.
- Insufficient power supply or unstable power supply causes data loss.
- The data cable is too long and causes data loss, and the extension cable should not exceed 20cm.
Question: What is a waveform file of an e-Paper screen and what does it do?
- The gray scale of electrophoresis e-paper is determined by the spatial position of the particles in the microcapsule or microcup, and the electrophoresis phenomenon occurs between black particles and white particles under the action of voltage, and the voltage timing that prompts the electrophoretic movement of the particles is the driving waveform of the e-paper. The driving waveform is the core part of the e-paper display, and the optimization of the driving waveform will directly affect the display effect of the display. The drive waveform file is a parameter formed to describe the voltage timing that causes the electrophoretic motion of the particles, and needs to be called periodically when the e-paper is refreshed.
- Different batches of e-paper diaphragms and electrophoretic matrices will have different voltage values when driving the display due to reasons such as materials and manufacturing processes. The relationship between grayscale, voltage, and temperature is reflected in the waveform of the e-Paper screen. Generally speaking, after each batch of electrophoresis matrices is generated, there will be a corresponding waveform file in the form of a .wbf file. The membrane manufacturer will provide the waveform file and electrophoresis matrix to the manufacturer of the e-paper screen, and then the the manufacturer of the e-paper screen integrates the protective board, substrate and driver and provides them to customers later; if the waveform file does not correspond to the screen, it is likely to cause the display to fail or the display effect to be unsatisfactory. Generally, the waveform file has been OTP built into the driver IC of the e-paper screen when it leaves the factory, and some of the demos we provide also call external waveform files to drive the e-paper screen.
Question: What do LUT and OTP stand for?
- LUT is the abbreviation of LOOK UP TABLE, and OTP is the abbreviation of ONE TIME PROGRAM. The original meaning of LUT is to load waveform files, and waveform files are divided into two types: OTP and REGISTER. OTP is the built-in waveform storage method, and REGISTER is the external waveform storage method.
Question: What is the partial refresh process of e-paper?
- There are two main types of e-paper screens:
- One is to refresh the background image first.
- The other is to alternately refresh old data and new data.
Question: How to perform partial refresh at different locations at the same time?
- Simultaneous partial refresh at different locations requires programming, that is, first refresh the data at different locations into the e-paper IC, and finally complete Updata/TurnOnDisplay in a unified manner.
Question: Does the three-color e-Paper have a reddish/yellowish color difference?
- Yes, there will be some color difference when e-Paper is produced in batches, which is normal. Storing the e-Paper face up can reduce the reddish/yellow cast to a certain extent.
Question: Is there a surface coating when the bare screen product is shipped?
- With coating.
Question: Does e-Paper have a built-in temperature sensor?
- All current screens have built-in temperature sensors, or an external LM75 temperature sensor can be used using the IIC pins.
Support
Monday-Friday (9:30-6:30) Saturday (9:30-5:30)
Email: services01@spotpear.com
[Tutorial Navigation]
- Parameters
- Communication Method
- Working Principle
- Programming Principle
- Precautions
- Raspberry Pi
- Arduino
- Jetson Nano
- Sunrise X3 Pi
- STM32
- ESP32/8266
- Resources
- FAQ
- Software Issues
- Question: The following occurs when Raspberry Pi runs a python demo
- Question: STM32 drives the e-Paper, but the MDK compilation display space is not enough?
- Question: Questions about data sheet. When does the font transmit Data Start Transmission 1, and when does it use Data Start Transmission 2?
- Question: Why can't I display Chinese on the e-Paper?
- Question: Why does e-Paper display a black border?
- Question: Multiple locations are partially refreshed, how many times does the font appear lighter after being refreshed?
- Question: When the e-Paper is in deep sleep mode, there may be an issue that the screen refresh will not be clean when waking up for the first time. How can I solve this problem?
- Question: When testing the demo, the demo keeps getting stuck at e-Paper busy?
- Question: Why can't the image be displayed after partial refresh and then full refresh?
- Question: Why does the printing information work normally but the e-Paper does not respond when running the python demo?
- Question: Error ImportError: No module named Image when running python demo?
- Hardware Issues
- Question: Can the Arduino 5V drive the e-Paper?
- Question: What should we pay attention to when designing a driver board?
- Question: Can I use analog SPI?
- Question: Why is the BUSY pin always busy?
- Question: What are the specifications of the e-Paper cable interface?
- Question: What type of connector does the e-Paper use?
- Screen Issues
- Question: What is the usage environment of the e-Paper?
- Question: Precautions for refreshing the e-Paper
- Question: What is the number of refresh times/lifespan of the e-Paper screen?
- Question: Why does the screen refresh (full refresh) has a serious residual image problem that cannot be fixed after a period of use?
- Question: Can the e-Paper screen be refreshed again after entering deep sleep mode?
- Question: Why does it show image offset?
- Question: What is a waveform file of an e-Paper screen and what does it do?
- Question: What do LUT and OTP stand for?
- Question: What is the partial refresh process of e-paper?
- Question: How to perform partial refresh at different locations at the same time?
- Question: Does the three-color e-Paper have a reddish/yellowish color difference?
- Question: Is there a surface coating when the bare screen product is shipped?
- Question: Does e-Paper have a built-in temperature sensor?
- Support