- sales/support
Google Chat:---
- sales
+86-0755-88291180
- sales01
sales@spotpear.com
- sales02
dragon_manager@163.com
- support
tech-support@spotpear.com
- CEO-Complaints
zhoujie@spotpear.com
- sales/support
WhatsApp:13246739196
Raspberry Pi GPM280 User Guide
Features
- 2.8inch IPS Screen, 640×480 pixel, 70% NTSC color gamut
- 60fps smooth gaming experience
- Fully laminated toughened glass panel, anti-fingerprint technique
- Compatible with CM3/CM3+
- Indicators for batteries
- Game ROMs Are Updatable Via WiFi
Basic introduction
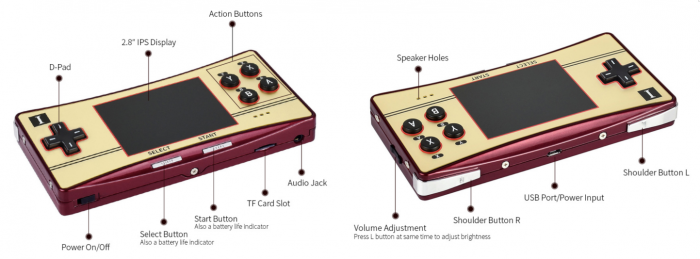
【Note】The battery life indicators indicate the battery power of the GPM2803P1 through the three colors of green, blue, and red from high to low.
Pre-configured Image
1)Download the zip file to the PC, and unzip it to get the .img file.
| OS | Revision | Raspberry Pi | User name/Password | Link |
|---|---|---|---|---|
| Retropie | v4.7 | CM4 series | user: pi \ password: raspberry |
2) Connect the TF card to the PC, use SDFormatter.exe software to format the TF card.
3) Open the Win32DiskImager software, select the system image downloaded in step 1, and click ‘Write’ to write the system image.
4) After the image has finished writing, insert the TF card into GPM280, turn on the switch, and then the system will start normally.
【Note】If the battery power is too low (the indicators flash red light or the indicator lights are off), the system will not be able to start. In this case, you need to charge the GPM280 by connecting a 5V 3A power adapter to the Micro USB interface. The indicator lights will flash when charging, and the GPM280 supports charging while playing games.
Configure image manually (Retropie)
1. Download the newest Retropie image(the GPM280 can support Retropie 4.7.1 now) from the official website, and unzip it to get the .img file.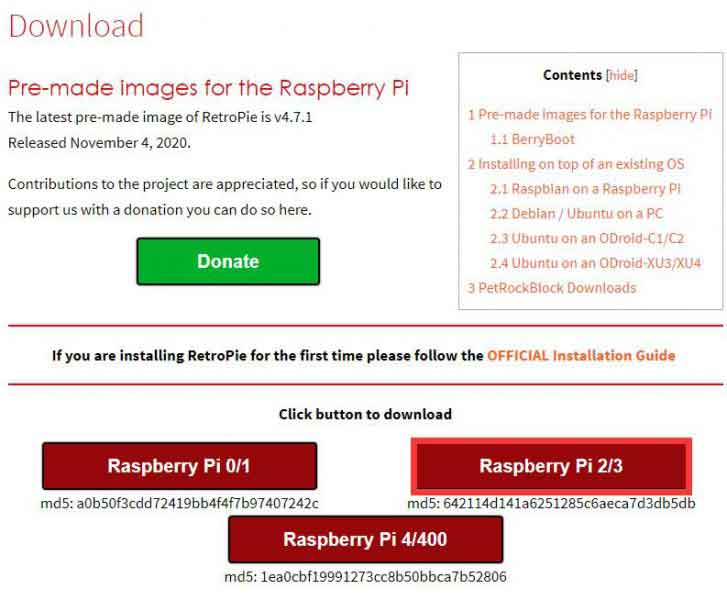
2. Connect the TF card to the PC, use SDFormatter.exe software to format the TF card.
3. Open the Win32DiskImager software, select the system image downloaded in step 1, and click‘Write’ to write the system image.
4. After the image has finished writing, open the config.txt file in the boot directory of the TF card, add the following code at the end of config.txt, then save and quit the TF card safely.
dtoverlay=dwc2,dr_mode=host
overscan_scale=1
dtparam=spi=off
dtparam=i2c_arm=off
gpio=0-9=a2
gpio=12-17=a2
gpio=20-25=a2
enable_dpi_lcd=1
display_default_lcd=1
dpi_group=2
dpi_mode=87
dpi_output_format=0x7F016
hdmi_timings=480 0 26 16 10 640 0 25 10 15 0 0 0 60 0 32000000 1
dtoverlay=waveshare-4dpib-3b-4b
disable_audio_dither=1
dtoverlay=audremap,pins_18_19
audio_pwm_mode=2
extra_transpose_buffer=2
boot_delay=0
hdmi_ignore_edid=0xa5000080
5. Download the GPM2804 DTBO and extract seven files. Copy the ssh and wpa_supplicat.conf files to the /boot directory of the TF card.
6. And then open wpa_supplicant.conf which you have copied on the /boot directory, modify the USERSSID and the USERPSK to the SSID and password of the WIFI you want to use.
7.Move the waveshare-4dpib-3b-4b.dtbo file to /boot/overlays/ directory.
8.Modify the cmdline.txt file, add the following line to the end of the file:
fbcon=rotate:3 video=DSI-1:480x640M@60,rotate=90
9. Save the file and quit the TF card safely.
10. Insert the TF card into the GPM280, turn on the power switch, and wait ten seconds to enter the system normally.
Advanced configuration
- Buttons Configuration
- After the system is started, you will enter the WELCOME interface
- Long press the “A” button (other keys are OK as well) to enter the buttons configuration page.
- Configure the cross button, START, SELECT, A, B, X, Y, L, R options by press the related buttons. You can long-press A to skip unused buttons. After configuring A\B\X\Y\START\SELECT\L\R, please note that the set the SELECT for the last HOTKEY ENABLE options by default, and then press A to confirm and finish the configuration.
- IP address
- Enter CONFIGURATION and then select SHOW IP, you will see the IP address on the GPM280.
- Adjust the orientation
- Access the Rrtropie by ssh with the IP address
- Run the following command to modify the autostart.sh file
sudo nano /opt/retropie/configs/all/autostart.sh
- Remove the first line of the file and add the following line to the file
emulationstation --screenrotate 3 --screensize 640 480

- Sound setting
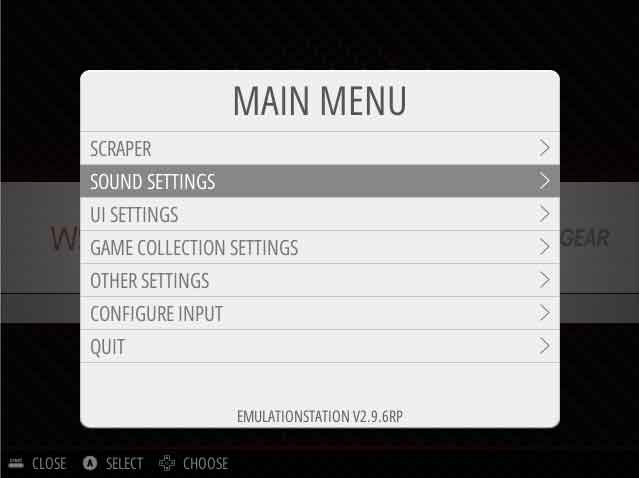
- Press the SELECT button to enter the MAIN MENU, choose SOUND SETTING
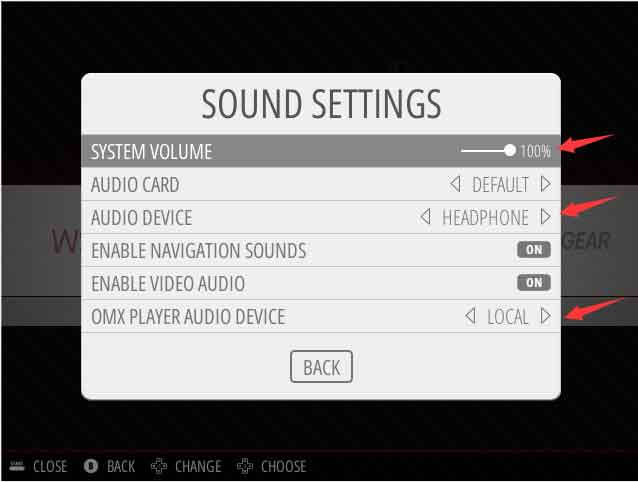
- Set the AUDIO DEVICE to HEADPHONE.
- Set the OMX PLAYER AUDIO DEVICE to LOCAL
- Save and return
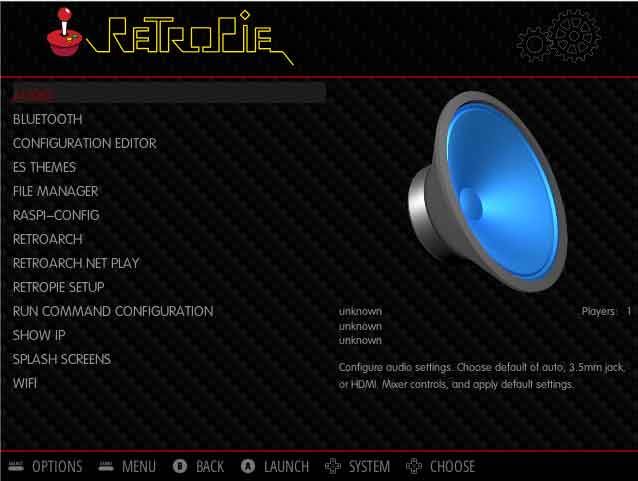
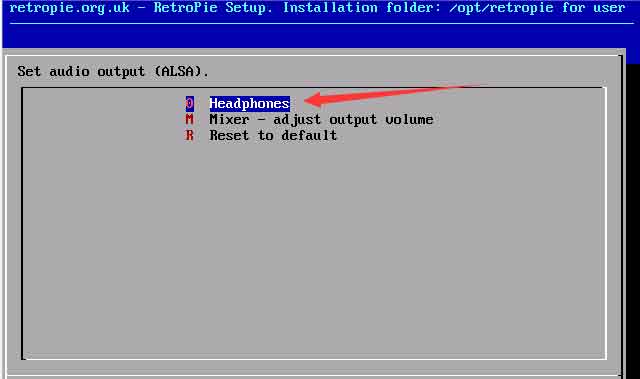
- Go to RETROPIE CONFIGURATION
- Set AUDIO to Headphones
- Save and return to the RETROPIE CONFIGURATION
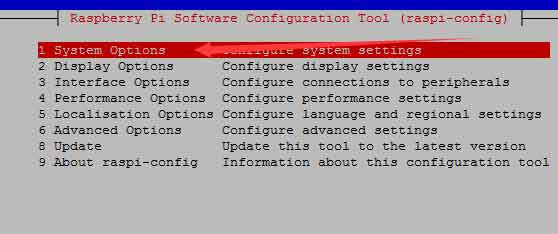
- Choose RASPI-CONFIG
- Use the cross button select 1 System Options and use the B button to select the option.
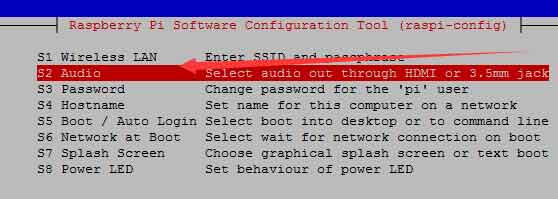
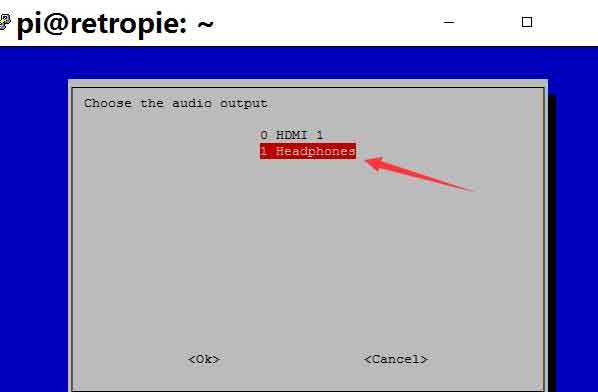
- Select S2 Audio and set it to 1 Headphones.
- Reboot the GPM2804
- Press the SELECT button to enter the MAIN MENU
- Choose SOUND SETTING and increase the VOLUME to 100%
- Reboot the GPM2804 again and then the sound is workable.
- Full screen setting
- Access the Retropie via SSH
- Modify retroarch.cfg file
sudo nano /opt/retropie/configs/all/retroarch.cfg
- Remove the following lines:
#video_fullscreen = "true"
#video_aspect_ratio_auto = "true"
- Add the following lines and save
video_fullscreen_x = 480
video_fullscreen_y = 640
video_force_aspect = true
video_scale_integer = true
aspect_ratio_index = "19"
video_allow_rotate = true
video_rotation = 1
screen_orientation = 1
- Reboot
- 'Expand filesystem
- Go into CONFIGURATION
- Choose RASPI-CONFIG -> 6 Advanced Options (B key can be used as OK button)
- Choose A1 Expand Filesystem and confirm
- Reboot
- Update ROMs
- Access Retropie by File Explorer in host PC with the IP address of GPM280

- Copy your ROMS to the corresponding directory
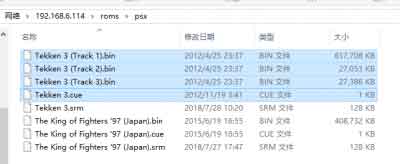
- Go into the emulation station selection interface, press the Start button and choose QUIT -> RESTART EMULATIONSTATION, and Press A to restart the emulation station.
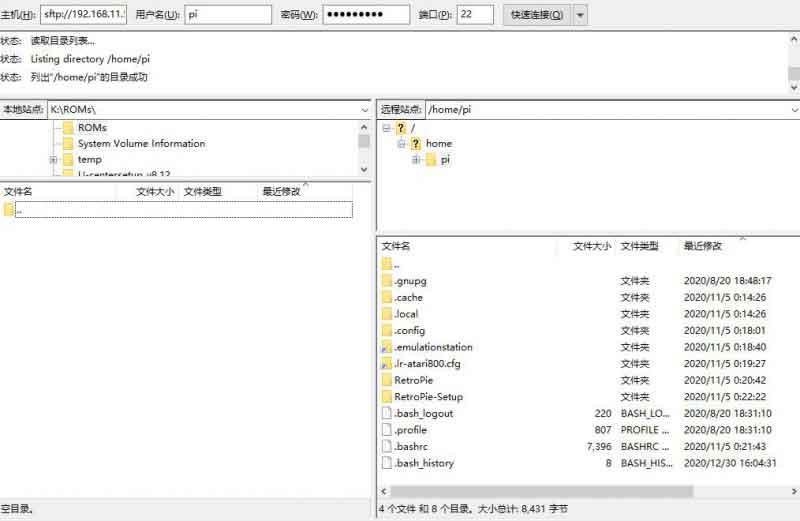
- Connect to GPM280 via sftp
- Open FileZilla or other similar software, enter the IP address obtained in the previous step.
- User name: pi Password: raspberry, port: 22, and then you can connect to GPM280, as shown in the picture below.
Safe Shutdown
- Press the START button on the menu interface and select QUIT-> SHUTDOWN SYSTEM.
For more details of the Retropie please refer to Official documentation
Others
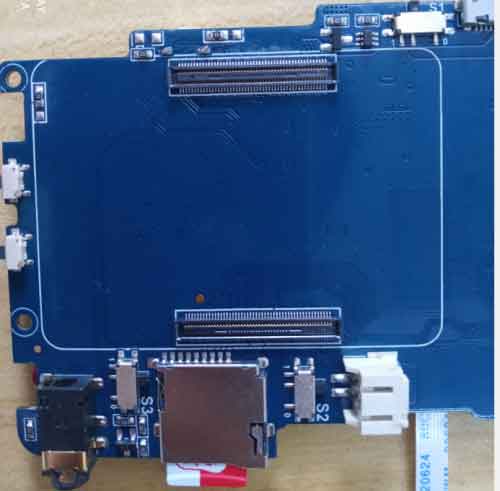
There are three switches on the PCB of GPM280 for configuration the GPM280:
- Mode 1: Set the S1, S2, and S3 to 1
- it is the default game mode. In this mode, the GPM280 will start while powering
- Mode 2: Set the S1, S2, and S3 to 0
- it is the eMMC writing mode. In this mode, You can connect the USB port of the GPM280 to Host PC, then write the eMMC of the CM4.
- Mode 3: Set the S1 and S3 to 0, set the S2 to 1
- It is the USB master mode. In this mode, you can connect USB devices to GPM280 like a keyboard of portable disk and so on.
- USB charge function is unavailable in this mode
- The console (buttons) are unavailable in this mode


