


- sales/support
Google Chat:---
- sales
+86-0755-88291180
- sales01
sales@spotpear.com
- sales02
dragon_manager@163.com
- support
tech-support@spotpear.com
- CEO-Complaints
zhoujie@spotpear.com
- Only Tech-Support
WhatsApp:13246739196
- Purchase/Shipping/Refund
WhatsApp:13424403025
- HOME
- >
- ARTICLES
- >
- Common Moudle
- >
- LCD
10.1inch HDMI LCD (E) User Guide
Working with PC
This product supports Windows 10/8.1/8/7 OS. For the Windows 10/8.1/8 OS, the touch screen supports multi-touch up to 10 points. For some Window 7 OS, the touch screen supports single touch only.
Hardware connection
Please make sure the connections are done in a right sequence, or else the LCD may not work well.
- Connect the Power Only Port of the LCD to a 5V 2.5A power adapter with a Type A to micro USB cable.
- Connect the Touch port of the LCD to one of the USB ports on your PC.
- Connect the HDMI port of the LCD to the HDMI port on your PC with an HDMI cable
- When multiple displays are detected by your PC, the LCD can only be used to control the cursor on main display. So it is proposed to set the LCD as the main display.
Generally, you will see the screen displays the interface as the figure shows below. In this interface, slightly click the screen can perform the left-key mouse action, and long press the screen can perform the right-key mouse action. (You can also control the Back light of the screen with the back light adjustment button; see the mark 1 shows in the following figure.)
Working with Raspberry Pi
For the Windows OS on PC, the resolution of the LCD is automatically identified. Hence, you do not need to make the relative settings. When working with Raspberry Pi, you should set the resolution of the LCD by yourself, or else the LCD screen will not work. For more detail information, please read the following section.
At the beginning, you should download the latest image file, RASPBIAN or UBUNTU MATE, from the website: http://www.raspberrypi.org/downloads/.
- Download the image file (zipped) into your PC, and extract it, then you will get a file with the expansion name .img
- Connect a TF card to your PC, and format your TF card with the software SD Formatter. Notices: The capability of TF card in used here should be more than 4GB. In this operation, a TF card reader is also required, which has to be purchased separately.
- Start the software Win32DiskImager, and select image file downloaded in the first step, then, click the button Write to program the system image file.
- When the programming finished, open the config.txt file under the root directory in the TF card, and add the following lines at the end of the file. Then, save the modification and pop-out the TF card.
max_usb_current=1
hdmi_group=2
hdmi_mode=87
hdmi_cvt 1280 800 60 6 0 0 0
hdmi_drive=1
If you use the LCD with Raspberry Pi 4B, you need to remove line dtoverlay=vc4-fkms-V3D from config.txt file
if the statements above do not work properly, replace them with the following lines:
max_usb_current=1
hdmi_group=2
hdmi_mode=27
If the LCD is used for Raspberry Pi and there are "ghost images" on the LCD, try to comment or delete this line in the config.txt to fix such cases:
hdmi_drive=2
Touch rotating
With the operation above. The screen could rotate in display. However, the touch works improperly. To rotate the touch as display, you could do as below:
1. install libinput
sudo apt-get install xserver-xorg-input-libinput
2. create an xorg.conf.d folder
sudo mkdir /etc/X11/xorg.conf.d
3. copy file 40-libinput-conf to the folder which we created
sudo cp /usr/share/X11/xorg.conf.d/40-libinput.conf /etc/X11/xorg.conf.d/
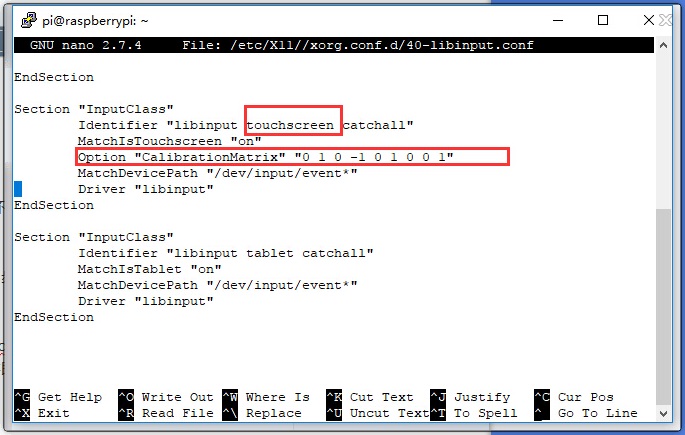
4. Append a statement to touchscreen part of the file as below:
sudo nano /etc/X11/xorg.conf.d/40-libinput.conf
sudo reboot
After completing these steps. The LCD could rotate 90 degree both display and touch.
Note:
90 degree: Option "CalibrationMatrix" "0 1 0 -1 0 1 0 0 1"
180 degree: Option "CalibrationMatrix" "-1 0 1 0 -1 1 0 0 1"
270 degree: Option "CalibrationMatrix" "0 -1 1 1 0 0 0 0 1"