


- sales/support
Google Chat:---
- sales
+86-0755-88291180
- sales01
sales@spotpear.com
- sales02
dragon_manager@163.com
- support
tech-support@spotpear.com
- CEO-Complaints
zhoujie@spotpear.com
- Only Tech-Support
WhatsApp:13246739196
- Purchase/Shipping/Refund
WhatsApp:13424403025
WAVEGO-Development Environment Configuration
Development Environment Setup
Introduction
- This chapter mainly introduces the development environment setup for WAVEGO on the Arduino IDE. By studying this chapter, you can begin your development journey for the WAVEGO slave ESP32.
Install Arduino IDE
- First, go to Arduino official website to download the installation package of the Arduino IDE.

- Once the download is complete, click Install.
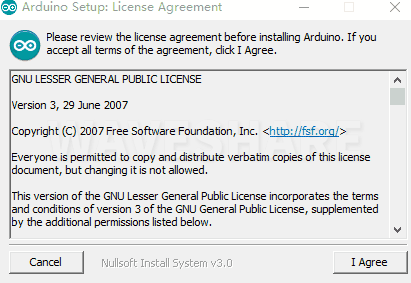
Notice: During the installation process, it will prompt you to install the driver, just click Install
Arduino IDE Interface
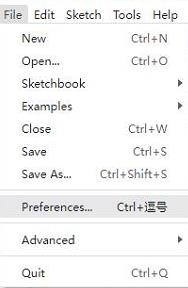
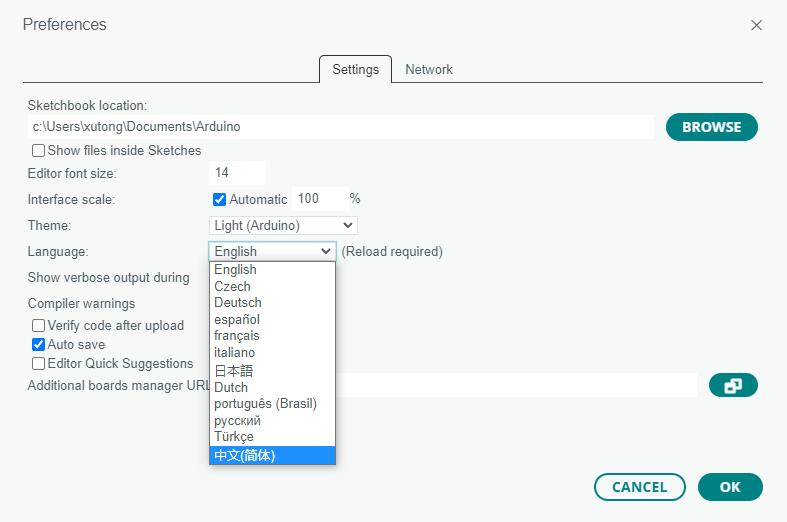
- After the first installation, when you open the Arduino IDE, it will be in English. You can switch to other languages in File --> Preferences, or continue using the English interface.
- In the Language field, select the language you want to switch to, and click OK.
Installing ESP32 Plugin in Arduino IDE
- Open the Arduino IDE, click on the file in the top left corner, and select Preferences

- Add the following link to the attached board manager URL, and then click OK
https://dl.espressif.com/dl/package_esp32_index.json

Note: If you already have an ESP32 board URL, you can use a comma to separate the URLs as follows:https://dl.espressif.com/dl/package_esp32_index.json,http://arduino.esp8266.com/stable/package_esp8266com_index.json
- Download packages package, and copy the extracted packages folder to the following path
C:\Users\xutong\AppData\Local\Arduino15

Note: Replace the username: xutong with your own username
Install Dependency Libraries
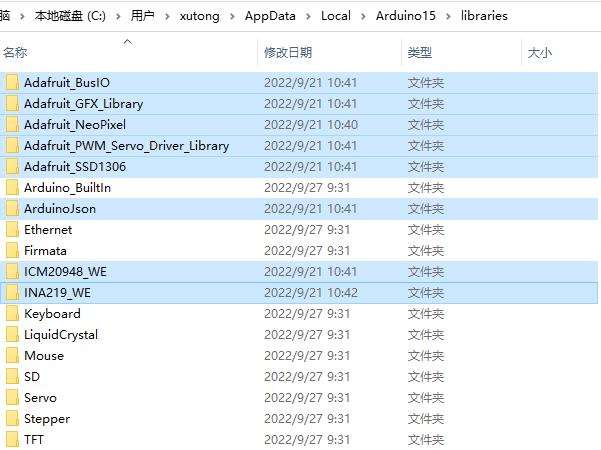
- Download and extract the Libraries dependency library. Open the default Arduino installation location C:\Users\xutong\AppData\Local\Arduino15\libraries (based on your actual location), and then copy these folders to Libraries
Upload Demo
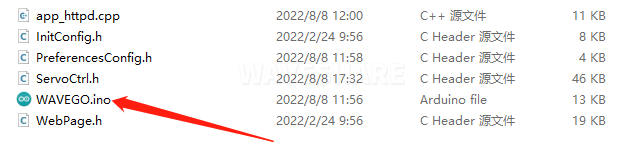
- Download WAVEGO open-source demo (Arduino), double-click Arduino\WAVEGO\WAVEGO.ino
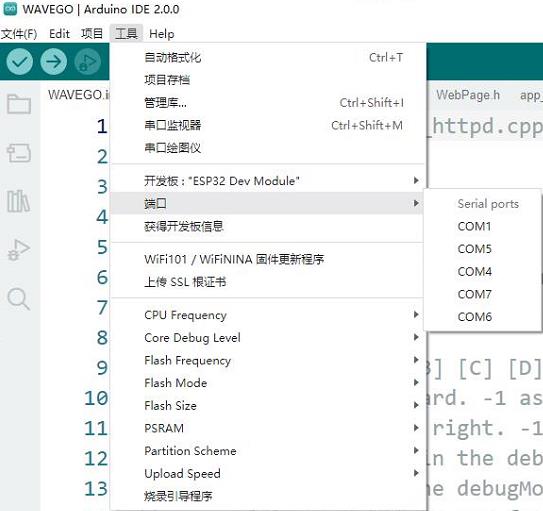
- Click Tools --> Port, remember the existing COM, do not click this COM (the COM displayed is different on different computers, remember the COM on your own computer)
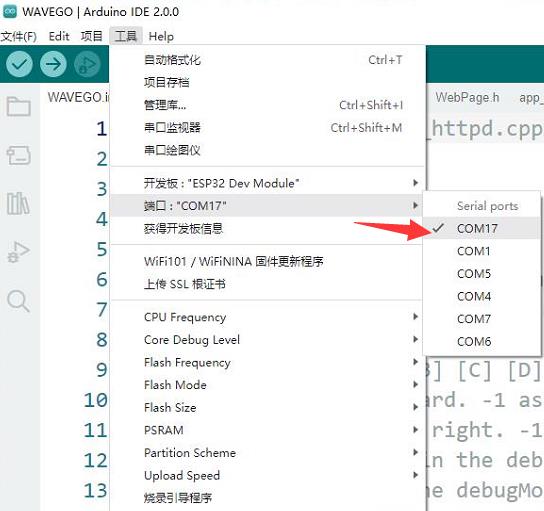
- Connect the driver board to the computer using a USB cable. Then, go to Tools > Port, and click the newly appeared COM
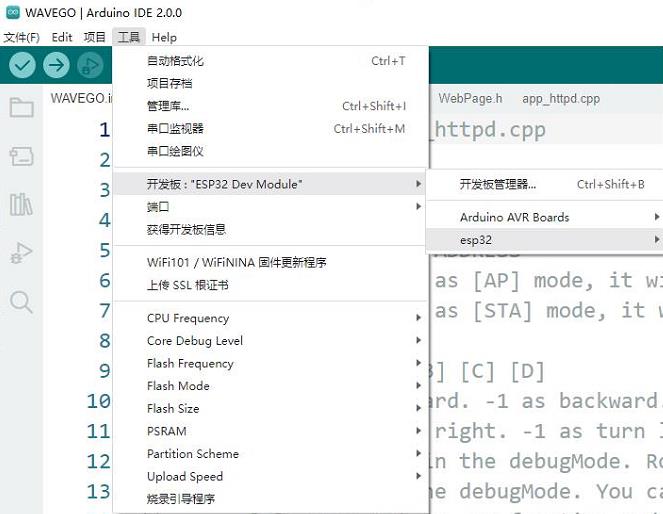
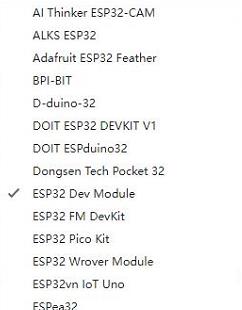
- Click Tools > Development Board > ESP32 Arduino > ESP32 Dev Module
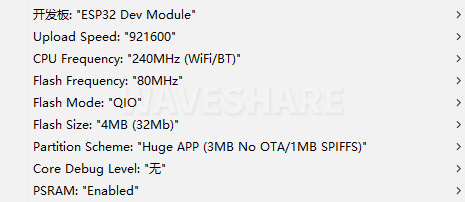
- Click Tools, and the other settings are as follows (it is best to set Partition Scheme as Huge APP, and PSRAM must be set to Enabled, otherwise the camera will flash black):
- Once all settings are configured, click "Upload" to upload the demo to the device

- If issues arise during this period, and if you need to reinstall or update the Arduino IDE version, it is necessary to uninstall the Arduino IDE completely. After uninstalling the software, you need to manually delete all contents within the C:\Users\[name]\AppData\Local\Arduino15 folder (you need to show hidden files to see this folder). Then, proceed with a fresh installation.
All Tutorials
- WAVEGO-Development Environment Configuration
- WAVEGO-GPIO Control
- WAVEGO-WAS2812 RGB_LED
- WAVEGO-PCA9685 Servo Control
Resources
Robot Diagram
Open Source Resources
Raspberry Pi Learning Resources
TAG:
Raspberry Pi 5 SSD
Raspberry Pi Pico 2 RP2350B 2.41 inch AMOLED Development Board QSPI Display TouchScreen 450x600 RM690BO FT6336 QMI8658
ESP32 S3 Development Board 1.5 inch Round Rotary OLED TouchScreen Smart Knob Display 1.5inch Display 466x466 LVGL for Arduino
SIM8260G M2 3G/4G/5G/GNSS/GPS Sub-6G PCIe M.2 Moudle For LTE-A/NSA/SA For DFOTA /VoLTE For SIMCOM
Python UART Communication
Gyroscope Sensor
Raspberry Pi AI HAT+ Official Original Hailo-8/8L 13/26Tops For Pi5 PCIe M.2 Gen3
ESP32 S3 LCD 1.3 inch Holographic Display Screen 1.3inch 3D Transparent Refractive Prism Mini TV For Arduino
Raspberry Pi 5
14 inch Dual LCD Computer PC Monitor Display Double Secondary Screen Type C Mini HDMI 1080P For Windows/MacOS
Raspberry Pi CM5 IO BASE B Mini Board a Base Development Platform Compute Module 5 IO Board with EEPROM And Encryption chip
Zero LCD HAT (A) user guide
Raspberry Pi Camera V1
spotpear
15.6 inch Dual LCD Computer PC Monitor Display Double Secondary Screen Type C Mini HDMI 1080P For Windows/MacOS
Sipeed-Lichee-Tang-Nano-FPGA-Series-IDE-Install
ESP32 P4 Development Board 7inch Display 7 inch TouchScreen Onboard ESP32-C6/Camera-Port/Speaker-Port
CAN FD Analyzer
ADXL354CZ EVAL BOARD
Raspberry Pi Pico Buzzer
TAG:
5V/3A Regulated Output
Raspberry Pi 5 PoE HAT G Power over Ethernet 802.3af at
Raspberry Pi Touch Display 2 5-inch 720x1280 LCD 5inch DSI/MIPI Screen
RS232 to RS485
Raspberry Pi 5 DSI
M12 High Resolution Lens 12MP 113 2.7mm Raspberry Pi High Quality Camera M12
8.8inch LCD 1920x480 Computer PC Monitor Display Secondary Screen TypeC USB CPU RAM
ESP32 S3 display
ESP32-S3 Smart 86 Box Development Board with 4 inch 480x480 Display Touch Screen For AI and DeepSeek
MPTPU Raspberry Pi 5 TPU AI Kit PCIe Google Coral Edge
2.42inch OLED Display
Arduino Thermal imaging
Jetson Nano 5G module
Smart Car
Jetson Camera
Sipeed NanoCluster Mini Cluster Board mini data center For Raspberry Pi CM45 / Computer /LM3H /M4N
Pi5-Active-Cooler-C
Raspberry Pi UPS
Raspber Pi 5 Original Power
Raspberry Pi-Zero-2W