- sales/support
Google Chat:---
- sales
+86-0755-88291180
- sales01
sales@spotpear.com
- sales02
dragon_manager@163.com
- support
tech-support@spotpear.com
- CEO-Complaints
zhoujie@spotpear.com
- Only Tech-Support
WhatsApp:13246739196
- Purchase/Shipping/Refund
WhatsApp:13424403025
6.25inch-720x1560-LCD User Guide
Overview
Introduction
The 6.25-inch 720x1560 LCD is a high-resolution universal capacitive touch screen compatible with most standard HDMI devices.
Featuring a small, thin body, toughened glass panel, excellent display performance and smooth multi-touch effect.
Feature
- 6.25inch IPS screen with 720x1560 hardware resolution.
- 5-point capacitive touch with up to 6H hardness toughened glass panel.
- Supports Raspberry Pi OS / Ubuntu / Kali and Retropie when used with Raspberry Pi.
- Supports Windows 11 / 10 / 8.1 / 8 / 7 when used as a computer monitor.
- Supports HDMI audio output, onboard 4PIN speaker jack.
Specification
| Item | Description | Unit |
|---|---|---|
| Model | 6.25inch 720x1560 LCD | / |
| Dimensions | 6.25 | Inch |
| Viewing angle | 178 | Deg |
| Resolution | 720x1560 | Pixels |
| Touch screen dimensions | 74.70(H)×159.18(V) | mm |
| Display area | 66.60(H)×144.18(V) | mm |
| Pixel pitch | 0.0918(H) x 0.0921(V) | mm |
| Color gamut | 70% | NTSC |
| Brightness (Max) | 450 | cd/m² |
| Contrast | 800:1 | / |
| Backlight | Software dimming | / |
| Refresh rate | 60 | Hz |
| Display interface | Standard HDMI port | / |
| Power port | 5V Type-C interface | / |
| Power consumption | 2 | Watt |
Electrical Parameters
| Parameter | Min. | Standard | Max. | Unit | Note |
| Input Voltage | 4.75 | 5.00 | 5.25 | V | Note 1 |
| Input Current | 360 | 400 | TBD | mA | Note 2 |
| Operating Temperature | 0 | 25 | 50 | ℃ | Note 3 |
| Storage Temperature | -20 | 25 | 60 | ℃ | Note 3 |
•Note 1: Input voltage exceeding the maximum value or improper operation may cause permanent damage to the device.
•Note 2: The input current should be ≥400mA, otherwise, it will lead to start-up failure or abnormal display, and a long time in an abnormal state may cause permanent damage to the device.
•Note 3: Please do not put the display in a high-temperature and high-humidity storage environment for a long time, the display needs to work within the limit value, otherwise it will be possible to damage the display.
Onboard Interface
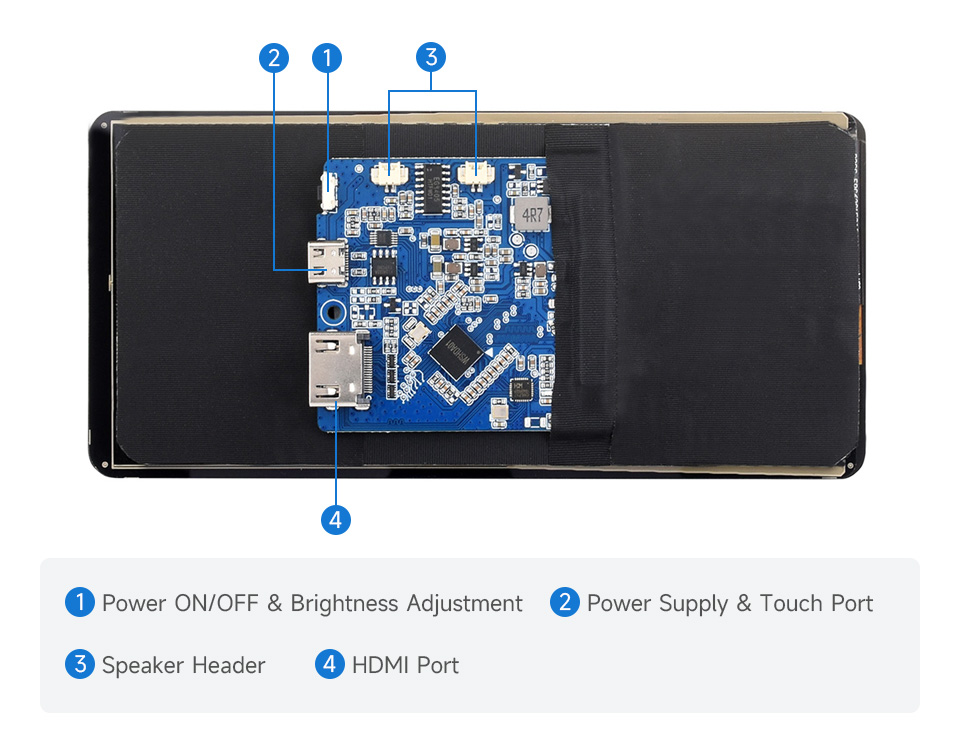
User Manual
Working with Raspberry Pi
Hardware Connection
1. Connect the Touch port to the USB interface of the Raspberry Pi.
2. Connect the HDMI port to the HDMI port of the Raspberry Pi .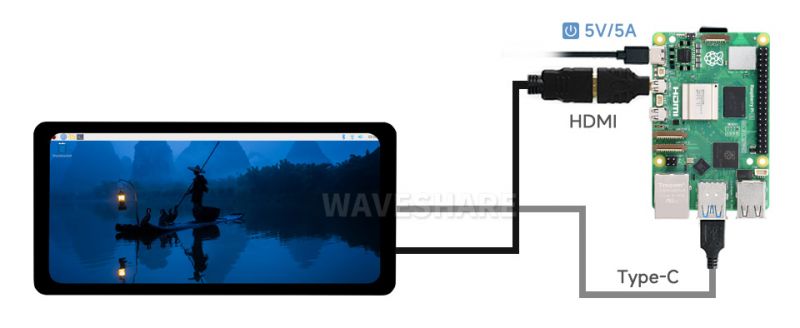
Software Setting
For Raspberry Pi OS/Ubuntu/Kali and Retropie system:
- 1. Insert the TF card into the PC, download and use Raspberry Pi Imager to program the corresponding image.
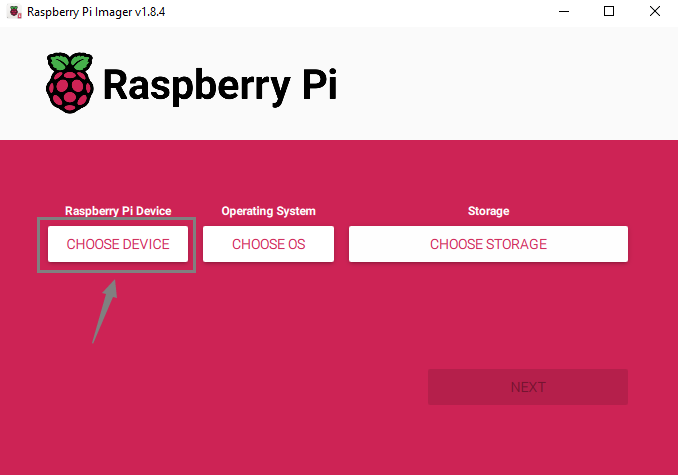
- 2. After programming the image, open the "config.txt" file located in the root directory of the TF card. Add the following code at the end of config.txt, save the file, and safely eject the TF card.
Note: As Pi 5/CM4/CM3+/CM3 has two MIPI DSI interfaces, please ensure to use the correct DSI interface and command. DSI1 is recommended by default.
hdmi_group=2
hdmi_mode=87
hdmi_force_hotplug=1
max_framebuffer_width=720
max_framebuffer_height=1560
hdmi_timings=720 0 22 10 78 1560 0 13 3 13 0 0 0 57 0 75000000 0- 3. Insert the TF card into the Raspberry Pi, power on the Raspberry Pi, and wait for a few seconds. After the system boots up, you should be able to enter the display interface and the LCD should touch normally.
Working with PC
Support Windows 11/10/8.1/8/7
- Connect the Touch port of the LCD to the USB interface of the PC, and Windows will automatically recognize the touch function.
- Connect the HDMI interface of the LCD to the HDMI interface of the PC, and Windows will automatically recognize the display function.
- Note:
- Some PCs do not support HDMI devices plug-and-play, usually after rebooting the system can be used normally.
- If the USB interface power supply is insufficient will lead to the LCD flashing, it is recommended to directly connect to the USB connector of the PC to make sure the stable power supply.
Windows Touch Calibration
Take Windows 10 as an example:
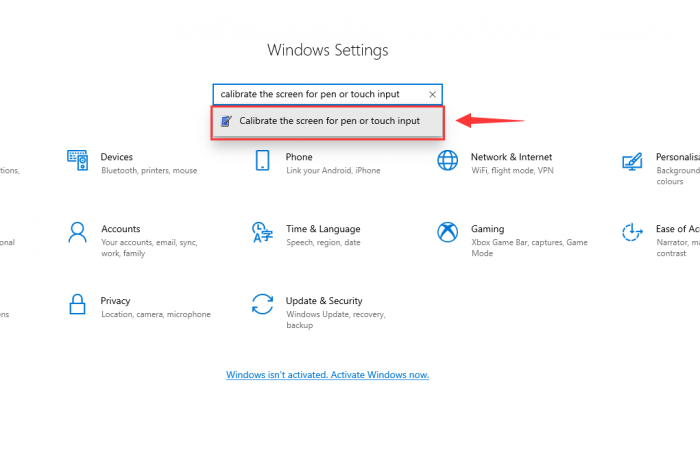
- 1. Enter the Windows Settings of the system, type in the search bar, and click "Calibrate the screen for pen or touch input" (as shown in the picture below):
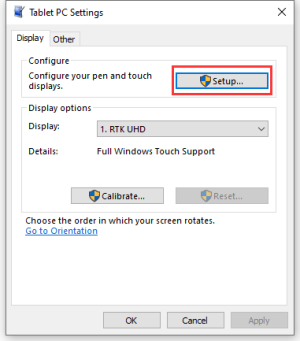
- 2. Click "Setup" in the pop-up "Tablet PC Settings" interface:
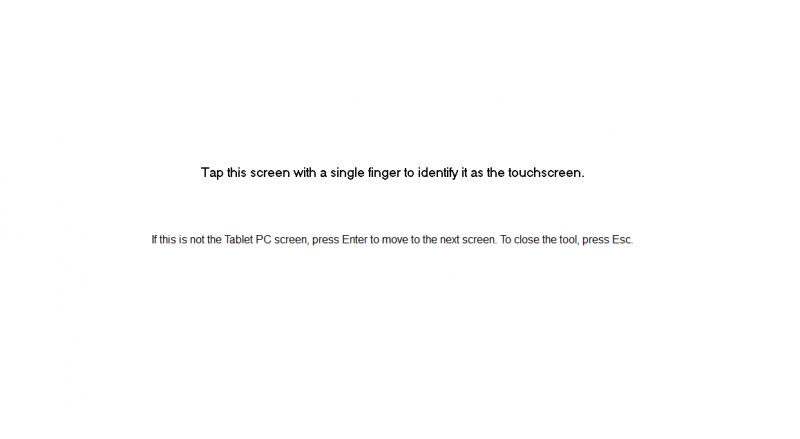
- 3. The following text prompt will appear on the screen. Please tap the touch screen with your finger, and the computer will recognize it as a touch screen.
FAQ
2PIN PH1.25 terminal, interface amplifier supports up to 2 x 3W, impedance 4R
Resource
3D Drwaing
Support
Monday-Friday (9:30-6:30) Saturday (9:30-5:30)
Email: services01@spotpear.com