- sales/support
Google Chat:---
- sales
+86-0755-88291180
- sales01
sales@spotpear.com
- sales02
dragon_manager@163.com
- support
tech-support@spotpear.com
- CEO-Complaints
zhoujie@spotpear.com
- sales/support
WhatsApp:13246739196
Raspberry Pi 2.8inch HDMI LCD (H) User Guide
Overview
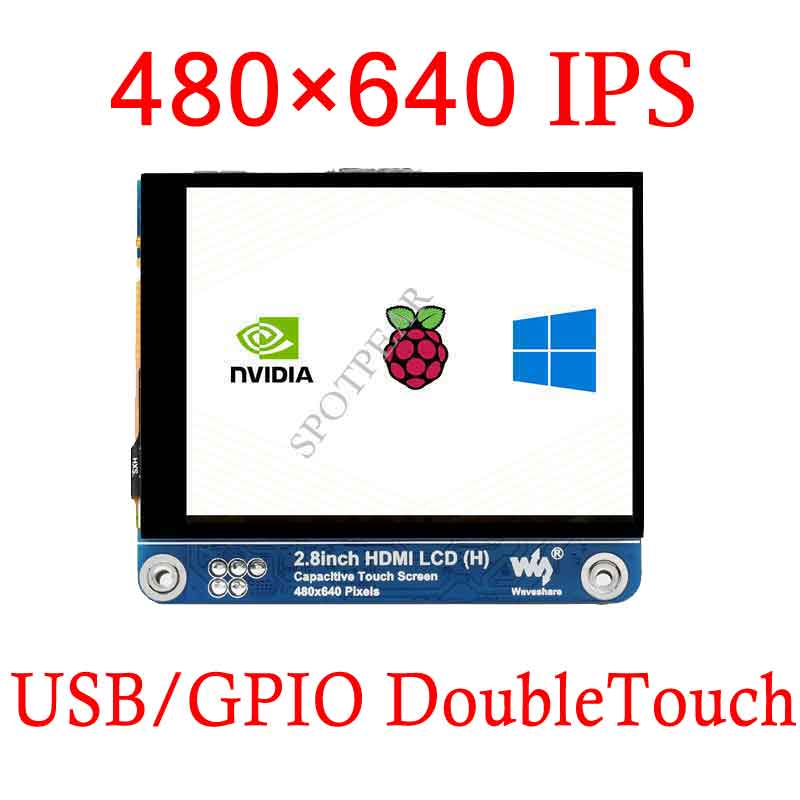
480×640, 2.8inch Capacitive Touch Screen LCD, HDMI interface, supports various systems. It supports Raspberry Pi and Jetson nano, also can be used as a computer monitor.
Features
- 2.8-inch IPS screen with a hardware resolution of 480×640.
- Onboard dual touch circuit, touch can be driven via USB(drive-free) touch interface or I2C interface of Raspberry Pi, 5-point touch, toughened glass capacitive touch panel, hardness up to 6H
- Use with Raspberry Pi, it supports Raspberry Pi OS / Ubuntu / Kali / Retropie and WIN10 IoT.
- Use with Jetson nano, support Ubuntu.
- Use as a computer monitor, it supports Windows 11 / 10 / 8.1 / 8 / 7.
- Support backlight control, more power saving.
Featured design
Working with Raspberry Pi
Supports Raspberry Pi OS / Ubuntu / Kali / Retropie / WIN 10 IoT.
Note: If you use the Raspberry Pi OS system and don’t know the two branches of Raspberry Pi OS, you can check the following introduction #Raspberry Pi OS branch introduction
When working with Raspberry Pi, you should set the resolution of the LCD by yourself, otherwise, the LCD screen will not work. For more detailed information, please read the following section.
Please download the latest version of the image on the Raspberry Pi official website.
1) Download the compressed file to the PC, and unzip it to get the .img file.
2) Connect the TF card to the PC, use SDFormatter software to format the TF card.
3) Open the Win32DiskImager software, select the system image downloaded in step 1, and click ‘Write’ to write the system image.
4) Add the following lines to the end of config.txt, then save and eject the TF card safely.
hdmi_force_hotplug=1
hdmi_group=2
hdmi_mode=87
hdmi_timings=480 0 100 16 100 640 0 100 20 100 0 0 0 60 0 42000000 6
dtparam=i2c_arm=on
dtoverlay=waveshare-28HDMI-3b
dtoverlay=waveshare-28HDMI-4b
start_x=1
gpu_mem=128
5) Download the 2.8inch DPI LCD DTBO file and extract 2 dtbo files. Copy these three files to the overlays directory (/boot/overlays/)
6) Save and quit the TF card safely, and insert the TF card into the Raspberry Pi.
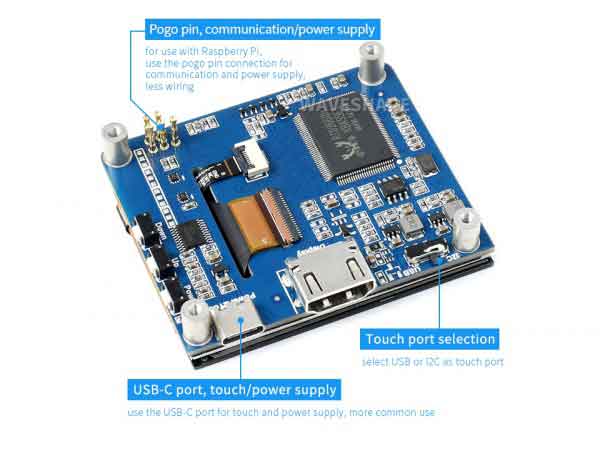
7) Switch the touch interface selection switch to "I2C".
8) Install the 2.8inch HDMI LCD (H) through the Pogo pins on the back of the LCD, and the Raspberry Pi GPIO interface will be connected to the power supply and touch pins of the LCD through Pogo pins.
9) Connect the HDMI interface of the LCD to the HDMI interface of the Raspberry Pi, power on the Raspberry Pi, and wait for more than ten seconds until the LCD displays normally.
【Note】This product is portrait mode by defaults, and the resolution (H×V) is 480×640. You can modify the display direction on the horizontal screen through software settings. For details, please refer to #Raspberry Pi Display Rotation.
Raspberry Pi OS branch introduction
Some users feedbacked that they are not clear about the specific differences between the two branches of Raspberry Pi OS, and which branch should be selected for development. Here is a brief introduction:
- On December 2, 2021, the Raspberry Pi OS was divided into two branches, the Buster branch, and the Bullseye branch. The Buster branch is a continuation of the old system and is more stable. The Bullseye branch added some new features, using open source libraries and new interfaces. Since the current Bullseye branch has just been released shortly, it is not stable yet.
- If you are an industrial user, it is strongly recommended to use the Buster branch.If you are a maker, want to try new things and like toss, you can consider using the Bullseye branch.
- The download link of the image

Raspberry Pi OS is the Bullseye branch, and Raspberry Pi OS (Legacy) is the Buster branch. More information you can refer to:
Raspberry Pi Display Rotation
Raspberry Pi OS Bullseye
To update the system first, execute the following command:
sudo apt-get update
sudo apt-get full-upgrade
1.Go to "Menu" -> "Preferences" -> "Screen Configuration"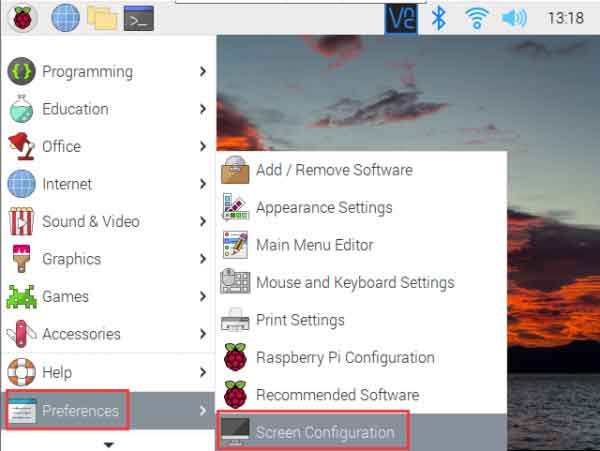
2.Click "Configure" -> "Screens" -> "HDMI-1" -> "Orientation" -> select the corresponding display direction to complete the display rotation.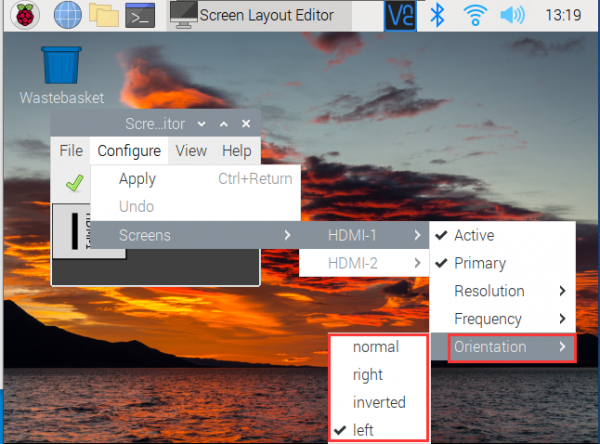
normal: the default display direction
right: display rotated 90 degrees
inverted: display rotated 180 degrees
left: display rotated 270 degrees
Raspberry Pi OS Buster
For Raspberry Pi 4/400, there is no need to update the system, you can set it up in the same way as Bullseye. Go directly to "Preferences" -> "Preferences" -> "Screen Configuration" to set.
For Raspberry Pi 0/1/2/3, it needs to be set as follows:
1. Add the following line in the config.txt file (the config file is located in the root directory of the TF card, ie in /boot):
display_rotate=1 #1: 90; 2: 180; 3: 270
2. Restart the Raspberry Pi after saving:
sudo reboot
Touch Rotating on the Raspberry Pi
After the display is rotated, the position of touch is incorrect because the touch doesn’t change with the display angle. So the touch also needs to be modified.
1.Install libinput.
sudo apt-get install xserver-xorg-input-libinput
If the system you installed is Ubuntu or Jetson Nano. The installation code is:
sudo apt install xserver-xorg-input-synaptics
2.Create the xorg.conf.d directory under /etc/X11/ (if the directory already exists, proceed directly to step 3).
sudo mkdir /etc/X11/xorg.conf.d
3.Copy the 40-libinput-conf file to the directory you created just now.
sudo cp /usr/share/X11/xorg.conf.d/40-libinput.conf /etc/X11/xorg.conf.d/
4.Edit this file.
sudo nano /etc/X11/xorg.conf.d/40-libinput.conf
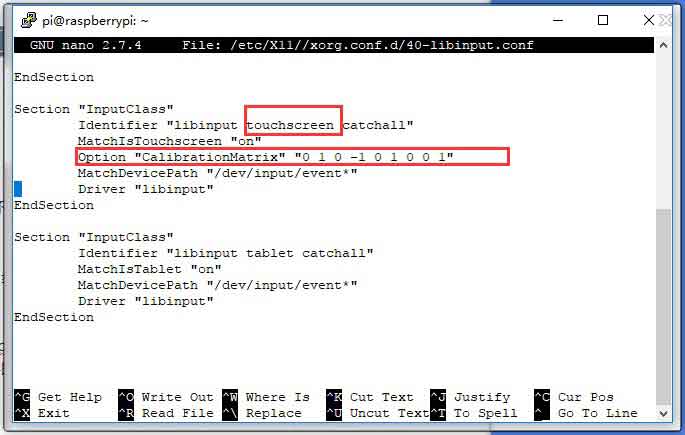
Find the part of the touchscreen, add the following statement inside, and then save the file.
Option "CalibrationMatrix" "0 1 0 -1 0 1 0 0 1"
Similar to the picture below:
sudo reboot
After completing these steps. The LCD could rotate 90 degrees both display and touch function.
Note:
90 degree: Option "CalibrationMatrix" "0 1 0 -1 0 1 0 0 1"
180 degree: Option "CalibrationMatrix" "-1 0 1 0 -1 1 0 0 1"
270 degree: Option "CalibrationMatrix" "0 -1 1 1 0 0 0 0 1"
Orientation on Windows
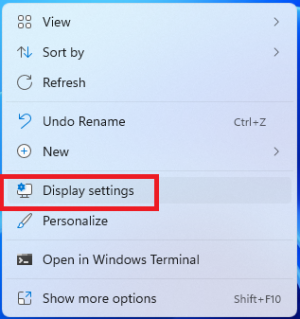
- 1. Right-click the desktop and enter "Display Settings":
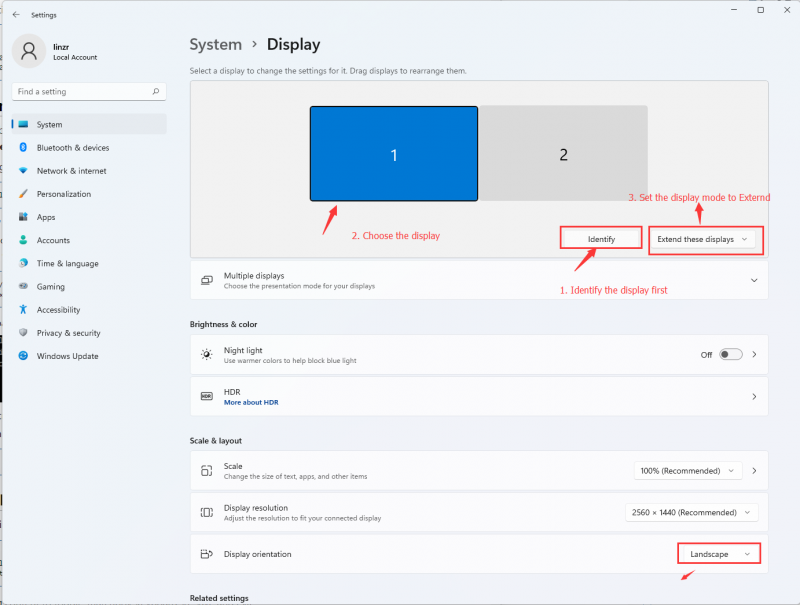
- Click the Identify to detect the display
- Choose the display, set the display mode to extend and change the orientation
Working with Jetson nano
1) Switch the Touch port selection switch to "USB".
2) Connect the Power&Touch interface of the LCD to the USB interface of the Jetson nano.
3) Connect the Display interface of the LCD to the HDMI interface of the Jetson nano.
Others
Backlight control
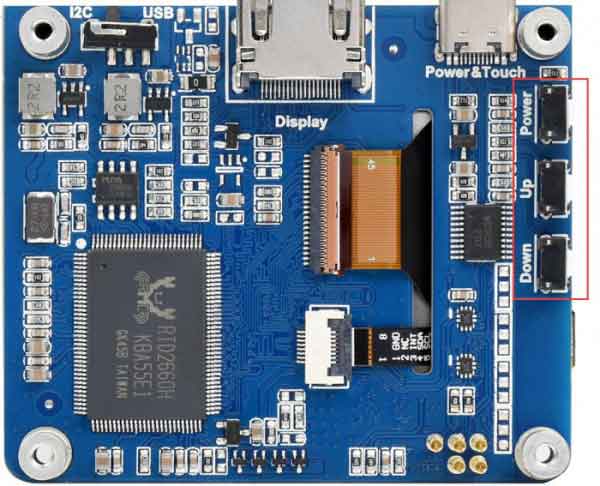
- Though Power button to turn on/off the backlight of the LCD.
- Though UP/DOWN button to control the backlight brightness.
