


- sales/support
Google Chat:---
- sales
+86-0755-88291180
- sales01
sales@spotpear.com
- sales02
dragon_manager@163.com
- support
tech-support@spotpear.com
- CEO-Complaints
zhoujie@spotpear.com
- Only Tech-Support
WhatsApp:13246739196
- Purchase/Shipping/Refund
WhatsApp:13424403025
Writing-Image User Guide
Steps
Please note that the EMMC version does not support being booted from the SD card.
Image Download
- Download the latest Raspberry Pi image from Raspberry Pi Website.
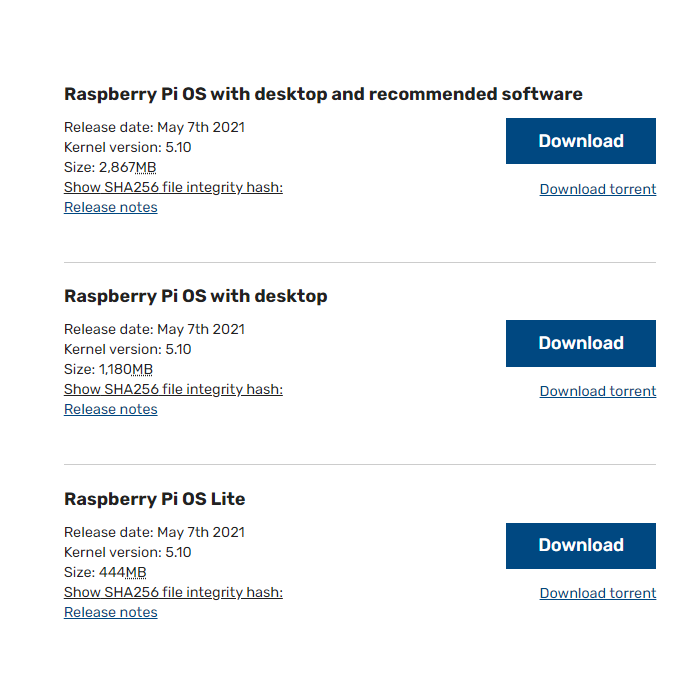
- The option "Raspberry Pi OS with desktop and recommended software" is recommended for EMMC 16G or CM4 lite 16G above memory cards.
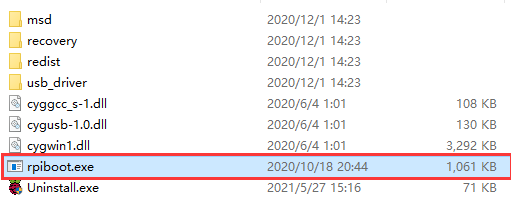
Download rpiboot
- Download and open the rpiboot software with administrator authority to install the driver and start the tool.
- After the installation is successful, there is an application of rpiboot.exe in the installation directory.
Enter Writing Mode
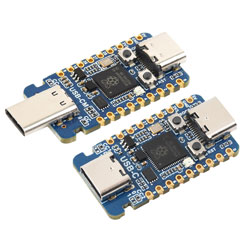
- Connect BOOT and GND, set the switch to ON, or just connect the USB-C port. You can check the product page to understand the location of the BOOT pin, for example:

- Connect the Micro USB/Type C interface (SLAVE port) of the carrier board to the host PC, then connect a power adapter to the cattier board.
- If you use the following products, you do not need to connect the power adapter:
Compute Module 4 PoE Board
Compute Module 4 IO Board
CM4-DUAL-ETH-BASE
Compute Module 4 PoE 4G Board
- If no need external power supply:
CM4-IO-BASE-B
CM4-IO-BASE-A
Compute Module 4 PoE Board (B)
CM4-NANO-A
CM4-NANO-B
- After connecting, the boards should be recognized as BCMxxx devices on Windows PC.

- Run the rpiboot.exe as administrator (The software in the installation directory of Step 2).
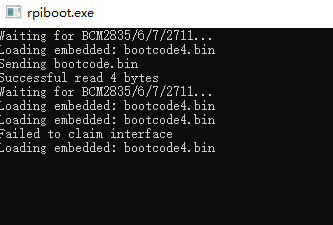
- Then the boards will be recognized as a portable disk, just format and write it with a new image.

Note: If your PC doesn't recognize the BCMxxx device, please check the connection again. Note that the USB cable used should be an OTG cable. *If you cannot write the image successfully, please try:- Use Windows 10 PC instead of Windows 7 or Linux. The other two OS are unstable as feedback.
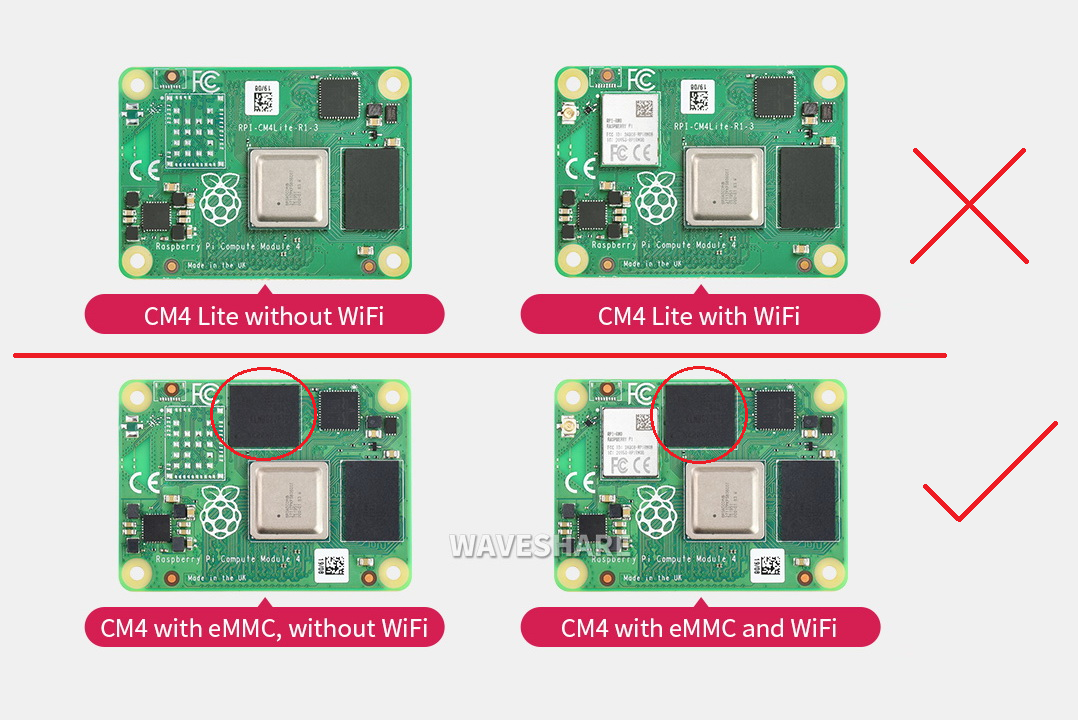
- Check if you write the eMMC version but not the Lite version. The eMMC version has one more chip than the Lite version.
- Connect a power adapter to the Power interface.
- Change to another USB OTG cable.
- Change to another USB port of the PC.
- Try to restart your host PC.
- Remount the CM4 board and try it again.
- Try with another PC.
- Check if you write the eMMC version but not the Lite version. The eMMC version has one more chip than the Lite version.
- Use Windows 10 PC instead of Windows 7 or Linux. The other two OS are unstable as feedback.
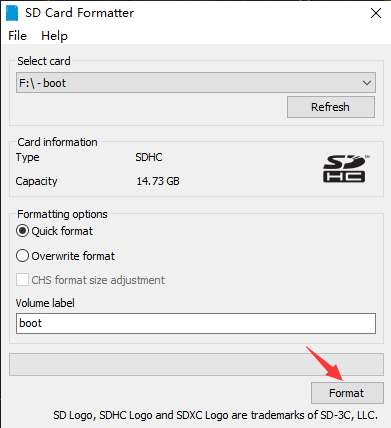
Format EMMC
- Format the SD card by SDFormatter.exe software
- Also, you can use the disk manager in WIN to set or delete the partition, just set the new partition after deleting the partition:
- Right-click My Computer -> Manager -> Disk Manager -> Find the new disk descriptor (Please select the correct one) -> Delete all partitions -> Create a partition (any file system) If you have programmed the system, there will be two disk descriptors, all you need to do is format it directly or delete the partition.
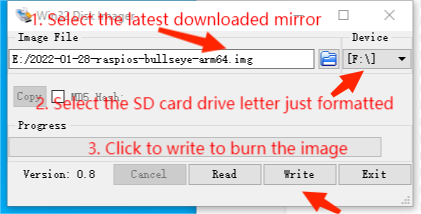
Write Image
- Write the Raspberry Pi image by Win32DiskImager.exe software.
- Choose the image file and click "Write" to start. It may prompt whether to format it after writing, please ignore it.
- After writing, in My Computer, a USB flash driver descriptor is recognized.
- Note:
- If you use the latest Raspberry Pi OS (image after October 30, 2021) USB2.0 is OTG mode by default, CM4 will report an error:
config failed, hub doesn't have any ports! (err -19)
- However, USB is still available. If you want to remove this error, remove "otg_mode=1" in [cm4] of config.txt, and add "dtoverlay=dwc2, dr_mode=host" (USB cannot be recognized without adding it).
dtoverlay=dwc2,dr_mode=host

- If you use the latest Raspberry Pi OS (image after October 30, 2021) USB2.0 is OTG mode by default, CM4 will report an error:
Reboot
- Power off after writing images, just disconnect it from the computer. Turn off the BOOT key or switch it off. Then reboot it.
TAG:
ESP32 S3 Development Board 1.43 inch AMOLED Display 1.43inch TouchScreen For Arduino LVGL With SD-Port/ QMI8658C 6-Axis Sensor
ESP32 Thermal imaging
Raspberry Pi 5
UGV Beast PT AI 4G 5G OpenCV Robot Car MediaPipe For Raspberry Pi4B/5
UART
SP3232EEN
ESP32 C6 Development board 1.9 inch LCD display 1.9inch Screen 172×320 With SD slot RGB LED QMI8658 6-Axis-Sensor ST7789 CST816
Raspberry Pi 8.8 inch DSI MIPI LCD TouchScreen Display 8.8inch 480x1920 For Luckfox Lyra RK3506/ESP32-P4/Luckfox Omni3576
LCD1602 I2C Module PWM Adjustable backlight 3.3V/5V For Arduino/ Raspberry Pi/ Pico/ Jetson Nano/ ESP32
ESP32 C3 Round LCD Development Board Electronic EYE 0.71 inch Display Watch Screen GC9D01 160x160
RS485
RV1103 SC3336
8.8inch LCD 1920x480 Computer PC Monitor Display Secondary Screen TypeC USB CPU RAM
spotpear
RV1106 SC3336
Raspberry Pi 3 display HAT
LuckFox Pico
Raspberry Pi LCD
ESP32-S3
JLINK OB
TAG:
UNO R4 Minima
Raspberry Pi 5 DSI
spotpear
Industrial Modbus RS485 RTU 8-ch Magnetic Latching Relay Module (C) With Digital Input
Milk-V Duo 256M
Raspberry Pi CSI-to-HDMI
MG996R Servo Metal Gear High Torque 9/11kg Rotate 180Angle
LCD1602 I2C Arduino Raspberry Pi Pico Jetson Nano ESP32
VisionFive2
Core3566104000
Luckfox Pico Rv1106 Core1106 Smart 86 TV Box Development Board With 4 inch LCD Display TouchScreen Relay RS485
Raspberry Pi 5 inch DSI IPS LCD Display MIPI 800x480 Optional Touchscreen
Jetson CSI-to-HDMI
Modbus RTU CAN
ESP32 C3 ST7735
Raspberry Pi 5 PoE MINI HAT (H) 5V/5A Power over RJ45 Ethernet 802.3af/at Moudle for Pi5/CM5
PiKVM-A8 Raspberry Pi 4 KVM Operation maintenance Over IP Server HDMI CSI
mobile phone
Raspberry Pi 3 LCD HAT
Banana Pi BPI-M4 Berry