- sales/support
Google Chat:---
- sales
+86-0755-88291180
- sales01
sales@spotpear.com
- sales02
dragon_manager@163.com
- support
tech-support@spotpear.com
- CEO-Complaints
zhoujie@spotpear.com
- Only Tech-Support
WhatsApp:13246739196
- Purchase/Shipping/Refund
WhatsApp:13424403025
- HOME
- >
- ARTICLES
- >
- Common Moudle
- >
- ESP
ESP32-S3-LCD-1.3 User Guide
【Hardware】
】Screen resolution: 240*240
】Screen driver IC: ST7789
】Pin definition
[] SPI interface definition
DC ==> GPIO38
CS ==> GPIO39
SCLK ==> GPIO40
MOSI ==> GPIO41
RESET ==> GPIO42
[] QMI8658
IMU_INT2 ==> GPIO45
IMU_INT1 ==> GPIO46
SDA ==> GPIO47
SCL ==> GPIO48
【Environment+Library】
[] Download and install Arduino IDE: https://www.arduino.cc/en/software
[] Import ESP32 series chips and motherboard libraries in Arduino IDE
Please download the ESP32 version 2.0.13, other versions may have problems
[] Import ESP32-S3-1.3 library
Open the downloaded program, enter the ESP32-S3-LCD-1.3-Demo\lib folder, and copy all the files under lib to the library storage path
C:\Documents\Arduino\libraries (click to confirm how to view your own path)
Note: If you have installed the LVGL library before, please delete the previous LVGL and copy the files in lib to the libraries folder
【Code Test】
【Clock/Astronaut Weather Ornaments】
[] Upload Clock/Rotating Astronaut Clock Weather Ornaments
--》Prism Version
After opening the downloaded package,
select ESP32-S3-LCD-1.3-Demo\Arduino\Astronaut Clock-EN\Astronaut Clock-Prism-CN\ESP32S3-1.3inch folder to enter, and open ESP32S3-1.3inch.ino
--》Non-Prism Version
After opening the downloaded package,
select ESP32-S3-LCD-1.3-Demo\Arduino\Astronaut Clock-EN\Astronaut Clock-No Prism-CN\ESP32S3-1.3inch folder to enter, and open ESP32S3-1.3inch.ino
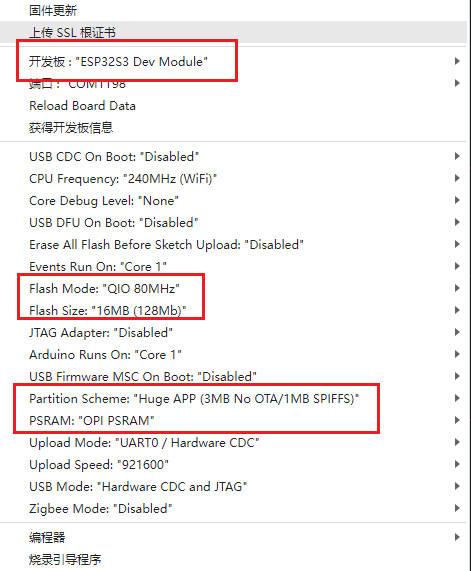
[] After entering the Arduino IDE, configure ESP32S3 according to the figure below
【SDcard Video】
】 Upload SDcard Video Demo
--》Prism Version
】After opening the downloaded package,
select ESP32-S3-LCD-1.3-Demo\Arduino\SDcard Video Prism Version\main folder to enter,
and open main.ino
】Copy the files in the Data folder to the SD card.
--》Non-Prism Version
】After opening the downloaded package,
select ESP32-S3-LCD-1.3-Demo\Arduino\SDcard Video - Non-Prism Version\main folder to enter,
and open main.ino
】Copy the files in the Data folder to the SD card.
】Click to upload
【SD-Picture + game2048】
】Upload SD-Picture + Game2048
--》SD-Picture + Game2048
】After opening the downloaded package,
select the ESP32-S3-LCD-1.3-Demo\Arduino\SD-Picture + game2048\ImageDemo folder to enter,
and open ImageDemo.ino
】Copy the files in the Image folder to the SD card.
】Shake left and right to operate
【Snake】
】Upload Snake
--》SD-Picture + Game2048
After opening the downloaded package,
select the ESP32-S3-LCD-1.3-Demo\Arduino\Snake folder to enter,
and open mian.ino
】Shake left and right to operate
Resources
Schematic Diagram
Demo
Size
Datasheets
ESP32-S3
Other Components
- QMI8658 Datasheet
- Pulan-PL4054 Datasheet
- ST7789VW Datasheet
- WCH-CH343DS1_V1.6 Datasheet
- 1.3inch_LCD_Module
Sofwares
Other Resource Links
【After-sales】
Monday-Friday (9:30-6:30) Saturday (9:30-5:30) -China time
Email: services01@spotpear.com