


- sales/support
Google Chat:---
- sales
+86-0755-88291180
- sales01
sales@spotpear.com
- sales02
dragon_manager@163.com
- support
tech-support@spotpear.com
- CEO-Complaints
zhoujie@spotpear.com
- Only Tech-Support
WhatsApp:13246739196
- Purchase/Shipping/Refund
WhatsApp:13424403025
- HOME
- >
- ARTICLES
- >
- Common Moudle
- >
- Power
Modbus RTU IO 8CH Factory Reset Tutorial
Hardware Operation
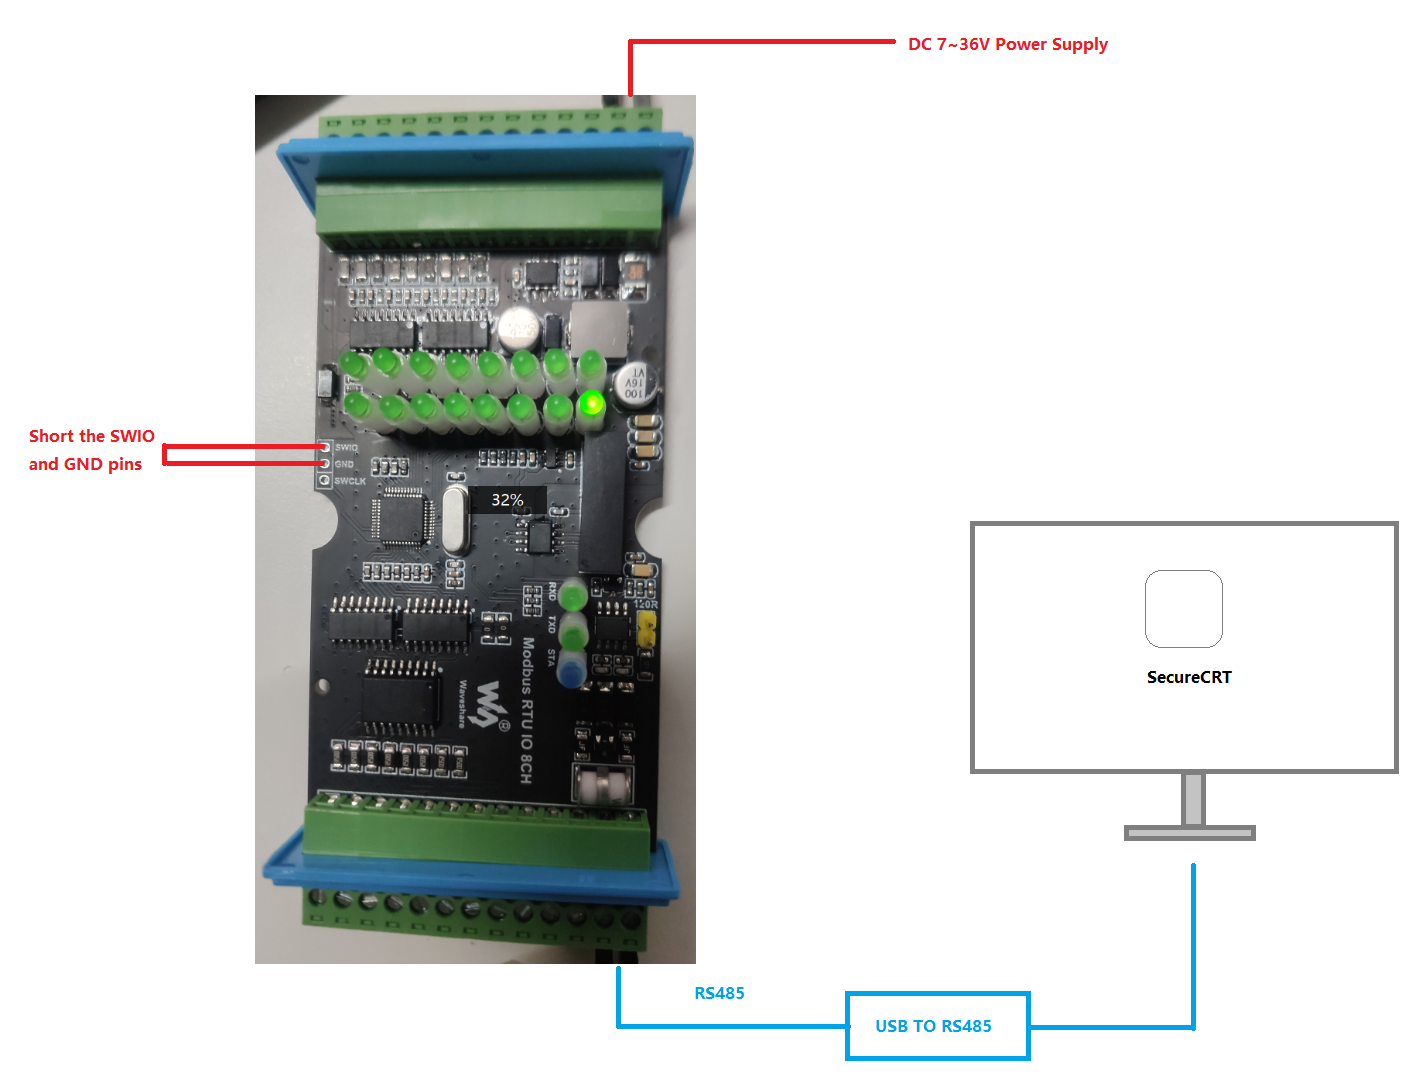
- Open the casing, hardware connection diagram:
Software Operation
- Using Securecrt: (Download Link: https://www.waveshare.com/w/upload/b/b7/SecureCRT.7z)
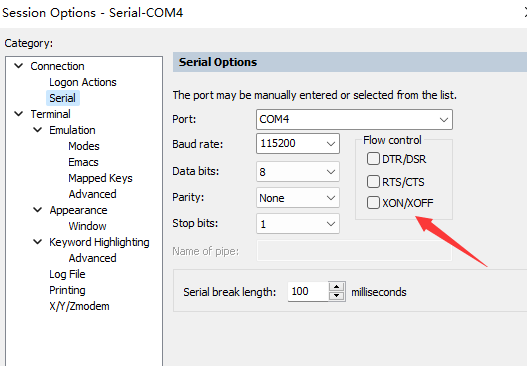
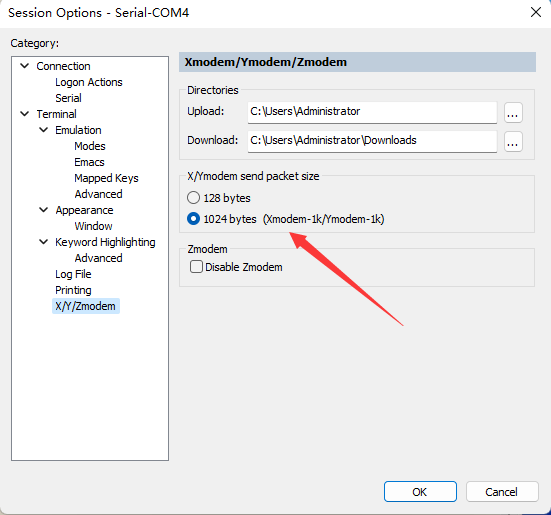
- Use SecureCRT to connect to the serial port, with the default settings of 115200 baud rate, N, 8, 1. Make sure not to select XONXOFF, and choose a Ymodem packet size of 1024 bytes.
Before powering on, short the SWDIO and GND pins to enter the bootloader program.
Once the bootloader program runs, the following interface will be displayed. The program starts with the LED constantly on, detecting the SWDIO pin. If shorted, it enters the bootloader program and the LED remains constantly on. If not shorted, it jumps to the user program, and the LED slowly blinks. If the user program fails to start, the LED will blink rapidly, indicating the need to re-download the user program.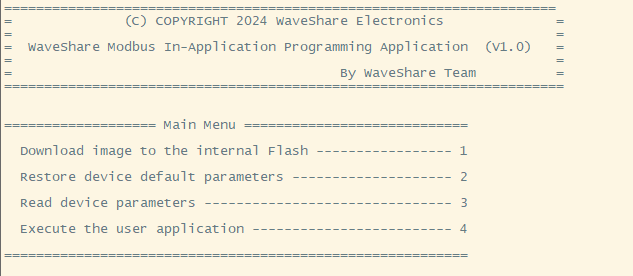
When the above interface appears, select:
- Here, we directly choose option 2 to Restore device default parameters.
TAG:
Image-Modulation-Tutorial User Guide
Arduino IR Thermal Imaging Camera
USB TO 2.5G Ethernet Port Converter RJ45 RTL8156B Driver-Free For Windows/macOS/Linux/Android
Workstation electronic Nameplate
ESP32-P4 DEV-KIT C6 WiFi6 MIPI DSI 7/10.1 inch Display/CSI Camera/Audio Speaker For AI Deepseek
Bevelopment Board
Changeable Photo Frames
ESP32-S3 AI 1.54-inch e-Paper Ink Screen 1.54inch Display AIoT Development Board Deepseek
LuckFox Pico pro
STM32 downloader
7inch-USB-Monitor user guide
Camera
Raspberry Pi Pico 2 RP2350B 1.46 inch Round LCD Touch Display 412x412 HMI LVGL QMI8658 6-axis 65K Colors
Raspberry Pi 3.97 inch e-Paper link BW 800x480 For Arduino / Jetson / STM32 /ESP32
3D Display
Raspberry Pi MLX90640
Jetson Orin 4G/3G/2G expansion board GNSS GPS SIM7600G-H-M.2
VGA to TTL
Raspberry Pi User Guide
Wiki
TAG:
ESP32-S3 1.28inch Round Display
Flipper Zero Ethernet
Raspberry Pi 5 Active Cooler
Raspberry Pi 5 PCIe to NVMe
RS485 to Ethernet
Raspberry Pi 5 Industrial Case
Radxa Penta SATA HAT For Raspberry Pi 5 Pi5
SpotPear
X1011 Raspberry Pi 5 PCIe M.2 NVMe 4-Ports SSD Pi5 Four-Times 2280
Rasberry Pi 5 PCIe TO MiniPCIe GbE USB HUB HAT+ Hub RJ45 SIM7600G-H EG25-G 4G
ESP32 C3
AI Machine Vision Kit OAK D Lite JPEG Encoder 12MP 4TOPS OpenCV Camera
SpotPear
Raspberry pi 5 Aluminum Case
PI5 Case
spotpear
Raspberry Pi Secondary Screen
ESP32 S3 display
4inch Round LCD HDMI Capacitive touchscreen display Raspberry Pi Jetson Nano mini PC 720x720
Core3566002000