


- sales/support
Google Chat:---
- sales
+86-0755-88291180
- sales01
sales@spotpear.com
- sales02
dragon_manager@163.com
- support
tech-support@spotpear.com
- CEO-Complaints
zhoujie@spotpear.com
- Only Tech-Support
WhatsApp:13246739196
- Purchase/Shipping/Refund
WhatsApp:13424403025
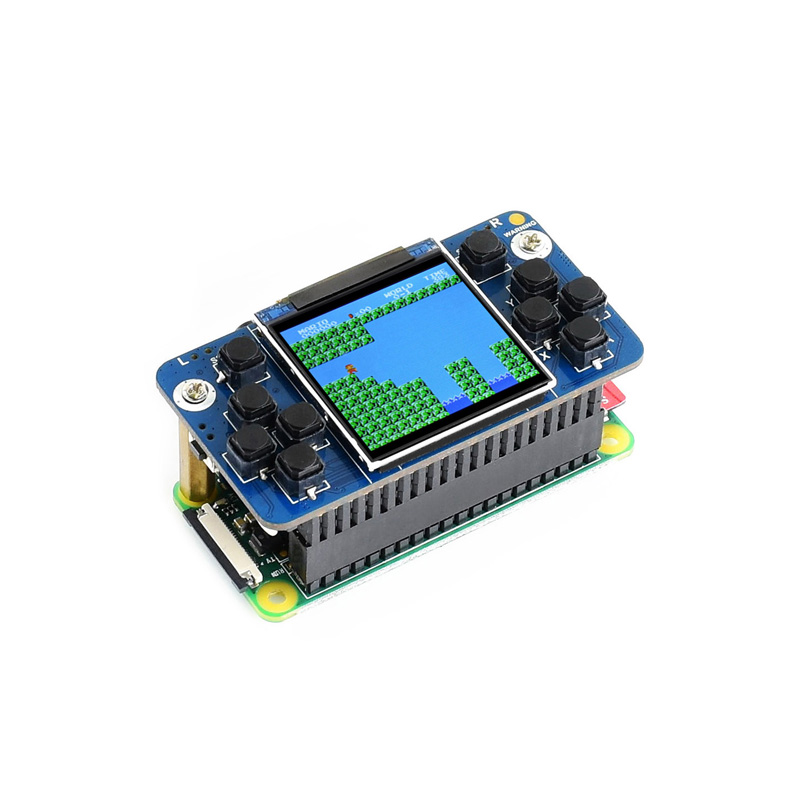
Raspberry Pi GamePi15 User Guide
Support Raspberry Pi
- Raspberry Pi Zero
- Raspberry Pi Zero W
- Raspberry Pi Zero WH
- Raspberry Pi 1 Model B+
- Raspberry Pi 2 Model B
- Raspberry Pi 3 Model B
- Raspberry Pi 3 Model B+
- Update time:20190625
How to use it
Hardware connection
- Turn the switch of GamePi15 into OFF, mount the 14500 battery
- make sure you mount the battery in correct direction, WARNING indicator will light on if direction is wrong. You should remove battery and correct the direction when the LED is on, otherwise, the GamePi15 may be damaged.
- Connect GPIO. Inset the GamePi15 to 40PIN GPIO of Raspberry Pi
To use the GamePi15, you can use the pre-configured image or install driver to refresh image yourself.
Pre-configured Images
- Here we provide pre-configured image, you can download and test
| OS | Version | Raspberry Pi | Default user/password | Download link |
|---|---|---|---|---|
| Recalbox | 6.0-DragonBlaze | Raspberry Pi 1/Zero/Zero W | root/recalboxroot | |
| Recalbox | 6.0-DragonBlaze | Raspberry Pi 2/3/Pi 3B+ | root/recalboxroo | |
| Retropie | v4.4 | Raspberry Pi 1/Zero/Zero W | pi/raspberry | |
| Retropie | v4.4 | Raspberry Pi 2/3/3B+ | pi/raspberry |
- Download image file, unzip and write it to SD card
- Inset the SD card to Raspberry Pi, turn the switch into ON. Generally, LCD is light on and Raspberry Pi is booting. It may cause about 2 minutes for Raspberry Pi 1/zero/zero W to starting.
- Raspberry Pi is failed to start if the battery is Low. In this case, you can connect 5V/2A power adapter to Power interface for charging. Capacity indicators
Basic operations
- Retropie
- After booting, you can select emulators by direction buttons on the left, then press "A" to confirm. For example, choose "A" and then "Start"
- Choose the games and press "A" to play
- Press "Start"+"HK" buttons to exit games
- You can adjust the potentiometer to adjust volume. Or Press "Start" and choose "SOUND SETTINGS" to adjust volume
- Recalbox
- After booting, you can select emulators by direction buttons on the left, then press "B" to confirm.
- Choose the games and press "A" to play, press "A" or "Start" to start games
- Press "Start"+"HK" buttons to exit games
- you can adjust the potentiometer to adjust volume. Or Press "Start" and choose "SOUND SETTINGS", press "B" confirm, then adjust "SYSTEM VOLUME" by direction buttons.
Install driver
- Click here to download the driver: GamePi15-190613
Install driver on Retropie
Download Retropie image from Retropie website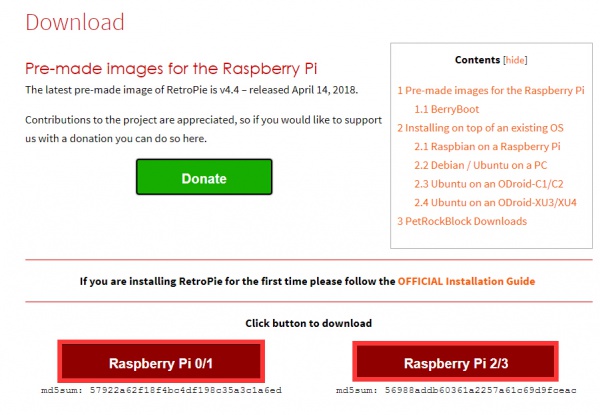
- Write the image to SD card
- Copy the driver (Do not unzip it) to root directory of the SD card (BOOT directory of the Raspbian)
- Connect SD card, keyboard and a HDMI display to Raspberry Pi, Turn the switch into ON side to power on Raspberry Pi. Press F4 (Keyboard) after booting
- Install driver with commands below:
tar xzvf /boot/GamePi15-*.tar.gz
cd GamePi15/
./GamePi15
- Long-press "A" button (GamePi15) to enter the configuration page, configure by pressing related buttons (GamePi15), you can also long-press to skip any button
After configuring, you can press "A" (GamePi15) to save configured and exit, or press "B" or "Start" (GamePi15) to exit without saving.
Install driver on Recalbox
Download the latest image from Recalbox website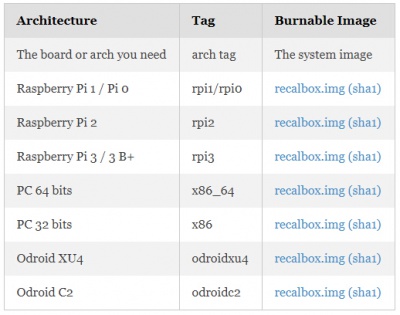
- Unzip the files download to get the .img file
- Write the .img file to SD card
- Copy driver to root directory of SD card
- Connect SD card, keyboard and a HDMI display to Raspberry Pi, Turn the switch into ON side to power on Raspberry Pi. Press F4 then Alt+F2(Keyboard) after booting. (user: root; password: recalboxroot)
- Install driver with commands:
tar xzvf /boot/GamePi15-*.tar.gz
cd GamePi15/
./GamePi15
- Reboot Raspberry Pi
Add new games (Retropie)
Maybe default games in test image are not those you want, you can also add games as you like.
- Size of most games are always large, so we need to expand filesystem fist. Choose RASPI-CONFIG on configure page and press enter
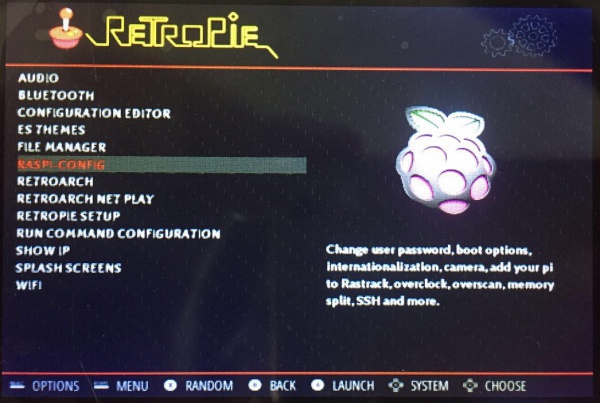
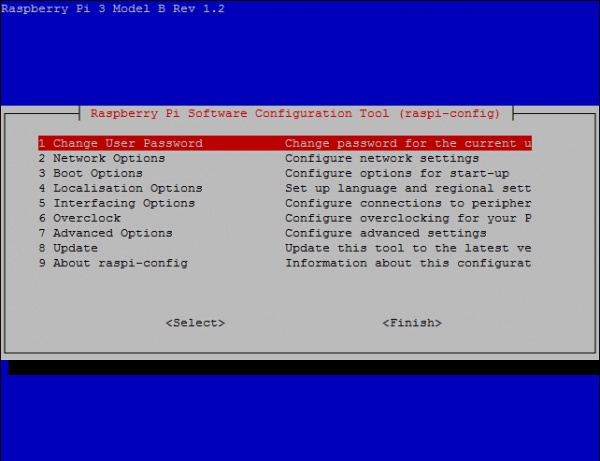
- Choose 7 Advanced Options -> A1 Expand Filesystem, Enter->Finish, (physical keyboard is required)
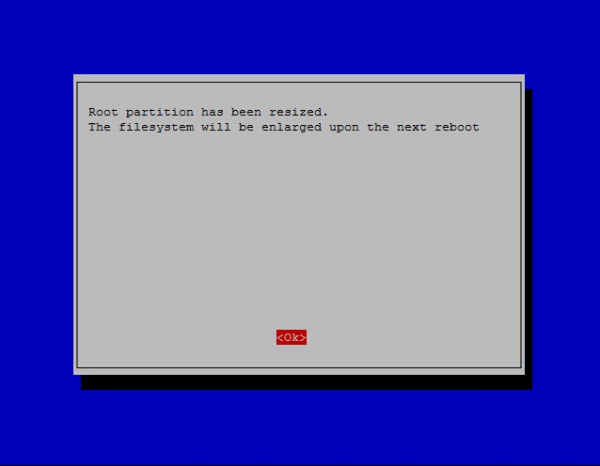
- Choose OK, and reboot.
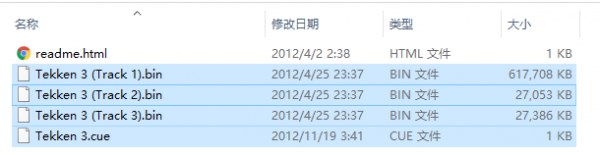
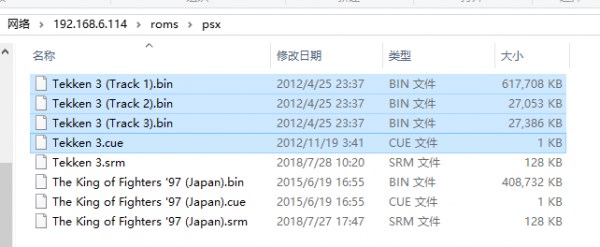
- Download ROMS of games you like
- Connect your Raspberry Pi to network (Make sure the network you connect is in the same LAN as your PC). Find SHOW IP in Retropie list, press “A” to query current IP address of your Raspberry Pi.
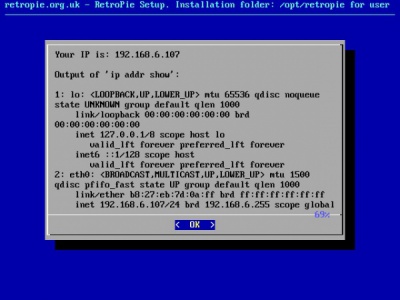
- Open it with the IP address on your PC

- Then on emulator choose page, you can press “Start”->QUIT->RESTART EMULATIONSTAION, press “A” to confirm. Then restart emulator, you can find the game added.
For more operations, you can read Retropie Instructions
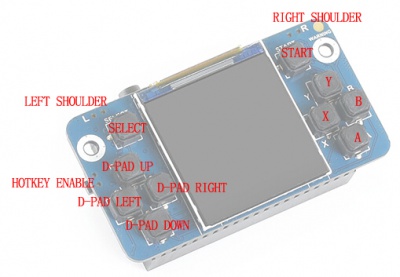
Interfaces
"NC" : No Connected
| PIN | Symbol | Description | PIN | Symbol | Description | |
|---|---|---|---|---|---|---|
| 1 | 3.3V | 3.3V power input | 2 | 5V | 5V power input | |
| 3 | NC | NC | 4 | 5V | 5V power input | |
| 5 | HOTKEY ENABLE | BCM=3, WPI = 9 | 6 | GND | Ground | |
| 7 | NC | NC | 8 | RIGHT SHOULDER | BCM=14, WPI=15 | |
| 9 | GND | Ground | 10 | X | BCM=15, WPI=16 | |
| 11 | NC | NC | 12 | Audio | BCM=18, WPI=1 | |
| 13 | LCD_Reset | BCM=27, WPI=2 | 14 | GND | Ground | |
| 15 | NC | NC | 16 | LEFT SHOULDER | BCM=23, WPI=4 | |
| 17 | 3.3V | 3.3V input | 18 | Backlight | BCM=24, WPI=5 | |
| 19 | LCD_MOSI | BCM=10, WPI=12 | 20 | GND | Ground | |
| 21 | NC | NC | 22 | LCD_DC | BCM=25, WPI=6 | |
| 23 | LCD_SCK | BCM=11, WPI=14 | 24 | LCD_CS | BCM=8, WPI=10 | |
| 25 | GND | Ground | 26 | NC | NC | |
| 27 | NC | NC | 28 | NC | NC | |
| 29 | UP | BCM=5, WPI=21 | 30 | GND | Gound | |
| 31 | DOWN | BCM=6, WPI=22 | 32 | Y | BCM=12, WPI=26 | |
| 33 | RIGHT | BCM=13, WPI=23 | 34 | GND | Ground | |
| 35 | SELECT | BCM=19, WPI=24 | 36 | LEFT | BCM=16, WPI=27 | |
| 37 | START | BCM=26, WPI=25 | 38 | B | BCM=20, WPI=28 | |
| 39 | GND | Ground | 40 | A | BCM=21, WPI=29 |
TAG:
Pi5 PCIe
Raspberry Pi Robot Dog Wavego Pro 12 quadruped ESP32 ESP-NOW color recognition and self-balancing control
Spotpear
ESP-NOW Control
Raspberry Pi Pico 2 RP2350 Core A Development Board RP2350A
Raspberry Pi 5 Audio hat
ESP32-S3 A7670E 4G development board supports LTE Cat-1/2G/GNSS positioning/WiFi/Bluetooth
ST servo driver
UPS HAT D
ESP32 C6 Development Board 1.43 inch AMOLED QSPI Display 1.43inch TouchScreen Dual MIC AudioI Deepseek N16R8
Raspberry Pi AF Camera
D-Robotics RDK X3 Development Board Horizon Sunrise Pi ARM Cortex-A53 5Tops 2GB/4GB RAM
Raspberry Pi 0.85inch LCD
PoE Power Supply
Modbus RTU 8-ch Relay Module (D)
ESP32-S3 AI RGB Matrix Driver Board Dual Microphone DeepSeek
Raspberry Pi 5inch Display 1024x600 HDMI Capacitive TouchScreen 5 inch LCD B Wide-Cover For Mini PC
EchoEar 1.85 inch Round TouchScreen 1.85inch QSPI LCD 360*360 CST816T ST77916
ESP32 C3 MINI TV
NanoKVM-Lite-Quick-Start
TAG:
Raspberry Pi MLX90641
EVAL-ADXL354CZ
LuckFox
Argon
SP3232EEN
Raspberry Pi 5 DSI Cable
ESP32
Raspberry Pi Compute Module 5 CM5 Official Original IO Board
Flipper Zero CC1101
Creative minimalist ornaments
Raspberry Pi 5 ICE Tower Argon THRML 60mm Radiator Cooler CPU Cooler Copper Tube Fins
Raspberry Pi 5 PD Induction
Raspberry Pi 5 Audio Card
JETSON NANO Expansion Board
Raspberry Pi Pico 2 RP2350 2.8 inch LCD Capacitive TouchScreen Development Board 240x320 Display QMI8658 6-Axis /PCM5101 Audio /SD /RTC /Battery Port
Jetson Orin 5G/4G/3G expansion board GNSS GPS RM520N-GL
Flipper Zero ESP32S2 WiFi Dev Board official
Jetson
360° Sensor
Changeable Photo Frames