- sales/support
Google Chat:---
- sales
+86-0755-88291180
- sales01
sales@spotpear.com
- sales02
dragon_manager@163.com
- support
tech-support@spotpear.com
- CEO-Complaints
zhoujie@spotpear.com
- sales/support
WhatsApp:13246739196
PCIe-TO-MiniPCIe-GbE-USB3.2-HAT+ User Guide
Overview
Introduction
This adapter board supports converting the PCIe interface to USB3.2, MiniPCIe and Gigabit ETH, designed for Raspberry Pi 5. It is compatible with multiple MiniPCIe 4G modules or MiniPCIe devices, supports Gen2 mode and high-speed communication.
Features
- Designed for Raspberry Pi 5, with HAT+ standard, onboard I2C EEPROM, and support 40pin GPIO header for stacking and expansion.
- Support PCI-E×1 Gen2 mode.
- Onboard 2-ch USB 3.2 Gen1 high-speed interface, for connecting to more peripheral devices, support PCIe to expand USB3.2 MiniPCIe interface, high-speed communication, with lower latency.
- Onboard MiniPCIe interface, support MiniPCIe 4G modules such as SIM7600G-H-PCIE and EG25-G mPCIe.
- Expand driver-free Gigabit Ethernet port.
- Onboard Type-C interface for 4G networking, debugging, firmware update on PC, or for external power input.
- Onboard power monitoring chip for real-time monitoring of voltage, current and power parameters.
- Onboard SIM card slot for inserting Nano-SIM card.
- Onboard reset key, power and network indicator for debugging and checking module working status.
MiniPCIe Support List
1. EG25-G mPCIe
2. 2-CH_CAN_MiniPCIe
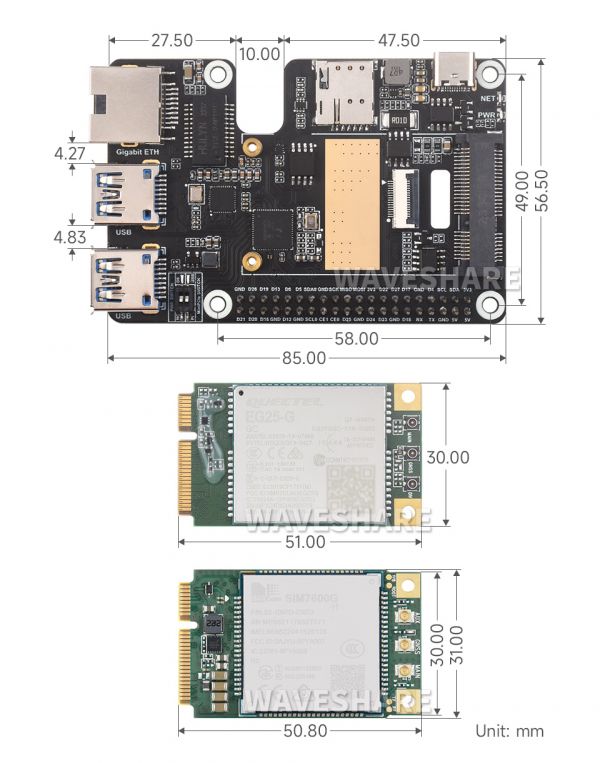
Dimensions

User Guide
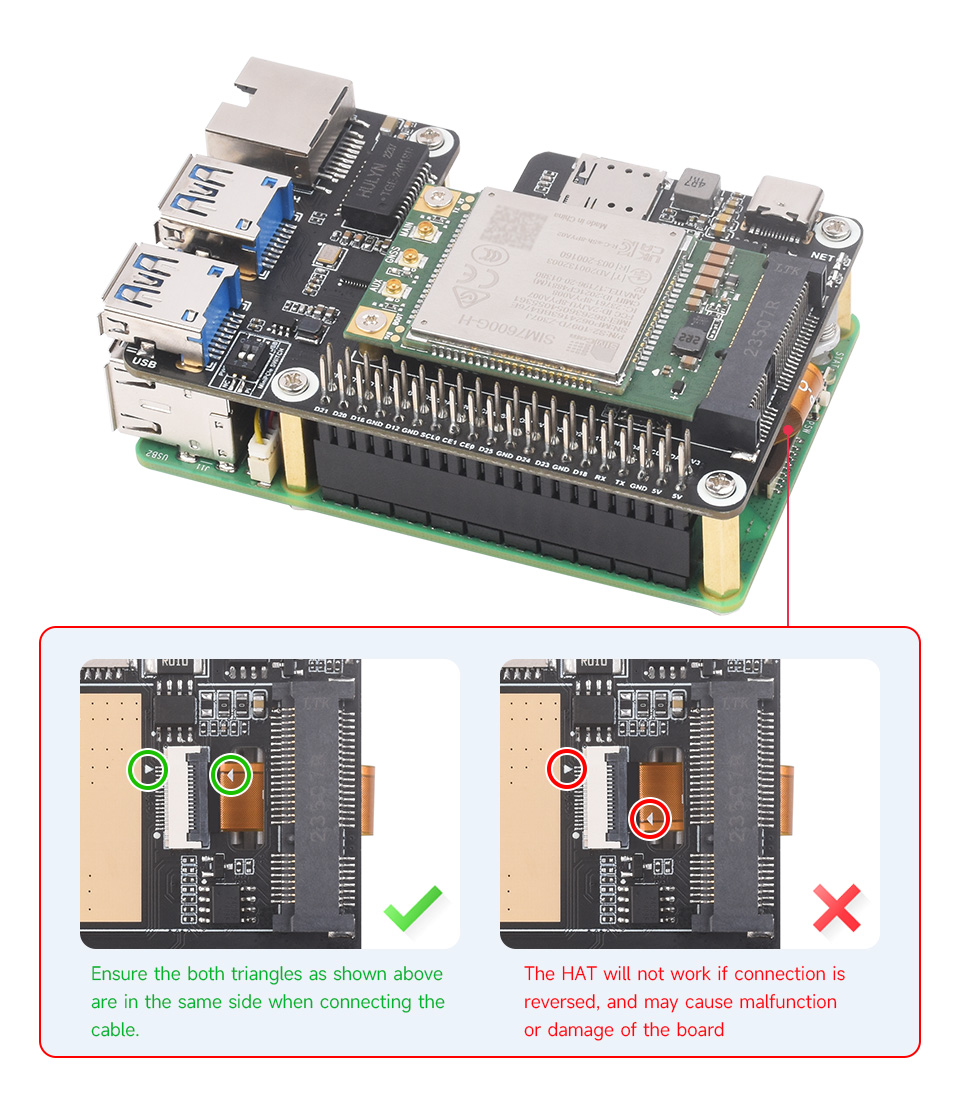
Hardware Connection
Please pay attention to the cable orientation as shown below:
How to Use
1: Enable PCIE interface:
As the PCIE interface is not enabled on the Raspberry Pi 5 by default, you can add the following content to enable it at /boot/firmware/config.txt:
dtparam=pciex1
2: Reboot PI5 after modification, and the device can be recognized.
As shown below, the VL805 is recognized as our device, and the other PI5 is the RPI chip.
3: Execute "lsusb" to the USB device that has been recognized.
DIP Switch Control
The onboard module dial-up switch can be connected to GPIO6 of the Raspberry Pi, you can switch it on to use the Raspberry Pi to control the module to reset or power on/off. (It is switched off by default (recommended). The board status is up to the Raspberry Pi, for example, if the Raspberry Pi shuts down, the board would power off.)
Onboard dial-up switch for switching MiniPCIe USB connection, and you can select the connected Raspberry Pi through dial-up switch mode:
How to Install and Use Dial-up Tool (Required for module usage)
Input the following commands to install waveshare-CM dial-up tool:
wget -O - https://files.waveshare.com/wiki/PCIe-TO-4G-5G-M.2-USB3.2-HAT-Plus/install.sh | sudo bash
After installation, if it cannot automatically dial up with NDIS(qmi) and MBIM, you can use the dial-up tool for network. YOUR_APN is the APN of the used SIM card:
sudo waveshare-CM
# or
sudo waveshare-CM -s YOUR_APN
NVME Power Monitoring
The onboard INA219 chip can detect the voltage and current, easy to monitor the device status and monitor the input 5V voltage status (not 3.3V).
The default I2C address is 0x40, addresses can be modified via back resistors to support stacking of different expansion boards.
Demo:
wget https://files.waveshare.com/wiki/PCIe-TO-M.2-HAT%2B/PCIe_TO_M.2_HAT%2B.zip
unzip -o PCIe_TO_M.2_HAT+.zip -d ./PCIe_TO_M.2_HAT+
cd PCIe_TO_M.2_HAT+
sudo python INA219.py
Ethernet (ETH) Port Usage
1: Reboot the PI5, and then it can recognize the device.
As shown below, the identified RTL8111 is our device, and the other one is the RPI chip for PI5
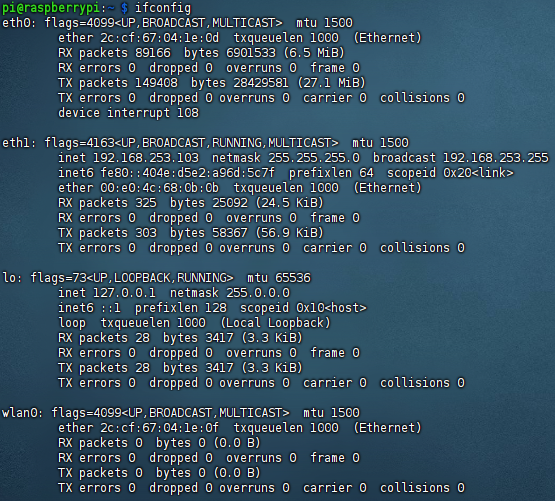
2: Execute "ifconfig", and you can see the network card is recognized.
3: Use ping command to test:
ping baidu.com -I eth1
#-I specifies the Ethernet port
Resource
Datasheet
INA219
SIM7600G-H-PCIE
EG25-G mPCIe
Driver Files
SIM7600G-H-PCIE
- Xshell
- TCP Test Tool
- SIM7600 Driver
- CP2102 driver
- GPS Debug Tool
- VLC media player
- Unicode Conversion Software
- SIM7600 Serial Debug Assistant
EG25-G mPCIe
Imager
Openwrt
Support
Monday-Friday (9:30-6:30) Saturday (9:30-5:30)
Email: services01@spotpear.com


