- sales/support
Google Chat:---
- sales
+86-0755-88291180
- sales01
sales@spotpear.com
- sales02
dragon_manager@163.com
- support
tech-support@spotpear.com
- CEO-Complaints
zhoujie@spotpear.com
- sales/support
WhatsApp:13246739196
- HOME
- >
- ARTICLES
- >
- Raspberry Pi
- >
- Raspberry Pi LCD
- >
- GPIO-SPI
3.5inch-RPi-LCD-G User Guide
Overview
Introduction
The 3.5-inch RPi LCD (G) is equipped with a resistive touch screen with a resolution of 320 × 480, supporting two connection methods: Pigo pin communication and GH1.25 11PIN cable connection, and providing example materials for Raspberry Pi, ESP32, Pico, Arduino, etc.
Features
- 320×480 resolution, 262K RGB colors, clear and colorful displaying effect
- High touch screen transmittance, fast response and long lifetime
- Embedded with ST7796S driver chip and XPT2046 resistive touch control chip, using SPI communication, minimizes required IO pins
- Supports two connection methods: Pigo pin communication and GH1.25 11PIN cable connection
- Adopts Immersion Gold process, nice looking, with better durability
- Provides complete demos and development materials for Raspberry Pi, Raspberry Pi Pico, ESP32 and Arduino platforms
Interfaces
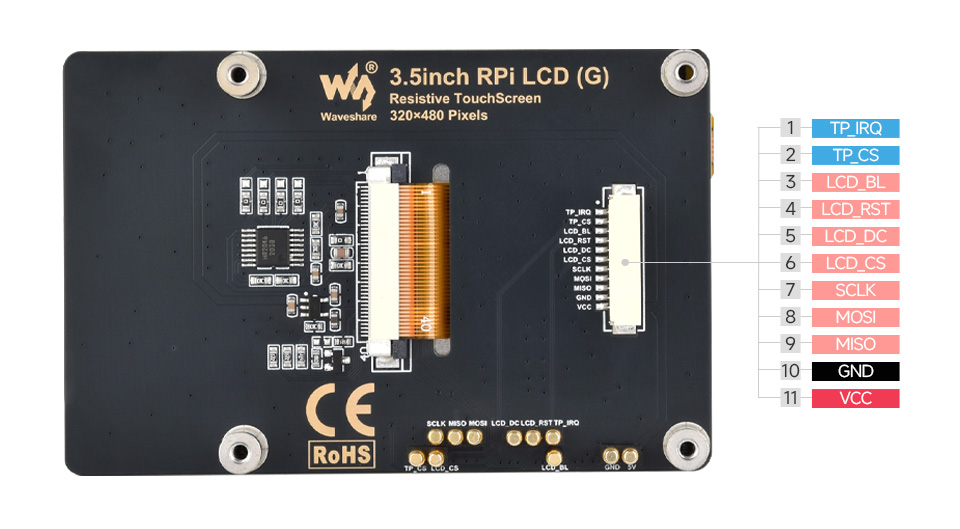
Dimensions
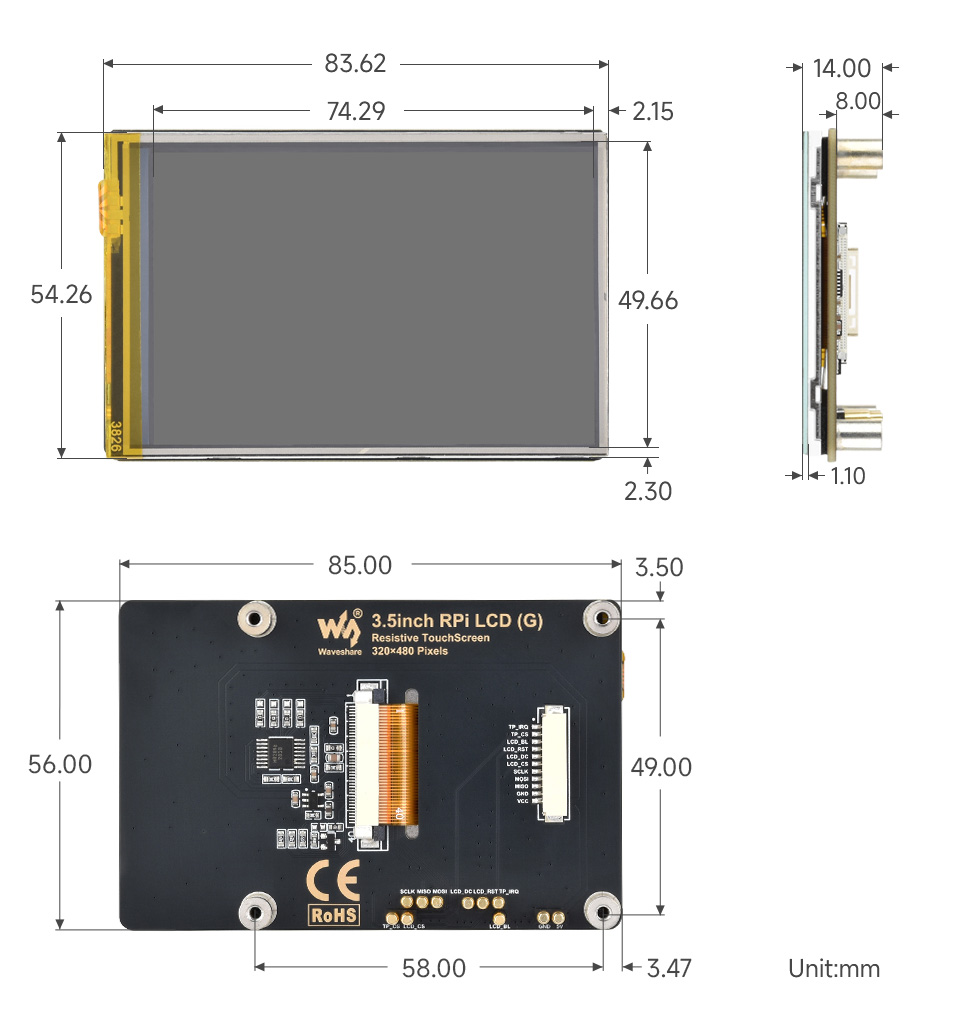
Specifications
| Parameter Name | Parameter |
| Supply Voltage | 5V |
| Logic Voltage | 3.3V |
| LCD type | IPS |
| Communication Interface | SPI |
| Controller Chip | Display: ST7796S |
| Touch: XPT2046 | |
| Resolution | 320 (H) x 480 (V) |
| Display Size | 49.36 (H) x 73.84 (V) mm |
| Dimensions | 56.00 (H) x 85.00 (V) mm |
Raspberry Pi Tutorial
Hardware Connection
This product supports two connection methods to Raspberry Pi
Method 1: Connect the Raspberry Pi through Pigo Pin
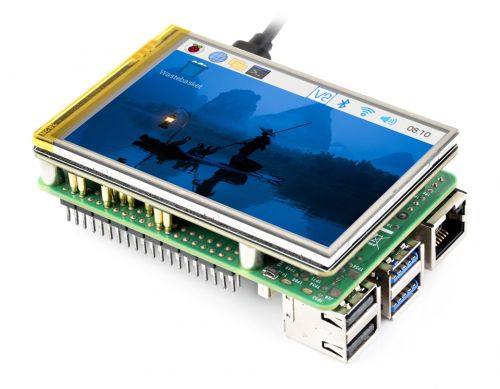
Method 2: Connect the Raspberry Pi through GH1.25 13PIN Cable
| Function pin | BCM encoding | Board physical pin number |
| TP_IRQ | 17 | 11 |
| TP_CS | 7 | 26 |
| LCD_BL | 18 | 12 |
| LCD_RST | 27 | 13 |
| LCD_DC | 22 | 15 |
| LCD_CS | 8 | 24 |
| SCLK | 11 | 23 |
| MOSI | 10 | 19 |
| MISO | 9 | 21 |
| GND | GND | 6 |
| VCC | 5V | 4 |
Enable SPI Interface
Enter the following command in the terminal:
sudo raspi-config nonint do_spi 0
Python Environment
- Install libraries
sudo apt-get update
sudo apt-get install python3-pip
sudo apt-get install python3-pil
sudo apt-get install python3-numpy
sudo apt-get install python3-spidev
sudo apt-get pip install smbus2
- Download and run the demo
wget https://files.waveshare.com/wiki/3.5inch%20RPi%20LCD%20(G)/3inch5_RPi_LCD_G_RPI.zip
unzip 3inch5_RPi_LCD_G_RPI.zip
cd 3inch5_RPi_LCD_G_RPI
sudo python ./main.py
Bookworm System Desktop Display
Install Driver Module
- Determine the current kernel version
uname -a
This command will output the complete kernel version information. For example, executing this command on Raspberry Pi 5 may produce the following output:
Linux raspberrypi 6.6.51+rpt-rpi-2712 #1 SMP PREEMPT Debian 1:6.6.51-1+rpt3 (2024-10-08) aarch64 GNU/Linux
This indicates that the kernel version number of this system is 6.6.51+rpt-rpi-2712, and it uses 64-bit ARM (AArch64) architecture.
- Download and install the ST7796 driver module
# Step 1: Download and enter the Waveshare-st7796s driver folder
wget https://files.waveshare.com/wiki/common/Waveshare-st7796s.zip
unzip Waveshare-st7796s.zip
cd Waveshare-st7796s

# Step 2: cd to the directory of the corresponding kernel version number
# Run the following command as in the example above
cd 6.6.51/64/rpi-2712-RPi5

# Copy the corresponding version of st7796s.ko to the current system
sudo cp st7796s.ko /lib/modules/$(uname -r)/kernel/drivers

# Make sure the module is loaded at boot time, add the module name to the /etc/modules file:
sudo nano /etc/modules

# Add at the end
st7796s

Enter the following statement in the terminal to handle kernel module dependencies:
sudo depmod -a
- Configure driver device tree
cd
wget https://files.waveshare.com/wiki/common/Waveshare35g.dtbo
sudo cp Waveshare35g.dtbo /boot/overlays/
For Rpi4 & Rpi5
Configure Driver File
Refer to the steps here first #Install Driver Module
- Edit config.txt configuration file
sudo nano /boot/firmware/config.txt
Comment out the dual-screen configuration statements
Add the following statements at the end of [all]
dtparam=i2c_arm=on
dtparam=i2c_arm_baudrate=50000
dtparam=spi=on
dtoverlay=Waveshare35g,fps=60,speed=48000000,rotate=90,penirq=17
hdmi_force_hotplug=1
max_usb_current=1
hdmi_group=2
hdmi_mode=87
hdmi_cvt 480 320 60 6 0 0 0
hdmi_drive=2
Create Screen Configuration File
Create 98-spi-screen.conf file
sudo nano /etc/X11/xorg.conf.d/98-spi-screen.conf
Add the following parameters to 98-spi-screen.conf file
Section "Device"
    Identifier "SPI Screen"
    Driver "fbdev"
    Option "fbdev" "/dev/fb0"
EndSection
Note: After the entire process operation is completed, if they are not displayed, modify "/dev/fb0" to "/dev/fb1" and then restart it
Switch to X11
sudo raspi-config nonint do_wayland W1
Calibrate Resistive Touch Screen
Run the following statements on the terminal:
sudo apt-get install xserver-xorg-input-evdev
sudo cp -rf /usr/share/X11/xorg.conf.d/10-evdev.conf /usr/share/X11/xorg.conf.d/45-evdev.conf
sudo apt-get install xinput-calibrator
sudo nano /usr/share/X11/xorg.conf.d/99-calibration.conf
Add the following statements in the 99-calibration.conf file:
Section "InputClass"
        Identifier      "calibration"
        MatchProduct    "ADS7846 Touchscreen"
        Option  "Calibration"   "3932 300 294 3801"
        Option  "SwapAxes"      "1"
        Option "EmulateThirdButton" "1"
        Option "EmulateThirdButtonTimeout" "1000"
        Option "EmulateThirdButtonMoveThreshold" "300"
EndSection
Restart to take effect
For All Raspberry Pi Versions
It must be operated based on the bookworm lite version, 64-bit lite or 32-bit lite
Configure Driver File
Refer to the steps here first #Install Driver Module
- Edit config.txt configuration file
sudo nano /boot/firmware/config.txt
Comment out the KMS and dual-screen configuration statements
Add the following statements at the end of [all]
dtparam=i2c_arm=on
dtparam=i2c_arm_baudrate=50000
dtparam=spi=on
dtoverlay=Waveshare35g,fps=60,speed=48000000,rotate=90,ts_rotate_90
hdmi_force_hotplug=1
max_usb_current=1
hdmi_group=2
hdmi_mode=87
hdmi_cvt 480 320 60 6 0 0 0
hdmi_drive=2
Download Necessary Softwares
- Install the Xorg service
sudo apt-get install --no-install-recommends xserver-xorg -y
sudo apt-get install --no-install-recommends xinit -y
- Install desktop manager
sudo apt install lightdm -y
- Install official Raspberry Pi GUI
sudo apt install raspberrypi-ui-mods -y
- Install git
sudo apt install git -y
- Install a browser (optional)
sudo apt install chromium-browser -y
- Install a music player (optional)
sudo apt install vlc -y
Download and Run Driver
Open the Raspberry Pi terminal and execute:
sudo apt install libraspberrypi-dev -y
sudo apt-get install unzip -y
sudo apt-get install cmake -y
sudo wget https://files.waveshare.com/wiki/common/Rpi-fbcp.zip
sudo unzip ./Rpi-fbcp.zip
cd rpi-fbcp/
sudo rm -rf build
sudo mkdir -m 777 ./build
cd ./build
sudo cmake ..
sudo make -j4
sudo install fbcp /usr/local/bin/fbcp
Set Auto-start startx and fbcp
- Open the Bash shell file, or create one if it does not exist
sudo nano ~/.bashrc
Add the following code to the end of the file
if [ "$(cat /proc/device-tree/model | cut -d ' ' -f 3)" = "5" ]; then
    # rpi 5B configuration
    export FRAMEBUFFER=/dev/fb1
    startx  2> /tmp/xorg_errors
else
    # Non-pi5 configuration
    export FRAMEBUFFER=/dev/fb0
    startx  2> /tmp/xorg_errors
fi
- Create and edit a fbcp service file for autostart
sudo nano /etc/systemd/system/fbcp.service
Add service configuration in the file
[Unit]
Description=Framebuffer Copy for Raspberry Pi
After=network.target

[Service]
ExecStartPre=/bin/sleep 20
ExecStart=/usr/local/bin/fbcp
Restart=always
User=root
Group=root

[Install]
WantedBy=multi-user.target
Reload the systemd configuration
sudo systemctl daemon-reload
The service enables auto-start at boot
sudo systemctl enable fbcp.service
Test the startup service
sudo systemctl start fbcp.service
Calibrate Resistive Touch Screen
Run the following statements on the terminal:
sudo apt-get install xserver-xorg-input-evdev
sudo cp -rf /usr/share/X11/xorg.conf.d/10-evdev.conf /usr/share/X11/xorg.conf.d/45-evdev.conf
sudo apt-get install xinput-calibrator
sudo nano /usr/share/X11/xorg.conf.d/99-calibration.conf
Add the following statements in the 99-calibration.conf file:
Section "InputClass"
        Identifier      "calibration"
        MatchProduct    "ADS7846 Touchscreen"
        Option  "Calibration"   "3932 300 294 3801"
        Option  "SwapAxes"      "1"
        Option "EmulateThirdButton" "1"
        Option "EmulateThirdButtonTimeout" "1000"
        Option "EmulateThirdButtonMoveThreshold" "300"
EndSection
Set CLI Auto-login
sudo raspi-config nonint do_boot_behaviour B2
sudo raspi-config nonint do_wayland W1
sudo reboot
Note1: Make sure that the username of the Raspberry Pi is pi, otherwise it will not be able to log in automatically
Note2: After setting all the configurations above, the system takes longer to restart each time, and SSH also requires a moment to enter
Bullseye System Dektop Display
Install Driver Module
- Determine the current kernel version
uname -a
This command will output the complete kernel version information. For example, executing this command on Raspberry Pi 5 may produce the following output:
Linux raspberrypi 6.1.21-v8+ #1642 SMP PREEMPT Mon Apr 3 17:24:16 BST 2023 aarch64 GNU/Linux
This indicates that the kernel version number of this system is 6.1.21, and it uses 64-bit ARM (AArch64) architecture.
- Download and install the ST7796 driver module
# Step 1: Download and enter the Waveshare-st7796s driver folder
wget https://files.waveshare.com/wiki/common/Waveshare-st7796s.zip
unzip Waveshare-st7796s.zip
cd Waveshare-st7796s

# Step 2: cd to the directory of the corresponding kernel version number
# Run the following command as in the example above
cd 6.1.21/64/

# Copy the corresponding version of st7796s.ko to the current system
sudo cp st7796s.ko /lib/modules/$(uname -r)/kernel/drivers

# Make sure the module is loaded at boot time, add the module name to the /etc/modules file:
sudo nano /etc/modules

# Add at the end
st7796s

Enter the following statement in the terminal to handle kernel module dependencies:
sudo depmod -a
- Configure driver device tree
cd
wget https://files.waveshare.com/wiki/common/Waveshare35g.dtbo
sudo cp Waveshare35g.dtbo /boot/overlays/
Configure Driver File
Refer to the steps here first #Install Driver Module
- Edit config.txt configuration file
sudo nano /boot/config.txt
Comment out the KMS and dual-screen configuration statements
Add the following statements at the end of [all]
dtparam=i2c_arm=on
dtparam=i2c_arm_baudrate=50000
dtparam=spi=on
dtoverlay=Waveshare35g,fps=60,speed=48000000,rotate=90,penirq=17
hdmi_force_hotplug=1
max_usb_current=1
hdmi_group=2
hdmi_mode=87
hdmi_cvt 480 320 60 6 0 0 0
hdmi_drive=2
Download and Run Driver
Open the Raspberry Pi terminal and execute:
sudo apt install libraspberrypi-dev -y
sudo apt-get install unzip -y
sudo apt-get install cmake -y
sudo wget https://files.waveshare.com/wiki/common/Rpi-fbcp.zip
sudo unzip ./Rpi-fbcp.zip
cd rpi-fbcp/
sudo rm -rf build
sudo mkdir -m 777 ./build
cd ./build
sudo cmake ..
sudo make -j4
sudo install fbcp /usr/local/bin/fbcp
Set Auto-start fbcp
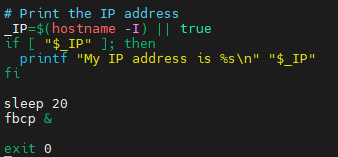
- Open rc.local file
sudo nano /etc/rc.local
Before adding the following code to exit 0, be sure to add "&" to run in the background, otherwise the system may not start.
sleep 20
fbcp &
Calibrate Resistive Touch Screen
Run the following statements on the terminal:
sudo apt-get install xserver-xorg-input-evdev
sudo cp -rf /usr/share/X11/xorg.conf.d/10-evdev.conf /usr/share/X11/xorg.conf.d/45-evdev.conf
sudo apt-get install xinput-calibrator
sudo nano /usr/share/X11/xorg.conf.d/99-calibration.conf
Add the following statements in the 99-calibration.conf file:
Section "InputClass"
        Identifier      "calibration"
        MatchProduct    "ADS7846 Touchscreen"
        Option  "Calibration"   "3932 300 294 3801"
        Option  "SwapAxes"      "1"
        Option "EmulateThirdButton" "1"
        Option "EmulateThirdButtonTimeout" "1000"
        Option "EmulateThirdButtonMoveThreshold" "300"
EndSection
Restart to take effect
Resources
Schematic Diagram
Demo
Datasheets
Softwares
- Chinese Character Modulation Software
- Image2Lcd Image Modulation Software
- Image Modulation Tutorial
- Font Modulation Tutorial
- flash_download_tool_3.9.7
FAQ
Support
Monday-Friday (9:30-6:30) Saturday (9:30-5:30)
Email: services01@spotpear.com
[Tutorial Navigation]
- Overview
- Raspberry Pi Tutorial
- Hardware Connection
- Method 1: Connect the Raspberry Pi through Pigo Pin
- Method 2: Connect the Raspberry Pi through GH1.25 13PIN Cable
- Enable SPI Interface
- Python Environment
- Bookworm System Desktop Display
- Bullseye System Dektop Display
- Resources
- FAQ
- Support


