- sales/support
Google Chat:---
- sales
+86-0755-88291180
- sales01
sales@spotpear.com
- sales02
dragon_manager@163.com
- support
tech-support@spotpear.com
- CEO-Complaints
zhoujie@spotpear.com
- Only Tech-Support
WhatsApp:13246739196
- Purchase/Shipping/Refund
WhatsApp:13424403025
WAVEGO API Tutorial
Subcontroller Program
The sub-controller program is the basic program for WAVEGO, responsible for all motion control and sensor information processing of the robot, which can be run in ESP32 and can be developed with the Arduino IDE.
Software Introduction
ESP32
"WAVEGO.ino" is the main program for initializing each module and executing commands.
"InitConfig.h" is the specific function of each module initialization, including IO port settings.
"app_httpd.cpp" is used to set WIFI SSID and password, including functions about WEB application and camera. "WebPage.h WEB" is the application interface.
"ServoCtrl.h" is the function of servo control and math, including the underlying servo angle control, inverse linkage, and gait generation functions.
"PreferencesConfig.h" is used to save the servo position after setting, which can prevent the data not to be lost due to re-uploading the program. You can also perform secondary development based on this function to save other data that needs to be permanently saved. Please note that the number of reading and writing of an address in Flash has a limit (about 100,000 times), so don't use it to store variables that change constantly.
Gait Generation & Control
Here we introduce the function of gait generation and control, and we will have a detailed introduction of each function.
Iterate "robotCtrl()"
robotCtrl();
We can control the basic movement of the robot by changing the following two variables. For more specific methods, please refer to the following chapters on gait functions.
For a detailed introduction to each function.
extern int moveFB = 0;
extern int moveLR = 0;
The following variable is used to set the function mode of the robot. When you have a custom function or action, you can make the robot run in the specified mode by changing this variable.
extern int funcMode = 0;
// 0 as not in any function mode. Robot can be controled to
move around.
// 1 as in steady mode. keep balancing.
// 2 as stayLow action.
// 3 as handshake action.
// 4 as jump action.
// 5, 6 and 7 as ActionA, ActionB and ActionC.
// 8 as servos moving to initPos, initPos is the middle angle
for servos.
// 9 as servos moving to middlePos, middlePos is the middle
angle for program.
The command is judged in robotCtrl(), here we focus on the basic movement in the gait generation.
Function for selecting gait in robotCtrl():
void gaitTypeCtrl(float GlobalStepInput, float directionCmd, int turnCmd)
The function for generating simpleGait in "gaitTypeCtrl()":
void simpleGait(float GlobalInput, float directionAngle, int turnCmd)
SimpleGait() is used to control the gait cycle of a single leg (the action of a single leg is controlled by the gait cycle parameter):
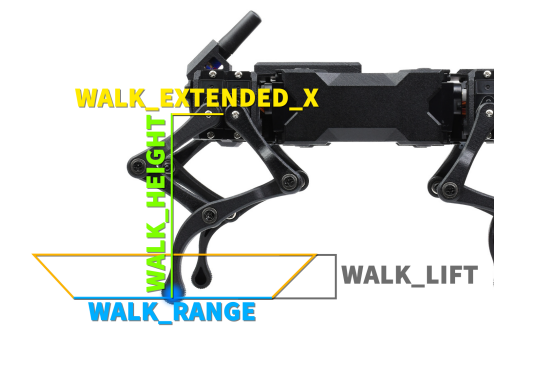
void singleGaitCtrl(uint8_t LegNum, uint8_t statusInput, float cycleInput, float
directionInput, double extendedX, double extendedZ)
The function in singleGaitCtrl() used to control the action of a leg through the coordinate point parameter:
(The previous function uses the gait cycle to control a leg, and this function uses the coordinate point to control the leg; the previous function uses the gait cycle parameter to calculate the coordinate point position and pass it to singleLegCtrl().)
void singleLegCtrl(uint8_t LegNum, double xPos, double yPos, double zPos)
The three functions are used to solve the angle of the servo in singleLegCtrl().
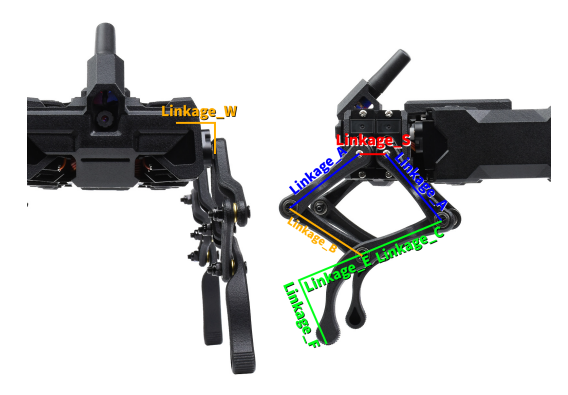
void wigglePlaneIK(double LA, double aIn, double bIn, uint8_t outputAlpha,
uint8_t outputLen)
void simpleLinkageIK(double LA, double LB, double aIn, double bIn, uint8_t
outputAlpha, uint8_t outputBeta, uint8_t outputDelta)
void singleLegPlaneIK(double LS, double LA, double LC, double LD, double LE,
double xIn, double yIn, uint8_t outputBeta, uint8_t outputX, uint8_t outputY)
From this, the angles of the three servos of each leg are calculated so you can control the servo to swing to the specified position.
For more specific information about the above functions, please refer to the subsequent function introduction chapters.
Demo Text
This chapter is used to introduce how to experiment or test subsequent functions. You can also use this method to test your own secondary development functions.
You can change the loop() function in "WAVEGO.ino" where the main program of this product runs.
The default loop() is as follows:
// main loop.
void loop() {
   robotCtrl();
   allDataUpdate();
   wireDebugDetect();
}
You can comment out all three functions and replace them with functions you need to test. For example, the following demo can make the robot's No. 1 leg swing cyclically in a gait cycle.
// main loop.
void loop() {
  // robotCtrl();
  // allDataUpdate();
  // wireDebugDetect();
while(1){
   for(i=0; i<=1; i+=0.01){
        singleGaitCtrl(1, 1, i, 0, WALK_EXTENDED_X, WALK_EXTENDED_Z);
        delay(STEP_DELAY);
    }
  }
}
In the subsequent function introduction, this method will be used to introduce demos for individual functions, and this method will not be repeated.
Parameters Related to Robot Mechanical Structure
- The corresponding number of each leg in the program.
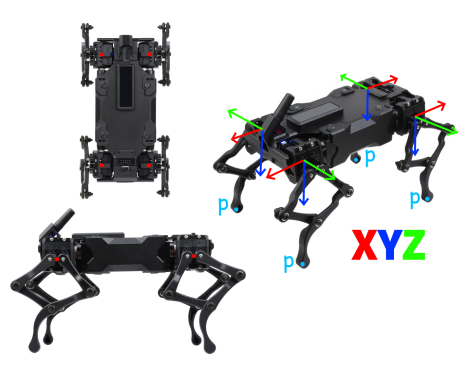
- The 3D coordinate origin and positive direction for each leg.
- Parameters for linkage inverse-solved gait algorithm.
Function Introduction
Gait Function
void robotCtrl();
Call this function cyclically, and the robot will perform corresponding actions according to the values of the two variables moveFB and moveLR.
When the special action command is issued, it will also be executed in this function.
| moveFB | moveLR | Function | |
|---|---|---|---|
| Move Forward | 1 | 0 | gaitTypeCtrl(GLOBAL_STEP, 0, 0) |
| Move Backward | -1 | 0 | gaitTypeCtrl(GLOBAL_STEP, 180, 0) |
| Move Forward Left | 1 | -1 | gaitTypeCtrl(GLOBAL_STEP, 30, 0) |
| Move Forward Right | 1 | 1 | gaitTypeCtrl(GLOBAL_STEP, -30, 0) |
| Move Backward Right | -1 | 1 | gaitTypeCtrl(GLOBAL_STEP, -120, 0) |
| Move Backward Left | -1 | -1 | gaitTypeCtrl(GLOBAL_STEP, 120, 0) |
| Turn Left | 0 | -1 | gaitTypeCtrl(GLOBAL_STEP, 0, -1) |
| Turn Right | 0 | 1 | gaitTypeCtrl(GLOBAL_STEP, 0, 1) |
- The role of the function
robotCtrl()is to convert the command into a parameter and pass it to the gait selection functiongaitTypeCtrl(StepInput, AngleInput, TurningCmd). - Use the parameter GAIT_TYPE to select the gait type. In the default program, only the diagonal gait code 0 can be used, and the gait code 1 is the triangle gait as an example of gait development. It is not recommended for high debugging requirements. For the debugging method and interface of gait, please refer to the chapter on gait debugging.
- The function for focusing gait:
simpleGait(float GlobalInput, float directionAngle, int turnCmd)- float StepInput (>=0 & <=1), corresponding to a gait cycle, the gait generation function uses this variable to control the movement of each joint of the robot to a certain shape within the gait cycle.
- float AngleInput (>= -180 & <=180), which is used to control the direction of the robot. For example, when this parameter is 30, the robot will move 30° to the left front, and the head will remain unchanged.
- int turnCmd (-1, 0, 1), used to control the steering of the robot. When this parameter is -1, it turns left in place, and when this parameter is 1, it turns right in place.
One Leg Control
void singleGaitCtrl(uint8_t LegNum, uint8_t statusInput, float cycleInput, float
directionInput, double extendedX, double extendedZ);
- There is a gait cycle in the robot, which was introduced in the gait function. Corresponding to each leg, there is also a leg movement cycle. A complete leg movement cycle includes a swing pair and a support pair.
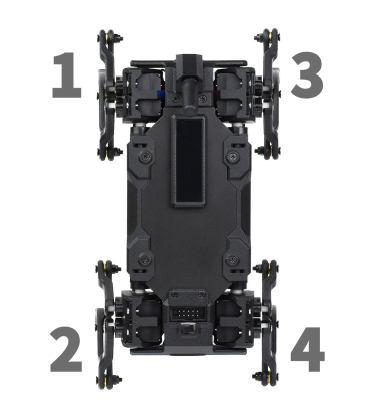
- uint8_t LegNum: select the leg to be controlled, the left front leg is 1, the left rear leg is 2, the right front leg is 3, and the right rear leg is 4.
- uint8_t statusInput Coefficient: control the swing amplitude of the leg, the actual amplitude = WALK_RANGE*statusInput.
- float cycleInput: control the leg movement to a certain point in the swing cycle. When cycleInput changes from 0-1, it will control a leg to run a complete cycle.
- float directionInput: control the forward direction, 180=backward, 0=forward, 90 to sit, -90 to right.
- double extendedX: control how far the location is extended in the front-back direction.
- double extendedZ: control the extension distance of the location position in the left and right direction to the far side.
// main loop.
void loop() {
   // robotCtrl();
   // allDataUpdate();
  // wireDebugDetect();
while(1){
  for(i=0; i<=1; i+=0.01){
       singleGaitCtrl(1, 1, i, 0, WALK_EXTENDED_X, WALK_EXTENDED_Z);
       delay(STEP_DELAY);
  }
 }
}
After uploading this demo, the robot's left front leg will move in one swing cycle.
Sensor
In order to avoid repetitive development, the libraries used in our products are all open source libraries with high popularity, and the library manager comes with Arduino IDE.
INA219 voltage and current Detection
InitINA219() is used to initialize the INA219() sensor.
Call InaDataUpdata() to read data from the sensor.
The read data includes the following:
float shuntVoltage_mV = 0.0; // shunt voltage
float loadVoltage_V = 0.0; // load voltage
float busVoltage_V = 0.0; // bus voltage
float current_mA = 0.0; // current current
float power_mW = 0.0; // current power
For more information on the use of the INA219 sensor, please refer to this Github link.
2 ICM20948 9-axis Motion Tracker
InitICM20948() is used to initialize the ICM20948.
Call accXYZUpdate() to read data from the sensor.
The read data includes the following:
float ACC_X; // X-axis attitude
float ACC_Y; // Y axis attitude
float ACC_Z; // Z-axis attitude
You can also refer to the routine of ICM20948 to read more other data. For more information, please refer to this Github link.
OLED Dislay
InitScreen() is used to initialize the SSD1306 OLED display.
The controls for the display are as follows:
display.clearDisplay(); // clear the display
display.setTextSize(1); // set the text size
display.setTextColor(SSD1306_WHITE); // set the text color
display.setCursor(0,0); // set the cursor position
display.print(F("TEXT")); // write text
display.println(F("TEXT")); // wrap text after writing
display.display(); // display the new content
You can also refer to the demo of SSD1306 to control the screen to display other content.
RGB LED
InitRGB() is used to initialize the RGB LED.
The numbers of the two onboard LEDs are 0 and 1 respectively, you can use the LED pins of the 2*5P multi-function expansion interface to expand more LED lights.
(The model number is WS2812), the number of extra-extended RGB LEDs starts with 3.
The control routine for the RGB LED is as follows:
// LED_NUM: LED number
// R: The value of the red channel, the range is 0<=R<=255, the larger the value, the higher the brightness of this channel.
// G: The value of the green channel, the range is 0<=G<=255, the larger the value, the higher the brightness of this channel.
// B: The value of the blue channel, the range is 0<=B<=255, the larger the value, the higher the brightness of this channel.
setSingleLED(LED_NUM, matrix.Color(R, G, B));
When the values of the three color channels are all 0, the light will turn off.
setSingleLED(0, matrix.Color(0, 0, 0)); // Control light 0 to go off.
setSingleLED(1, matrix.Color(0, 0, 0)); // Control light 1 to go off.
When all three color channels have a value of 1, the light turns bright white.
setSingleLED(0, matrix.Color(255, 255, 255)); // Control light 0 as white light with maximum brightness.
setSingleLED(1, matrix.Color(255, 255, 255)); // Control lamp 1 to white light with maximum brightness.
Buzzer
InitBuzzer() is used to initialize the buzzer.
The buzzer control demo is as follows:
digitalWrite(BUZZER, HIGH); // Buzzer does not sound.
digitalWrite(BUZZER, LOW); // Buzzer sounds.