- sales/support
Google Chat:---
- sales
+86-0755-88291180
- sales01
sales@spotpear.com
- sales02
dragon_manager@163.com
- support
tech-support@spotpear.com
- CEO-Complaints
zhoujie@spotpear.com
- Only Tech-Support
WhatsApp:13246739196
- Purchase/Shipping/Refund
WhatsApp:13424403025
- HOME
- >
- ARTICLES
- >
- For Arduino
- >
- Mother Board
UNO R3 User Guide
一: Introduction to programming environment
① Software acquisition
Download Arduino development environment: You need to download Arduino IDE back (IDE is the software program development environment of Arduino). Click the following link to download:
Windows
Mac OS X (please download it yourself)
② Drive installation
After downloading, you can find a place to decompress and zoom. Then unpack the purchased arduino and connect it to the computer with a square-headed u * * data cable. This post takes the win xp and win7 systems as examples to demonstrate how to install the original arduino driver.
(1) Win xp system:
After connecting to the computer with a square-head u * * * data cable, the new hardware recognition display will appear
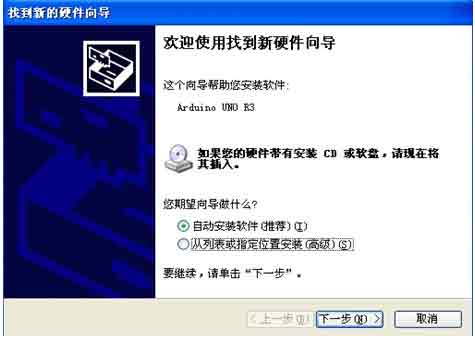
Click Next, and the driver search directory will appear. The driver is under the drivers file in the IDE software.
After finding it, click Next, and then wait for a moment.

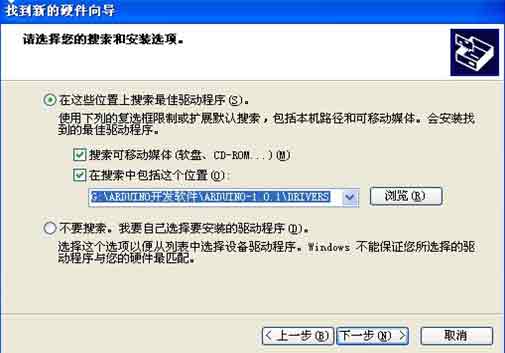
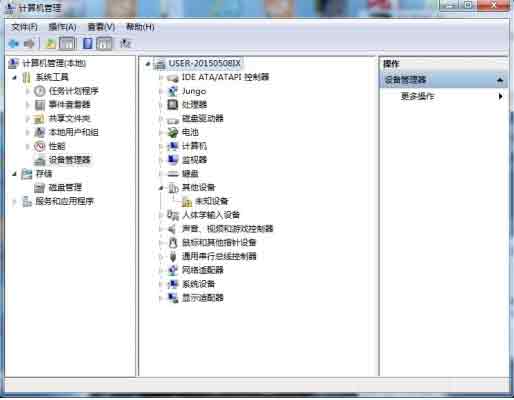
After the installation is completed, click Device Manager to verify whether the installation is successful.
After the driver is installed, the COM ports can be displayed. Here I show the COM4 ports. If you have installed this step, congratulations on the successful installation of the original arduino driver under the WINXP system.
(2) Win7 system:
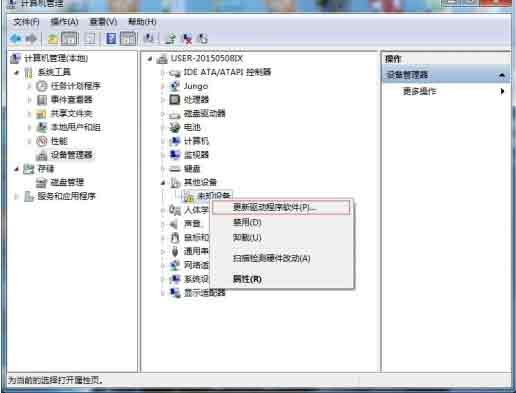
After connecting to the computer with a square-headed u * * data cable, there will be an unknown device prompt in the device manager after recognizing the new hardware.
After that, right-click to update the driver.
After clicking, click "Browse the computer to find the driver software" in the pop-up dialog box, that is, find the arduino driver in the computer.
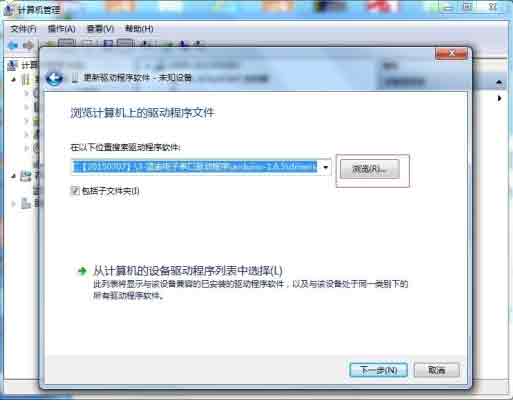
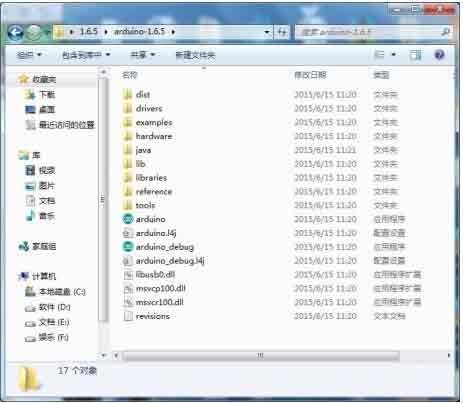
The arduino driver is located in the drivers file under the IDE software folder, so the directory where the drivers folder is located is as follows.
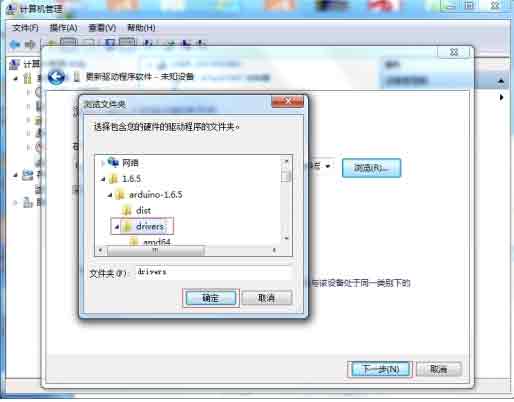
After selecting, click OK, and then go to the next step. Wait a moment for the software installation to complete.
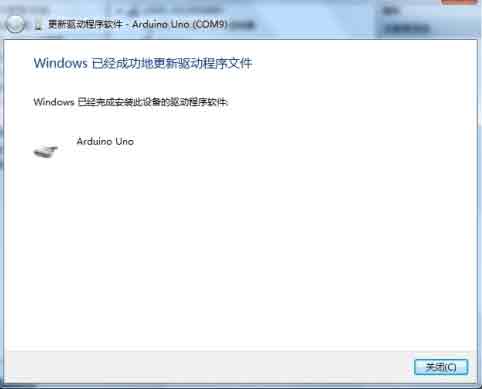
When the above prompt appears, it is proved that the original arduino driver has been installed. To view the com slogan, we open the device manager again.
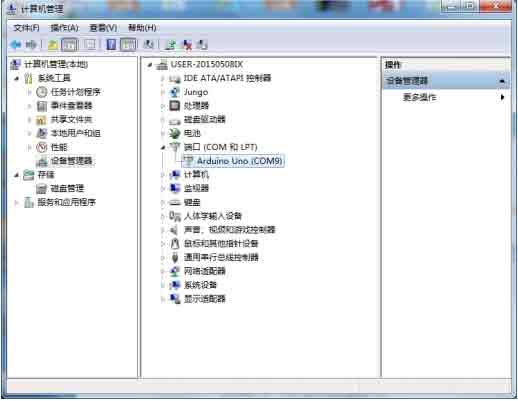
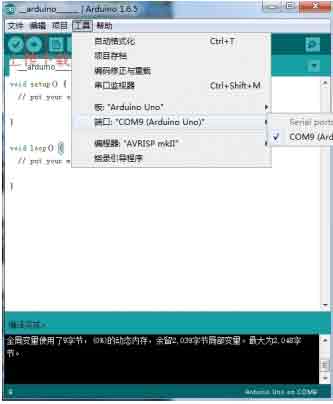
We can see that our arduino driver has been successfully installed, and the com slogan is COM9.
③ Software instructions
(1) Software introduction
Next, let's introduce the IDE interface of Arduino. Take Arduino 1.6.5 IDE as an example, first enter the software directory. Then you can see the arduino.exe file and double-click to open the IDE.
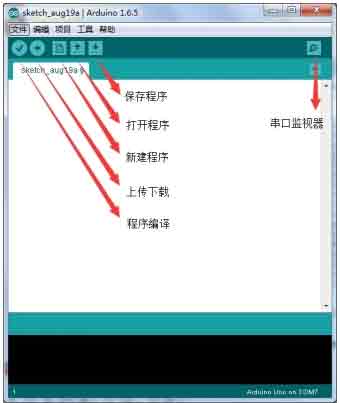
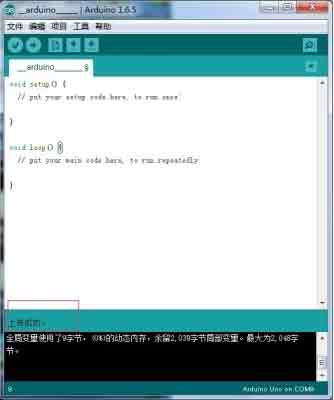
First of all, you will see the interface below. The functions of the toolbar buttons are "Compile" - "Upload" - "Create a new program" - "Open a program" - "Save a program" - "Serial port monitor"
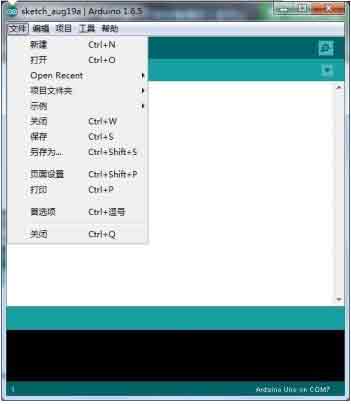
On the menu bar, first look at the File menu. The introduction is as follows:
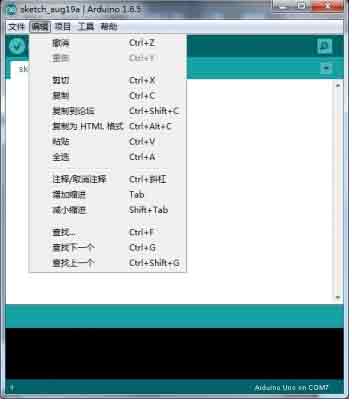
Next, look at the Edit menu. The introduction is as follows:
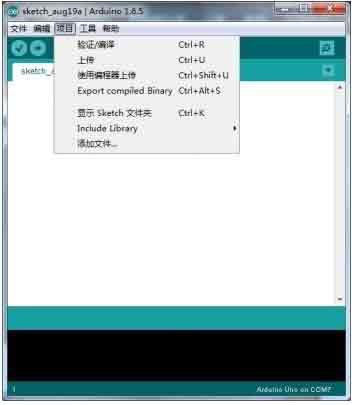
Sketch Menu Introduction
Tools Menu Introduction
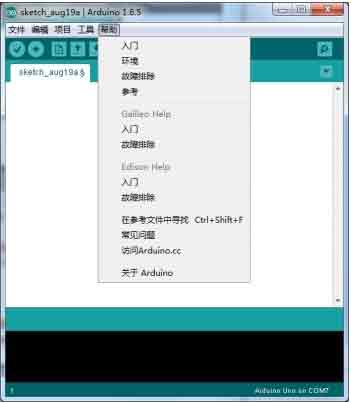
Help Introduction
(2) Download program
Next, let's explain how to download programs: download programs to the original development board of arduino uno R3 through IDE software. Find the IDE software and open the application.

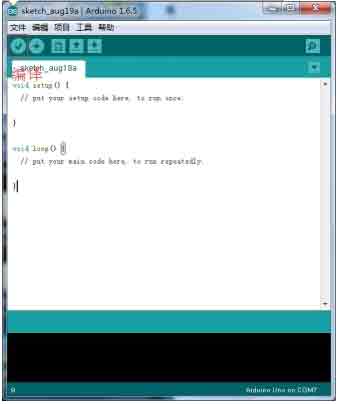
After opening the software, the interface is as follows, and the original program appears. We click the compile button.
This is the interface being compiled. Waiting...
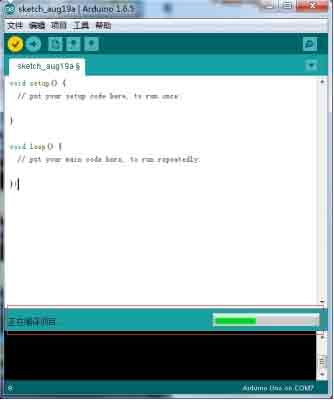
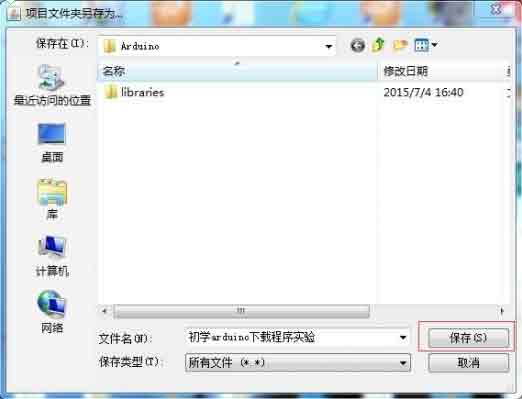
During the compilation process, because we did not save the program before, the save interface pops up. After renaming, click Save.
The compilation is completed after a little while.

Next, we search the port in the tool directory. Here, my computer is COM9 port. Just select COM9 directly. Then click the upload button, which means to download the program. At this time, ensure that the arduino board has been plugged into the computer.
In this way, you have completed the steps of downloading programs from the IDE software to the original development board of arduino uno R3.
If the above interface appears after you upload and download the program, congratulations on your success in downloading the program of arduino uno R3! It can be said that your arduino already has the foundation of entry!
④ Arduino main control board description
Summary
Arduino is a simple I/O platform based on open source code, and has the characteristics that the development language and development environment are simple and easy to understand. Let you quickly use Arduino to make interesting things. It is a set of tools that can be used to sense and control the real physical world. It consists of a hardware platform based on single-chip microcomputer and open source, and a development environment for programming Arduino board. Arduino can be used to develop interactive products. For example, it can read a large number of switch and sensor signals, and can control a variety of lights, motors and other physical devices. The Arduino project can be separate, or it can communicate with the programs running in your computer (such as Flash, Processing, MaxMSP) at runtime.
Feature description
Open source circuit diagram design and development interface can be downloaded for free, and can also be modified as required!! The download procedure is simple and convenient. It can simply connect with sensors and various electronic components (such as LED lights, buzzers, keys, photoresistors, etc.) to make various interesting things. Use high-speed microprocessor controller (ATMEGA328). The development language and development environment are very simple and easy to understand, and are very suitable for beginners to learn.
Performance description
Digital I/O digital input/output ports 0-13.
Analog I/O analog input/output ports 0-5.
Support ISP download function.
Input voltage: no external power supply or external 5V~9V DC voltage input is required when connecting USB.
Output voltage: 5V DC voltage output, 3.3V DC voltage output and external power input.
Atmel Atmega328 microprocessor controller is adopted. Due to its numerous supporters, the company has developed a 32-bit MCU platform to support arduino.
Arduino size: 70mm wide X 54mm high.
Several special port descriptions:
1) VIN port: VIN is the abbreviation of input voltage, indicating the input port when there is external power supply. If USB power supply is not used, the external power supply can provide voltage through this pin. (If the battery is powered, the positive structure of the battery is connected to the VIN port and the negative structure is connected to the GND port).
2) AREF: Reference voltage for the analog inputs. Called using the analogReference() command.
⑤ The first routine is written by HELLO Xincontrol
Here you should have a preliminary understanding of Arduino and ArduBlock. Let's learn this graphical programming software through practical operation.
Serial port is a single-chip debugging tool that we often use. Through it, we can have a dialogue with the single chip computer. For example, the single chip computer collects the value of the sensor. We can send it through the serial port, and then determine whether the single chip computer correctly collects the value of the sensor.
一、 Send Hello Xincontrol to greet us with the help of SCM
1. Control learning
Serial port is our common single-chip communication module. It is located under the communication sub-column of graphical programming (as shown in Figure 1.1)
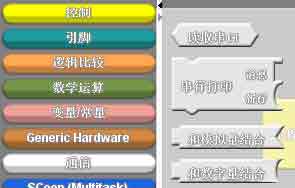
Figure 1.1
It contains two parameters:
① Message to be sent;
② Whether to wrap.
The data sent by it can be viewed by using the serial port monitor provided by the software (as shown in Figure 1.2)

Figure 1.2
2. Programming
Drag a graphic control for serial port printing to connect to the node of the main program, and set the message as "Hello Xincontrol". (See Figure 1.3)
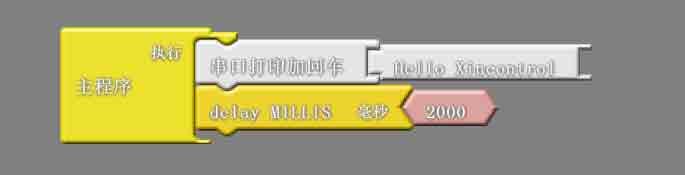
Figure 1.3
3. Program execution
After saving and downloading the program, open the serial port monitor and you can see that the SCM has been sending out the string of "Hello XinControl" (as shown in Figure 1.4)
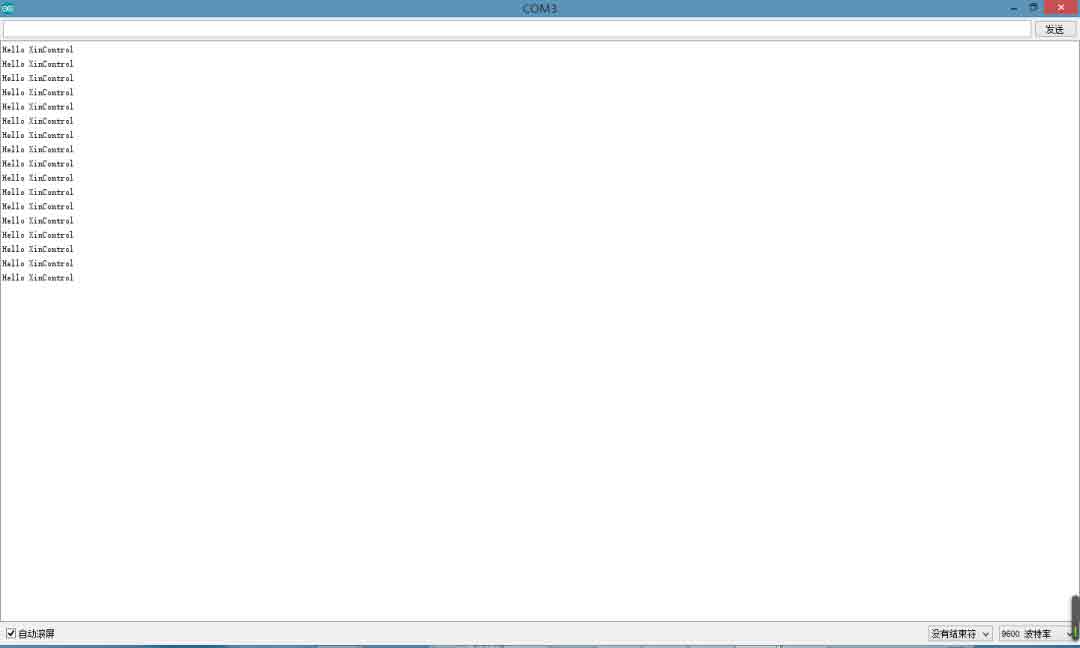
Figure 1.4
4. Program analysis
After the graphic transformation software is executed, we can see the generated C language code as shown below:
Click the orange box (at the magnifying glass) to open the serial port monitor.

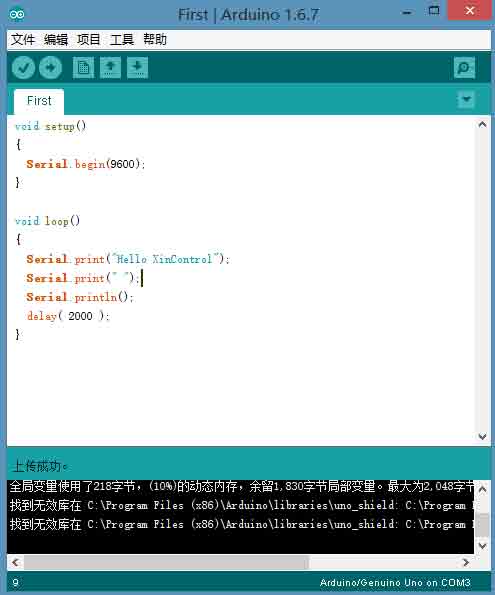
Serial.print(“Hello XinControl”); Print Hello XinControl.
Serial.print(“ ”); Transfer the data to the computer and provide the option of encoding mode. If not specified, it is expected to be transmitted in general text.
Serial.println( ); Indicates that the line breaks are printed every time (can be observed in serial communication)
Delay(2000); Print the next line with a delay of 2000ms for each line