


- sales/support
Google Chat:---
- sales
+86-0755-88291180
- sales01
sales@spotpear.com
- sales02
dragon_manager@163.com
- support
tech-support@spotpear.com
- CEO-Complaints
zhoujie@spotpear.com
- Only Tech-Support
WhatsApp:13246739196
- Purchase/Shipping/Refund
WhatsApp:13424403025
- HOME
- >
- ARTICLES
- >
- Common Moudle
- >
- LCD
PhotoPainter-B User Guide
Overview
Parameters
| Display Size | 160.0mm × 96.0mm |
| Outline Dimensions | 154.0mm × 214.0mm × 32.0mm |
| Screen Pixel Pitch | 0.2mm × 0.2mm |
| Screen Resolution | 800 × 480 |
| Display Color | Black, White, Green, Blue, Red, Yellow |
| Grayscale | 2 |
| Refresh Time | 12s |
| Sleep Current | < 0.01uA (close to 0) |
| Charging Voltage/Operating Voltage | 5V |
- Refresh time: The refresh time is based on experimental test data, and there may be errors in the actual refresh time. The actual results shall prevail. There will be a flickering effect during the global refresh process, which is a normal phenomenon.
Usage
Function Introduction
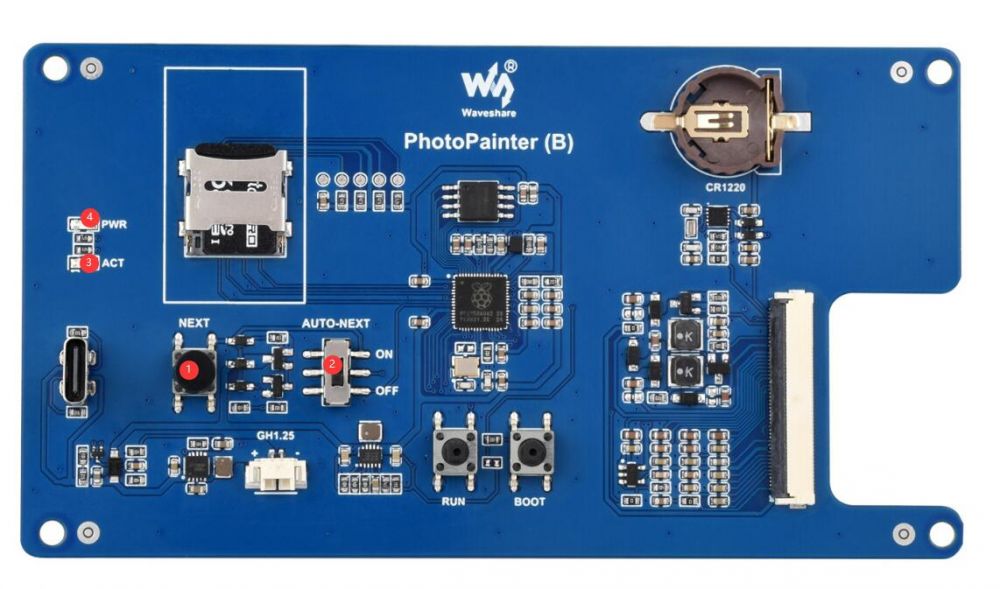
- NEXT button: The function of this button is to switch between images. Pressing it will switch to the next image. Please note that if there is a change in the number or name of the images on the memory card, the index will be regenerated and played from the first image.
- AUTO-NEXT switch: This switch is used to switch the electronic frame's operating mode. By default, it is "OFF", in which case the RTC signal will not be processed. To switch to automatic mode, please turn the switch to the "ON" position. In automatic mode, the RTC signal will trigger the switching of images. The trigger interval can be modified by the program, with the default set to 12 hours. Please note that the image switch button is still valid in automatic mode.
- ACT indicator light: It will flash three times before each refresh if the self-check is normal; it will flash quickly when reading or writing to the memory card.
- PWR indicator light: It will flash five times during self-check for low battery before each refresh; it will light up when charging the lithium battery and turn off after it is fully charged.
Quick Usage
There is a limit to the number of factory firmware, just follow the firmware flashing tutorial below to refresh the firmware again.
- First of all, prepare the picture to be displayed, the electronic photo frame only supports 24-bit BMP format images, and the resolution must be 480*800 or 800*480. For picture production, please refer to the next section Picture Production, and here are some sample pictures that work well, you can click here to download.
- Then prepare a FAT32 memory card, create a new "pic" folder in the root directory of the card, and place the images to be displayed in it (with file names less than 100 characters in length, theoretically able to store hundreds of thousands of files)
- Next, insert the memory card into the memory card slot of the electronic photo frame, please refer to: TF card removal and installation
- Finally, the photo frame can be powered by either a 5V Type-C USB interface or a 3.7V lithium battery. Note: If you want to use automatic mode, please insert the button battery on the RTC chip or use USB power.
Note: MAC will generate hidden files when copying pictures or folders, and then our program will also read these hidden files, which will eventually cause the program to get stuck. Delete these hidden files in the pic folder, and delete the fileList.txt and index txt files in the root directory of the TF card to solve the problem.
Picture Production
- To make a scatter plot with PS and other tools, please refer to: E-Paper Floyd-Steinberg
- Use the tools we have written to convert images, applications and source codes: Six color dithering image conversion tool
- The program converts images to appropriate resolutions and optimizes them using dithering algorithms, supports most formats of images, recognizes the orientation of images and automatically stretches and crops them
- How to use: Drag and drop the picture directly onto "convert.exe" to convert a single image, or put all the images into a folder and then double-click "converterTo6color_all.cmd" for batch conversion
- Note: This program is developed and open source for the convenience of customers only, and we do not provide technical support for it
Tools for Windows
- Single image conversion
Drag the image onto convert.exe
- Batch conversion of images
Put the images, convert.exe, and converterTo6color_all.cmd in a folder, and then double-click converterTo6color_all.cmd
Tools for MAC
Put the images, convert, and converterTo6color_all in a folder
Open the terminal and enter the corresponding folder
cd xxxx/xxx/xxx/
- Conversion of a single image
Enter the command to grant the convert executable permission
sudo chmod +x convert
Image conversion
./convert image name
- Batch conversion of images
You need to perform permission operations on the convert file first
Enter a command to give converterTo6color_all.sh executable permissions
sudo chmod +x converterTo6color_all.sh
Image conversion
./converterTo6color_all.sh
Development Description
- Note: This program is open source and does not provide technical support (please feel free to provide feedback if there are any bugs).
- The program is written based on Rpi Pico's C++SDK, compiled using CMAKE, and theoretically supports multiple platforms. Please set up the relevant environment yourself.
- Windows environment setup
- Raspberry Pi environment setup
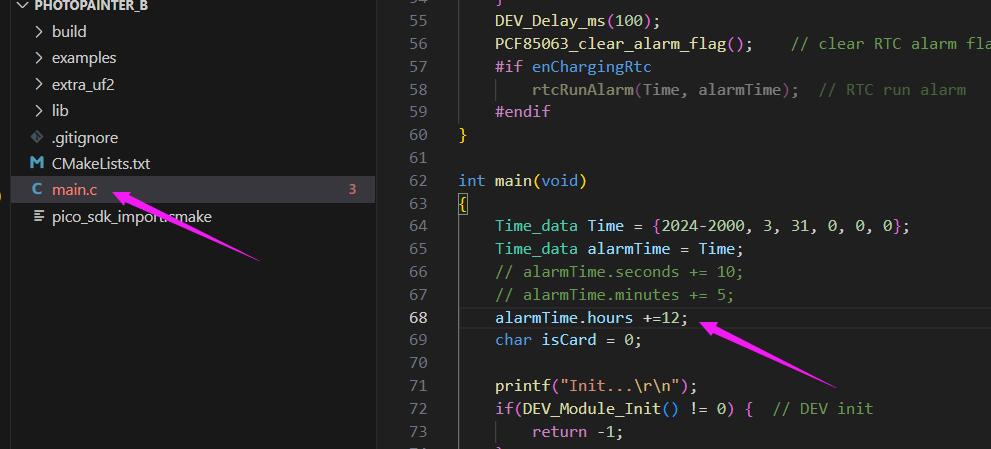
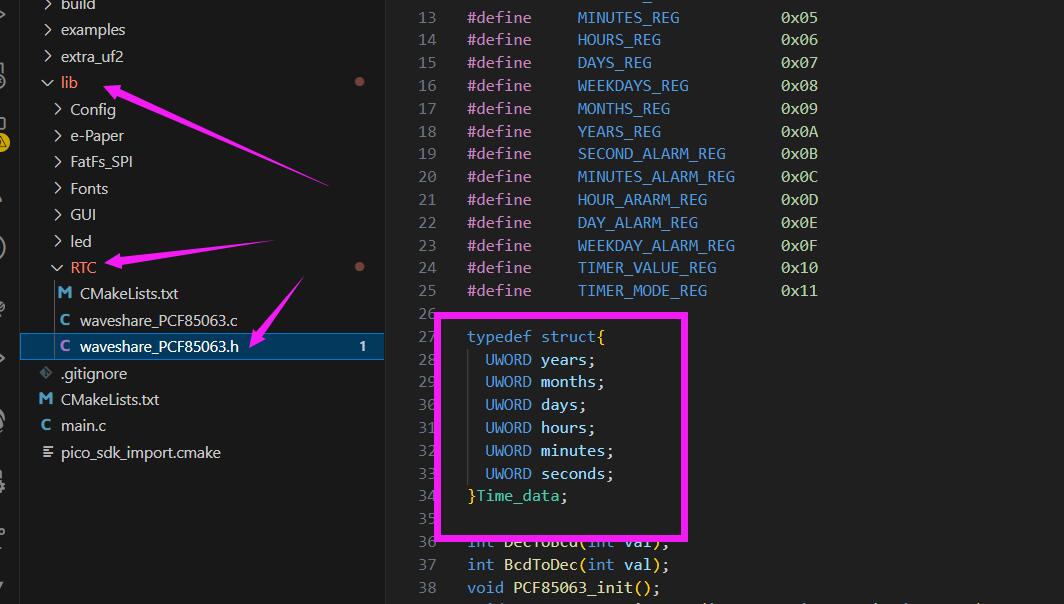
Timing Modification
- Directly modify the alarmTime struct in main.c
- The modification position is shown in the figure, which means that it is refreshed every 24 hours. If you have other needs, you can modify other parameters in the structure
Firmware Flashing
- By default, the firmware switches images every 12 hours in mode 0
- The flashing solution is as follows:
Press RUN, then press BOOT, then release RUN, and then release BOOT. The computer will pop up a USB flash drive, and you can drag the UF2 file into it
Firmware Function
Mode Selection
Mode 0: Automatically get the image names in the pic folder and sort them
Mode 1: Automatically get the image names in the pic folder, but do not sort
Mode 2: The name of the image in the pic folder will not be automatically obtained. Users need to create a fileList.txt file in the root directory of the TF card and write the image name in it
Clock Selection
The next timer will only start after the screen refresh is completed
rtc_15_minutes. uf2: Refresh every 15 minutes
rtc_30_minutes. uf2: Refresh every 30 minutes
rtc_1_hours. uf2: Refresh once 1 hour
rtc_2_hours. uf2: Refresh every 2 hours
rtc_4_hours. uf2: Refresh every 4 hours
rtc_6_hours. uf2: Refresh every 6 hours
rtc_8_hours. uf2: Refresh every 8 hours
rtc_10_hours. uf2: Refresh every 10 hours
rtc_12_hours. uf2: Refresh every 12 hours
rtc_24_hours. uf2: Refresh every 24 hours
Resources
Documents
Demo
Related Documents
Development Resources
FAQ
1. First remove the TF card, then press the NEXT button to see if the red indicator light flashes red and the screen refreshes. If all are present, the hardware is functioning properly.
2. Check if the photos in the TF card meet the requirements of the 24-bit bmp file with a resolution of 800 × 480 or 480 x 800 under the pic folder. Or you can replace the file in the image with "Related Documents-> Sample Images" in the tutorial to see if it is an issue with the image.
3. If the indicator light does not light up normally, please connect the data cable to the Type-C interface, and see if there is a green light. After charging, see if it still displays.
4. If there is no problem with the hardware, but the inserted TF card still cannot refresh the picture, please follow the "Firmware Flashing" operation method in the tutorial and flash the firmware again to see if it can solve the problem. The firmware is in the "Demo -> Demo source code" of the tutorial.
5. If you are using MAC as the system, please refer to the second question in the FAQ.
Question: After making a TF card through MAC and refreshing the image, the NEXT button becomes invalid and cannot refresh automatically
Reason for the problem: MAC generates hidden files when copying images or folders, and our program also reads these hidden files, ultimately causing the program to freeze
Solution: Delete these hidden files, and delete the fileList.txt and index txt files under the root directory of TF card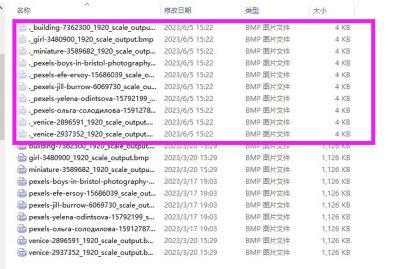
Question: Firmware update
Press RUN, then press BOOT, then release RUN, and then release BOOT. The computer will pop up a USB flash drive, and you can drag the UF2 file into it
Question: TF card removal and installation
1. For safety reasons, it is necessary to disconnect the USB and battery, and turn the switch to the OFF position for replacement
2. If you do not want to remove the back cover, you need to disconnect the USB, turn the switch to the OFF position, and perform the replacement when the screen is not refreshing
Question: Can the Type-C interface provide supply power?
It can supply power to lithium batteries.
Question: Is there a way to restart the device without disassembling the frame?
After connecting the USB, press the Reset button or flash the firmware again.
Support
Monday-Friday (9:30-6:30) Saturday (9:30-5:30)
Mobile: +86 13434470212
Email: services01@spotpear.com

[Tutorial Navigation]
- Overview
- Usage
- Function Introduction
- Quick Usage
- Picture Production
- Development Description
- Timing Modification
- Firmware Flashing
- Firmware Function
- Resources
- FAQ
- Question: PhotoPainter (B) After inserting a TF card and battery, pressing the button does not display any images.
- Question: After making a TF card through MAC and refreshing the image, the NEXT button becomes invalid and cannot refresh automatically
- Question: Firmware update
- Question: TF card removal and installation
- Question: Can the Type-C interface provide supply power?
- Question: Is there a way to restart the device without disassembling the frame?