


- sales/support
Google Chat:---
- sales
+86-0755-88291180
- sales01
sales@spotpear.com
- sales02
dragon_manager@163.com
- support
tech-support@spotpear.com
- CEO-Complaints
zhoujie@spotpear.com
- Only Tech-Support
WhatsApp:13246739196
- Purchase/Shipping/Refund
WhatsApp:13424403025
- HOME
- >
- ARTICLES
- >
- Common Moudle
- >
- Camera
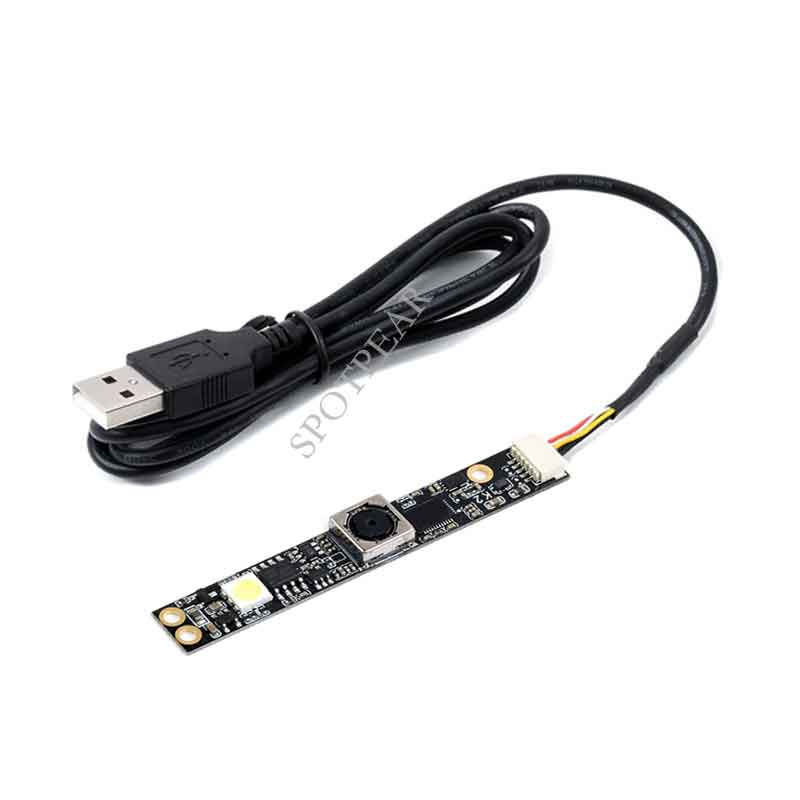
OV5640 5MP USB Camera User Guide
Introduction
USB Camera, OV5640 sensor. 5 megapixel. Supports UVC protocol.
Specification
- Pixel:500 Megapxixel
- Resolution:2592×1944
- Video:
- 15FPS 2592 x 1944
- 30FPS 1920 x 1080
- 30FPS 1280 x 720
- Sensor:OV5640
- DSP :Automatic white balance(AWB)\Automatic exposure(AEC)\Automatic gain control(AGC)
- Camera Specification:
- CCD Size:1/4inch
- Aperture(F):2.8
- Focus Length(EFL):3.29mm
- Field of View(FOV):68°
- Focus Type: Auto focus (B type), Fixed focus (C type)
- Interface:USB2.0
- Image Format:MJPEG、YUV422
- Working Temperature:0°C ~ 50°C
- Dimension:9mm×62mm
- Support OS:Windows、Linux
Working with Windows PC
Test Software
Most of the Windows 10 PC has pre-install Camera software, you can use it to test the USB camera
If your PC doesn't have Camera software, you can also download the AMCap test software from Resouces->Software and test.
Testing
- Use Camera software of Windows
- Search "Camera" and open the software
- Click the setting icon of the top-left to configure the image/video.
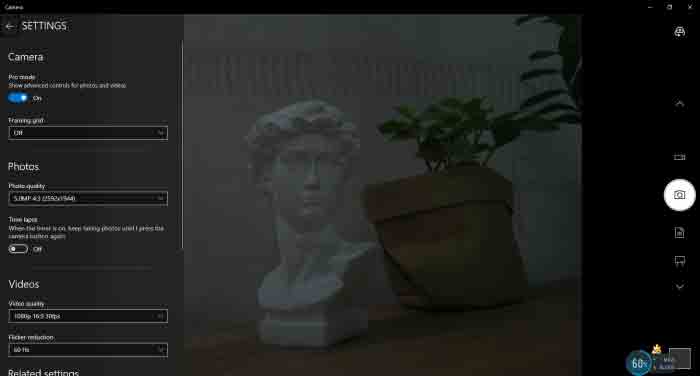
- You can click the icons on the right to switch between Image Capture or Video Recording.
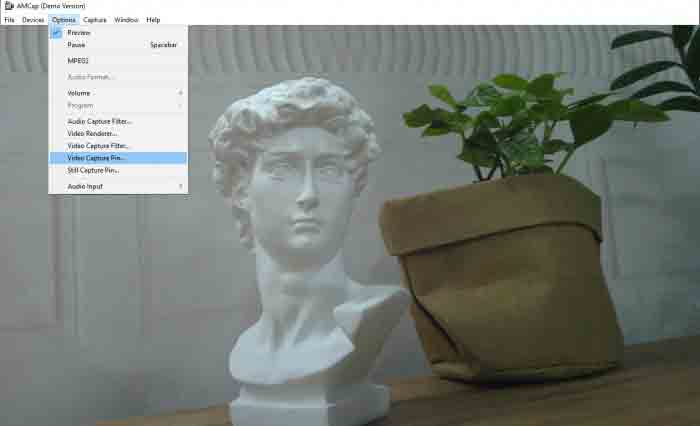
- AMCap Software
- Download and install the AMCap software
- You can click the Options option, choose Video Capture Pin... or Still Capture Pin... to configure image/video
Working with Raspberry Pi
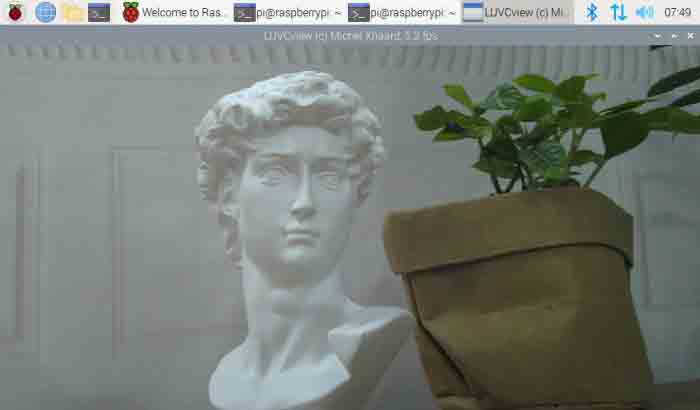
- Open a terminal of Raspberry Pi (You can use Ctrl+Alt+T shortcut)
- Ues command sudo raspi-config to open the configuration
- Choose Interface Option -> Camera -> Yes to enable camera and reboot.
- Open a Terminal of Pi and install luvcview tool with the following command
- sudo apt-get install luvcview -y
- After installing, use the following command to test the USB camera.
- sudo luvcview -s 1920x1080
Working with Jetson Nano Developer Kit
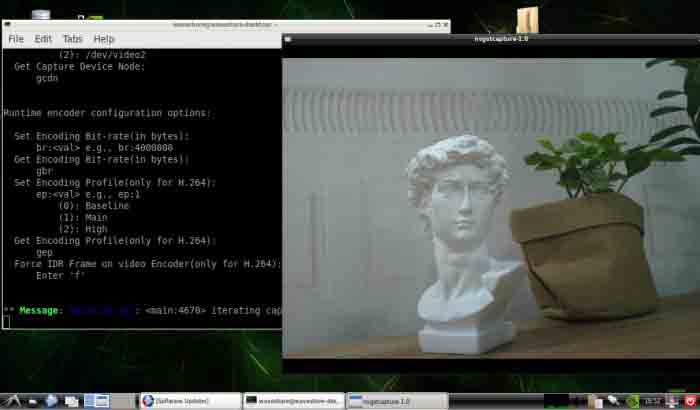
- Open a terminal of Jetson Nano Developer Kit (You can use Ctrl+Alt+T shortcut or open it by Mouse)
- Use the following command for previewing:
- nvgstcapture-1.0 --camsrc=0
- With the command, a preview window is opened
【Notice】You may need to use the camera by script/codes, in this case, you can refer to tools/libraries like Opencv yourself.
TAG:
Raspberry Pi Pico 2 RP2350 1.64 inch AMOLED Development Board Display TouchScreen 280x456 QMI8658 IMU QSPI
0.49inch OLED Screen Display 64×32 SSD1315 Arduino Raspberry Pi ESP32 Pico STM32
Arducam 64MP Camera
Raspberry Pi CSI-to-HDMI
Industrial UART USB TO 8CH RS485 Isolated Converter For 35mm standard rail and stacked installation
USB to I2C
JETSON-NANO-MINI
CAN Analyzer
ESP32 Thermal imaging
Tuya AI Voice Robot T5-E1 1.75 inch Round AMOLED TouchScreen GPS For XiaoZhi Development Board
7inch Round LCD HDMI Capacitive 7 inch Touchscreen Display 1080x1080 For Raspberry Pi/Jetson Nano/mini PC
Workstation electronic Nameplate
Raspberry Pi MIPI
Windows Environment User Guide
Milk-V RJ45
Raspberry Pi 3 display HAT
CH340 driver
USB Camera 2MP GC2093 ‌WDR Backlight Compensation‌ Onboard microphone
Raspberry Pi 5
SpotPear
TAG:
ESP32 C3 ST7735
ESP32-C3FN4
Raspberry Pi 1.54 inch e-Paper HAT+ (G) E-Ink Red/Yellow/Black/White 200x200 Screen Display For Arduino /STM32/Jetson
EchoEar 1.85 inch Round TouchScreen 1.85inch QSPI LCD 360*360 CST816T ST77916
Linux Board
ESP32-S3 AI E-Paper Ink Screen 7.3-inch E6 Full-Color Electronic PhotoPainter Frame Deepseek
Raspberry Pi 5
Raspberry Pi5 PCIe M.2 MINI Gen2 Gen3 SSD 2230 2242
PCIe to M.2 Adapter Board
12.3 inch LCD In-Cell Type C HDMI Capacitive Touchscreen Display Raspberry Pi Jetson Nano mini PC 1920x720
Raspberry Pi Long Bar Screen
Raspber Pi 5
Raspberry Pi 5 Official Original PCIe to M.2 HAT+ Compact Expansion Board NVMe SSD
spotpear
Raspberry Pi 5 Silver-Shadow Case
Raspberry Pi 10.1 inch DSI LCD C Display MIPI 1280×800 Capacitive TouchScreen
Pi5 Pure-Copper Active Cooler
Milk-V Duo
Raspberry Pi Display
Round screen