


- sales/support
Google Chat:---
- sales
+86-0755-88291180
- sales01
sales@spotpear.com
- sales02
dragon_manager@163.com
- support
tech-support@spotpear.com
- CEO-Complaints
zhoujie@spotpear.com
- Only Tech-Support
WhatsApp:13246739196
- Purchase/Shipping/Refund
WhatsApp:13424403025
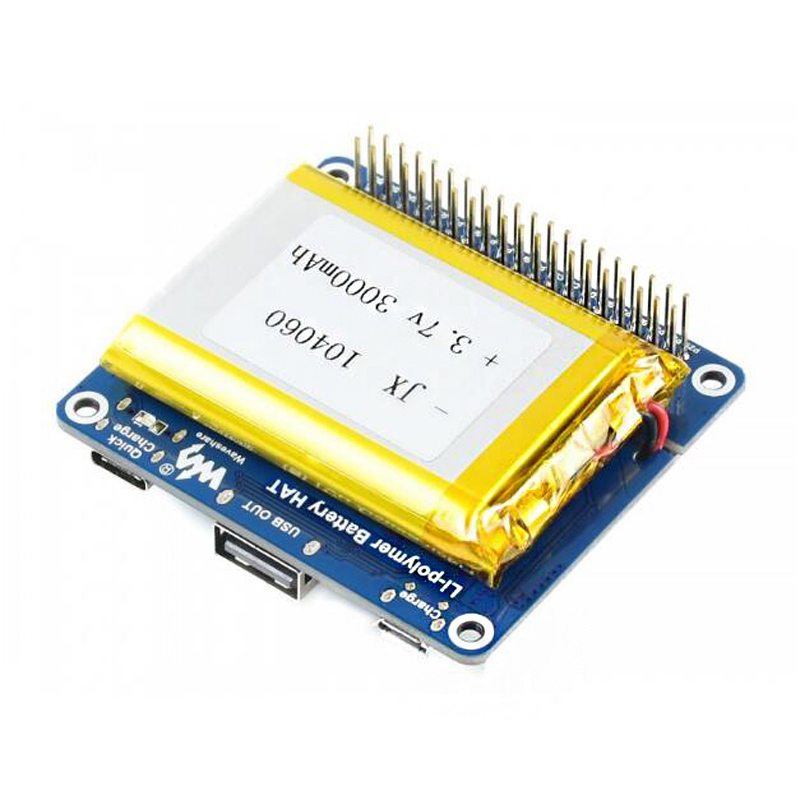
Raspberry Pi Li-polymer Battery HAT User Guide
Instruction
The Li-polymer Battery HAT integrates SW6106 power bank management chip, allows providing 5V regulated power supply to your Raspberry Pi or other 5V devices, from a high capacity Li-polymer battery. It will charge the battery as well, supports bi-directional quick charge.
Features
- Onboard SW6106 chip, supports bi-directional quick charge, supports multi quick charge protocols like PD/QC/FCP/PE/SFCP
- Lithium battery protection circuitry, provides reverse protection, overcharge protection, and short circuit protection
- Onboard indicators: quick charge, power capacity
- PH 2.0 battery connector, for connecting the 3.7V 3000mA high capacity Li-polymer battery (MSDS certified)
Specifications
- Output voltage: 5V
- Charge voltage: 5V
- Applicable battery: 3.7V Li-polymer battery (4.2V when full charged)
- Dimension: 65.0mm × 56.5mm
- Mounting hole size: 3.0mm
Interfaces and Indicators
- Interfaces
| Interface | Description |
| Micro USB | Charge |
| USB Type-A | Power output |
| USB Type_C | Suports chrage, quick charge and power output |
- There are five battery indicators.
| Capacity | LED1 | LED2 | LED3 | LED4 | LED5 |
| 80%~100% | ON | ON | ON | ON | ON |
| 60%~80% | ON | ON | ON | ON | Blink |
| 40%~60% | ON | ON | ON | Blink | OFF |
| 20%~40% | ON | ON | Blink | OFF | OFF |
| 5%~20% | ON | Blink | OFF | OFF | OFF |
| 1%~5% | Blink | OFF | OFF | OFF | PFF |
| 0% | OFF | OFF | OFF | OFF | OFF |
- Quick start indicator
- When you connect power adapter to Type_C interface for quick charging, the Quick Charge indocator will turn on. If it keeps on, maybe that your adapter doesn't support quick charge.
- Standby button
- Single-press it to output 5V, and double-press it to set it to sleep mode.
How to use
Discharge
- Connect it to Raspberry Pi
- Step1: Insert the Li-polymer battery to 2.0mm battery socket.
- Step2: Single-press Standby button, set it to discharge mode
- Step3: Attach it on Raspberry Pi for powering.
- For other devices.
- Step1: Insert the Li-polymer battery to 2.0mm battery socket.
- Step2: Single-press Standby button, set it to discharge mode
- Step3: Connect it to other devices by USB cable or wires.
Charge
- Charge
- Step1: Insert the Li-polymer battery to 2.0mm battery socket.
- Step2: Connect power adapter to micro USB or Type-C interface by USB cable
- Quick charge
- Step1: Insert the Li-polymer battery to 2.0mm battery socket.
- Step2: Connect power adapter (support quick charge) to type_C interface by USB cable
- Step3: Check if the Quick charge indicator turns on.
Notices
- Module enter sleep mode when the working current is less than 40mA and stop to discharge.
- The Quick charge mode only works when you connect a power adapter that supports quick charge.
- To power Raspberry Pi, you can attach it on the GPIO or connect Type_A interface to Pi by USB cable.
- This module cannot work as UPS. It will turn off Raspberry Pi when low-voltage.
- The battery is about 4.2v when fully charged. Note that you should discharge the battery to 3.0, otherwise it is damaged.
- Please disconnect any devices when you replace battery.
- DO NOT change the battery provided with other battery without protective panel.
- Please check the poles of the battery interface carefully when you connect batteries.
TAG:
Serial UART Bus Servo CF35-12 TTL 35KG.CM Magnetic-Encoder High precision and Large torque
NanoKVM-USB-Development
Raspberry Pi 5 NVMe
Raspberry Pi 10.85 inch e-Paper ink screen display black white 1360×480 For Arduino /Jetson /STM32 /ESP32
Milk V Duo
Raspberry Pi 5 PCIe to M.2 NVME SSD And Gigabit Ethernet RJ45 HAT RTL8111H M_KEY For 2230/2242/2260/2280
Arduino Thermal imaging camera
1.54 inch Passive NFC e-Paper BW Display E-ink Screen No Need Battery Wireless Powered & Data Transfer
RS485 to Ethernet
Raspberry Pi
Raspberry Pi 3.5 inch LCD F Display Capacitance TouchScreen 60fps ST7796 GT911 320x480 Also For Arduino/Pico2/ESP32/RP2040/RP2350
1.54inch OLED
DeepSeek ESP32-S3 Voice Chat Robot espHome XiaoZhi Ball
D-Robotics RDK X3 Module Core MD Module Horizon Sunrise Pi ARM Cortex-A53 5Tops Size Compatible With Raspberry Pi CM4 Size
NVIDIA-acess User Guide
Milk V
LuckFox Pico
ESP32-S3-Zero
RP2040 1.5inch LCD
LuckFox SC3336
TAG:
1.46inch LCD TouchScreen Display 412×412 SPD2010 For Arduino /Raspberry Pi /ESP32 /Pico /STM32
ESP32-S3 AI 3.97-inch e-Paper Ink Screen 3.97inch Display AIoT Development Board Deepseek
USB Camera 2MP GC2093 WDR Backlight Compensation Onboard microphone
ESP32 P4 Development Board 7-inch LCD Display 1024×600 7inch Touchscreen ESP32-C6 WiFi6 AI Deepseek
Raspberry Pi 5 PCIe to 4-CH PCIe FFC HAT Board Pi5 4 Channels
DeepSeek ESP32-S3 Voice Chat Robot
NVIDIA Jetson TX2 NX Module
SpeedyBee BLS 50A ESC Controller Motor Driver Board DJI FPV Drone
SpotPear
Raspberry Pi 5
Pi5 Case
PI5 8G
Raspberry Pi Pico 2 RP2350A 1.54inch TouchScreen 1.54 inch LCD Display Development Board 240×240
Raspberry Pi display
DeepSeek AI Voice Chat Robot BOX ESP32-S3 Development Board 3.5 inch QSPI LCD N16R8 Touchscreen Display 6-Axis /Camera /SD
Jetson Orin Nano Super AI Developer Kit 8GB Core board
X1010 Raspberry Pi 5 PCIe FFC Connector to Standard PCIe x4 Slot
MPS2280 POE Raspberry Pi 5 PCIe M.2 NVMe SSD Pi5 2280 2242 2230
Milk-V Duo
Raspberry-Pi-Game-1.54inch-LCD-touchscreen-display-ST7789