


- sales/support
Google Chat:---
- sales
+86-0755-88291180
- sales01
sales@spotpear.com
- sales02
dragon_manager@163.com
- support
tech-support@spotpear.com
- CEO-Complaints
zhoujie@spotpear.com
- Only Tech-Support
WhatsApp:13246739196
- Purchase/Shipping/Refund
WhatsApp:13424403025
8.8inch DSI LCD User Guide
Features
- 8.8inch DSI touch screen, supports ten-point capacitive touch control
- IPS display panel with hardware resolution of 480×1920
- Adopt optical bonding process, the picture quality is clearer
- Equipped with 6H hardness tempered glass touch cover
- Compatible with Raspberry Pi 5/4B/CM4/3B+/3A+/3B/CM3+/CM3
- Directly drive the LCD through the Raspberry Pi's DSI interface, with a refresh rate of up to 60Hz
- When used with Raspberry Pi, it is compatible with Bookworm/Bullseye/Buster systems
- Supports software to adjust the brightness of the backlight
Hardware connection
Working with Raspberry Pi 5
1. Use the DSI-Cable-12cm cable to connect the DSI port of the display to the 22PIN DSI1 port of the Raspberry Pi motherboard.
2. Secure the Raspberry Pi to the display with M2.5 screws, ensuring that the spring pins make good contact with the Raspberry Pi.
The installation effect is as follows: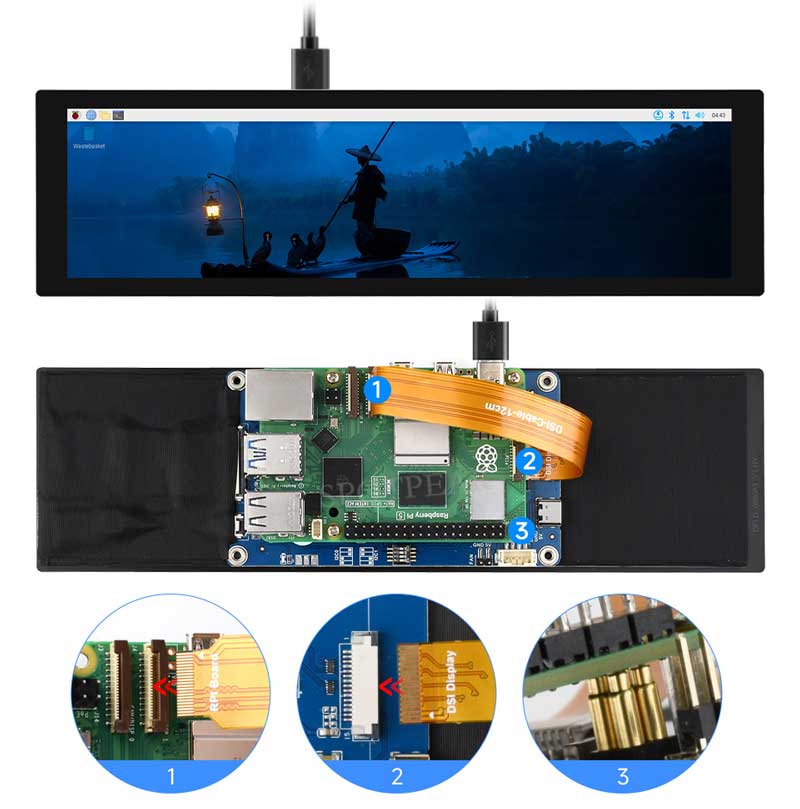
Note: Ensure that the DSI cable is connected in the correct direction and supplies 5V power to the display via the spring pins.
Working with Raspberry Pi4B/3B+/3B/3A+
1. Use a double-headed 15PIN FPC cable to connect the DSI interface of the display to the DSI interface of the Raspberry Pi motherboard.
2. Secure the Raspberry Pi to the display with M2.5 screws, ensuring that the spring pins make good contact.
The installation effect is as follows:
Note: Ensure that the DSI cable is connected in the correct direction and supplies 5V power to the display via the spring pins.
Working with CM4/CM3
1. Use the DSI-Cable-12cm cable to connect the DSI port of the display to the 22PIN DSI1 port of the Raspberry Pi motherboard.
2. Using the 4PIN PH2.0 cable, connect the 5V and GND of the display to the 5V and GND pins of the Raspberry Pi respectively.
(I2C0 touch communication is used by default, if you switch to I2C1 touch communication, you need to connect SDA1 and SCL1 pins additionally)
The installation effect is as follows:
Note: Ensure that the DSI cable is connected in the correct direction and supplies 5V power to the display via the cable.
Software settings
For Bookworm system
Method 1: Use Raspberry Pi Imager to burn the latest official image
- 1. Insert the TF card into your PC, download and use Raspberry Pi Imager to burn the system image.
- 2. After the burning is completed, open the config.txt file in the root directory of the TF card, add the following code at the end of the file, save and safely eject the TF card.
Note: For Pi5/CM4/CM3+/CM3, since there are two MIPI DSI display interfaces, please make sure to use the correct display interface and instructions, the DSI1 display interface is recommended by default.
dtoverlay=vc4-kms-v3d
#DSI1 Use
dtoverlay=vc4-kms-dsi-waveshare-panel,8_8_inch
#DSI0 Use
#dtoverlay=vc4-kms-dsi-waveshare-panel,8_8_inch,dsi0- 3. Insert the TF card into the Raspberry Pi, power on and start, wait for a few seconds to enter the system display, and the touch function can also work normally.
Method 2: Use the pre-installed image
1. Download the Waveshare pre-installed image, and unzip it as .img file.
- Image download: Waveshare pre-installed image
2. Connect the TF card to the PC, format the TF card with SDFormatter.
3. Open Win32DiskImager, select the prepared system image, and click Write to start burning.
4. After the burning is completed, open the config.txt file in the root directory of the TF card, add the following code at the end of the file, save and safely eject the TF card. Note: For Pi5/CM4/CM3+/CM3, since there are two MIPI DSI display interfaces, please make sure to use the correct display interface and instructions, the DSI1 display interface is recommended by default.
dtoverlay=vc4-kms-v3d
#DSI1 Use
dtoverlay=vc4-kms-dsi-waveshare-panel,8_8_inch
#DSI0 Use
#dtoverlay=vc4-kms-dsi-waveshare-panel,8_8_inch,dsi0
5. Insert the TF card into the Raspberry Pi, power on and start, wait for a few seconds to enter the system display, and the touch function can also work normally.
For Bullseye and Buster systems
Method 1: Install the driver manually
1. Download the latest version of the image from the Raspberry Pi official website, download the compressed file to your PC, and extract it as .img file.
2. Connect the TF card to the PC, format the TF card with SDFormatter software.
3. Open the Win32DiskImager software, select the system image prepared in step 1, and click Write to burn the system image.
4. After the burning is completed, connect the TF card to the Raspberry Pi, start the Raspberry Pi, and log in to the terminal of the Raspberry Pi (You can connect the Raspberry Pi to the HDMI display or use ssh to log in remotely).
#Step 1: Download and enter the Waveshare-DSI-LCD driver folder
git clone https://github.com/waveshare/Waveshare-DSI-LCD
cd Waveshare-DSI-LCD

#Step 2: Enter uname -a on the terminal to view the kernel version, and cd it to the corresponding file directory
#6.1.21 then run the following command
cd 6.1.21

#Step 3: Please determine the bits of the current system you are using. For a 32-bit system, proceed to the 32 directory, and for a 64-bit system, proceed to the 64 directory
cd 32
#cd 64

#Step 4: Enter your corresponding model command to install the driver
#7inch DSI LCD(C) 1024×600 Driver:
sudo bash ./WS_xinchDSI_MAIN.sh 70C I2C0

#Step 5: Wait for a few seconds, when the driver installation is complete and no error is displayed, restart and load the DSI driver to use it normally
sudo reboot
#Note: The steps above require that the Raspberry Pi can connect to the internet normally
5. Wait for the system to reboot, it will be able to display and touch normally.
Method 2: burn the pre-installed image
1. Select your corresponding Raspberry Pi version image, download and unzip it as .img file
Raspberry Pi 4B/CM4 version download: Waveshare DSI LCD - Pi4 pre-installed image
Raspberry 3B/3B+/CM3 Version Download: Waveshare DSI LCD - Pi3 pre-installed image
2. Connect the TF card to the PC, format the TF card with SDFormatter software.
3. Open the Win32DiskImager software, select the system image prepared in step 1, and click Write to burn the system image.
4. After the burning is completed, open the config.txt file in the root directory of the TF card, add the following code under [all], save and safely eject the TF card.
dtoverlay=WS_xinchDSI_Screen,SCREEN_type=2,I2C_bus=10,Backlight=128
dtoverlay=WS_xinchDSI_Touch,I2C_bus=10
5. Connect the TF card to the Raspberry Pi, start the Raspberry Pi, and wait for about 30 seconds for it to be displayed and touched normally.
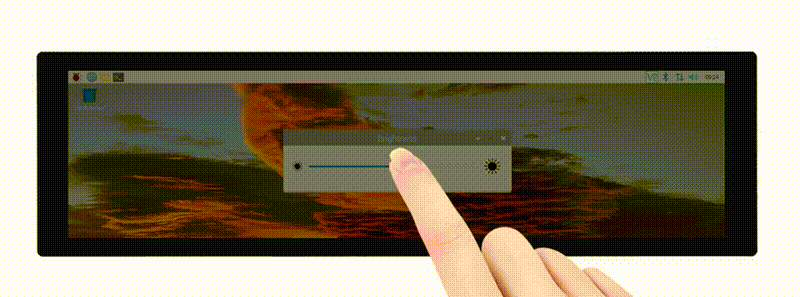
Adjusting Backlight Brightness
- 1. Open the "Screen Configuration" application;
/5inch-dsi-lcd-c-t4.jpg)
- 2. Go to "Screen" -> "DSI-2" -> "Brightness", check the backlight brightness you need to set, and finally click "Apply" to complete the backlight setting.

Waveshare also provides a corresponding demo (the demo is only used for Bookworm and Bullseye systems), users can download, install and use in the following way:
wget https://files.waveshare.com/wiki/common/Brightness.zip
unzip Brightness.zip
cd Brightness
sudo chmod +x install.sh
./install.sh
After the installation is completed, you can open the demo in the Start Menu -> Accessories -> Brightness, as shown below:
In addition, you can also control the brightness of the backlight by entering the following command on the terminal:
echo X | sudo tee /sys/class/backlight/*/brightness
Where X represents any number from 0 to 255. 0 means the darkest backlight, and 255 means the brightest backlight. For example:
echo 100 | sudo tee /sys/class/backlight/*/brightness
echo 0 | sudo tee /sys/class/backlight/*/brightness
echo 255 | sudo tee /sys/class/backlight/*/brightness
Bookworm touch screen rotation
- 1. Open the Screen Configuration application;
- 2. Go to Screen - > DSI-1 - > Touchscreen and check 10-0014 Goodix Capacitive TouchScreen;
/5inch-dsi-lcd-c-t5.jpg)
- 3.Click Apply, then close the current window, and reboot according to the pop-up prompts to complete the specified touch screen;
/5inch-dsi-lcd-c-t6.jpg)
- 4.Go to Screen > DSI-1 - - > Orientation, check the direction you need to rotate, and finally click Apply to complete the display and touch synchronous rotation.
/5inch-dsi-lcd-c-t7.jpg)
Note: Only the Bookworm system supports the above synchronization rotation method. For the Bullseye and Butser systems, manual separate settings for touch rotation are required after displaying the rotation.
lite version display rotation
sudo nano /boot/cmdline.txt
#Add a command to display the rotation angle at the beginning of the cmdline.txt file, and save it to take effect after restarting
#Display rotation 90 degrees
video=DSI-1:480x1920M@60,rotate=90
#Display rotation 180 degrees
video=DSI-1:480x1920M@60,rotate=180
#Display rotation 270 degrees
video=DSI-1:480x1920M@60,rotate=270
Screen sleep
Run the following command on the Raspberry Pi terminal and the screen will go to sleep:
xset dpms force off
Disable touch
At the end of the config.txt file, add the following command corresponding to disabling touch (the config file is located in the root directory of the TF card, which can also be accessed by the command: sudo nano /boot/config.txt):
disable_touchscreen=1
Note: After adding a command, it needs to be restarted to take effect.
Resources
Drawing
Support
Monday-Friday (9:30-6:30) Saturday (9:30-5:30)
Mobile: +86 13434470212
Email: services01@spotpear.com
[Tutorial Navigation]
- Features
- Hardware connection
- Software settings
- For Bookworm system
- Method 1: Use Raspberry Pi Imager to burn the latest official image
- Method 2: Use the pre-installed image
- For Bullseye and Buster systems
- Adjusting Backlight Brightness
- Bookworm touch screen rotation
- lite version display rotation
- Screen sleep
- Disable touch
- Resources
- Support