- sales/support
Google Chat:---
- sales
+86-0755-88291180
- sales01
sales@spotpear.com
- sales02
dragon_manager@163.com
- support
tech-support@spotpear.com
- CEO-Complaints
zhoujie@spotpear.com
- Only Tech-Support
WhatsApp:13246739196
- Purchase/Shipping/Refund
WhatsApp:13424403025
IMX462-IR-CUT-Camera-A User Guide
Overview
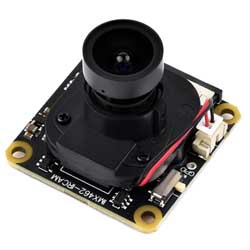
Introduction
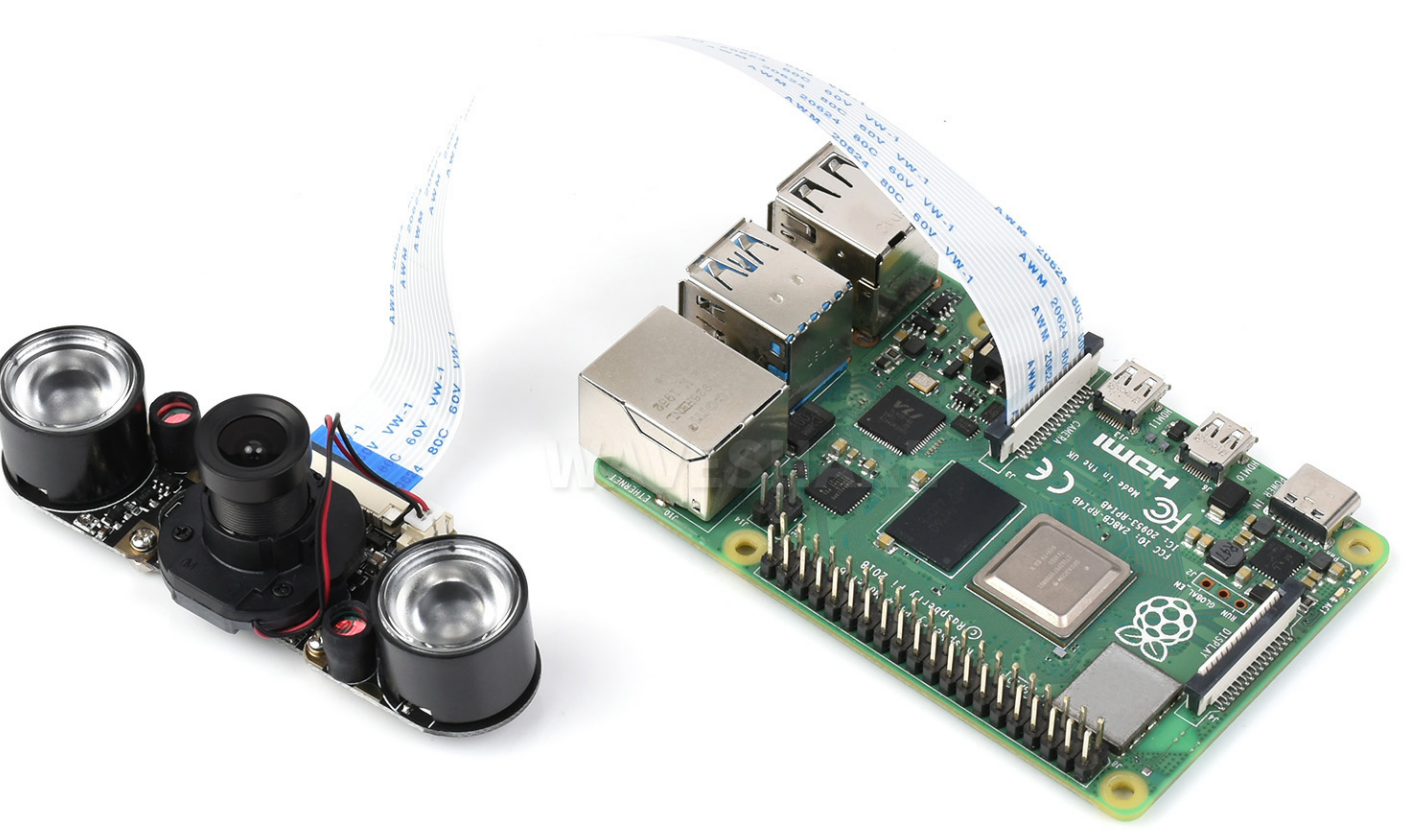
The IMx462 IR-CUT Camera is a starlight camera suitable for the Raspberry Pi motherboard and computer module series. Using Sony IMX462 starlight level sensor with 2 megapixels and built-in IR-CUT, it can freely switch between daytime full-color and nighttime camera modes through the onboard switch.
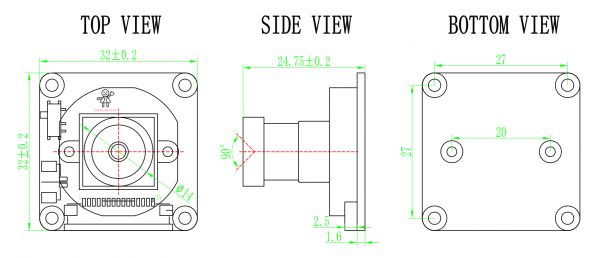
Dimensions
Quick Test
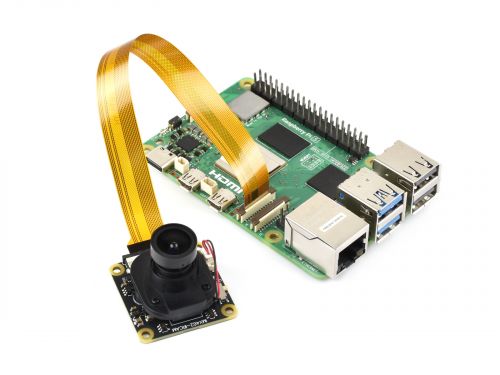
Hardware Connection
To test the Raspberry Pi camera, you need to connect the Raspberry Pi to an HDMI screen or DSI screen
The packages of the CSI (camera) and DSI (monitor) ports on the Raspberry Pi motherboard are similar, so be careful not to connect them incorrectly when wiring. The CSI interface is located between the audio interface and the HDMI interface. The camera interface of the Raspberry Pi Zero series is next to the power interface. If you are using a computing module, it depends on the layout of the baseplate.
- Connect to Raspberry Pi 5
- Place the metal surface of the cable towards the wired network port and insert it into the port
- Pi5 has two CSI interfaces, and either interface can be connected
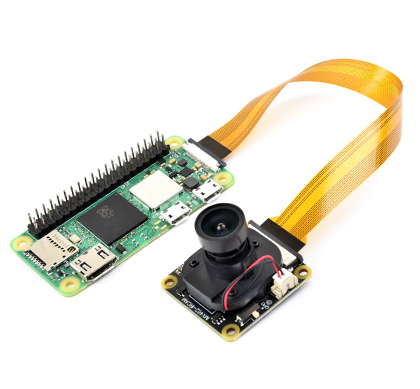
- Connect to the Raspberry Pi Zero series
- Put the metal side of the cable downwards and connect it to the camera interface
- Other Raspberry Pi motherboards
- Put the metal side of the cable downwards the HDMI interface and connect it to the camera interface
About the Model
| Sensor model | Supported Raspberry Pi motherboard models | Supported driver types |
|---|---|---|
| OV5647 | All Raspberry Pi motherboards | libcamera / Raspicam |
| OV9281 | All Raspberry Pi motherboards | libcamera |
| IMX219 (Raspberry Pi official) | All Raspberry Pi motherboards | libcamera / Raspicam |
| IMX219 (Third-party) | Raspberry Pi computing module | libcamera |
| IMX290/ IMX327 | All Raspberry Pi motherboards | libcamera |
| IMX378 | All Raspberry Pi motherboards | libcamera |
| IMX477 (Raspberry Pi official) | All Raspberry Pi motherboards | libcamera / Raspicam |
| IMX477 (Third-party) | All Raspberry Pi motherboards | libcamera |
| IMX462 | All Raspberry Pi motherboards | libcamera |
| IMX519 | All Raspberry Pi motherboards | libcamera (Install additional driver) |
| IMX708 (Raspberry Pi Camera Module 3) | All Raspberry Pi motherboards | libcamera |
| IMX296 (Raspberry Pi Global Camera) | All Raspberry Pi motherboards | libcamera |
| IMX500 (Raspberry Pi AI Camera) | All Raspberry Pi motherboards | libcamera |
Test Camera
Software Configuration
If you are using the latest Raspberry Pi Camera Module 3 or Raspberry Pi Global Shutter Camera, you need to run the following command to update the system (Internet connection required).
sudo apt-get update -y
sudo apt-get upgrade -y
If only one camera is called, connect the camera to the CAM1 port.
If you are using a camera that is not the official Raspberry Pi, you need to configure a config.txt file separately.
If you are using the latest Bookworm system, you need to configure /boot/firmware/config.txt.
sudo nano /boot/config.txt
#If it is the bookworm system
sudo nano /boot/firmware/config.txt
Find the camera-auto-detect=1 statement and change it to camera_auto_detect=0
At the end of the file, add the following setting statements according to the camera model
| Model | Setting statement |
|---|---|
| OV9281 | dtoverlay=ov9281 |
| IMX290/IMX327/IMX462 | dtoverlay=imx290,clock-frequency=37125000 |
| IMX378 | dtoverlay=imx378 |
| IMX219 | dtoverlay=imx219 |
| IMX477 | dtoverlay=imx477 |
| IMX708 | dtoverlay=imx708 |
Note: To use the IMX290 on the Raspberry Pi 5, you also need to add the json file to the command directory to use it. The operation is as follows:
sudo wget https://www.waveshare.net/w/upload/7/7a/Imx290.zip
sudo unzip Imx290.zip
sudo cp imx290.json /usr/share/libcamera/ipa/rpi/pisp
- Binocular camera configuration
- At present, both the CM4 baseplate and the Raspberry Pi 5 support access to two cameras
- If the user needs to access two camera calls at the same time, cam0 and cam1 can be added after the corresponding camera configuration statement to specify the camera.
- For example, if IMX219 is connected to CAM0 interface, and at the same time OV5647 camera interface is connected to CAM1
dtoverlay=imx219,cam0
dtoverlay=ov5647,cam1
AI Camera Software Configuration
To use the Raspberry Pi AI Camera, you need to make sure you're using the latest Raspberry Pi system.
- Open the Raspberry Pi terminal and use the command to update the system
sudo apt update && sudo apt full-upgrade
- Install imx500 firmware and related driver
sudo apt install imx500-all
- After installation, restart the system
sudo reboot
Test Camera Command
- Open the Raspberry Pi terminal and turn on the camera preview
sudo rpicam-hello -t 0
If you want to close the preview window, you can directly press Alt-F4, or click x to close it. You can also return to the terminal interface and use ctrl-c to terminate the program.
Note: If it is Camera module 3, the autofocus function will be enabled
- Test binocular camera
- When testing a binocular camera, you need to add the --camera option to specify the camera. If this parameter is not added, the default setting is to specify cam0
sudo rpicam-hello -t 0 --camera 0
sudo rpicam-hello -t 0 --camera 1
Test AI Camera Command
- Open the Raspberry Pi terminal and test it with the rpicam-apps camera program
- Object recognition preview test
rpicam-hello -t 0s --post-process-file /usr/share/rpi-camera-assets/imx500_mobilenet_ssd.json --viewfinder-width 1920 --viewfinder-height 1080 --framerate 30
- Record a video and do object detection
rpicam-vid -t 10s -o output.264 --post-process-file /usr/share/rpi-camera-assets/imx500_mobilenet_ssd.json --width 1920 --height 1080 --framerate 30
- Pose detection preview
rpicam-hello -t 0s --post-process-file /usr/share/rpi-camera-assets/imx500_posenet.json --viewfinder-width 1920 --viewfinder-height 1080 --framerate 30
libcamera/libcamera Usage Guide
Preface
In Raspberry Pi images after Bullseye version, the underlying Raspberry Pi driver has switched from Raspicam to libcamera. libcamera is an open-source software stack (hereinafter referred to as "drivers") that facilitates third-party porting and development of their own camera drivers. As of December 11, 2023, the official picamera2 library has been provided for libcamera, which is convenient for users to call it in Python programs
Call Camera
The libcamera software stack provides six commands for users to preview and test the camera interface.
libcamera-hello
This is a simple "hello world" program that previews the camera and displays the camera feed on the screen.
- Usage example
libcamera-hello
This command will preview the camera on the screen for about 5 seconds, and the user can use the -t <duration> parameter to set the preview time, where the unit of <duration> is milliseconds, if it is set to 0, it will keep previewing. For example:
libcamera-hello -t 0
- Tuning file
The libcamera driver of Raspberry Pi will call a tuning file for different camera modules, and various parameters are provided in the tuning file, and when the camera is called, libcamera will call the parameters in the tuning file, and the image will be processed in combination with the algorithm and finally output into a preview screen. Since the libcamera driver can only automatically detect the chip signal, but the final display effect of the camera will be affected by the entire module, the tuning file is used to flexibly handle the cameras of different modules and adjust to improve image quality.
If the camera output image is not ideal when using the default tuning file, the user can call a custom tuning file to adjust the image. For example, if you are using the official NOIR version camera, compared to the regular Raspberry Pi Camera V2, the NOIR camera may require different white balance parameters. In such cases, you can switch by calling the tuning file.
libcamera-hello --tuning-file /usr/share/libcamera/ipa/raspberrypi/imx219_noir.json
Users can copy the default tuning file and modify it according to their needs.
Note: The use of tuning files applies to other libcamera commands, which will not be described in subsequent commands
- Preview window
Most libcamera commands will display a preview window on the screen. Users can customize the preview window's title information using the --info-text parameter. They can also call some camera parameters using %directives and display them in the window
For example, if you use HQ Camera: The focal length of the camera can be displayed on the window via --info-txe "%focus"br />
libcamera-hello --info-text "focus %focus"
Note: For more information about parameter setting, please refer to the subsequent section on command parameter settings
libcamera-jpeg
libcamera-jpeg is a simple static image capture program, unlike the complex features of libcamera-still, libcamera-jpeg code is more concise and has many of the same functions to complete image capture.
- Take a full-pixel JPEG image
libcamera-jpeg -o test.jpg
This command will display a preview serial port for about 5 seconds, and then take a full-pixel JPEG image and save it as a test.jpg
The user can set the preview time with the -t parameter, and the resolution of the captured image can be set with --width and --height. For example:
libcamera-jpeg -o test.jpg -t 2000 --width 640 --height 480
- Exposure control
All libcamera commands allow users to set shutter speed and gain, for example:
libcamera-jpeg -o test.jpg -t 2000 --shutter 20000 --gain 1.5
This command will capture an image, with an exposure of 20ms and a camera gain set to 1.5 times. The set gain parameter will prioritize adjusting the analog gain inside the photosensitive chip. If the set gain exceeds the maximum analog gain value built-in in the driver program, the system will first set the analog gain of the chip to the maximum value, and the remaining gain multiples will be implemented through digital gain.
Note: The digital gain is realized by ISP (Image Signal Processing), not directly adjusting the chip's built-in registers. Under normal circumstances, the digital gain is usually close to 1.0, unless the following three situations occur:
- Gain requirement exceeds the analog gain range: When the analog gain cannot meet the set gain requirement, digital gain will be used for compensation.< br />
- The gain of a certain color channel is less than 1: The digital gain can also be used to adjust the color gain. When the gain value of a certain color channel (such as red or blue) is less than 1, the system will apply a uniform digital gain, with a final value of 1/min (red_gain, blue_gain)< br />
- Automatic exposure/gain control (AEC/AGC) adjustment: When AEC or AGC changes, the digital gain may be adjusted accordingly to eliminate brightness changes caused by parameter fluctuations. This change usually quickly returns to the "normal value". < br />
The AEC/AGX algorithm of Raspberry Pi allows the program to specify exposure compensation, which adjusts the brightness of the image by setting the aperture value. For example:
libcamera-jpeg --ev -0.5 -o darker.jpg
libcamera-jpeg --ev 0 -o normal.jpg
libcamera-jpeg --ev 0.5 -o brighter.jpg
libcamera-still
libcamera-still and libcamera-jpeg are very similar in functionality, but libcamera-still inherits more of the functionality originally provided by raspistill. For example, users can still use commands similar to the following to take a picture:
- Test command
libcamera-still -o test.jpg
- Encoder
libcamea-still supports image files in different formats, it can support png and bmp encoding, and it also supports saving binary dumps of RGB or YUV pixels directly to a file without encoding or any image format. If RGB or YUV data is saved directly, the program must know the pixel arrangement of the file when reading such files.
libcamera-still -e png -o test.png
libcamera-still -e bmp -o test.bmp
libcamera-still -e rgb -o test.data
libcamera-still -e yuv420 -o test.data
Note: The format of image saving is controlled by the -e parameter, if the -e parameter setting is not called, the format of the output file name will be saved by default.
- Raw image capture
A raw image is an image output directly from an image sensor that has not been processed by any ISP or CPU. For color camera sensors, generally speaking, the output format of the original image is Bayer. Note that the original image is different from the bit-encoded RGB and YUV images we talked about earlier, and RGB and YUV are also ISP processed images.
The command to take a raw image:
libcamera-still -r -o test.jpg
The raw image is usually saved in DNG (Adobe Digital Negative) format, which is compatible with most standard programs such as dcraw or RawTherapee. The raw image is saved as a file with the same name with a .dng extension, e.g., if you run the above command, it will be saved as test.dng and a jpeg file will be generated at the same time. DNG files contain metadata related to image acquisition, such as white balance data, ISP color matrix, etc. The following metadata encoding information is displayed with the exiftool tool:
File Name                       : test.dng
Directory                       : .
File Size                       : 24 MB
File Modification Date/Time     : 2021:08:17 16:36:18+01:00
File Access Date/Time           : 2021:08:17 16:36:18+01:00
File Inode Change Date/Time     : 2021:08:17 16:36:18+01:00
File Permissions                : rw-r--r--
File Type                       : DNG
File Type Extension             : dng
MIME Type                       : image/x-adobe-dng
Exif Byte Order                 : Little-endian (Intel, II)
Make                            : Raspberry Pi
Camera Model Name               : /base/soc/i2c0mux/i2c@1/imx477@1a
Orientation                     : Horizontal (normal)
Software                        : libcamera-still
Subfile Type                    : Full-resolution Image
Image Width                     : 4056
Image Height                    : 3040
Bits Per Sample                 : 16
Compression                     : Uncompressed
Photometric Interpretation      : Color Filter Array
Samples Per Pixel               : 1
Planar Configuration            : Chunky
CFA Repeat Pattern Dim          : 2 2
CFA Pattern 2                   : 2 1 1 0
Black Level Repeat Dim          : 2 2
Black Level                     : 256 256 256 256
White Level                     : 4095
DNG Version                     : 1.1.0.0
DNG Backward Version            : 1.0.0.0
Unique Camera Model             : /base/soc/i2c0mux/i2c@1/imx477@1a
Color Matrix 1                  : 0.8545269369 -0.2382823821 -0.09044229197 -0.1890484985 1.063961506 0.1062747385 -0.01334283455 0.1440163847 0.2593136724
As Shot Neutral                 : 0.4754476844 1 0.413686484
Calibration Illuminant 1        : D65
Strip Offsets                   : 0
Strip Byte Counts               : 0
Exposure Time                   : 1/20
ISO                             : 400
CFA Pattern                     : [Blue,Green][Green,Red]
Image Size                      : 4056x3040
Megapixels                      : 12.3
Shutter Speed                   : 1/20
- Ultra-long exposure
If we want to take an ultra long exposure image, we need to disable AEC/AGC and white balance, otherwise these algorithms will cause the image to wait for many more frames of data as it converges. Disabling these algorithms requires setting explicit values separately, and users can skip the preview process through the -- immediate setting.
Here is the command to take an image with a 100 second exposure:
libcamera-still -o long_exposure.jpg --shutter 100000000 --gain 1 --awbgains 1,1 --immediate
Note: The maximum exposure times for several official cameras are shown in the table.
| Module | Maximum exposure time (s) |
|---|---|
| V1(OV5647) | 6 |
| V2(IMX219) | 11.76 |
| V3(IMX708) | 112 |
| HQ(IMX477) | 670 |
libcamera-vid
libcamera-vid is a video recording program that uses the Raspberry Pi's hardware H.264 encoder by default. After running this program, a preview window will be displayed on the screen, and the bitstream will be encoded and output to the specified file. For example, recording a 10 second video.
libcamera-vid -t 10000 -o test.h264
If you want to view videos, you can use VLC to play them.
vlc test.h264
Note: The recorded video stream is unpacked, users can use --save-pts to set the output timestamp, which is convenient for converting the bitstream to other video formats.
libcamera-vid -o test.h264 --save-pts timestamps.txt
If you want to output an mkv file, you can use the following command:
mkvmerge -o test.mkv --timecodes 0:timestamps.txt test.h264
- Encoder
The Raspberry Pi supports JPEG as well as YUV420 without compression and formatting:
libcamera-vid -t 10000 --codec mjpeg -o test.mjpeg
libcamera-vid -t 10000 --codec yuv420 -o test.data
The --codec option sets the output format, not the extension of the output file.
The -- segment parameter can be used to segment the output file into segments (in milliseconds), which is suitable for splitting JPEG video streams into individual JPEG files with relatively short processing times (approximately 1ms).
libcamera-vid -t 10000 --codec mjpeg --segment 1 -o test%05d.jpeg
- UDP video streaming transmission
UDP can be used for video streaming, running on the Raspberry Pi server:
libcamera-vid -t 0 --inline -o udp://<ip-addr>:<port>
Where <ip-addr> needs to be replaced with the actual client IP address or multicast address.
On the client, enter the following commands to fetch and display the video stream (use one of the two commands):
vlc udp://@:<port> :demux=h264
vlc udp://@:<port> :demux=h264
Note: The port needs to be consistent with the one you set on the Raspberry Pi.
- TCP video streaming transmission
TCP can be used for video streaming, running on the Raspberry Pi server:
libcamera-vid -t 0 --inline --listen -o tcp://0.0.0.0:<port>
The client runs:
vlc tcp/h264://<ip-addr-of-server>:<port> #Just pick one of the two commands
ffplay tcp://<ip-addr-of-server>:<port> -vf "setpts=N/30" -fflags nobuffer -flags low_delay -framedrop
- RTSP video streaming transmission
On Raspberry Pi, VLC is commonly used to process RTSP video streams,
libcamera-vid -t 0 --inline -o - | cvlc stream:///dev/stdin --sout '#rtp{sdp=rtsp://:8554/stream1}' :demux=h264
On the playback end, you can run any of the following commands:
vlc rtsp://<ip-addr-of-server>:8554/stream1
ffplay rtsp://<ip-addr-of-server>:8554/stream1 -vf "setpts=N/30" -fflags nobuffer -flags low_delay -framedrop
Among all preview commands, if you want to close the preview window on the Raspberry Pi, you can use the parameter - n (-- nopeview) to set it. Additionally, please note the setting of the -inline parameter, which will force the header information of the video stream to be included in every I (intra) frame. This setting allows the client to correctly parse the video stream even if the video header is lost.
- High frame rate mode
If you use the libcamera-vid command to record a high frame rate (generally higher than 60fps) and reduce frame drops, pay attention to the following points:
- Set the target level for H.264: The encoding level for H.264 needs to be set to 4.2, which can be achieved by adding the -- level 4.2 parameter.
- Turn off color noise reduction function: When recording high frame rate videos, the color noise reduction function must be turned off to reduce additional performance consumption. You can use the parameter -- denoise cdn_off to turn it off.
- Close preview window (applicable for frame rates above 100fps): If the frame rate setting exceeds 100fps, it is recommended to close the preview window to free up more CPU resources and avoid frame loss. It can be set using the parameter -n.
- Enable forced Turbo mode: Add the force_turbo=1 setting in the/boot/config.txt file to ensure that the CPU clock frequency is not limited during video recording, thereby improving performance.
- Adjusting ISP output resolution: Lowering the resolution can reduce resource usage, for example, setting the resolution to 1280x720 using the parameters - width 1280- height 720, or adjusting it to a lower resolution based on the camera model.
- Overclocking GPU (applicable to Raspberry Pi 4 or higher models): You can overclock the GPU by adding a value of gpu_freq=550 (or higher) in the/boot/config.txt file to improve performance and meet high frame rate requirements.
For example:
The following command is used to record a video with a resolution of 1280x720 and a frame rate of 120fps:
libcamera-vid --level 4.2 --framerate 120 --width 1280 --height 720 --save-pts timestamp.pts -o video.264 -t 10000 --denoise cdn_off -n
libcamera-raw
libcamera-raw is similar to a video recording program, except that libcamera-raw records data in Bayer format that is directly output by the sensor, i.e., raw image data. libcamera-raw does not show the preview window. For example, recording a 2-second raw data clip.
libcamera-raw -t 2000 -o test.raw
The program will dump the original frame directly without format information, and the program will print the pixel format and image size directly on the terminal, and the user can view the pixel data according to the output data.
By default, the program saves the original frame as a file, which is usually quite large and can be split by the --segement parameter.
libcamera-raw -t 2000 --segment 1 -o test%05d.raw
If the memory conditions are good (such as using SSD), libcamera-raw row can write official HQ Camera data (approximately 18MB per frame) to the hard drive at a speed of about 10 frames per second. To achieve this speed, the program writes raw frames that have not been formatted and cannot be saved as DNG files like libcamera-still. If you want to ensure that there is no frame loss, you can use -- framerate to reduce the frame rate.
libcamera-raw -t 5000 --width 4056 --height 3040 -o test.raw --framerate 8
General Command Setting Options
The general command setting options apply to all of libcamera's commands
--help, -h
Print the program help information, you can print the available setting options for each program command, and then exit.
--version
Print the software version, print the software version of libcamera and libcamera-app, and exit.
--list-cameras
Display the recognized supported cameras. For example:
Available cameras
-----------------
0 : imx219 [3280x2464] (/base/soc/i2c0mux/i2c@1/imx219@10)
    Modes: 'SRGGB10_CSI2P' : 640x480 [206.65 fps - (1000, 752)/1280x960 crop]
                             1640x1232 [41.85 fps - (0, 0)/3280x2464 crop]
                             1920x1080 [47.57 fps - (680, 692)/1920x1080 crop]
                             3280x2464 [21.19 fps - (0, 0)/3280x2464 crop]
           'SRGGB8' : 640x480 [206.65 fps - (1000, 752)/1280x960 crop]
                      1640x1232 [41.85 fps - (0, 0)/3280x2464 crop]
                      1920x1080 [47.57 fps - (680, 692)/1920x1080 crop]
                      3280x2464 [21.19 fps - (0, 0)/3280x2464 crop]
1 : imx477 [4056x3040] (/base/soc/i2c0mux/i2c@1/imx477@1a)
    Modes: 'SRGGB10_CSI2P' : 1332x990 [120.05 fps - (696, 528)/2664x1980 crop]
           'SRGGB12_CSI2P' : 2028x1080 [50.03 fps - (0, 440)/4056x2160 crop]
                             2028x1520 [40.01 fps - (0, 0)/4056x3040 crop]
                             4056x3040 [10.00 fps - (0, 0)/4056x3040 crop]
According to the printed information, IMX219 camera suffix 0, IM new 477 camera suffix 1. When calling the camera, the corresponding suffix can be specified.
--camera
Specify the camera, and the corresponding suffix can refer to the printing information of the command --list-camera.
For example: libcamera-hello -c config.txt
In the settings file, set parameters one by one in the format of key=value:
timeout=99000
verbose=
--config, -c
In general, we can directly set camera parameters through commands. Here, we use the -- config parameter to specify a settings file and directly read the settings parameters from the file to set the camera preview effect.
--timeout, -t
The -t option sets the running time for the libcamera program. If the command is for video recording, the timeout option sets the recording duration. If the command is for taking an image, the timeout option sets the preview time before capturing and outputting the image.
If no timeout is set when running the libcamera program, the default timeout value is 5000 (5 seconds). If the timeout is set to 0, the program will run indefinitely.
For example: libcamera-hello -t 0
--preview, -p
The -p option sets the preview window size and position (if qualified, the setting will be valid in both X and DRM versions of the window), set the format to --preview <x, y, w, h> where x and y set the position of the preview window on the display, and w and h set the width and height of the preview window.
The settings of the preview window do not affect the resolution and aspect ratio of the camera image preview. The program will zoom the preview image to the preview window and adapt it to the original image aspect ratio.
For example: libcamera-hello -p 100,100,500,500
--fullscreen, -f
The -f option sets the preview window to be displayed in full screen, and the preview window and border in full screen display mode. Like -p, it does not affect the resolution and aspect ratio, and will be automatically adapted.
For example: libcamera-still -f -o test.jpg
--qt-preview
Use a preview window based on the QT framework. Normally, this setting is not recommended because the preview program does not use zero-copy buffer sharing or GPU acceleration, which can lead to high resource consumption. The QT preview window supports X forwarding (not supported by the default preview program).
The Qt preview window does not support the --fullscreen setting option. If the user wants to use Qt preview, it is recommended to keep the preview window small to avoid high resource consumption affecting the normal operation of the system.
For example: libcamera-hello --qt-preview
--nopreview, -n
Do not preview the image. This setting will turn off the image preview function.
Example: libcamera-hello -n
--info-text
Set the preview window title and information display (only effective in X graphical windows) using the format --info-text <string>. To call this option, there are multiple parameters that can be set, and the parameters are usually called in the form of % command. The program calls the corresponding values in the graphical metadata according to the commands.
If no window information is specified, the default --info-text setting is "#%frame (%fps fps) exp %exp ag %ag dg %dg"
For example: libcamera-hello --info-test "Focus measure: %focus Available parameters:
| Command | Description |
|---|---|
| %frame | Frame sequence number |
| %fps | Instantaneous frame rate |
| %exp | Shutter speed at which an image is captured, in ms |
| %ag | Image analog gain controlled by photosensitive chip |
| %dg | Image number gain controlled by ISP |
| %rg | Gain of the red component of each pixel point |
| %bg | Gain of the blue component of each pixel point |
| %focus | The corner point measure of the image, the larger the value, the clearer the image |
| %lp | Diopter of the current lens (distance in 1/meter) |
| %afstate | Autofocus status (idle, scanning, focused, failed) |
--width
--height
These two parameters set the width and height of the image respectively. For the libcamera-still, libcamera-jpeg and libcamera-vid commands, these two parameters can set the resolution of the output image/video.
If the libcamera-raw command is used, these two parameters will affect the size of the metadata frame obtained. The camera has a 2x2 block reading mode. If the set resolution is smaller than the block mode, the camera will obtain the metadata frame according to the 2x2 block size.
libcamera-hello cannot specify the resolution.< br /> For example:
libcamera-vid -o test.h264 --width 1920 --height 1080 records 1080p video.
libcamera-still -r -o test.jpg --width 2028 --height 1520 takes a JPEG image with a resolution of 2028x1520.
--viewfinder-width
--viewfinder-height
This setting option is also used to set the resolution of the image, except that only the size of the image for the preview is set. It does not affect the resolution of the final output image or video. The device that previews the size of the image does not affect the size of the preview window, and it will be adapted according to the window.
For example: libcamera-hello --viewfinder-width 640 --viewfinder-height 480
--rawfull
This setting forces the sensor to activate --width and --height settings, outputting static images and videos in full resolution read mode. This setting libcamera-hello is invalid.
With this setting, the frame rate is sacrificed. In full-resolution mode, frame reading speeds will be slower.
For example: libcamera-raw -t 2000 --segment 1 --rawfull -o test%03d.raw example command captures multiple frames of metadata in full resolution mode. If you are using the HQ camera. The size of each frame is 18MB. If --rawfull is not set, the HQ camera defaults to 2x2 mode, and the data size of each frame is only 4.5MB.
--mode
This parameter is more universal than rawfull and is used to set the camera mode. When using it, you need to specify the width, height, bit depth, and packaging mode, and separate them with colons. The set values do not necessarily have to be completely accurate, the system will automatically match the closest values, and the bit depth and packaging mode can be set (default is 12 and P represents packaging).
- 4056:3040:12:P - 4056x3040 resolution, 12bit per pixel, packaged. Packaging means that the original image data will be packed in the buffer, in which case, two pixel points will only occupy 3 bytes, saving memory.
- 1632:1224:10 - 1632x1224 resolution, 10bit per pixel, default packaging. In the 10-bit packaging mode, 4 pixel data points will occupy 5 bytes.
- 2592:1944:10:U - 2592x1944 resolution, 10 bits per pixel, not packaged. Without packaging, each speed limit will occupy 2 bytes of memory, in which case, the highest 6 bits will be set to 0.
- 3262:2448 - 3264x2448 resolution, default using 12 bits and packed mode. However, if the camera model, such as the Camera V2 (IMX219) does not support 12 bits mode, the system will automatically select 10 bits mode.
--viewfinder-mode #Specify sensor mode, given as <width>:<height>:<bit-depth>:<packing>
--mode parameter is used to set the camera mode when recording videos and taking static images. If you want to set it during preview, you can use the --viewfinder-mode parameter.
--lores-width
--lores-height
These two options set low resolution images. Low-resolution data streams compress images, causing a change in the aspect ratio. When recording videos with libcamera-vid, if the low resolution is set, the color denoising and other functions will be disabled.
For example: libcamera-hello --lores-width 224 --lores-height 224 Note that low resolution settings are usually combined with image post-processing; otherwise, they are not very effective.
--hflip   #Flip the image horizontally
--vflip    #Flip the image vertically
--rotation     #Depending on the angle given, flip the image horizontally or vertically <angle>
These three options are used to flip the image. --rotation parameter currently only supports 0 and 180, which is equivalent to --hflip and --vflip.
For example: libcamera-hello --vflip --hflip
--roi #Crop image<x, y, w, h>
--roi allows users to crop their desired image area from the full image provided by the sensor according to coordinates, which is essentially digital scaling. Note that the coordinate values should be within the valid range. For example, --roi 0, 0, 1, 1 is an invalid command.
Example: libcamera-hello --roi 0.25,0.25,0.5,0.5 example command crops 1/4 of the image from the center of the image.
--hdr Run the camera in HDR mode (supported cameras only)
The hdr parameter is used to set the wide dynamic mode of the camera. This setting will only take effect if the camera supports wide dynamic range. You can use--list-camera to see if the camera supports hdr mode.
--sharpness #Set the image sharpness <number>
Adjust the image sharpness through <number> values. If set to 0, no sharpening is applied. If the value is set higher than 1.0, the extra sharpening amount is used.
For example: libcamera-still -o test.jpg --sharpness 2.0
--contrast #Set the image contrast <number>
For example: libcamera-still -o test.jpg --contrast 1.5
--brightness #Set the image brightness<number>
The setting range is -1.0~1.0
Example: libcamera-still -o test.jpg --brightness 0.2
--saturation #Set the image color saturation<number>
Example: libcamera-still -o test.jpg --saturation 0.8
--ev #Set EV compensation<number>
Set the EV compensation of the image in aperture units, the setting range is -10 ~ 10, the default value is 0. The program runs using AEC/AGC algorithms.
Example: libcamera-still -o test.jpg --ev 0.3
--shutter #Set exposure time, unit is ms <number>
Note: If the frame rate of the camera is too fast, it may not work according to the set shutter time, if this happens, you can try to reduce the frame rate with --framerate.
Example: libcamera-hello --shutter 30000
--gain  #Set the gain value (combination of numerical gain and analog gain) <number>
--analoggain  #--Synonymous with gain
--analoggain and --gain are the same, and using --analoggain is only for compatibility with the raspicam program.
--metering #Set the metering mode <string>
To set the metering mode of the AEC/AGC algorithm, the available parameters are:
- centre - center metering (default)
- spot - spot metering
- averag - average or full-frame metering
- custom - custom metering mode, which can be set by the tuning file
Example: libcamera-still -o test.jpg --metering spot
--exposure #Set exposure configuration file <string>
The exposure mode can be set to normal or sport. The reporting profile files of these two modes does not affect the overall exposure of the image, but in the case of sport mode, the program shortens the exposure time and increases the gain to achieve the same exposure effect.
- sport: short exposure time, large gain
- normal: normal exposure, normal gain
- long: long exposure time, small gain
Example: libcamera-still -o test.jpg --exposure sport
--awb #Set white balance mode<string>
Available white balance modes:
| Mode | Color temperature |
|---|---|
| auto | 2500K ~ 8000K |
| incadescent | 2500K ~ 3000K |
| tungsten | 3000K ~3500K |
| fluorescent | 4000K ~ 4700K |
| indoor | 3000K ~ 5000K |
| daylight | 5500K ~ 6500 K |
| cloudy | 7000K ~ 8500K |
| custom | A custom range defined in the tuning file |
For example: libamera-still -o test.jpg --awb tungsten
--awbgains #Set fixed color gain<number,number>
Set the red and blue gains.
For example: libcamera-still -o test.jpg --awbgains 1.5, 2.0
--denoise #Set the denoising mode <string>
Supported denoising modes:
- Auto - Default mode, uses standard spatial denoising, uses fast color denoising for video, and uses high-quality color denoising for static images. Preview images will not use any color denoising
- off—Turns off spatial denoising and color denoising
- cdn_off - Turn off color denoising
- cdn_fast - Use fast color denoising
- cdn_hq - Uses high-quality color denoising, not applicable for video recording
For example: libcamera-vid -o test.h264 --denoise cdn_off
--tuning-file #Specify the camera tuning file <string>
For more instructions on tuning files, please refer to the official tutorial
For example: libcamera-hello --tuning-file ~/my~camera-tuning.json
--autofocus-mode Specify the autofocus mode <string>
Set the autofocus mode.
- default - By default, the camera will start continuous autofocus mode, unless --lens-position or --autofocus-on-capture manual focus is set
- manual - Manual focus mode, you can set the focus position by --lens-position
- auto - Only focuses when the camera is turned on; does not adjust focus in other situations (If the libcamera-still command is used, autofocus will only occur before taking a photo when the --autofocus-on-capture option is used)
- continuous - The camera will automatically adjust the focus position according to the scene changes
--autofocus-range Specify the autofocus range <string>
Set the autofocus range.
- normal - Default item, from nearest to infinity
- macro - Macro mode, only focus on close objects
- full - Full distance mode, adjust to infinity for nearest objects
--autofocus-speed Specify the autofocus speed <string>
Set the focus speed.
- normal - Default item, normal speed
- fast - Fast focus mode
--autofocus-window --autofocus-window
To display the focus window, you need to set x, y, width, height, where the coordinate values are set according to the scale of the image. For example, -autofocus-window 0.25,0.25,0.5,0.5 will set a window that is half the size of the image and is in the center.
--lens-position Set the lens to a given position <string>
Set the focus position.
- 0.0 -- Set the focus position to infinity
- number --Set the focus position to 1/number, where the number is any value you set, for example, if set to 2, it means the focus will be on a position of 0.5m
- default -- Focus to the default position relative to the lens hyperfocal length
--output, -o #Output filename <string>
Set the file name of the output image or video. In addition to setting the file name, you can also specify the udp or tcp server address for the output to output the image to the server. If you are interested, you can check the relevant setup instructions for subsequent tcp and udp.
For example: libcamera-vid -t 100000 -o test.h264
--wrap #Package the output file counter<number>
For example: libcamera-vid -t 0 --codec mjpeg --segment 1 --wrap 100 -o image%d.jpg
--flush #Refresh the output file immediately
--flush will write each frame image to the hard disk immediately while updating, reducing latency.
Example: libcamera-vid -t 10000 --flush -o test.h264
Still Picture Shooting Setting Parameters
--qiality, -q  #Set JPEG image quality <0 ~ 100>
--exif, -x #Add additional EXIF flags
--timelapse  #The time interval for taking pictures with time delay, the unit is ms
--framestart #The starting value of the frame count
--datetime  #Name the output file in date format
--timestamp #Name the output file with the system timestamp
-- restart  #Set the JPEG restart time interval
--keypress, -k  #Set Enter button to take a photo mode
--signal, -s  #Set signal to trigger photography
--thumb #Set thumbnail parameters <w:h:q>
--ebcoding, -e  #Sets the image encoding type jpg / png / bmp / rgb / yuv420
--raw, -r  #Save the original image
--latest #Associate the symbol to the latest saved file
--autofocus-on-capture  #Set to perform a focus action before taking a photo
Video Recording Image Setting Parameters
--quality, -q  #Set the JPEG quality <0 - 100>
--bitrate, -b  #Set H.264 bitrate
--intra, -g #Set internal frame period (only supports H.264)
--profile #Set H.264 configuration
--level  #Set H.264 level
--codec  #Set encoding type h264/mjpeg/yuv420
--keypress, -k  #Set Enter to pause and record
--signal, -s  #Set signal pause and recording
--initial #Start the program while recording or pausing
--split #Split the video and save it to another file
--segment #Split the video into multiple video segments
--circular  #Write the video into a circular buffer
--inline #Write data header in each I-frame (only supports H.264)
--listen #Wait for TCP connection
--frames #Set the number of frames recorded
- For more camera settings instructions, please refer to the Official camera documentation
Support
Monday-Friday (9:30-6:30) Saturday (9:30-5:30)
Email: services01@spotpear.com