- sales/support
Google Chat:---
- sales
+86-0755-88291180
- sales01
sales@spotpear.com
- sales02
dragon_manager@163.com
- support
tech-support@spotpear.com
- CEO-Complaints
zhoujie@spotpear.com
- Only Tech-Support
WhatsApp:13246739196
- Purchase/Shipping/Refund
WhatsApp:13424403025
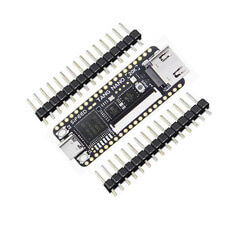
Tang-Nano-FPGA-Series-IDE-Install
【Install the IDE】
】Download the IDE
- The IDE can be downloaded from this page after logging in.
It may look difference as this screenshot is from 2023.05.29 and the IDE has since been updated.
The IDE is available in two editions: Standard Edition and Education Edition.
The Standard Edition IDE requires license, which you can get from GOWIN Semiconductor Corp.
The Education Edition IDE is free to use, but supports fewer devices and includes fewer IP cores.
The following figure (updated 2023/05/29) shows the part numbers (PN) supported in the latest Education Edition IDE
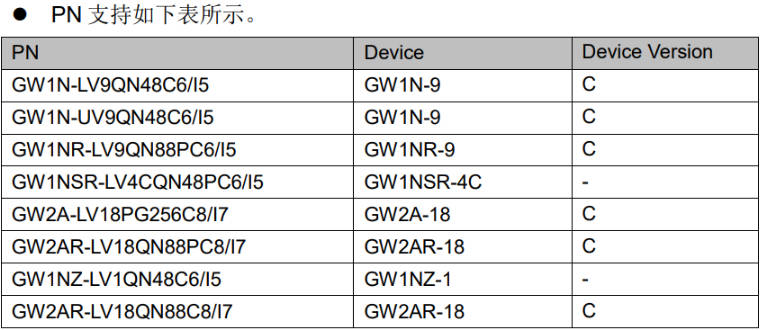
The chips and boards in the following table can be synthesized and programmed via Educational IDE.
| Chip full name | Chip Series | Chip model | Board |
|---|---|---|---|
| GW1NZ-LV1QN48C6/I5 | GW1NZ | GW1NZ | Nano 1K |
| GW1NSR-LV4CQN48PC6/I5 | GW1NSR | GW1NSR-4C | Nano 4K |
| GW1NR-LV9QN88PC6/I5 | GW1NR | GW1NR-9C | Nano 9K |
| GW2AR-LV18QN88C8/I7 | GW2AR | GW2AR-LV18 | Nano 20K |
| GW2A-LV18PG256C8/I7 | GW2A | GW2A-18C | Primer 20K |
| GW5A-LV25MG121NC1/I0 | GW5A | GW5A-25 | Primer 25K |
For those who want to use Tang Nano (Onboard jtag is CH552), you'll need to use the Standard Edition IDE and apply for a license from GOWIN Semiconductor Corp.
】Install
[] Linux OS
For linux, download the Linux edition IDE and decompress it, the executable file gw_ide is in the decompressed folder /IDE/bin/. Execute it on command line to run the GOWIN IDE. Remember to change the permission of the software to make it executable with chmod + x if running the software fails.
[] Windows OS
Simply download the software and install it.
Making sure to install all components.
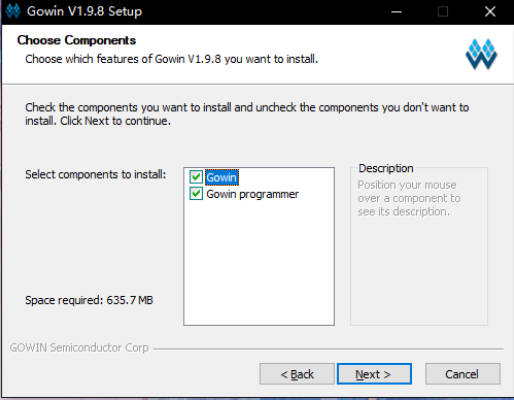
In the second picture, Gowin is the IDE which we will use to generate the bitstream file, and the Gowin programmer is what we use to burn it to the fpga. But the programmer installed with IDE does not match the USB-Jtag we provide. So we suggest you visit Tang questions to see how to replace programmer software with one will work better.
After you finish installing IDE, you will need to install 2 drivers.
After installing everything there will be an IDE icon, like the one below, on your desktop.
【Use the IDE】
】About the license
The Educational edition IDE does not require a license.
The Standard edition IDE requires a license, which you should apply for from the Gowin official website, visit https://www.gowinsemi.com/en/support/license/ for more information, and there you will be able to make a choice of software between GOWIN EDA and GOWIN GMD. GOWIN EDA is what we use to program FPGA and the GOWIN GMD is what we use to program the hardcore or softcore in FPGA, so you should choose GOWIN EDA to get a license to run GOWIN IDE.
If you don't want to apply lic, you can use online lic server from Sipeed too:
if the ip not work, try use "gowinlic.sipeed.com" domain's IP.
】Verify license
When you run GOWIN IDE, a license manager message box will appear. Once you have a license file you can click Browse... and select your license file, then Check and finally Save.
】Programmer
Because the Programmer installed with IDE may not match the USB-JTAG we provide it may not work. So for Windows users we recommended using this Programmer instead.
For Linux users, go to the end of this page to see the section burn-in-linux if you have issues with the Gowin programmer.
【Other】
It may take some time to receive a license. During this time we sugegst you read the GOWIN Semiconductor Corp official documents, which are installed with the IDE.
There are three things in the IDE installation path: IDE folder, Programmer folder, uninst.exe
IDE folder:Here I suggest you look in the doc folder, where many GOWIN Semiconductor Corp official documents are, as shown below.
Programmer folder: There are also many documents here.
We suggest you delete the Programmer folder installed with the IDE and use this version Click me,which can solve some issues.
uninst.exe:This program uninstalls the IDE.
【Burn in linux】
It's recommended to use openFPGALoader to flash the development board from linux environments. This page covers installation instructions and has been verified on Ubuntu but may work on other linux distributions.
The currently available package on Ubuntu is older ('openfpgaloader') and does not support the latest boards (i.e. tangnano20k), because of this compiling the latest git source is recommended and covered below (adapted from the offical projects documentation: https://trabucayre.github.io/openFPGALoader/guide/install.html).
】Compiling openFPGALoader from git
- Install build dependences
- Clone the source code
- Configure and compile the code
- Install
】Optionally install Udev rules
Using the board may require root permissions if Uden rules are not used. If this is not done you will likely need to run openFPGAloader as root or with sudo each time.
】Flashing the board
First ensure openFPGAloader detects the cable and device.
Flash the bitstream to the device as shown below. The board name must be speficied after the -b option, -f options means the file is programmed to the non-volatile flash, without it it will be stored in SRAM but lost if the device loses power.
[]Board names
You can find the list of supported tang boards using the command openFPGAloader --list-boards | grep tang.
| Board name | FPGA | Memory | Flash |
|---|---|---|---|
| tangnano | GW1N-1 QN48 | OK | Internal Flash |
| tangnano1k | GW1NZ-1 QN48 | OK | Internal Flash |
| tangnano4k | GW1NSR-4C QN48 | OK | Internal Flash |
| tangnano9k | GW1NR-9C QN88P | OK | Internal Flash |
| tangnano20k | GW2AR-18C QN88 | OK | External Flash |
| tangprimer20k | GW2A-18C BGA256 | OK | External Flash |