


- sales/support
Google Chat:---
- sales
+86-0755-88291180
- sales01
sales@spotpear.com
- sales02
dragon_manager@163.com
- support
tech-support@spotpear.com
- CEO-Complaints
zhoujie@spotpear.com
- Only Tech-Support
WhatsApp:13246739196
- Purchase/Shipping/Refund
WhatsApp:13424403025
- HOME
- >
- ARTICLES
- >
- Common Moudle
- >
- ESP
ESP32-C5-WIFI6-KIT-N16R4 User Guide
Overview
Introduction
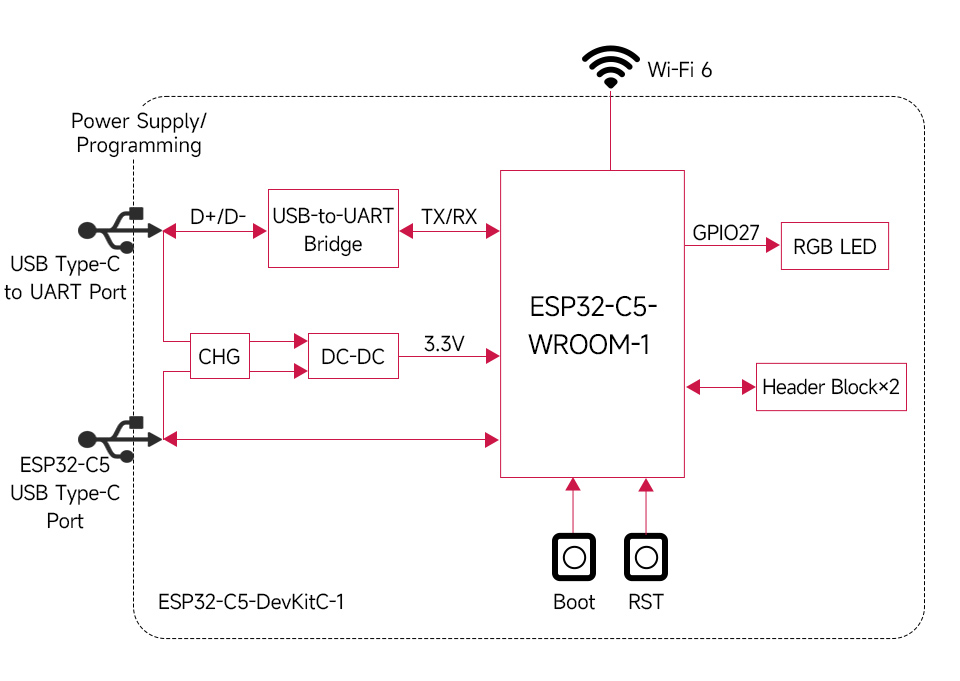
The ESP32-C5-WIFI6-KIT is a development board designed by Waveshare based on the ESP32-C5-WROOM-1 module for dual-band Wi-Fi and multi-protocol IoT gateway scenarios. The ESP32-C5 is a single-core chip by Espressif supporting Wi-Fi 6 dual-band (2.4GHz and 5GHz) RISC-V, which also integrates BLE 5, Zigbee, and Thread protocols, allowing it to be flexibly used as a smart home hub or cross-protocol communication gateway. In terms of hardware, it is equipped with a 240MHz RISC-V processor, 384KB SRAM, 16MB Flash, and 4MB or 8MB PSRAM (version optional), which can stably handle multi-stack concurrent tasks and medium-load applications. Developers can quickly prototype and implement products with the help of mature development frameworks such as ESP-IDF or Arduino, which are suitable for practical IoT scenarios such as smart gateways and multi-protocol device access.
Features
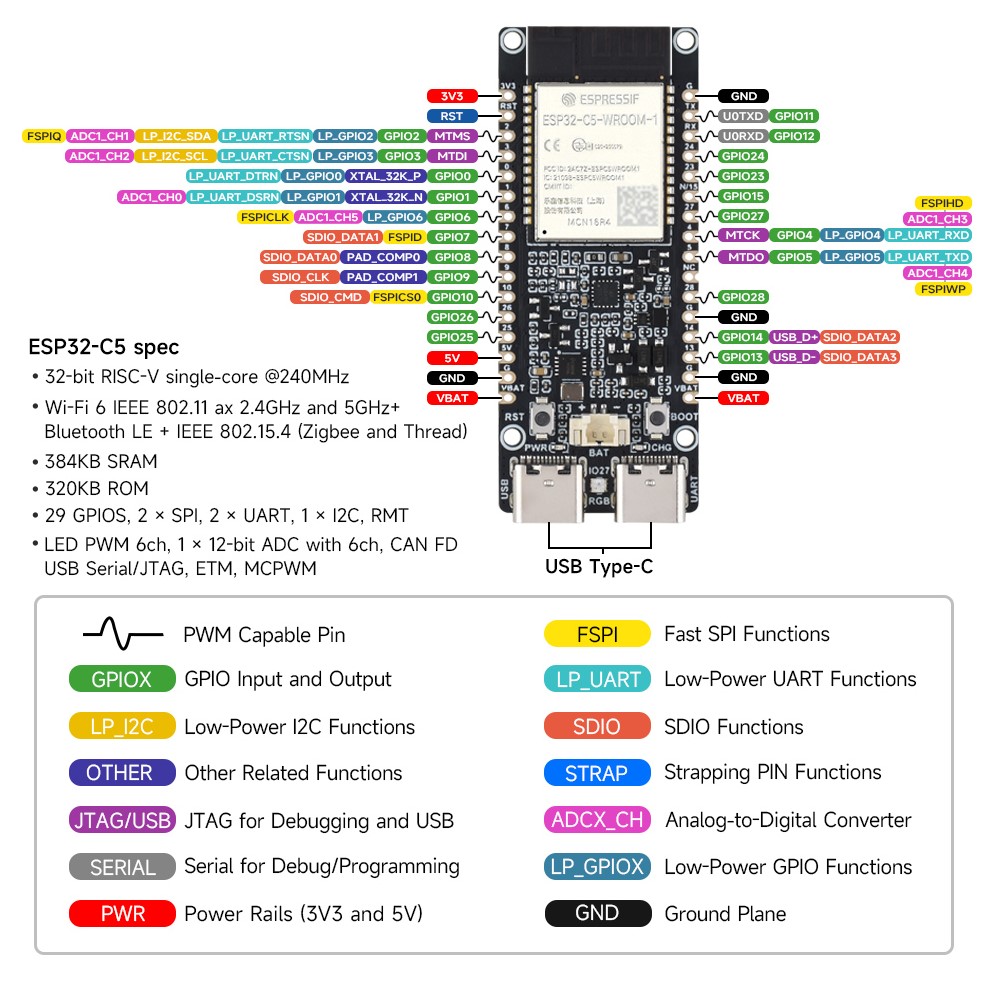
- Adopts ESP32-C5-WROOM-1 series modules, equipped with a RISC-V 32-bit processor, with a clock speed of up to 240MHz
- Integrates with 384KB SRAM, 320KB ROM, and 16MB Flash, and offers optional versions with 4MB or 8MB PSRAM
- Integrates dual-band 2.4GHz and 5GHz Wi-Fi, Bluetooth 5 (LE), and IEEE 802.15.4 (supporting Zigbee 3.0 and Thread) wireless communication, featuring excellent RF performance
- Onboard battery charging management module, with a reserved 3.7V MX1.25 lithium battery interface, allowing for external battery connection for power supply
- Features a reversible USB Type-C interface
- Features rich peripheral interfaces, with castellated design for easy welding and integration into the user-designed base boards
- Supports a variety of low-power operating states, allowing flexible adjustment of the balance between communication distance, data rate and power consumption to meet the power requirements of various application scenarios
Functional Block Diagram
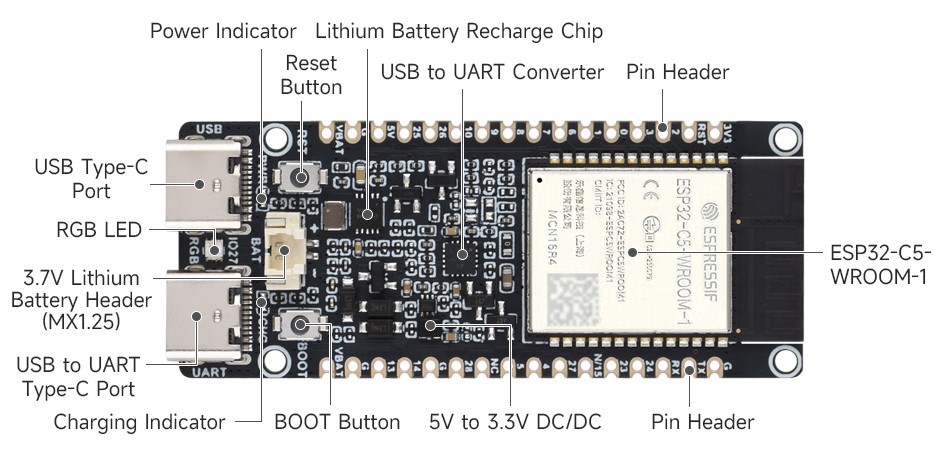
Interfaces
Pinout Definition
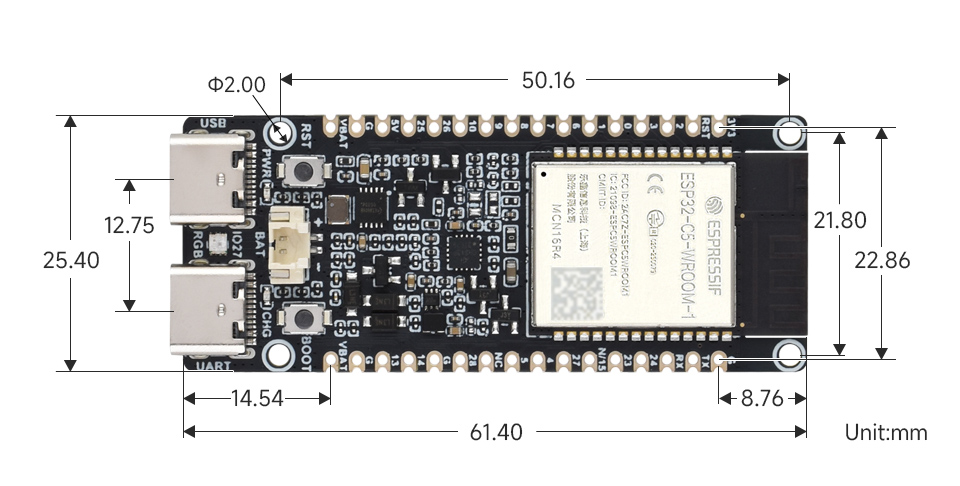
Dimensions
Development Environment Configuration
- The following development system is Windows by default
ESP-IDF
- It is recommended to use the VSC plugin for development
Develop with VSCode Plugin
Install VSCode
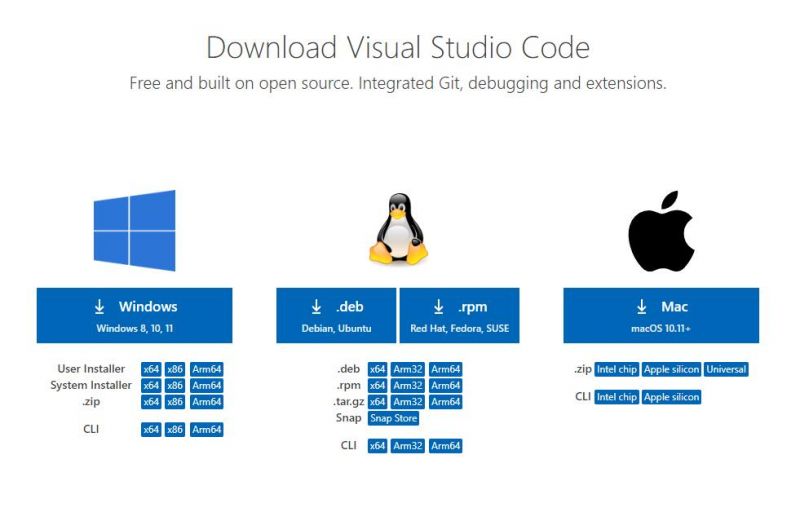
- Open the download page of the official VSCode website, and select the corresponding system and system bit to download
- After running the installation package, the rest can be installed by default, but here for the subsequent experience, it is recommended to check boxes 1, 2, and 3
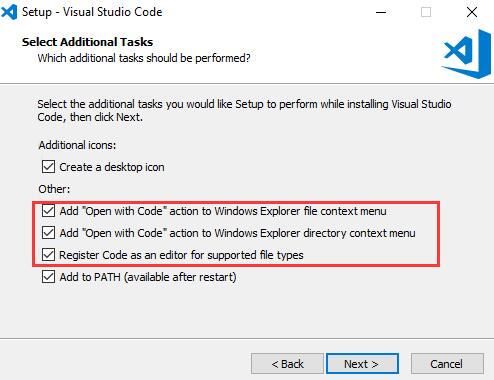
- After the first two items are enabled, you can open VSCode directly by right-clicking files or directories, which can improve the subsequent user experience
- After the third item is enabled, you can select VSCode directly when you choose how to open it
Install Espressif IDF Plugin
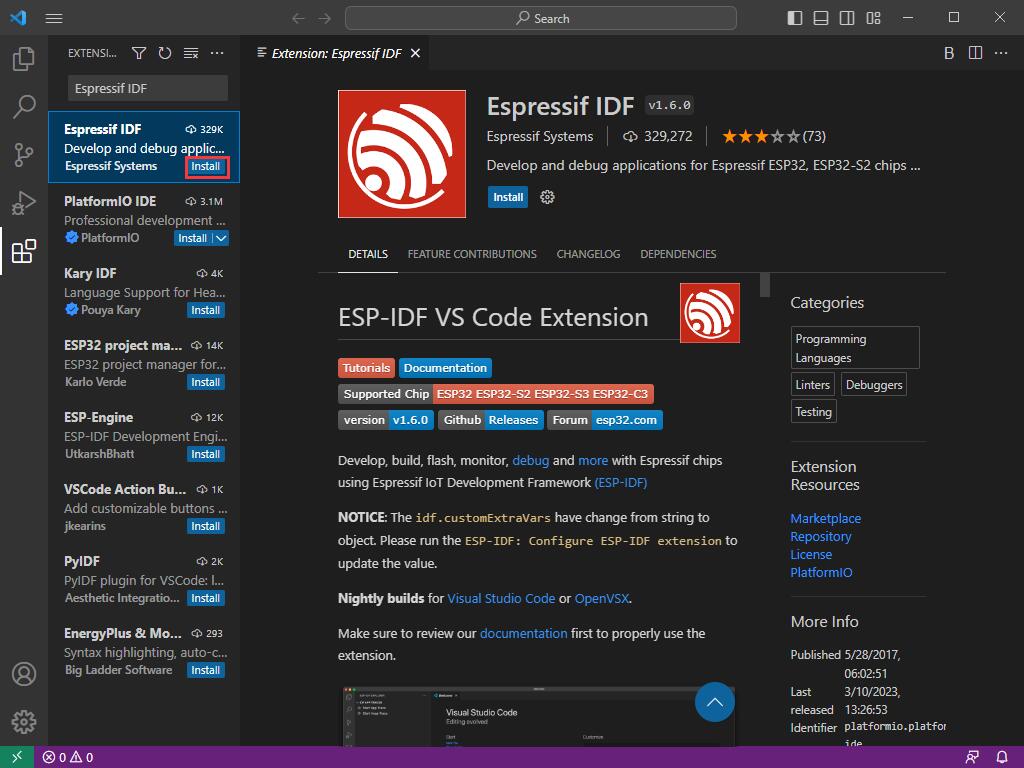
- Note: Currently the latest version of the plugin is V1.6.0, users can choose the same version as us for a consistent experience
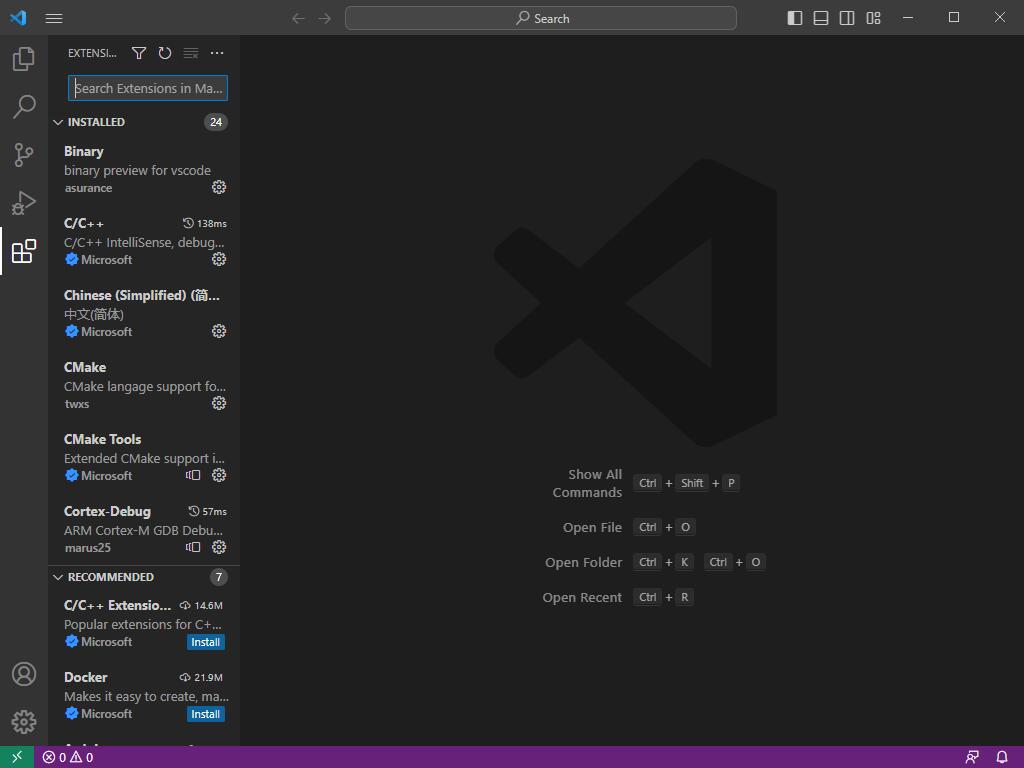
- Open VSCode, use Shift+Ctrl+X enter the plugin manager
- In the search bar, enter Espressif IDF to select the corresponding plugin and click Install
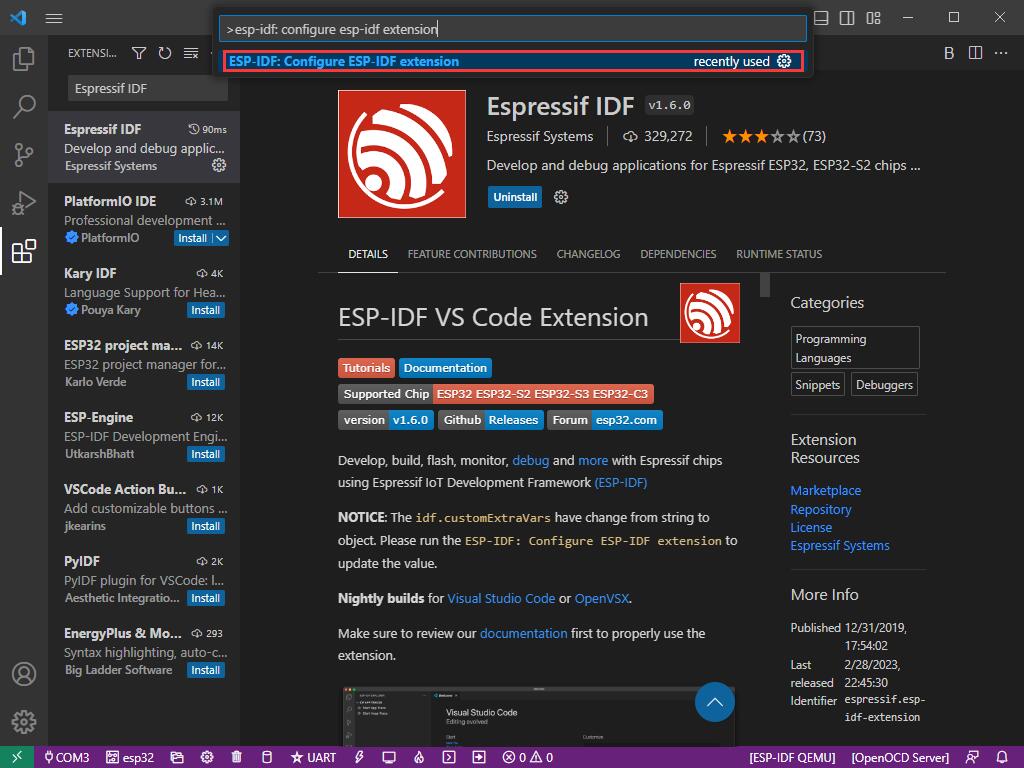
- Use the shortcut key F1 and enter
esp-idf: configure esp-idf extension
- Select express (This tutorial is intended for first-time installation users, so only the first general installation tutorial is covered)
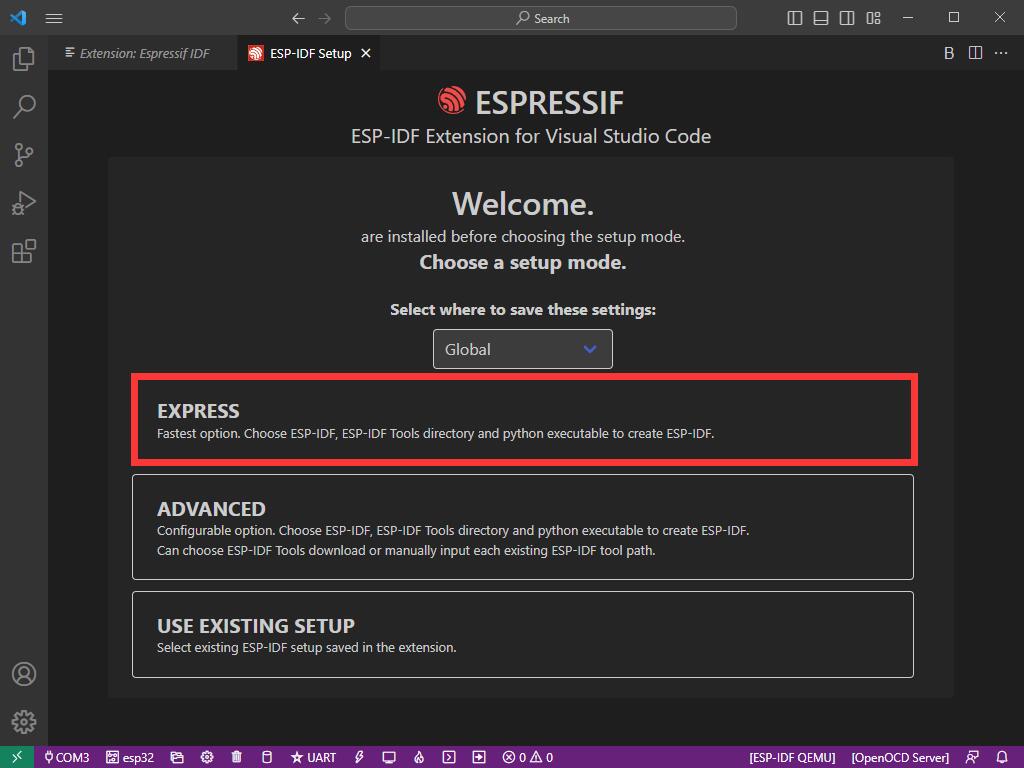
- After opening, it displays this interface
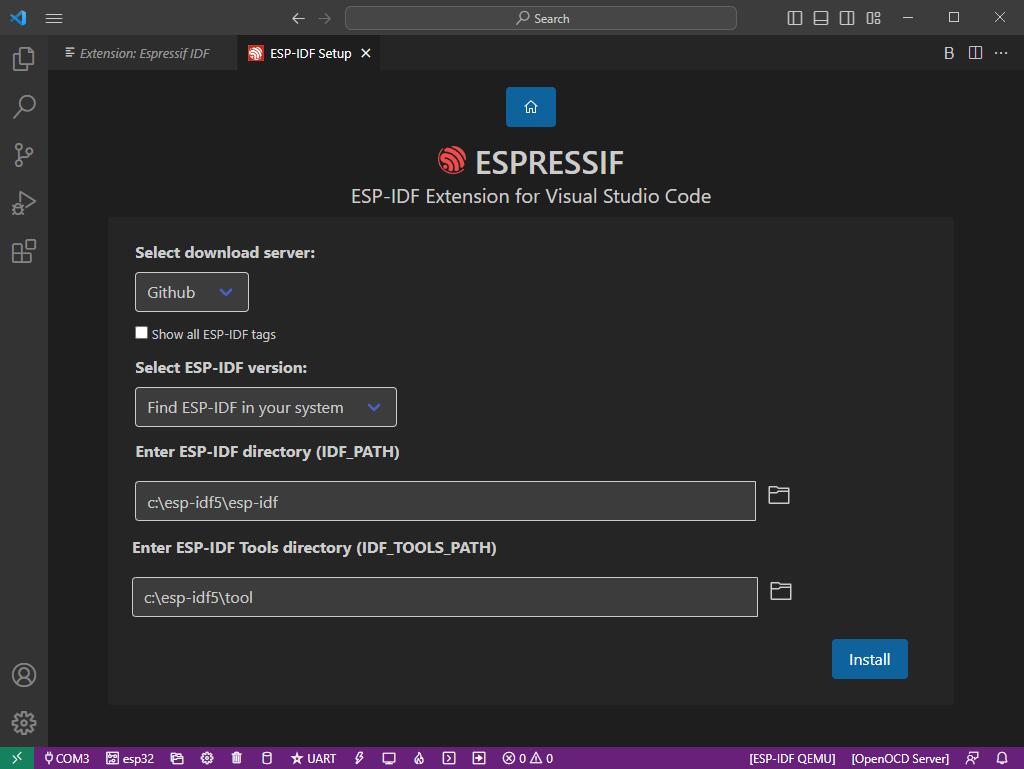
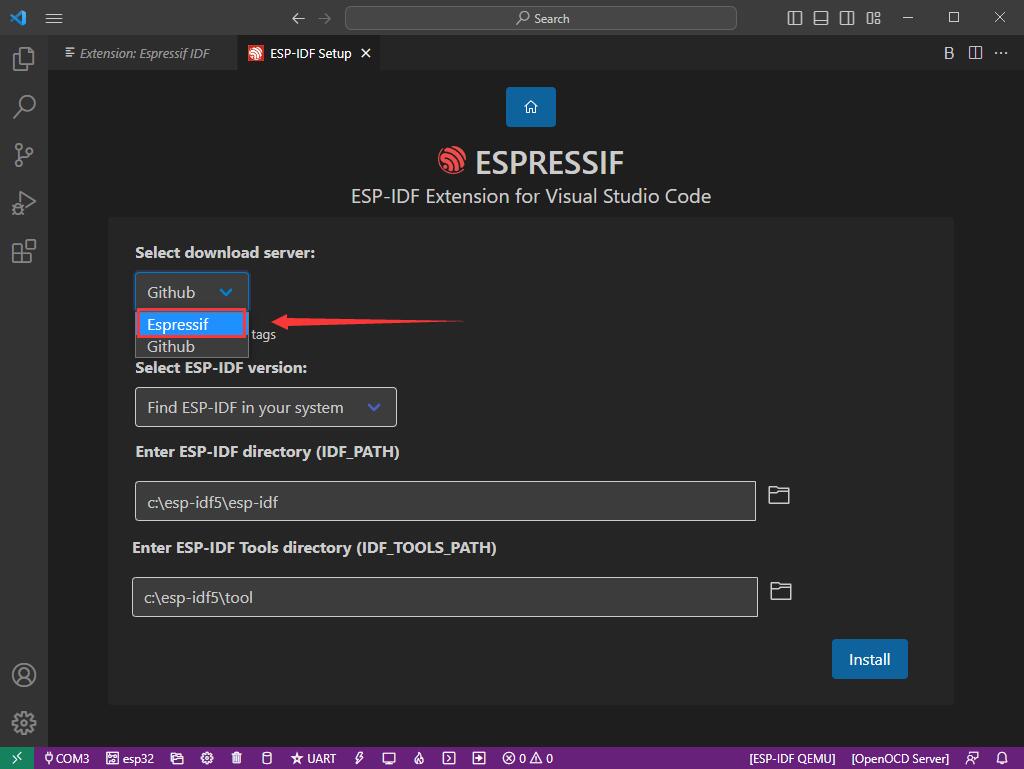
- Choose the download server, we recommend users to use Espressif as your download server
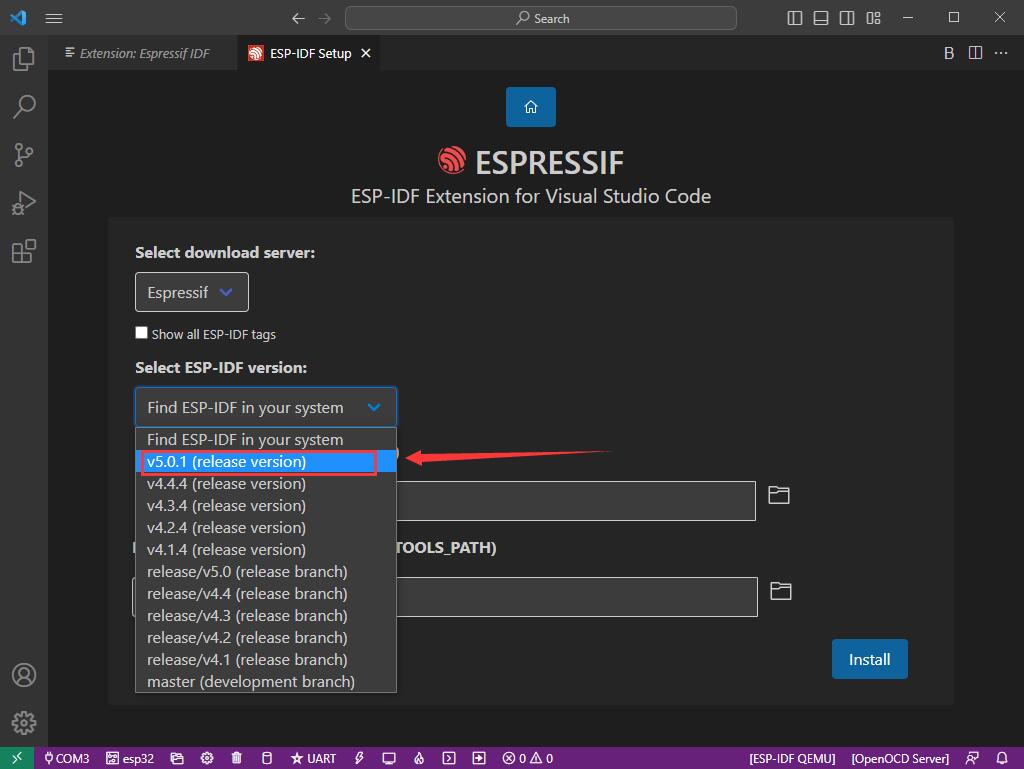
- Select the ESP-IDF version you want to download, we choose the latest V5.0.1 (note that ESP-IDF only supports ESP32-C5 after V4.4)
- The following two are the installation paths respectively for the ESP-IDF container directory and the ESP-IDF Tools directory
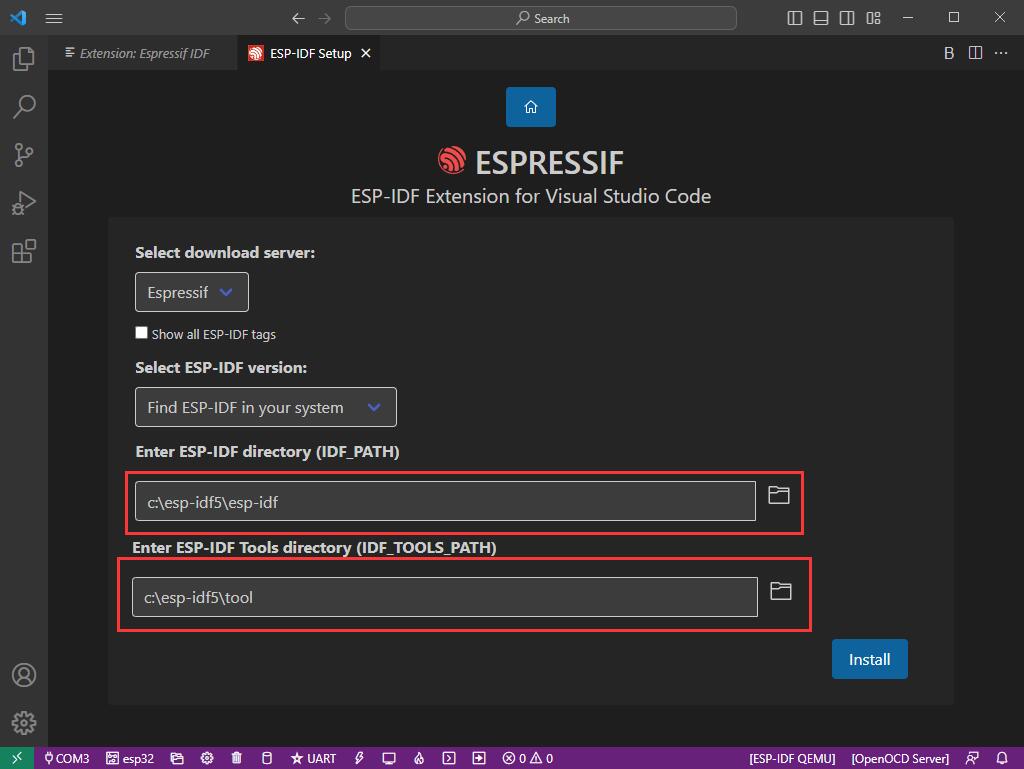
- Note: If you have installed ESP-IDF before, or failed to do so, please be sure to delete the file completely or create a new path without Chinese characters
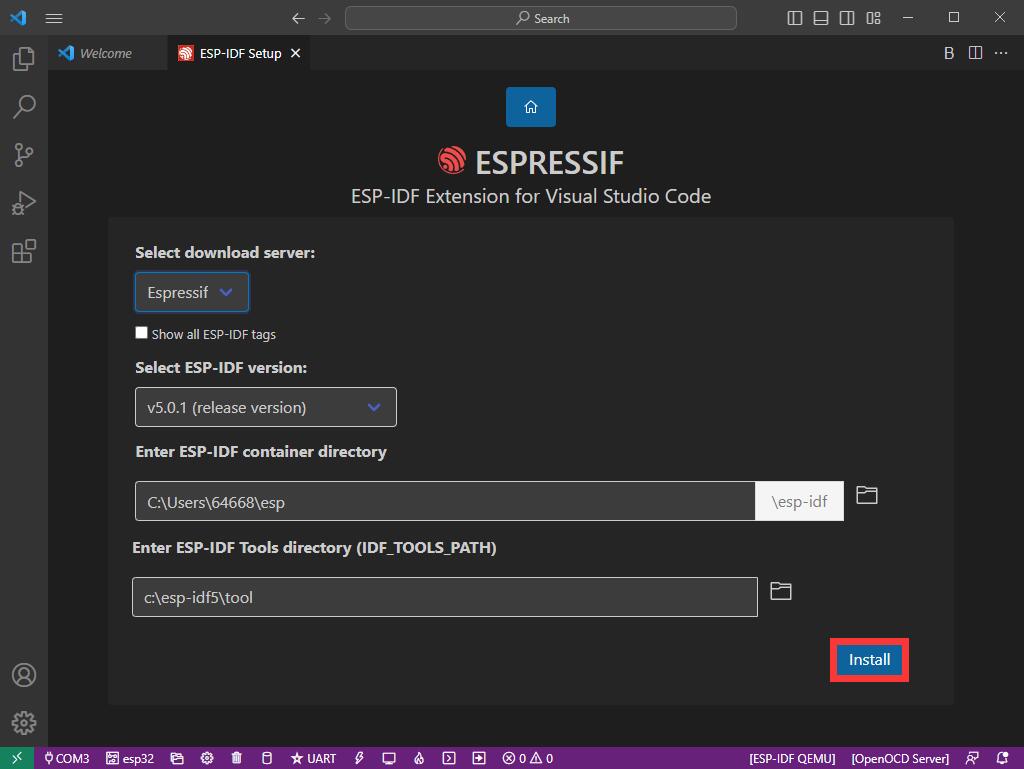
- After configuring, click Install to download
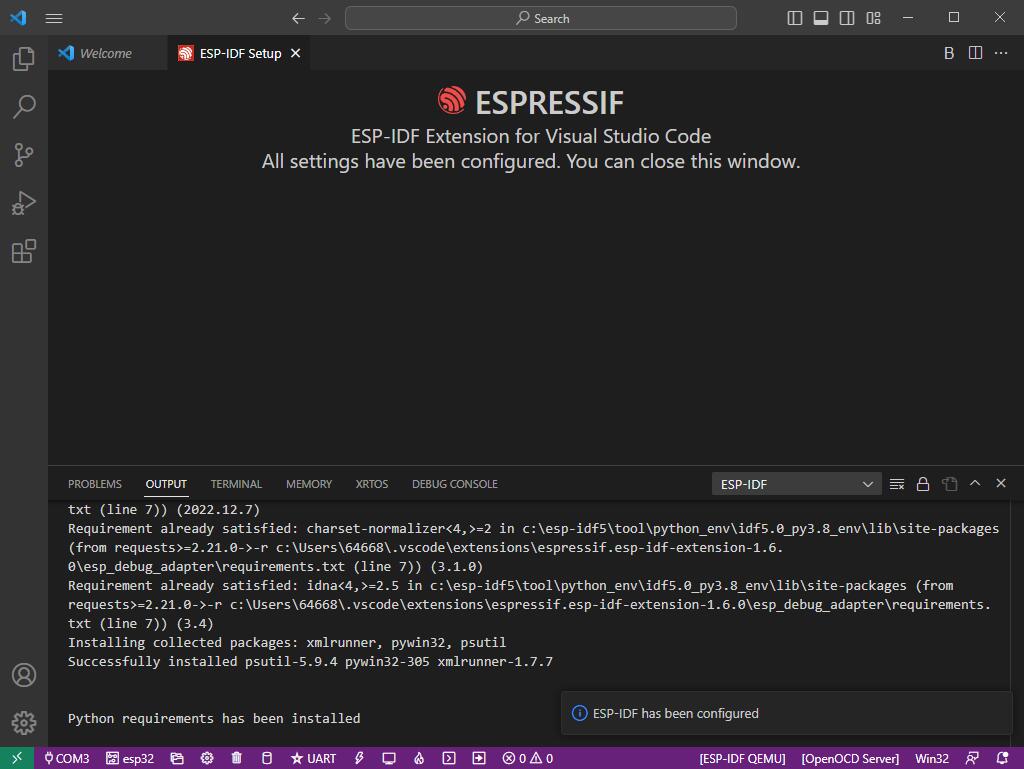
- Enter the download interface, and then it will automatically install the corresponding tools and environment, just wait for a second

- After the installation is complete, you will enter the following interface, indicating that the installation is finished
Run Official Demos
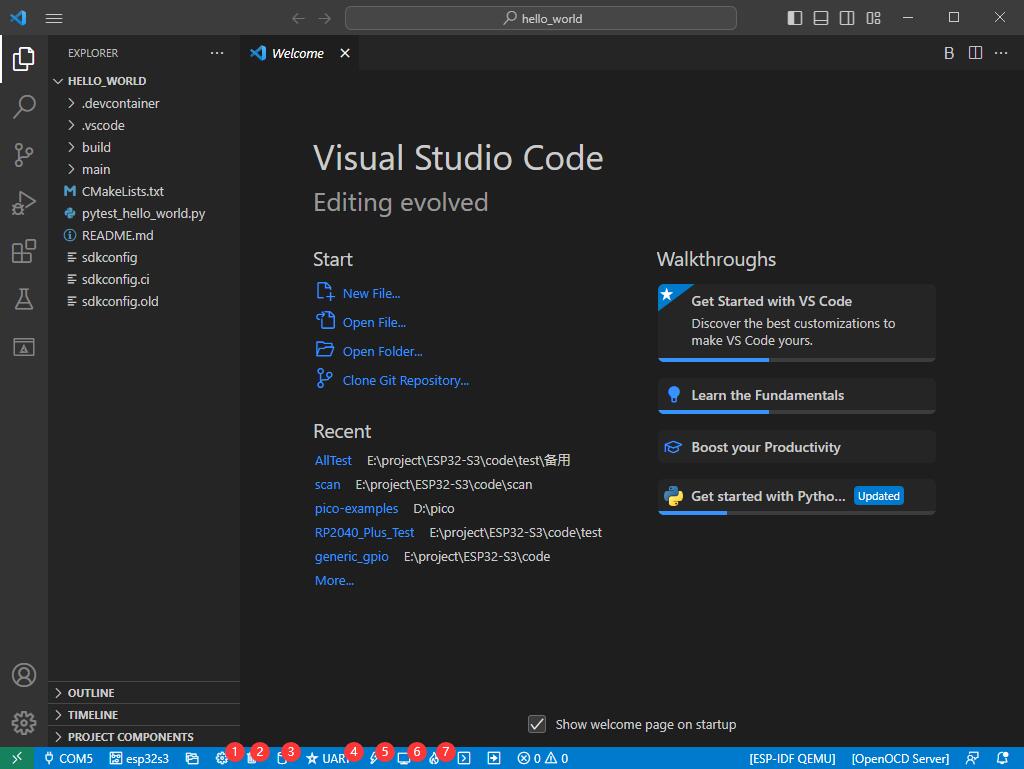
Create Demo
- Using the shortcut F1, enter
esp-idf:show examples projects
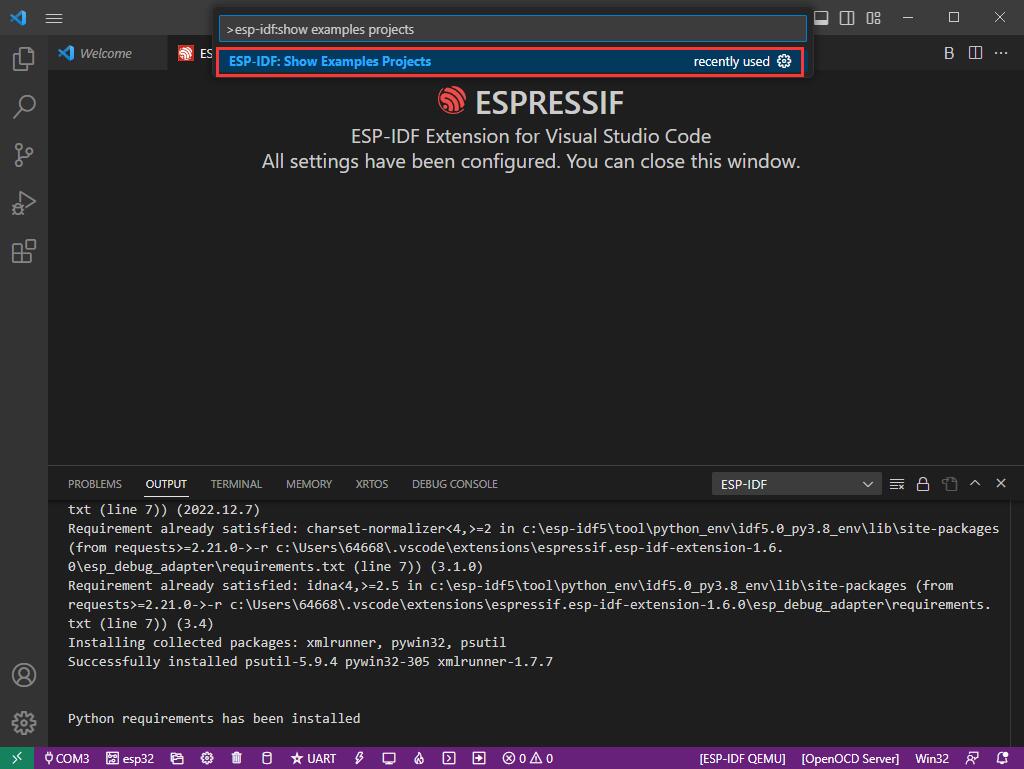
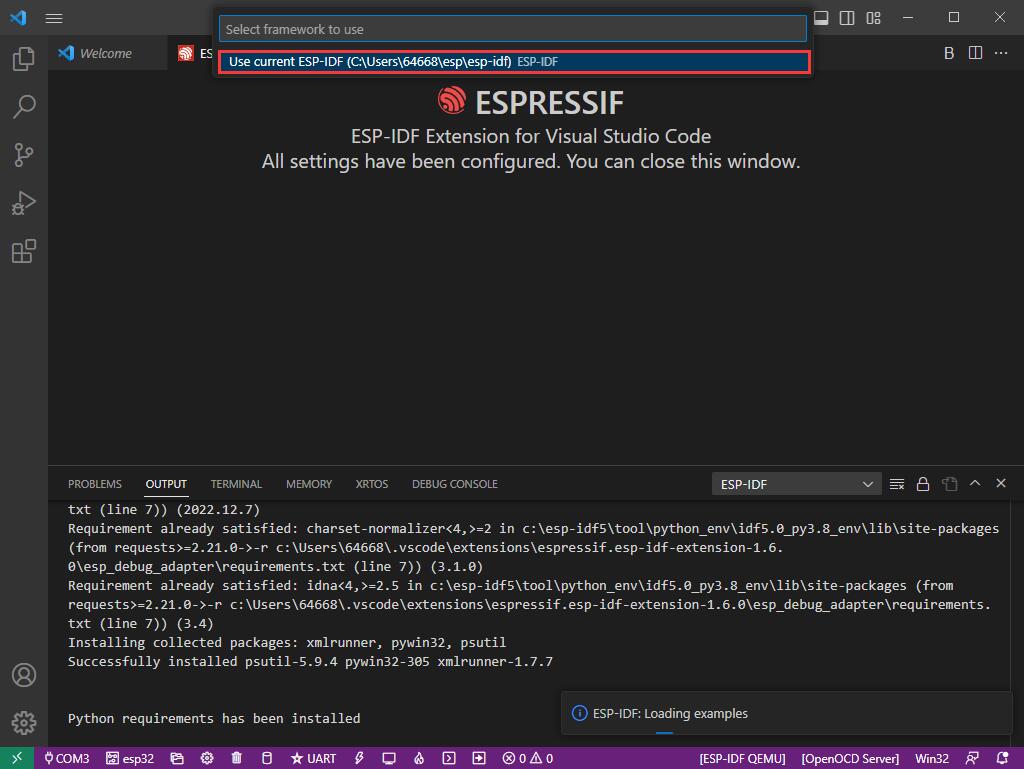
- Select your current IDF version
- Take the Hello world demo as an example:
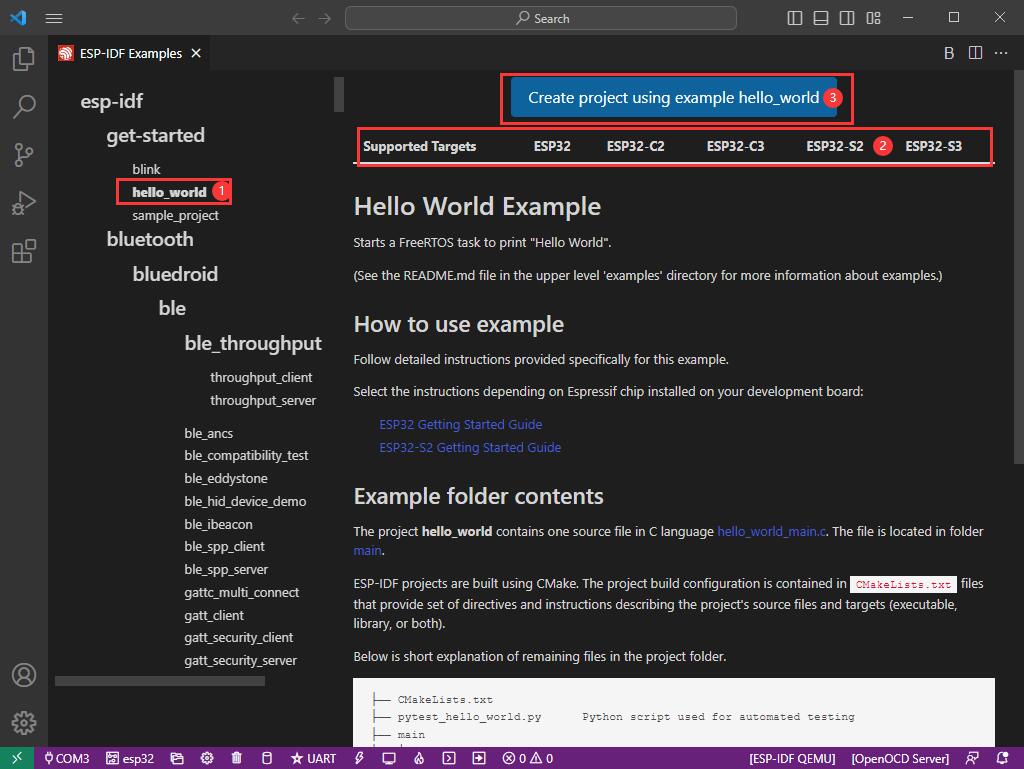
- ①Select the corresponding demo
- ②Its readme will state what chip the demo applies to (how to use the demo and the file structure are described below, omitted here)
- ③Click to create the demo
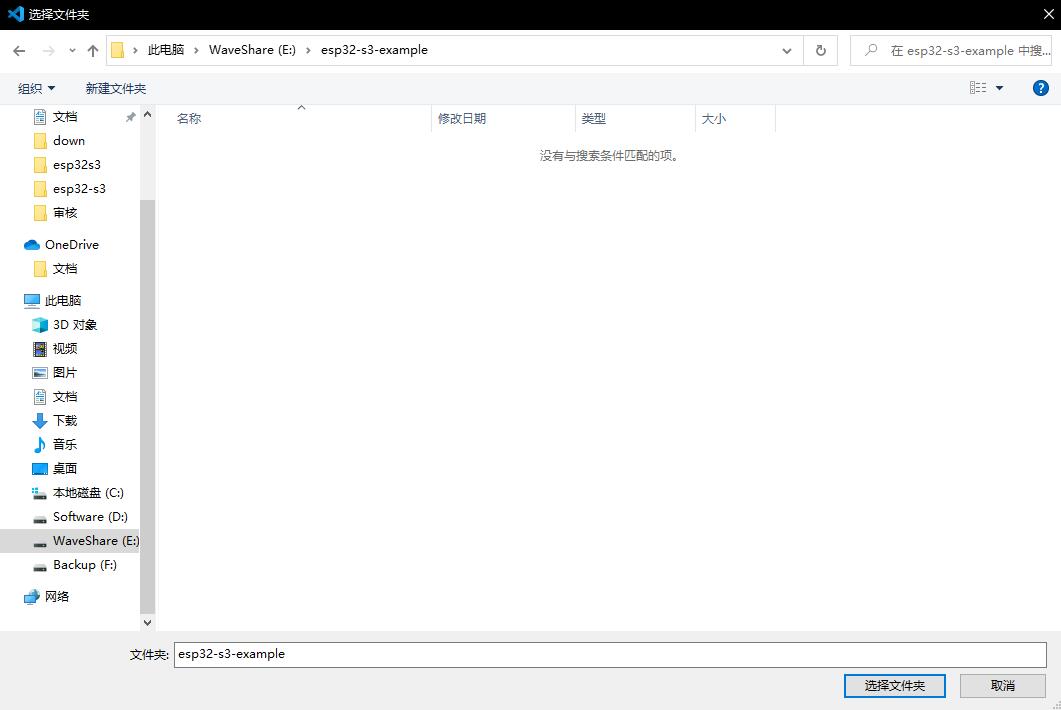
- Select the path to save the demo, and require that the demos cannot use folders with the same name
Modify COM Port
- The corresponding COM ports are shown here, click to modify them
- The COM of our CH343 is COM5, so we choose COM5. Please choose the COM port corresponding to your CH343
- Select the project or demo to use
- Then we finish the modification of the COM ports
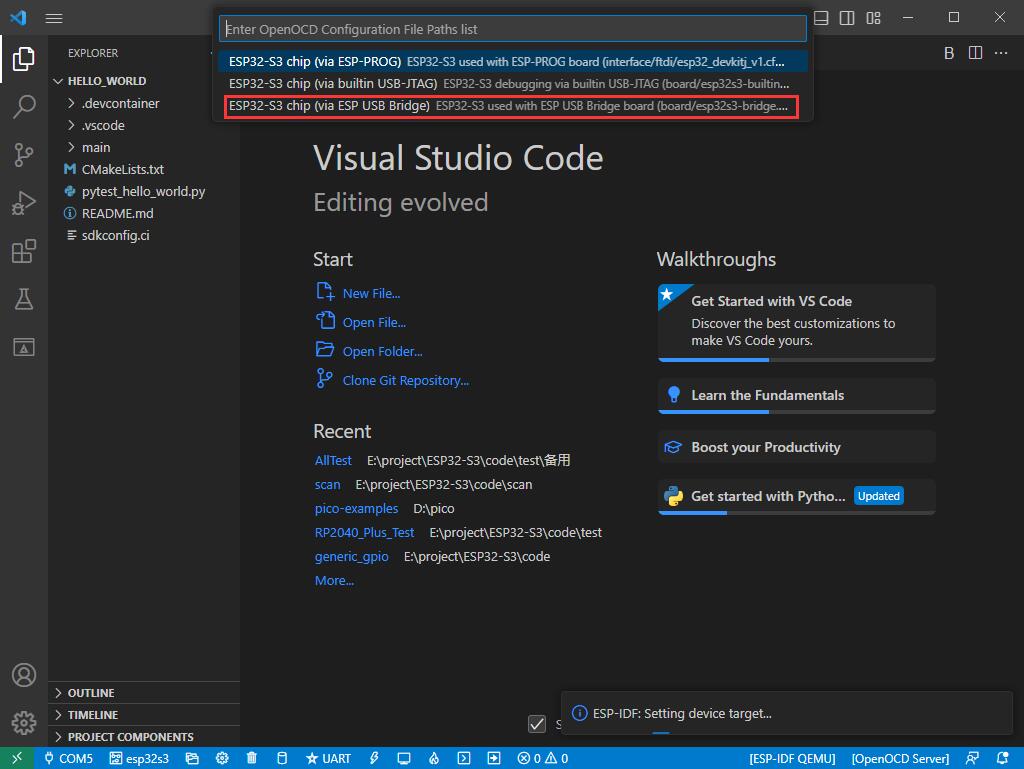
Modify Driver Object
- The driver object used is displayed here, and you can click it to modify the corresponding driver object

- Select the project or demo to use
- Click and wait for a moment

- Select the object we need to drive, which is our main chip ESP32S3
- Choose the openocd path, it doesn't affect us here, so let's just choose one
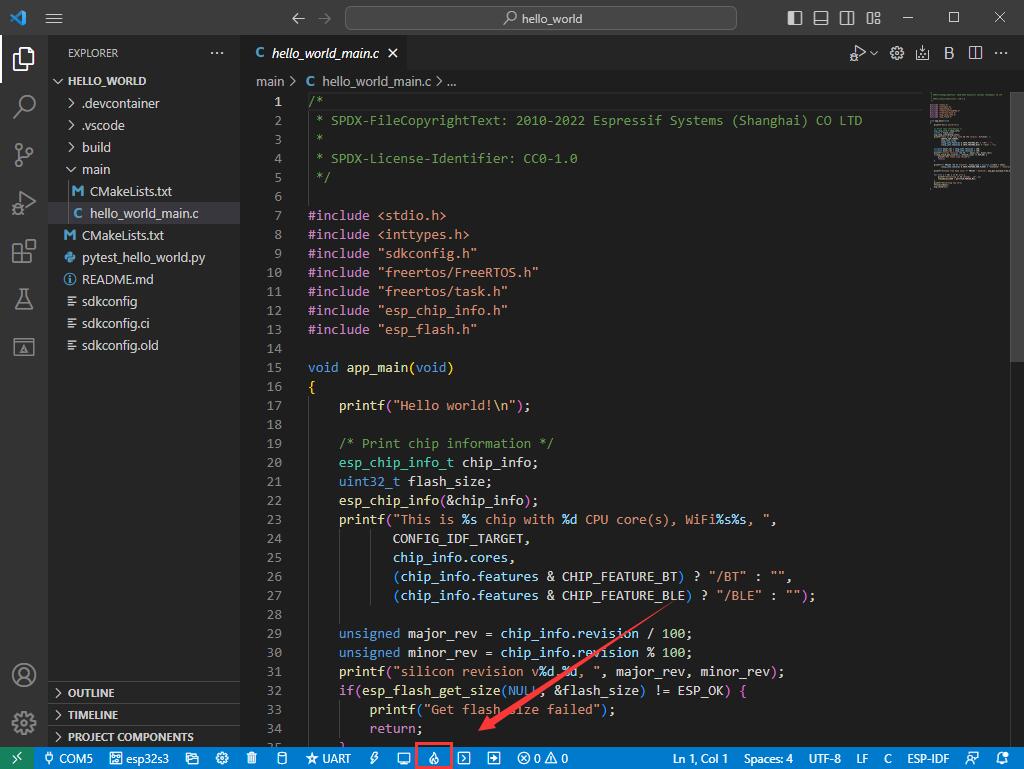
Other Status Bars
- ①SDK configuration editor, supports modifying many features and configurations of ESP-IDF
- ②All cleanup, and clear all compiled files
- ③Compile
- ④Current download mode, the default is UART
- ⑤Flash the current firmware, please do it after compiling
- ⑥Open the serial port monitor, used to view the serial port information
- ⑦Compile, flash,open the serial monitor, all-in-one button (most commonly used for debugging)
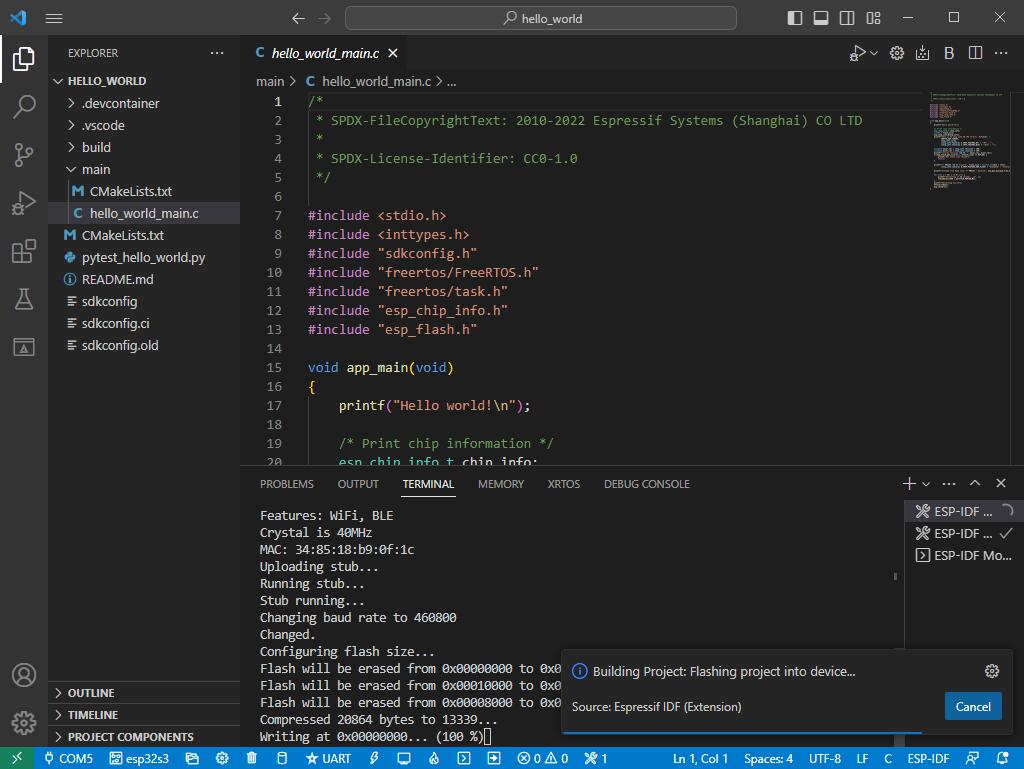
Compile, Flash and Serial Port Monitor
- Click on the all-in-one button we described before to compile, flash and open the serial port monitor
- It may take a long time to compile especially for the first time
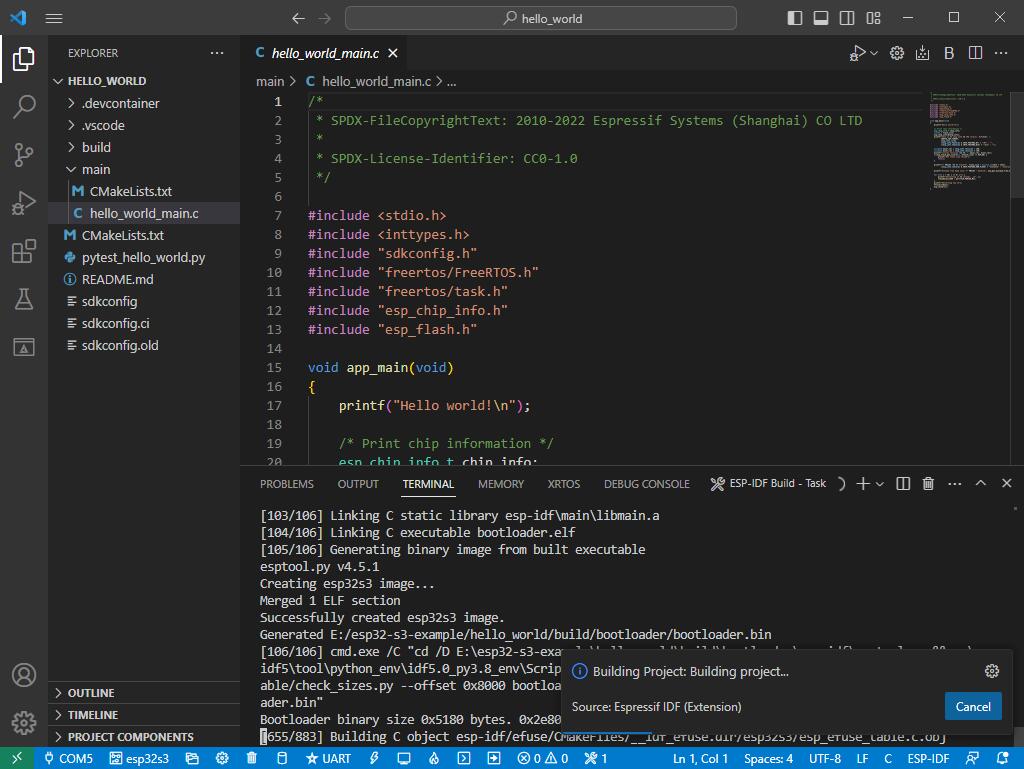
- During this process, the ESP-IDF may take up a lot of CPU resources, so it may cause the system to lag
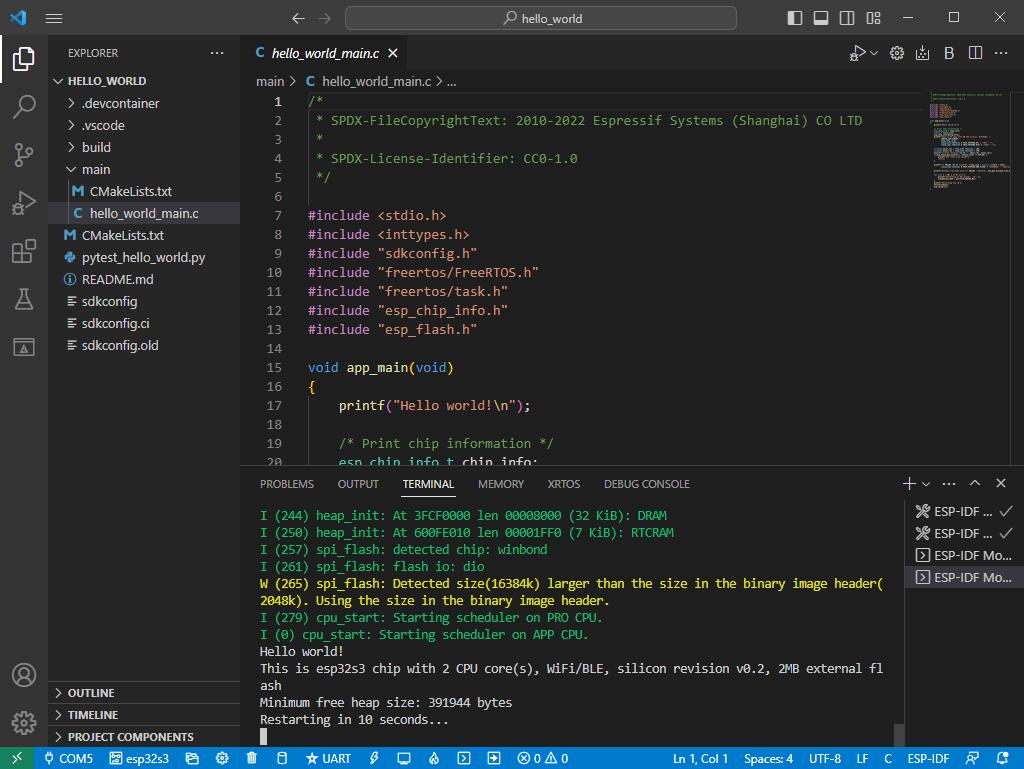
- Because we are using CH343 as a USB to serial port chip, and there is an automatic download circuit on board, it can be automatically downloaded without manual operation
- After successful download, it will automatically enter the serial monitor, you can see the chip output the corresponding information and be prompted to restart after 10S
Arduino
Install Arduino IDE
- Open the software download page of the official website, and select the corresponding system and system bit to download
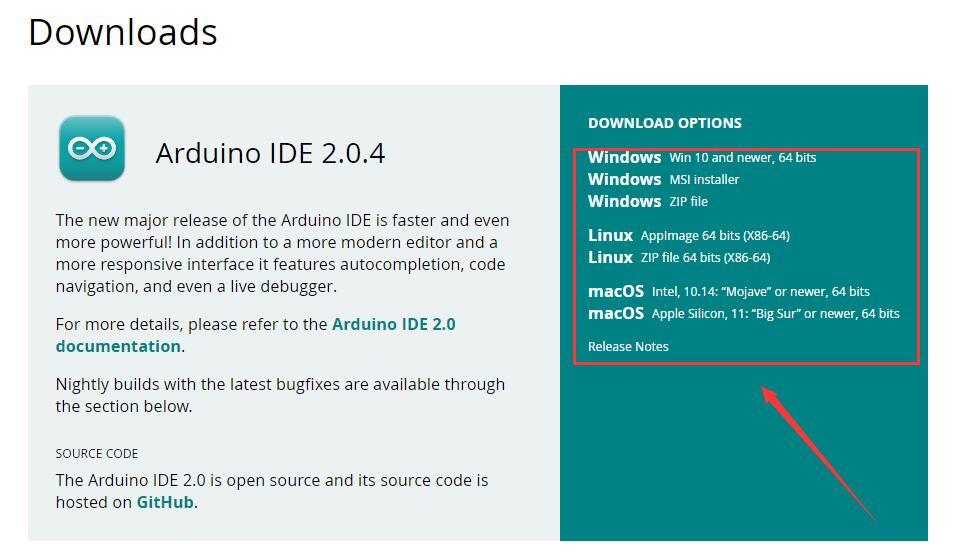
- You can choose to download directly or donate and download

- Run the installer and install all by default
Install Arduino-esp32 Online
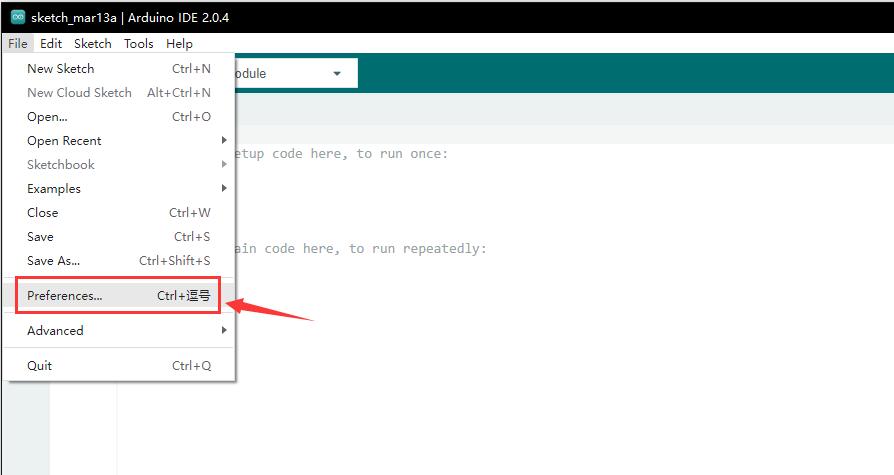
- Open Preferences
- Add the corresponding board management link, click the button
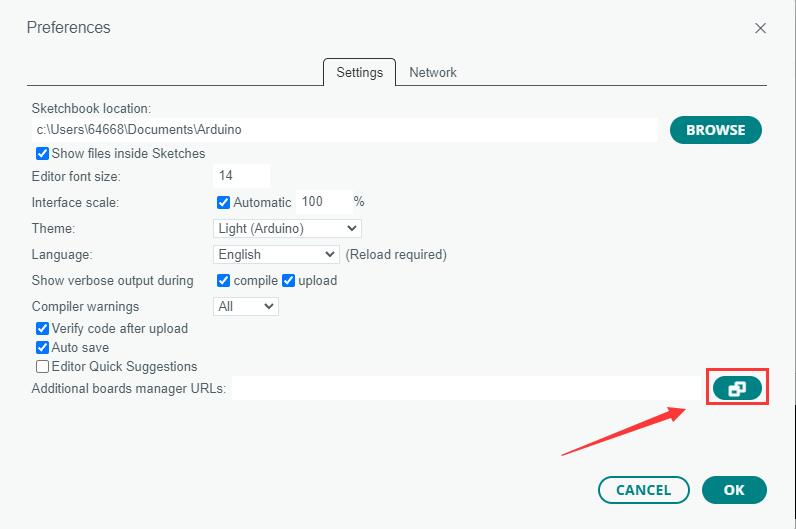
- Add the following text in the first blank
https://raw.githubusercontent.com/espressif/arduino-esp32/gh-pages/package_esp32_index.json
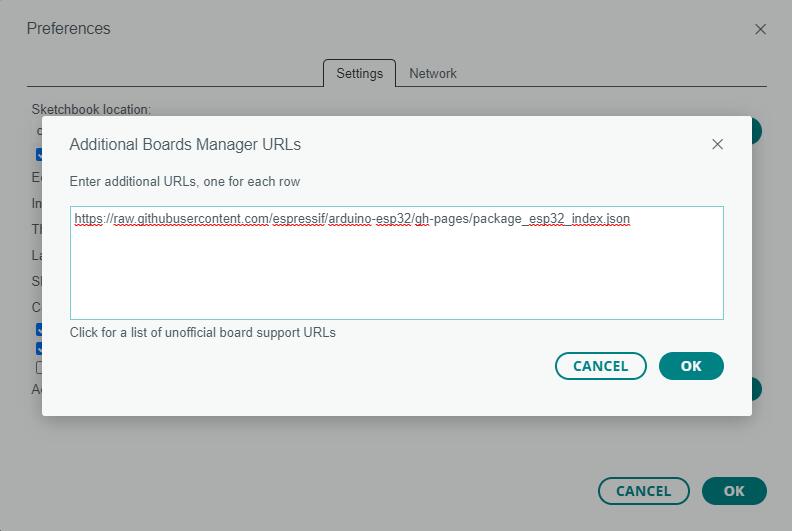
- Save settings
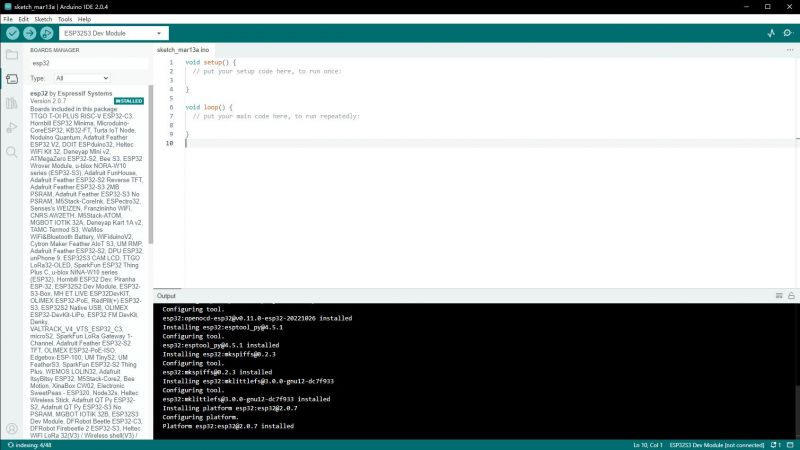
- Open the board manager and input ESP32 to search
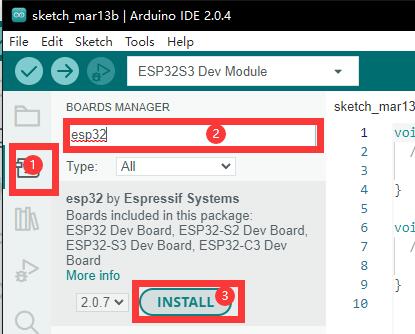
- Wait for the download
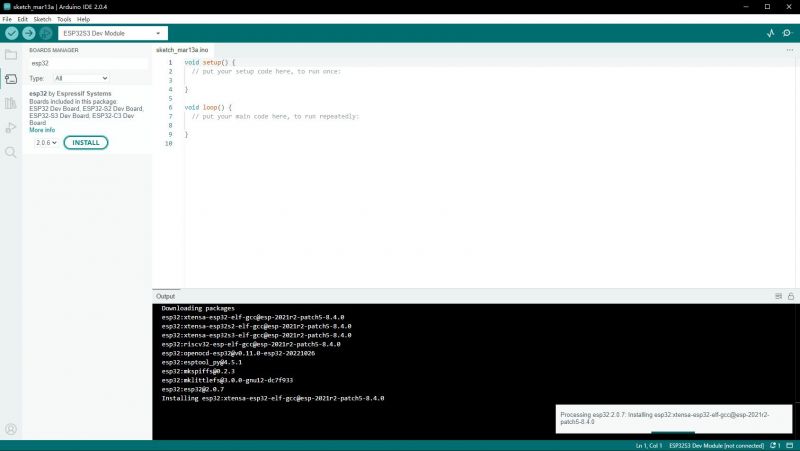
- The arduino-esp32 download is complete
Install Arduino-esp32 Offline
- Arduino-ESP32 offline component package
- Unzip the compressed file
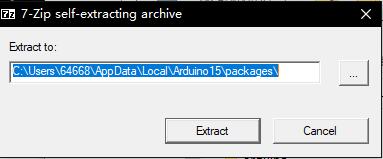
- Place the unzipped files in the Arduino components package directory of the corresponding user
C:\Users\{username}\AppData\Local\Arduino15\packages\Take the username waveshare as an exampleC:\Users\waveshare\AppData\Local\Arduino15\packages\
- Close all arduino windows to make sure Arduino is turned off
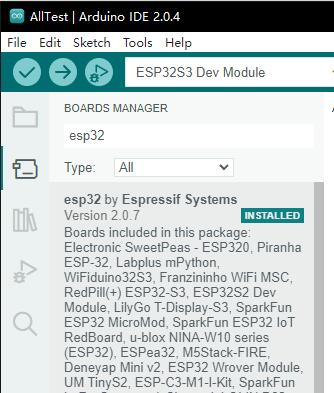
- Open Arduino, then open the board manager, you can see that esp32-arduino has been installed
Run Arduino Demos
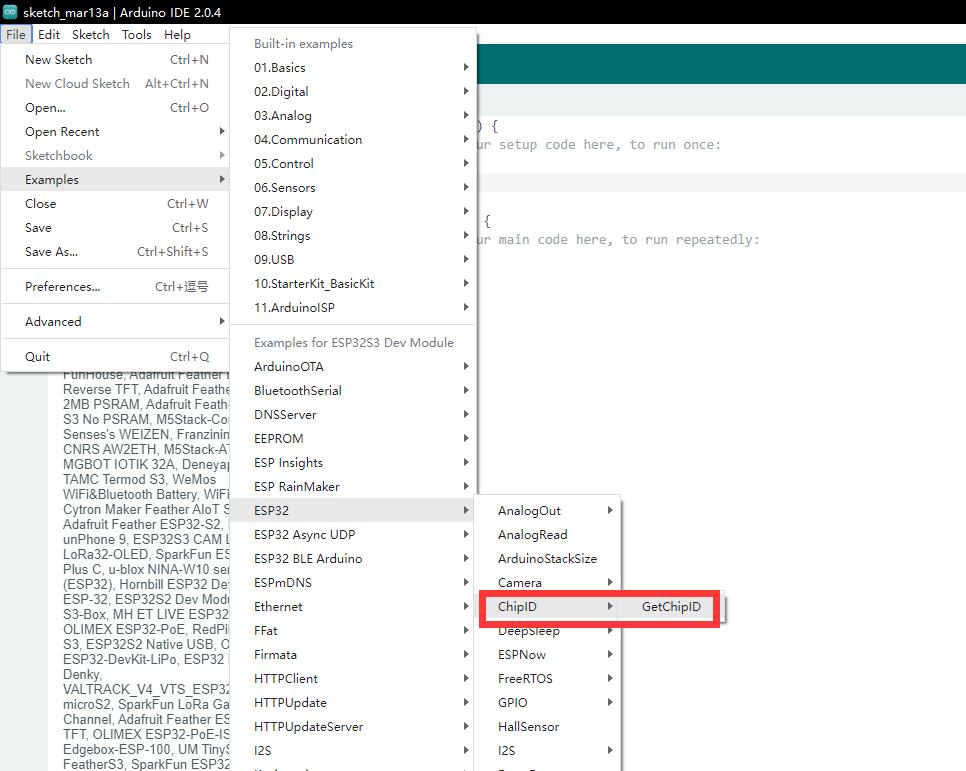
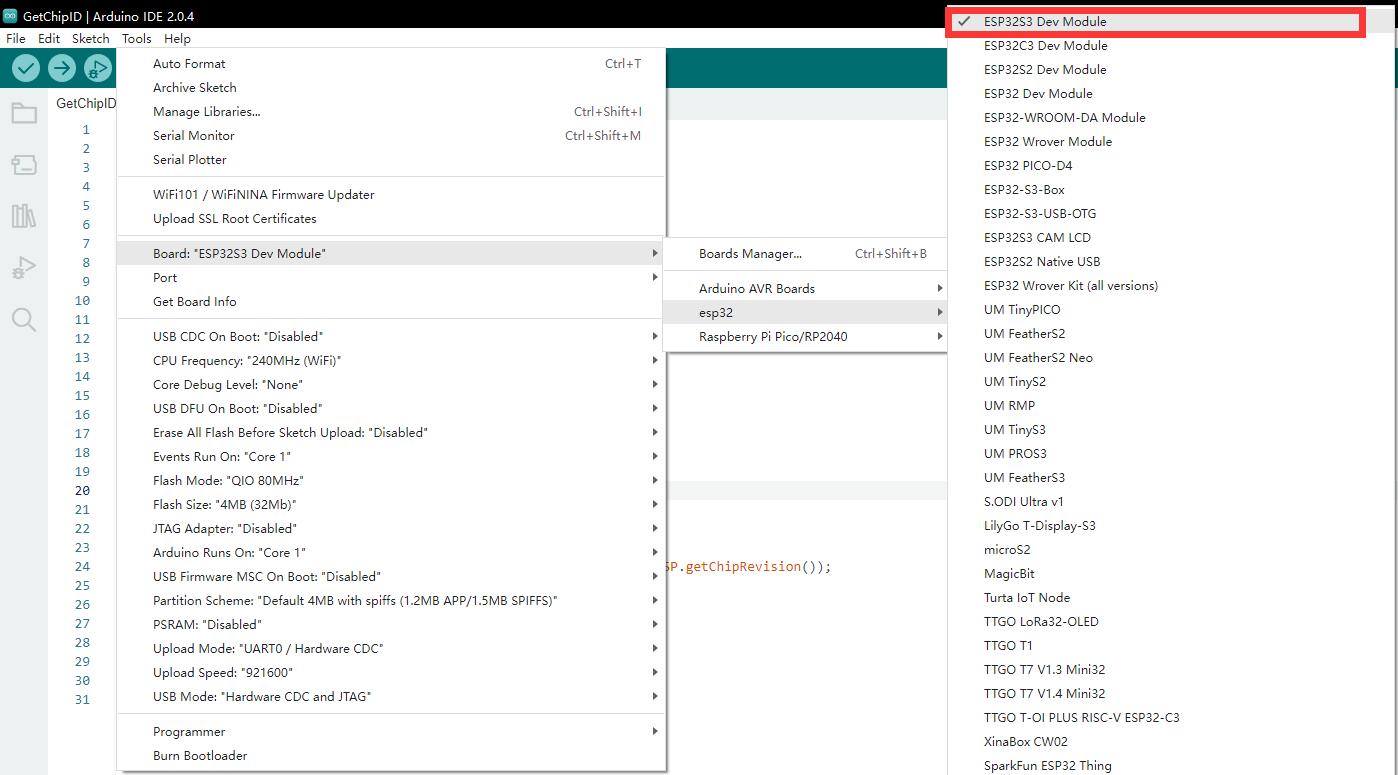
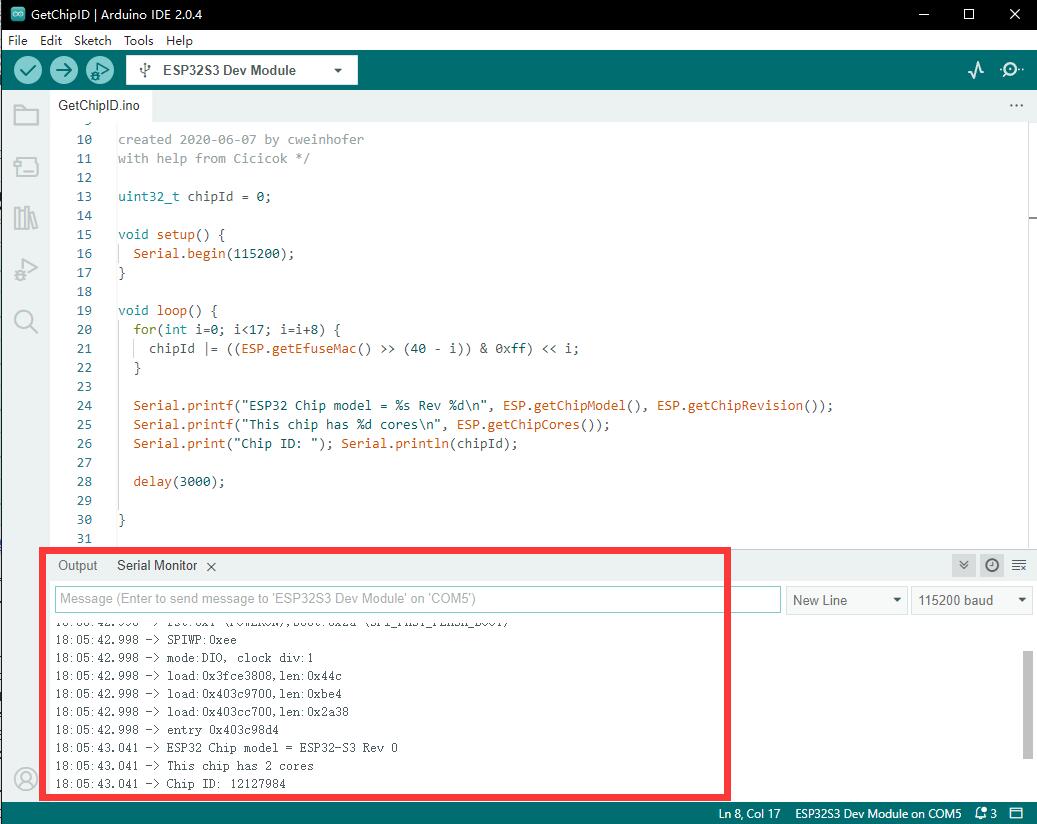
- Select the demo, here we choose the demo to get the chip ID
- Choose our board as ESP32S3 Dev Module
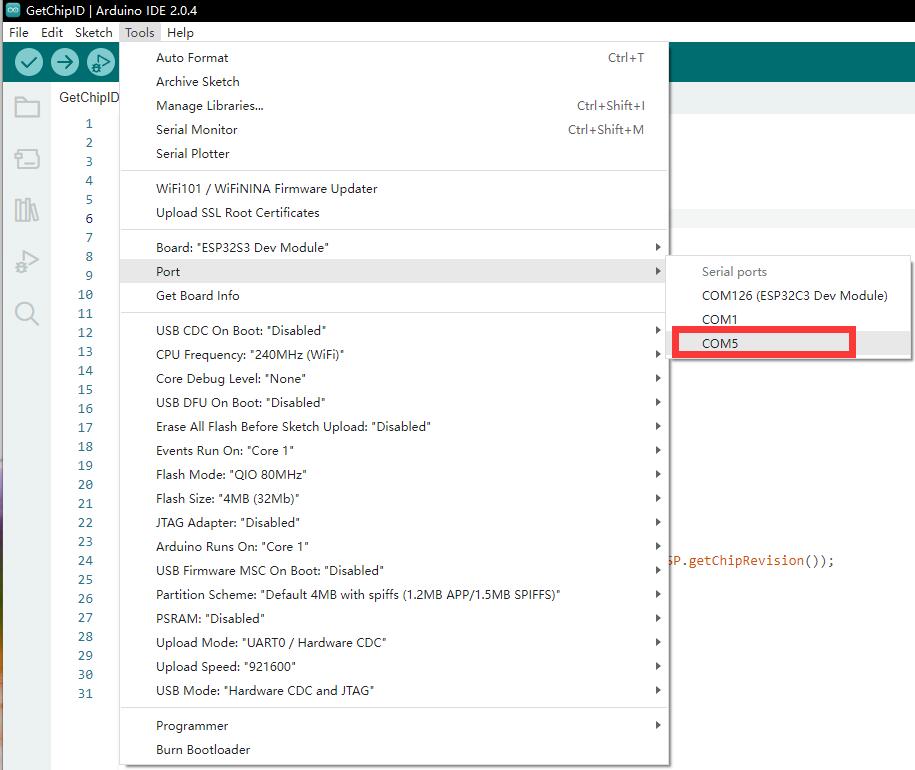
- Choose our port number, here we choose COM5 for CH343
- Click the download button, and it will automatically compile and download
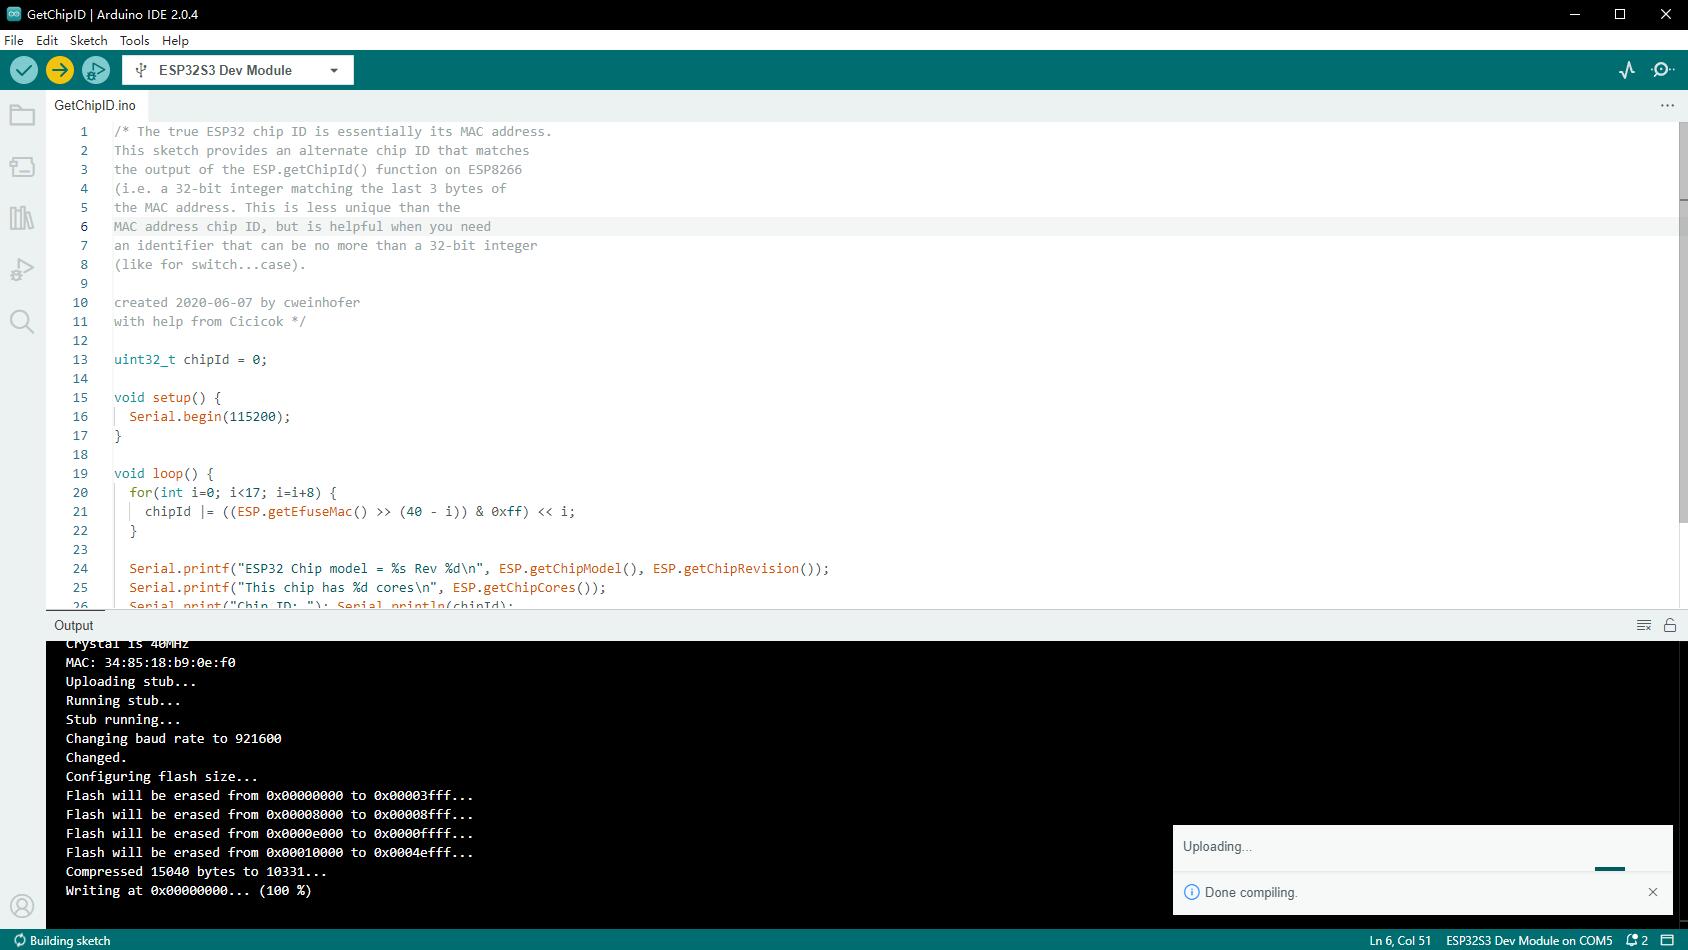
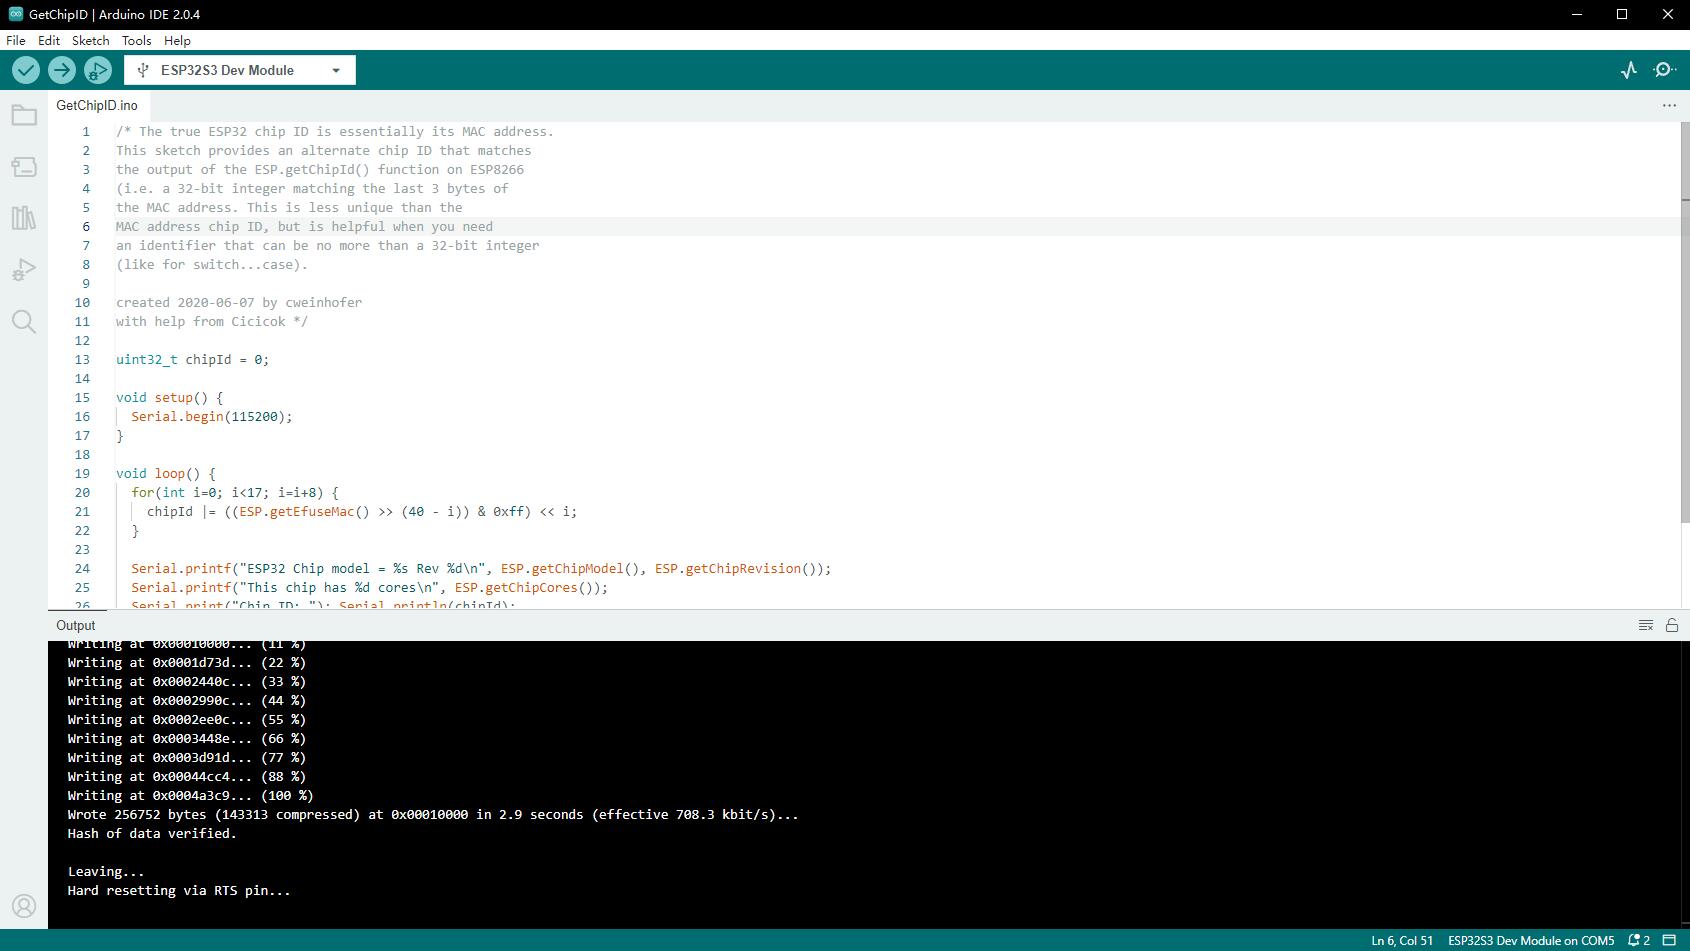
- The download is complete
- Open the serial port monitor

- See the chip ID of the loop output
Flash Firmware Flashing and Erasing
- Flash Firmware Flashing and Erasing for reference
Resources
Schematic Diagram
Demo
Software
Arduino
CH343
Serial Port
Datasheets
ESP32-C5
CH343
Official Documents
ESP32 Official Documents
FAQ
Question: After powering on the module, the recognized serial port devices and USB ports keep resetting and rebooting?
Check if the power voltage of the USB port is less than 5V. Generally, the power voltage of the USB port is above 4.9V, and both USB ports of the module can be used normally. If it is below 4.9V, there may be a power supply shortage and USB disconnection issue. In this case, a USB port with sufficient voltage should be used.
Question: After the module downloads the demo and re-downloads it, why sometimes it can't connect to the serial port or the flashing fails?
Long press the BOOT button, press RESET at the same time, then release RESET, then release the BOOT button, at this time the module can enter the download mode, which can solve most of the problems that can not be downloaded.
Support
Monday-Friday (9:30-6:30) Saturday (9:30-5:30)
Email: services01@spotpear.com
[Tutorial Navigation]
- Overview
- Development Environment Configuration
- Flash Firmware Flashing and Erasing
- Resources
- FAQ
- Question: After powering on the module, the recognized serial port devices and USB ports keep resetting and rebooting?
- Question: After the module downloads the demo and re-downloads it, why sometimes it can't connect to the serial port or the flashing fails?
- Support