- sales/support
Google Chat:---
- sales
+86-0755-88291180
- sales01
sales@spotpear.com
- sales02
dragon_manager@163.com
- support
tech-support@spotpear.com
- CEO-Complaints
zhoujie@spotpear.com
- Only Tech-Support
WhatsApp:13246739196
- Purchase/Shipping/Refund
WhatsApp:13424403025
- HOME
- >
- ARTICLES
- >
- Common Moudle
- >
- LCD
5inch HDMI LCD (H) User Guide
Introduction
800x480, 5 inch Capacitive Touch Screen LCD, HDMI interface, supports various systems
Working with PC
This product supports Windows 10/8.1/8/7 OS. For the Windows 10/8.1/8 OS, the touch screen supports multi-touch up to 5 points. For some Window 7 OS, the touch screen supports single touch only.
Connect the LCD to your PC (USB Port of LCD -> USB Port of PC; HDMI Port of LCD -> HDMI Port of PC. Please first connect the USB Ports then connect the HDMI Port). A new touch drive will be recognized by Windows and you can use the LCD as a human interface device. When multiple displays are detected by your PC, the LCD can only be used to control the cursor on main display. So it is proposed to set the LCD as the main display.
Touch Settings on Win 10 PC
Some users want to connect more than one display to their PC. Here we talk about how to setting the touch to make the touchscreen to control its screen separately.
- Connect touchscreen to PC. Here we use an standard PC monitor and connect an 7inch HDMI LCD (C) for example. We make the monitor as main screen and the touchscreen as secondary screen.
- By default,The touchscreen can only control cursor on the main screen. Here we set it to control the secondary screen
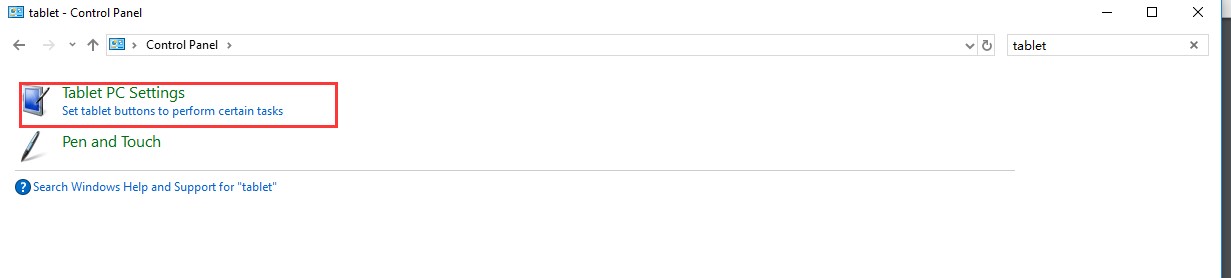
- Open Control Panel and search Tablet PC setting on the control panel and open the tool
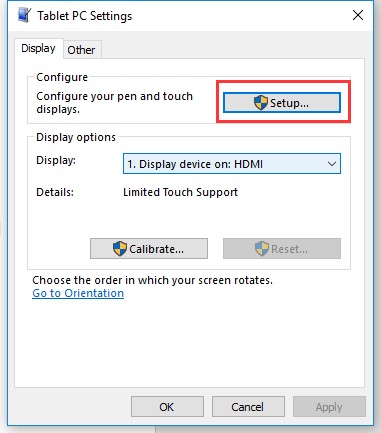
- Click button "Setup..." to setting the touchscreen
- After click the setup you can find that there is prompt on your first screen with white color background and other screens are white.
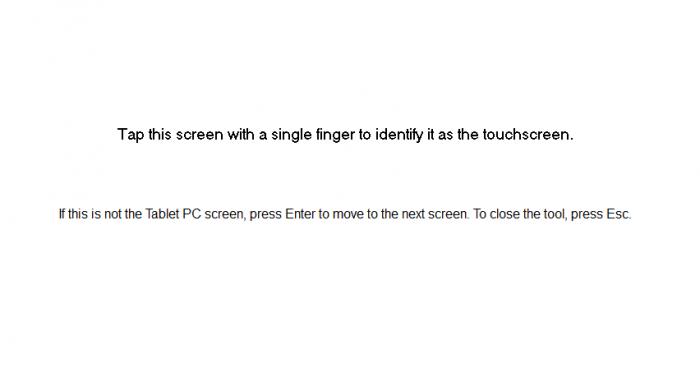
- If we want the touch of the touchscreen to control the desktop of the touchscreen itself. Just press Enter key to pass the first screen. And the second screen, when you find that the black text is displayed on the touchscreen, just touch the center of the touchscreen to finish this setting.
- After this setting, the touch on the screen will just control this touchscreen even thought it is not the main screen.
Note:
1 If the first screen and the second screen are touchscreen as well, you can touch them when the text is displayed on the screens. Then you can find that all the touchscreen can work.
2 This method is just tested on win 10 PC.
Working with Raspberry Pi
For the Windows OS on PC, the resolution of the LCD is automatically identified. Hence, you do not need to make the relative settings. When working with Raspberry Pi, you should set the resolution of the LCD by yourself, or else the LCD screen will not work. For more detail information, please read the following section.
Connect the LCD to your Pi (HDMI Port of LCD -> HDMI Port of Pi; USB Port of LCD -> USB Port of Pi; 5V~2A power supply). Download the Raspbian image from Raspberry Pi web site. Write the image to a TF card and append the following lines to the config.txt file which is located in the root of your TF card:
max_usb_current=1
hdmi_group=2
hdmi_mode=87
hdmi_cvt 800 480 60 6 0 0 0
If you use the LCD with Raspberry Pi 4B, you need to remove line dtoverlay=vc4-fkms-V3D from config.txt file
You must make sure that there are no spaces on either side of the equal sign.
Save and connect the TF card to your Pi then power up.
Note:
- Resolution of Ubuntu Mate OS or Windows 10 IoT Core OS can also be set properly by editing config.txt.
- For Pi Zero / Zero W: if you've used an SD card on a Pi 3 and then attached the card to the Pi Zero, the touch screen often doesn't work. In such cases, you have to write a fresh system image to the SD card. The first boot up must be done on the Pi Zero but not Pi 3, due to initialization for a corresponding device.
Rotation
Note: To rotate the touch, you can re-compile the kernel as well. There is an example for reference (use 7inch HDMI LCD (C).)
Display Rotating
To rotating the display, you can append this statement to the config file
display_rotate=1 #1: 90; 2: 180; 3: 270
Reboot the Raspberry Pi
sudo reboot
Touch rotating
With the operation above. The screen could rotate in display. However, the touch works improperly. To rotate the touch as display, you could do as below:
1. install libinput
sudo apt-get install xserver-xorg-input-libinput
2. create an xorg.conf.d folder
sudo mkdir /etc/X11/xorg.conf.d
3. copy file 40-libinput-conf to the folder which we created
sudo cp /usr/share/X11/xorg.conf.d/40-libinput.conf /etc/X11/xorg.conf.d/
4. Append a statement to touchscreen part of the file as below:
sudo nano /etc/X11/xorg.conf.d/40-libinput.conf
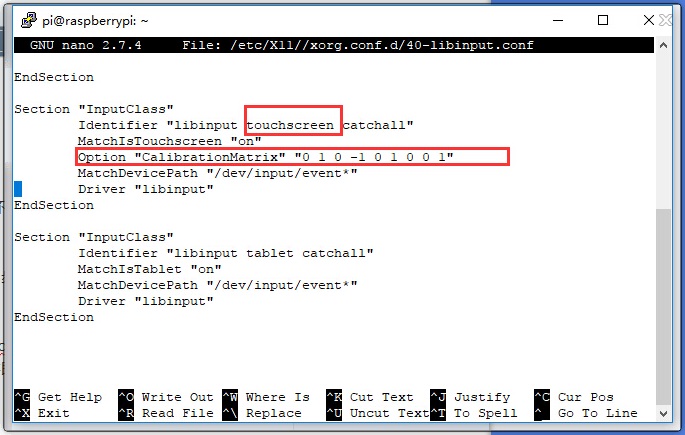
5. save and reboot your Pi
sudo reboot
After completing these steps. The LCD could rotate 90 degree both display and touch.
Note:
90 degree: Option "CalibrationMatrix" "0 1 0 -1 0 1 0 0 1"
180 degree: Option "CalibrationMatrix" "-1 0 1 0 -1 1 0 0 1"
270 degree: Option "CalibrationMatrix" "0 -1 1 1 0 0 0 0 1"