


- sales/support
Google Chat:---
- sales
+86-0755-88291180
- sales01
sales@spotpear.com
- sales02
dragon_manager@163.com
- support
tech-support@spotpear.com
- CEO-Complaints
zhoujie@spotpear.com
- Only Tech-Support
WhatsApp:13246739196
- Purchase/Shipping/Refund
WhatsApp:13424403025
Raspberry Pi 7inch FHD Monitor User Guide
Overview
7inch Touch Monitor, 1080 Full HD, IPS Screen, HDMI, Ideal Companion for Various Host Devices
Features
- Display: 7inch, 1080x1280 pixels, IPS screen (up to 178° viewing angle)
- Touch panel: capacitive, toughened glass panel, 6H hardness
- Display interface: Mini HDMI
- Touch interface: USB
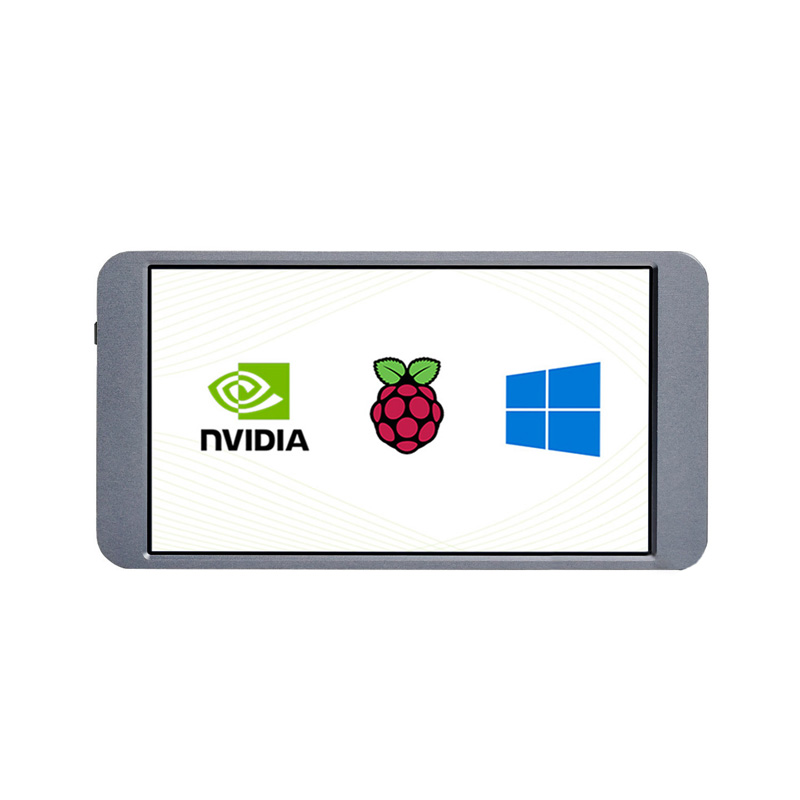
- Supports popular mini PCs such as Raspberry Pi, Jetson Nano
- When works with Raspberry Pi, supports Raspbian/Ubuntu/Kali/Retropie/WIN10 IOT, driver free
- Supports desktop computers with Windows 10/8.1/8/7, 10-point touch, and driver free
- Multi-languages OSD menu, for power management, brightness/contrast adjustment, etc.
- HDMI audio input, 3.5mm headphone/speaker jack
- Embedded ferrite Hi-Fi speaker
Instruction
How to use
1. This LCD supports Windows 7/8/8.1/10 when working with PC via HDMI interface
- 1) Connect the Touch interface of LCD to the USB port of PC by USB cable. The touch function is enabled after that.
- 2) Connect the HDMI interface of LCD to the HDMI interface of PC by HDMI cable. LCD displays normally after seconds.
- 1) If you connect multiple screens to your PC, please set this LCD as the main display for properly touching
- 2) If the USB port of PC cannot supply much voltage for the LCD, you can connect external 5V power supply to the Power interface of LCD.
- 3) We recommend you to set the icons bigger for better displaying.
2. When working with Raspberry Pi, this LCD supports Raspbian/Ubuntu mate/Kali/Retropie/Windows 10 IoT Core
When working with Raspberry Pi, you should set the resolution of the LCD by yourself, or else the LCD screen will not work. For more detail information, please read the following section.
Download the Raspbian image from the Raspberry Pi web site. Write the image to a TF card and append the following lines to the config.txt file which is located in the root of your TF card:
- 1) Download the image and unzip it to get the .img file.
- 2) Connect the TF card to PC and format the card by formatting software
- 3) Write the image to the TF card by imager software
- 4) After writing, modify the config.txt file which is located in BOOT directory. Append the following lines to the file:
max_framebuffer_height=1920
max_usb_current=1
hdmi_group=2
hdmi_mode=87
hdmi_timings=1080 0 112 16 160 1920 0 4 10 10 0 0 0 60 0 140000000 3
- 5) Save and eject the card.
- 6)Connect the Touch interface of the LCD to the USB port of Raspberry Pi.
- 7) Connect the HDMI interface of the LCD to the HDMI port of Raspberry Pi and then power on the Raspberry Pi.
Setting orientation
Display orientation
For Pi4:
- 1. Open Screen Configuration。
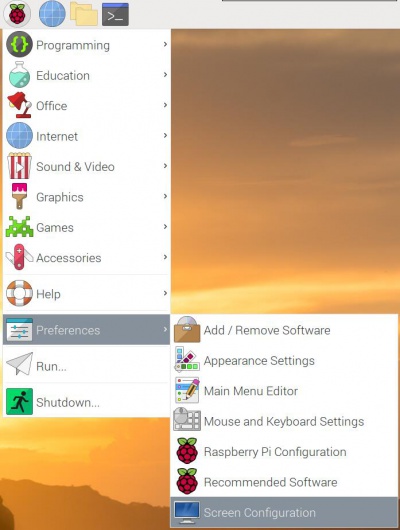
- 2. Rotate display as figure
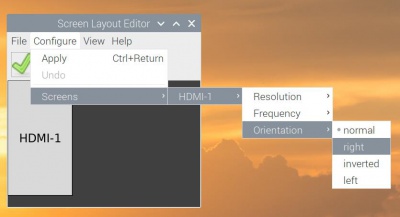
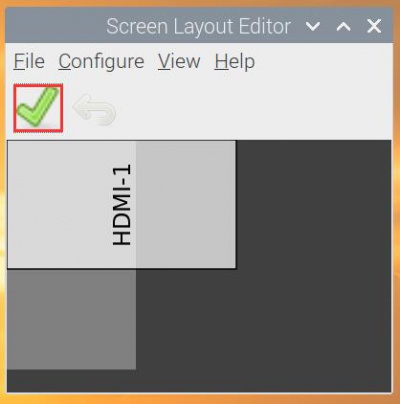
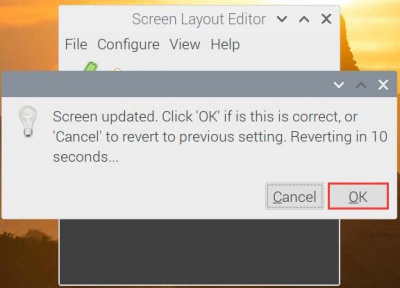
- 3. The LCD will work normally after you rotate the touch as well.
For Pi 3/Pi 3+:
- 1. Add the following line to config.txt file which is located in BOOT directory.
display_rotate=1 #1:90;2: 180; 3: 270
- 2. Save and reboot Raspberry Pi
sudo reboot
Touch orientation
The Touch of the LCD cannot be changed along with the display, in this case, you should rotate the display manually after changing the display orientation. With this display, you can rotate the touch by pressing the button.(To avoid from unintended touching, we hide the Rotate Touch button in the case)

Note: The touch orientation may be wrong with a new OS, you can fix it by pressing the Rotate Touch button.
GUI improving
For better display and touching, you can modify the theme setting. Set the icons and text bigger. Here we take Raspbian as examples.
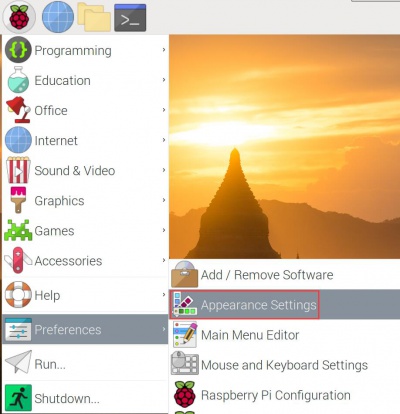
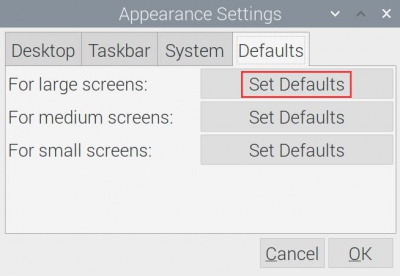
- Select Menu-》Preferences-》Appearance Settings-》Defaults-》For large screens:Set Defaults-》OK。
- Mosify the font size of System

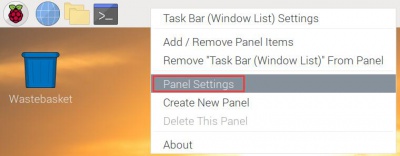
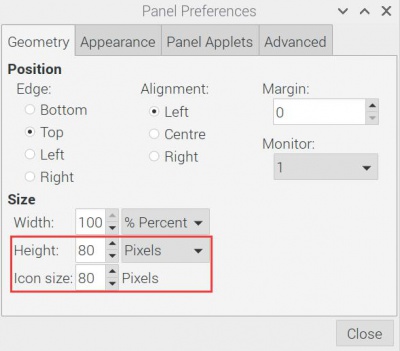
- Right-click the taskbar and select-》Panel Settings -》Set the size of Geometry.
Keys
- ON/OFF:Signle press to turn on/off display, Long-press to adjust the brightness.
- Rotate Touch: Adjust the orientation of touch. To avoid unintended touching, the button is hidden in the case.
Others
Disable power saving.
If you want to keep the display turning on all the time, you can disable the power saving function.
Modify file lightdm.conf
sudo nano /etc/lightdm/lightdm.conf
Find the [SeatDefaults] option and uncomment the line"xserver-command", modify it as below:
#xserver-command=X
修改为
xserver-command=X -s 0 -dpms
- -s # –Disable the display protecting.
- dpms Disable power saving.
Reboot
sudo reboot
Turn on/off HDMI output
You can use the following commands to disable/enable the displaying.
vcgencmd display_power 0
vcgencmd display_power 1