


- sales/support
Google Chat:---
- sales
+86-0755-88291180
- sales01
sales@spotpear.com
- sales02
dragon_manager@163.com
- support
tech-support@spotpear.com
- CEO-Complaints
zhoujie@spotpear.com
- Only Tech-Support
WhatsApp:13246739196
- Purchase/Shipping/Refund
WhatsApp:13424403025
RP2350-ETH User Guide
Overview
Introduction
The RP2350-ETH is a mini RP2350 development board that allows you to have an integrated TCP/IP protocol stack for network communication.
On a very small board, 14 multi-functional GPIO pins are brought out, and the PCB edge uses half-hole processing, making it easy and quick to integrate into projects.
Features
- RP2350 microcontroller chip officially designed by Raspberry Pi
- Adopts unique dual-core and dual-architecture design, equipped with dual-core ARM Cortex-M33 processor and dual-core Hazard3 RISC-V core processor, flexible clock running up to 150 MHz
- Built-in 520KB of SRAM and 4MB of on-chip Flash
- Onboard CH9120 with integrated TCP/IP protocol stack
- Set network parameters such as chip working mode, port, and IP through host computer software and serial port commands
- Castellated module allows soldering directly to carrier boards
- Drag-and-drop downloads can be made by USB recognition as mass storage
- 14 × multi-function GPIO pins of RP2350
- Multiple hardware peripherals
- SPI(SPI0) × 1
- I2C × 2
- UART × 2
- 12-bit ADC × 3
- Controllable PWM channel × 13
- Built-in temperature sensor on chip
- 12 × Programmable I/O (PIO) state machines for custom peripheral support
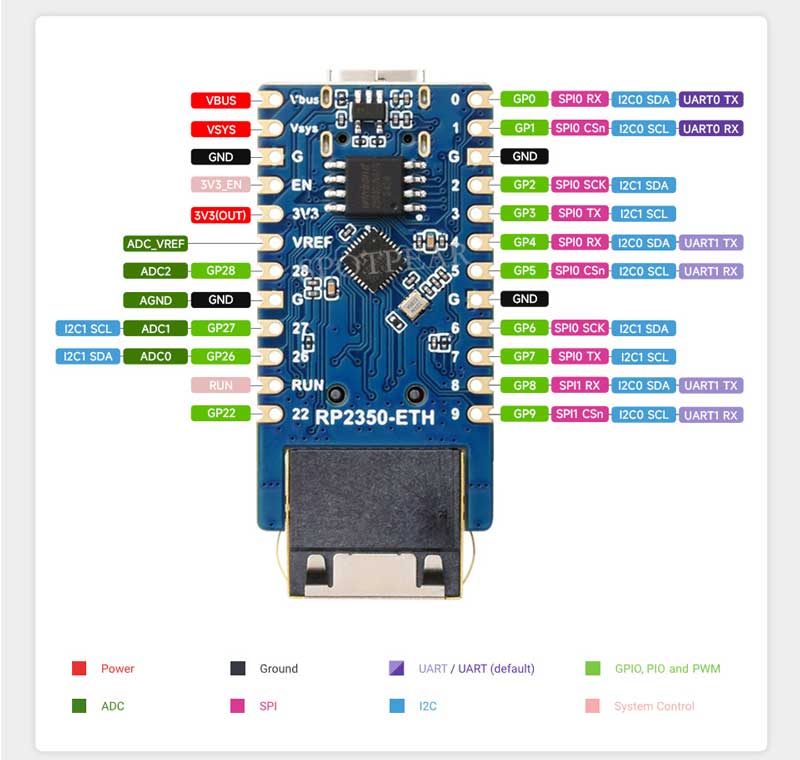
Pinout definition
Tutorials
Environment setup
C/C++ development environment installation
- Before using demos and tutorials, you need to set up a development environment and learn the basics of the project
MicroPython development environment installation
- Go to Thonny official website to download the software suitable for your system
- After installation, the language and motherboard environment need to be configured for the first use. Since we are using Pico, we select the Raspberry Pi option for the motherboard environment
- Configure MicroPython environment and choose Pico port
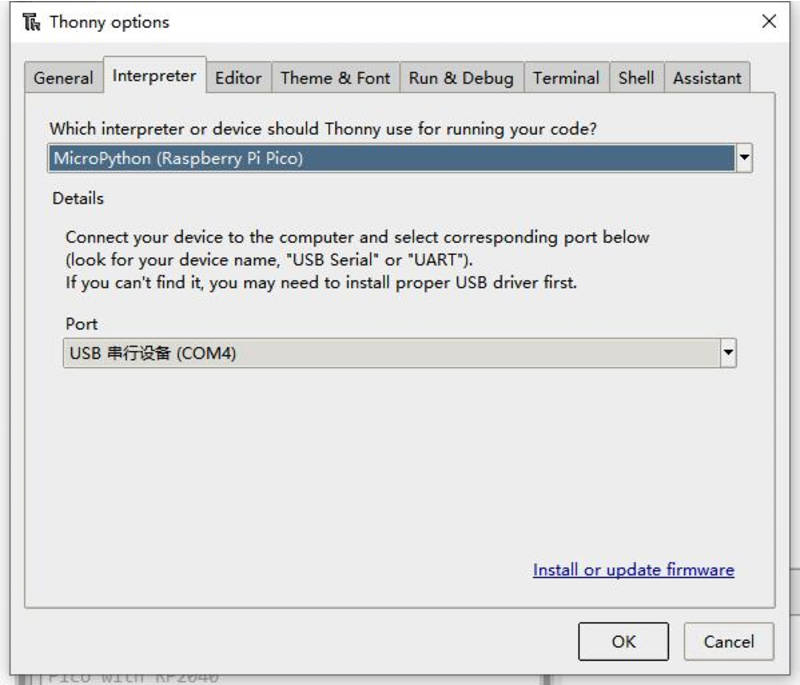
- Connect Raspberry Pi Pico to your computer first, and in the lower right corner of Thonny left-click on the configuration environment option --> select Configture interpreter
- In the pop-up window, select MicroPython (Raspberry Pi Pico), and choose the corresponding port
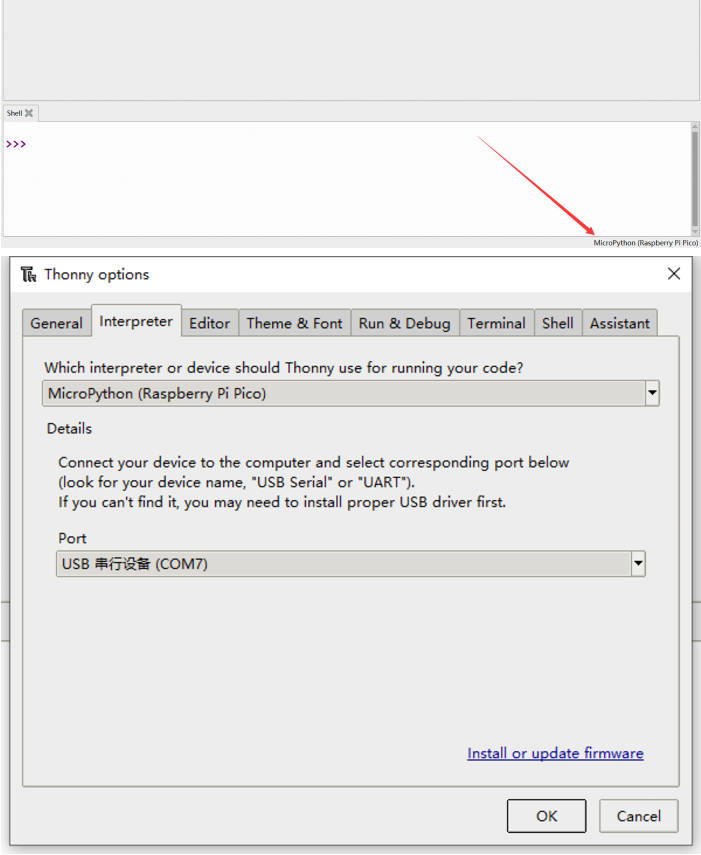
- Click OK to return to the Thonny main interface, download firmware library to Pico, and then click the Stop button to display the current environment in the Shell window
- How to download the firmware library for Pico in windows: After connecting to the computer, press the BOOT key and the RESET key at the same time, release the RESET key first and then release the BOOT key, a removable disk will appear on the computer, copy the firmware library into it
- Raspberry Pi system operates similarly to a Windows system, the Raspberry Pi only needs to install the latest version of the system with a desktop
name3 =Arduino IDE development environment installation list3 =
- Open the Arduino IDE and go to File->Preferences
- In the dialog box that pops up, enter the following URL in the "Additional Boards Manager URLs" field (ladder required):
https://github.com/earlephilhower/arduino-pico/releases/download/global/package_rp2040_index.json
- Click OK to close the dialog box
- Go to Tools in the IDE - > Board Manager
- Enter "pico" in the search box, and then select "Add":
Hardware connection
- The internal connection between the CH9120 and the RP2350 is as follows.
| CH9120 | RP2350 | Function |
| RXD | GP21 | Serial data input |
| TXD | GP20 | Serial data output |
| TCPCS | GP17 | In TCP client mode, indicate the connection status; a low level signifies a successful connection |
| CFG0 | GP18 | Network configuration enable switch, when the level is low, enter serial port configuration mode |
| RSTI | GP19 | Reset, active low |
Demo
Working with Raspberry Pi
- Open the Raspberry Pi terminal and execute:
cd ~
sudo wget https://www.waveshare.net/w/upload/1/15/RP2350_ETH_CODE.zip
unzip RP2350_ETH_CODE.zip
cd ~/RP2350_ETH_CODE
C
- The following tutorial is for operating on a Raspberry Pi, but due to the multi-platform and portable characteristics of cmake, it can also be successfully compiled on a PC, with some differences in operation that you will need to judge on your own
- For compilation, please make sure that it is in the C/RP2350-ETH-Demo/build/ directory:
- Go to the build directory and add the SDK:
- ../../pico-sdk is the directory of your SDK.
cd C/RP2350-ETH-Demo/build/
export PICO_SDK_PATH=../../pico-sdk
#Note: Make sure to write the correct path to your own SDK
cmake ..
#Execute make to generate an executable file, the first compilation takes a long time
make -j9
#After the compilation is completed, the uf2 file will be generated
- After connecting RP2350-ETH to the Raspberry Pi, press the BOOT key and the RESET key at the same time, release the RESET key first and then release the BOOT key, a removable disk will appear on the computer, copy the firmware library into it
cp main.uf2 /media/pi/RPI-RP2/
Python
- After connecting RP2350-ETH to the Raspberry Pi, press the BOOT key and the RESET key at the same time, release the RESET key first and then release the BOOT key, a removable disk will appear on the computer
- Copy the ~/RP2350_ETH_CODE/Python/rp2-pcio2-20240809-v1.24.0.uf2 file to RP2350
- Open the Thonny IDE on the Raspberry Pi (click on the Raspberry logo -> Programming -> Thonny Python IDE), you can view the version information by going to Help->About Thonny
- To ensure your version is supported by the Pico package, you can also click on Tools -> Options... -> Interpreter and select MicroPython (Raspberry Pi Pico and ttyACM0 port)
As shown below: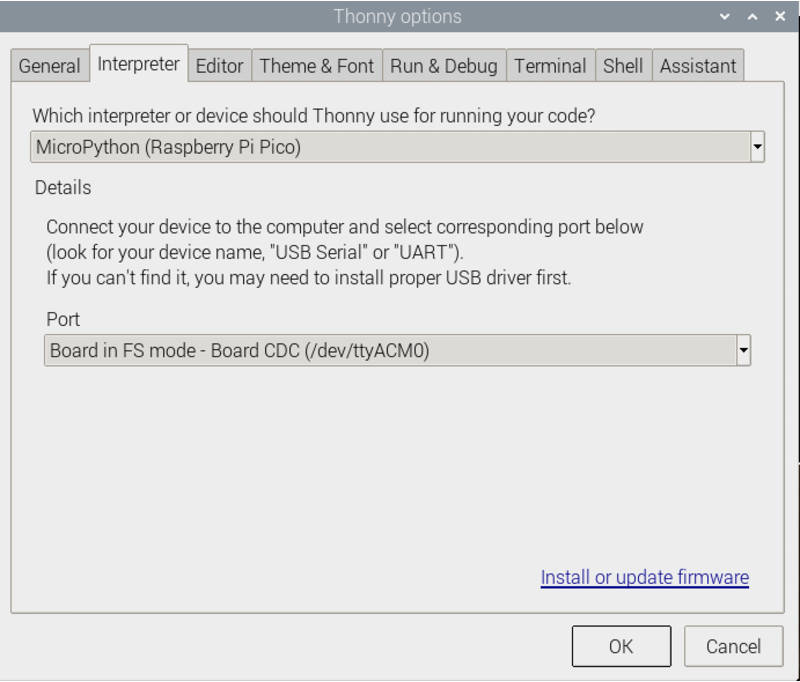
If your current Thonny version does not have the pico support package, input the following command to update the Thonny IDE
sudo apt upgrade thonny
3. Click File->Open...->~/RP2350_ETH_CODE/Python/RP2350-ETH-Demo.py to run the script
Working with Windows
C
- First install Visual Studio Code
- After the installation is complete, open the Visual Studio Code extension interface (shortcut Ctrl+Shift+X)
- Input CMake Tools and install
- Press F1 to input open settings UI, open the settings UI interface
- Search for cmake.configureEnvironment
- Click to add item
| Item | Value |
| PICO_SDK_PATH | [The path to store PICO-SDK]\pico-sdk |
- “[The path to store PICO-SDK]\pico-sdk” is the path where the SDK is stored, and it will not be compiled if it is incorrect
- Search for cmake.generator again, fill in:
NMake Makefiles
#Ctrl+S to save the settings, clear the build folder, restart Visual Studio Code and recompile
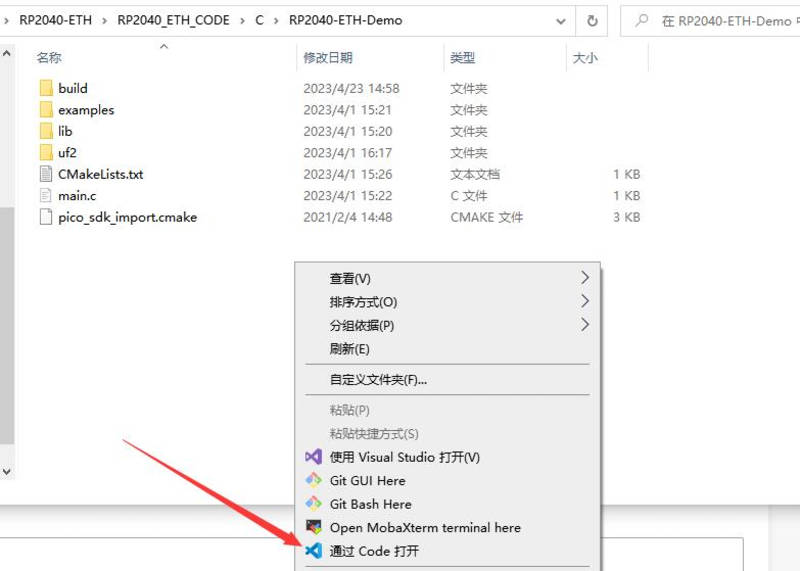
- Click to download the demo, unzip it and enter the RP2350_ETH_CODE folder
- After entering RP2350_ETH_CODE\C\RP2350-ETH-Demo, use vs code to open the project
- Select the compiler
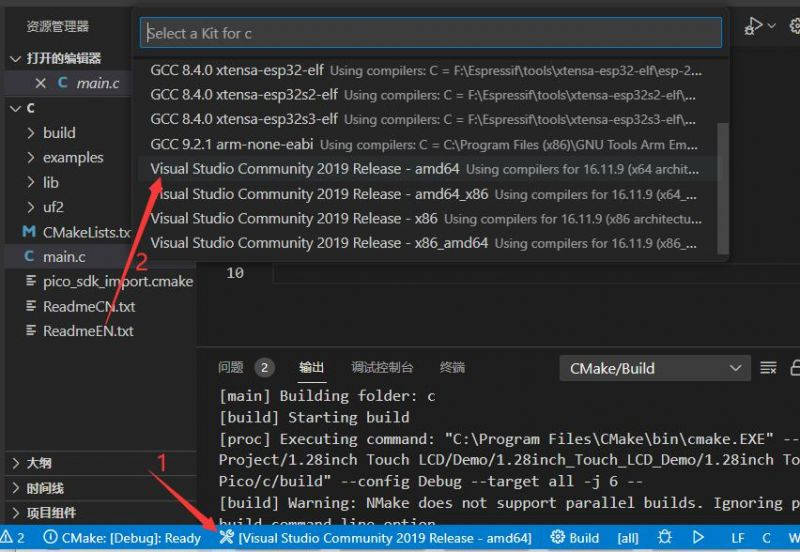
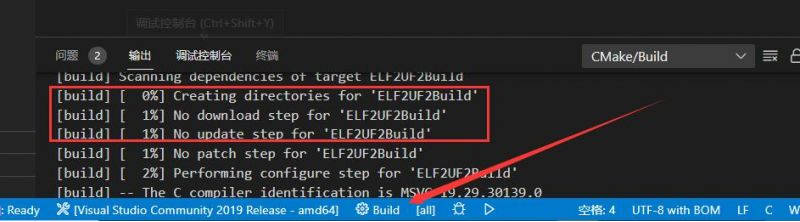
- Start compiling
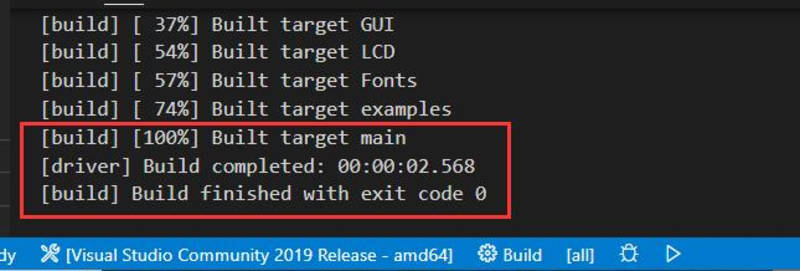
- Compilation completed
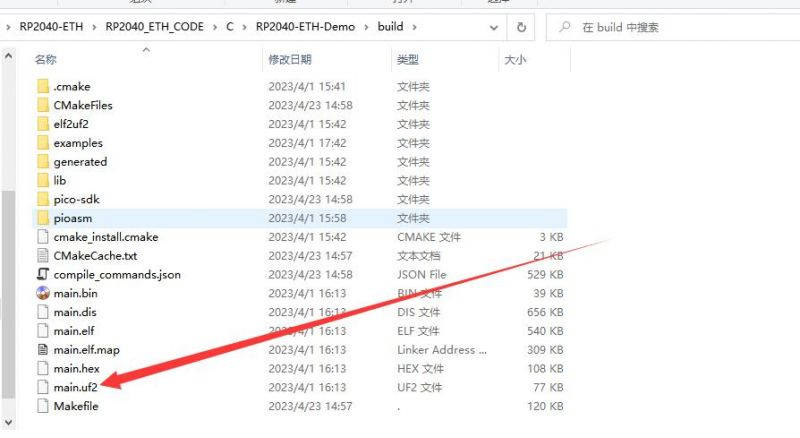
- Copy the main.uf2 file from the build to Pico and the program will run automatically
Python
- 1. After connecting RP2350-ETH to the computer, press the BOOT key and the RESET key at the same time, release the RESET key first and then release the BOOT key, a removable disk will appear on the computer
- 2. Copy the rp2-pcio2-20240809-v1.24.0.uf2 file in the Python directory to the recognized removable disk
- 3.Open Thonny IDE (Note: Make sure to use the latest version of Thonny, otherwise there is no support package for Pico, the latest version under Windows is v3.3.3)
- 4. Click Tools -> Settings -> Interpreter and select Pico and the corresponding port as shown in the figure
- 5. File -> Open -> RP2350-ETH-Demo.py, click Run, as shown in the following figure:
- This demo only provides a simple test procedure.
Host computer configuration
- If you want to configure through the host computer without using serial port commands, you can refer to the following method, which is only applicable to the Windows system:
- Download Network configuration tool
- Connect the RP2350-ETH to the power supply and ethernet
- Open the network configuration tool
- Search for a device - > double-click the searched device - > set the information you need - > configure device parameters - > wait for the restart to complete

- After executing 1 and 2 in the figure above, then configure the parameters in the red box, then execute 3, and wait for 4 to appear
Demo
C/C++ Demo
1. Network configuration
- The code for configuring the operation mode, IP, gateway, subnet mask, port number, and serial port baud rate is in the CH9120.c or CH9120.cpp files. You can modify it according to your actual needs:
UCHAR CH9120_Mode = TCP_CLIENT; //Optional:TCP_SERVER、TCP_CLIENT、UDP_SERVER、UDP_CLIENT
UCHAR CH9120_LOCAL_IP[4] = {192, 168, 10, 205};   // LOCAL IP
UCHAR CH9120_GATEWAY[4] = {192, 168, 11, 1};      // GATEWAY
UCHAR CH9120_SUBNET_MASK[4] = {255, 255, 252, 0}; // SUBNET MASK
UCHAR CH9120_TARGET_IP[4] = {192, 168, 10, 137};  // TARGET_IP
UWORD CH9120_PORT1 = 1000;                        // LOCAL PORT1
UWORD CH9120_TARGET_PORT = 2000;                  // TARGET PORT
UDOUBLE CH9120_BAUD_RATE = 115200;                // BAUD RATE
- Each working mode is defined in the header file, you can directly modify CH9120_Mode to use
#define TCP_SERVER 0
#define TCP_CLIENT 1
#define UDP_SERVER 2
#define UDP_CLIENT 3
2. Hardware interface
- Enter configuration mode
void CH9120_Start();
- Exit configuration mode
void CH9120_End();
- Configure the working mode
void CH9120_SetMode(UCHAR Mode);
- Configure the local IP
void CH9120_SetLocalIP(UCHAR CH9120_LOCAL_IP[]);
- Configure the subnet mask
void CH9120_SetSubnetMask(UCHAR CH9120_SUBNET_MASK[]);
- Configure the gateway
void CH9120_SetGateway(UCHAR CH9120_GATEWAY[]);
- Configure the target IP
void CH9120_SetTargetIP(UCHAR CH9120_TARGET_IP[]);
- Configure the local port number
void CH9120_SetLocalPort(UWORD CH9120_PORT);
- Configure the target port number
void CH9120_SetTargetPort(UWORD CH9120_TARGET_PORT);
- Configure the baud rate
void CH9120_SetBaudRate(UDOUBLE CH9120_BAUD_RATE);
3. Code parsing
The main code is as follows:
int Pico_ETH_CH9120_test(void)
{
    CH9120_init(); //Initialize Configuration CH9120
    RX_TX();       //receive and dispatch
}
- CH9120_init();
Call each hardware interface to initialize and configure CH9120 - RX_TX();
After the CH9120 initialization is complete, call the RX_TX() to enter the data transmission and reception mode, and the CH9120 will send the received information back (Acsll code string only)
4. Result demonstration
- Open the network debugging tool, configure the TCP server, wait for the RP2350-ETH to initiate the connection, and observe the prompt in the lower right corner to check whether the connection is successful
800px - Test data transmission and reception
800px
MicroPython Demo
01-TCP/UDP
1. Network configuration
The code for configuring the operation mode, IP, gateway, subnet mask, port number, and serial port baud rate is in the Python/RP2350-ETH-Demo/RP2350-ETH-Demo.py files. You can modify it according to your actual needs:
MODE = 1  #0:TCP Server 1:TCP Client 2:UDP Server 3:UDP Client
GATEWAY = (192, 168, 1, 1)    # GATEWAY
TARGET_IP = (192, 168, 1, 10) # TARGET_IP
LOCAL_IP = (192, 168, 1, 200) # LOCAL_IP
SUBNET_MASK = (255,255,255,0) # SUBNET_MASK
LOCAL_PORT1 = 1000            # LOCAL_PORT1
TARGET_PORT = 2000            # TARGET_PORT
BAUD_RATE = 115200            # BAUD_RATE
2. Hardware interface
The configuration functions of the CH9120 are all in the Python/RP2350-ETH-Demo/ch9120.py file, and the program imports the CH9120 class and then calls it through the ch9120 object
- Create the object
ch9120 = CH9120(uart1)
- Enter configuration mode
ch9120.enter_config()
- Exit configuration mode
ch9120.exit_config()
- Configure the working mode
ch9120.set_mode(MODE)
- Configure the local IP
ch9120.set_localIP(LOCAL_IP)
- Configure the subnet mask
ch9120.set_subnetMask(SUBNET_MASK)
- Configure the gateway
ch9120.set_gateway(GATEWAY)
- Configure the local port number
ch9120.set_localPort(LOCAL_PORT1)
- Configure the target IP
ch9120.set_targetIP(TARGET_IP)
- Configure the target port number
ch9120.set_targetPort(TARGET_PORT)
- Configure the baud rate
ch9120.set_baudRate(BAUD_RATE)
3. Code parsing
The main code is as follows:
if __name__ == "__main__":
    ch9120_configure()
    while True:
        time.sleep(0.1)
        while uart1.any() > 0:
            rxData1 = uart1.read(uart1.any())
            uart1.write(rxData1)
            print(rxData1.decode('utf8'))
- ch9120_configure()
Call each hardware interface to initialize and configure CH9120 - After the CH9120 initialization is complete, enter the data transmission and reception mode, and the CH9120 will send the received information back (Acsll code string only)
4. Result demonstration
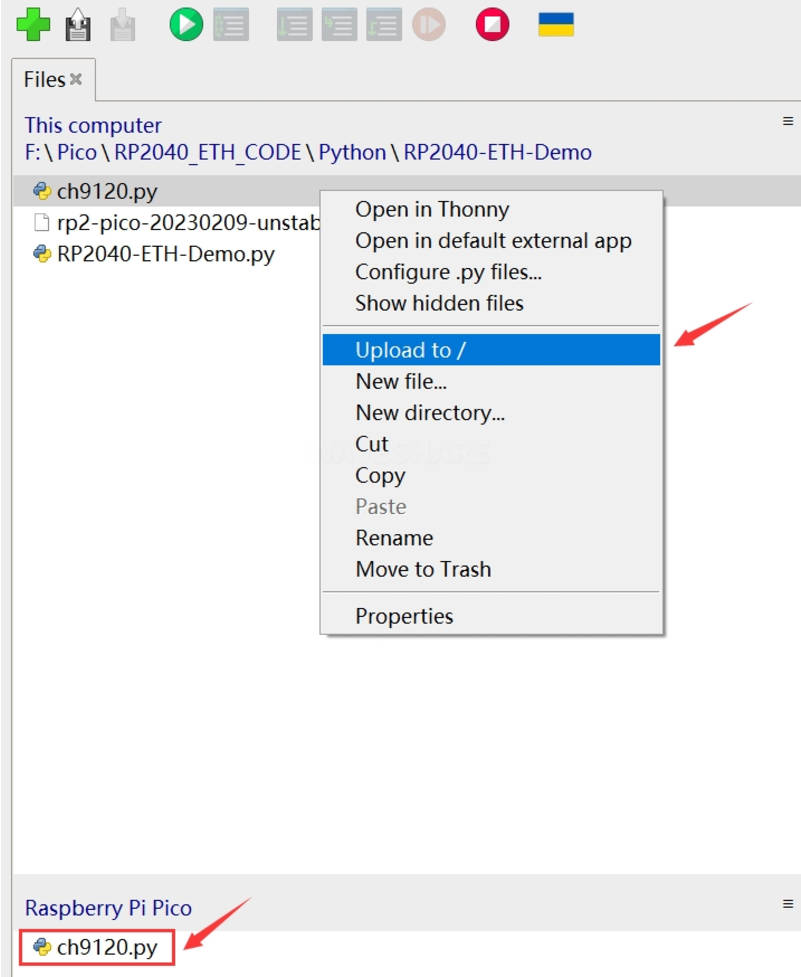
- Burn the micropython firmware, upload the ch9120.py, and run the program
- Open the network debugging tool, configure the TCP server, wait for the RP2350-ETH to initiate the connection, and observe the prompt in the lower right corner to check whether the connection is successful
800px - Test data transmission and reception
800px
02-MQTT
1. Network configuration
MQTT communication is implemented based on TCP/IP protocol, and the configuration code of MQTT and CH9120 is in the Python/RP2350-ETH-Demo/RP2350-ETH-MQTT.py file:
# MQTT
CLIENT_ID = "Waveshare_RP2350_ETH"
SUBSCRIBE_TOPIC = "test_topic1"
PUBLISH_TOPIC = "test_topic2"
# CH9120
MODE = 1  #0:TCP Server 1:TCP Client 2:UDP Server 3:UDP Client
GATEWAY = (192, 168, 1, 1)     # GATEWAY
TARGET_IP = (47, 92, 129, 18)  # TARGET_IP
LOCAL_IP = (192, 168, 1, 200)  # LOCAL_IP
SUBNET_MASK = (255,255,255,0)  # SUBNET_MASK
LOCAL_PORT1 = 1000             # LOCAL_PORT1
TARGET_PORT = 1883             # TARGET_PORT
BAUD_RATE = 115200             # BAUD_RATE
MQTT-related variable explanations, you can modify according to your own needs:
CLIENT_ID: Client ID
SUBSCRIBE_TOPIC: The name of the subscribed topic
PUBLISH_TOPIC: The name of the published topic
TARGET_IP: MQTT server IP
TARGET_PORT: MQTT server communication port
2. UART function
- Create an MQTT client object
mqtt_client = MQTTClient(uart1)
- Initiate a connection request
mqtt_client.connect()
- Subscribe to a topic
mqtt_client.subscribe(SUBSCRIBE_TOPIC)
- Publish a message
mqtt_client.publish(PUBLISH_TOPIC, message)
- Send a heartbeat packet
mqtt_client.send_heartbeat()
- Check the heartbeat response
mqtt_client.check_heartbeat_response()
- Parse data
mqtt_client.extract_data(rxData)
3. Code parsing
The main code is as follows:
if __name__ == "__main__":
    ch9120_configure()
    mqtt_client = MQTTClient(uart1)
    mqtt_client.ClientID = CLIENT_ID # Set ClientID
    mqtt_client.connect() # Connect to MQTT server
    mqtt_client.subscribe(SUBSCRIBE_TOPIC) # Subscribe to topic:test_topic1

    while True:
        rxData = uart1.read()
        if rxData is not None:
            topic, message = mqtt_client.extract_data(rxData) # Parse the received data
            if topic == SUBSCRIBE_TOPIC:
                print("Topic:", topic)
                print("Message:", message)
                mqtt_client.publish(PUBLISH_TOPIC, message) # Send received data to topic:test_topic2
        time.sleep_ms(20)
This code first configures CH9120, then sends byte data to the communication port of the MQTT server to establish a connection and subscribe to topics:
ch9120_configure()
mqtt_client = MQTTClient(uart1)
mqtt_client.ClientID = CLIENT_ID # Set ClientID
mqtt_client.connect() # Connect to MQTT server
mqtt_client.subscribe(SUBSCRIBE_TOPIC) # Subscribe to topic:test_topic1
- ch9120_configure()
Call each hardware interface to initialize and configure CH9120 - mqtt_client = MQTTClient(uart1)
Create an MQTT client object mqtt_client - mqtt_client.ClientID = CLIENT_ID
Configure the client ID - mqtt_client.connect()
Initiate a connection request to the MQTT server - mqtt_client.subscribe(SUBSCRIBE_TOPIC)
Subscribe to the topic
This code indicates entering a data transmission and reception mode, where messages received are sent back from another topic:
while True:
    rxData = uart1.read()
    if rxData is not None:
        topic, message = mqtt_client.extract_data(rxData) # Parse the received data
        if topic == SUBSCRIBE_TOPIC:
            print("Topic:", topic)
            print("Message:", message)
            mqtt_client.publish(PUBLISH_TOPIC, message) # Send received data to topic:test_topic2
    time.sleep_ms(20)
- rxData = uart1.read()
Read the data - topic, message = mqtt_client.extract_data(rxData)
Parse the data and extract topics and messages from the data - if topic == SUBSCRIBE_TOPIC
If it is a subscribed topic, print the topic name and message - mqtt_client.publish(PUBLISH_TOPIC, message)
Send the received message back from another topic
After the connection is established, the client needs to ensure that the transmission interval of any two MQTT protocol packets does not exceed the value of Keep Alive. If the client is currently idle and there are no packets to send, it can send PINGREQ protocol packets (heartbeat packets). If the MQTT server does not receive any packets from the client within 1.5 times the time of Keep Alive, it will consider that there is a problem with the connection between the MQTT server and the client, and the server will disconnect from the client. Therefore, when the client does not send data packets for a long time but needs to maintain the connection, it should send a heartbeat packet at regular intervals. It is generally recommended to do so within half of the Keep Alive time. The following code indicates that a heartbeat packet is sent to the server every 30 seconds, and if the heartbeat check fails, it will reconnect until the heartbeat check is successful:
current_time = time.time()
    if current_time - last_heartbeat_time >= 30:
    last_heartbeat_time = current_time
    mqtt_client.send_heartbeat()
    if not mqtt_client.check_heartbeat_response():
        while True:
            mqtt_client.send_heartbeat()
            if mqtt_client.check_heartbeat_response():
                break
- mqtt_client.send_heartbeat()
To send a heartbeat packet to the MQTT server, it is recommended to send it once within half of the Keep Alive time, and the Keep Alive is set to 60 seconds, so it is sent every 30 seconds - mqtt_client.check_heartbeat_response()
Check the heartbeat response returned by the MQTT server, and exit the loop if the returned data is normal, and continue to try to reconnect if it is abnormal
4. Result demonstration
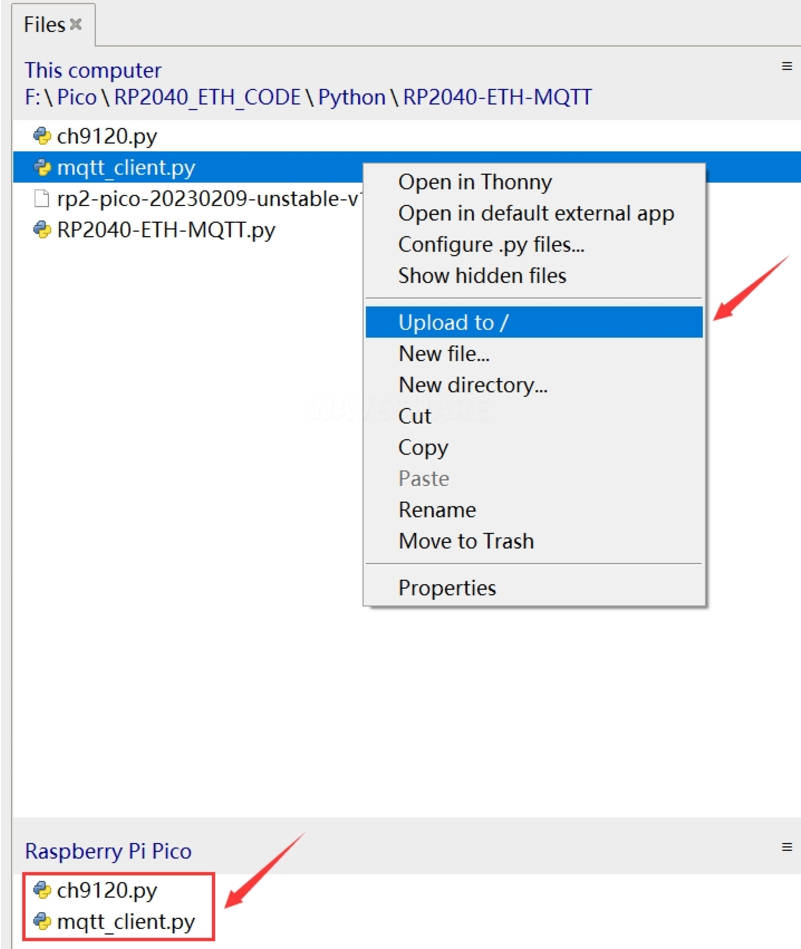
- Burn the Micropython firmware, upload ch9120.py and mqtt_client.py, run the program
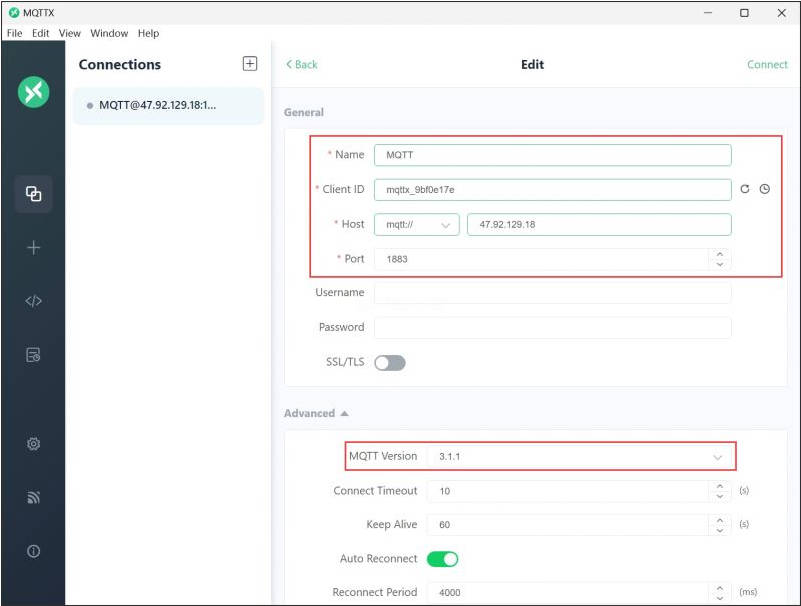
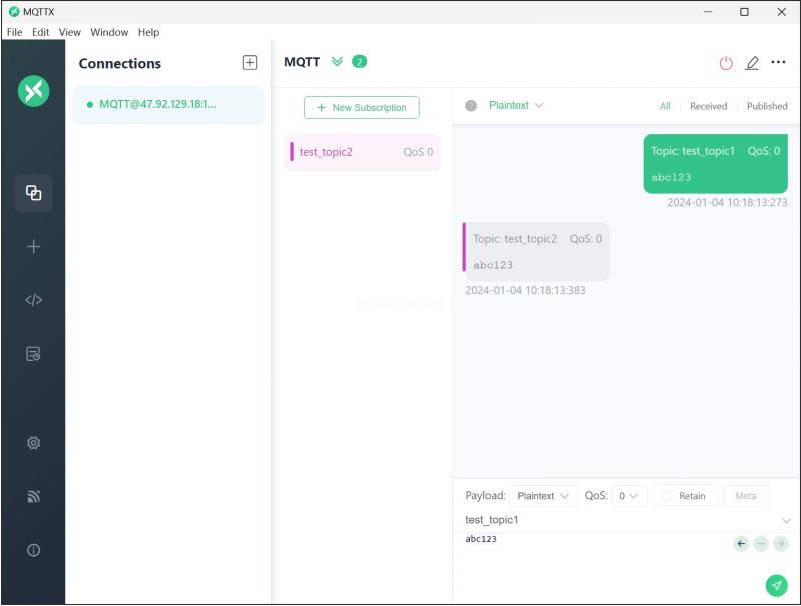
- Open the MQTT client testing tool, configure the MQTT client, and click Connect in the upper right corner to connect
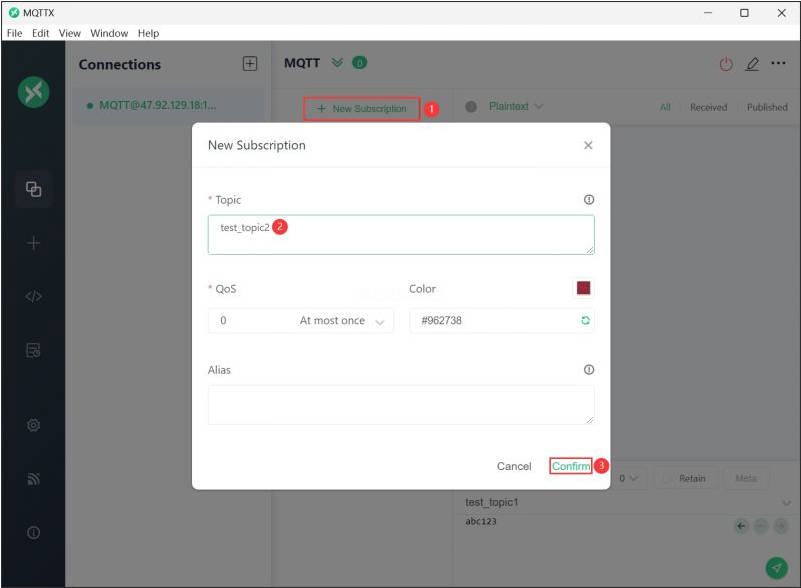
- Subscribe to a topic
- Data transmission and reception test, use the tool to send a message to the test_topic1 topic, and RP2350-ETH will send back the message through the test_topic2 topic after receiving it
Pico Get Started
Video tutorial
- PICO Series Tutorial 1——Introduction to the Basics
- PICO Series Tutorial 2——Peripheral GPIO
- PICO Series Tutorial 3——PWM (Pulse width modulation)
- PICO Series Tutorial 4——ADC (Analog to digital converter)
- PICO Series Tutorial 5——UART (Asynchronous transceiver)
- PICO Series Tutorial 6——I2C (Integrated circuit bus)
- PICO Series Tutorial 7——SPI (Serial peripheral interface)
- PICO Series Tutorial 8——PIO (Programmable I/O Port)
Text tutorial
Introduction
Raspberry Pi Pico introduction
MicroPython
Details
- 【MicroPython】 machine.Pin Function
- 【MicroPython】 machine.PWM Function
- 【MicroPython】 machine.ADC Function
- 【MicroPython】 machine.UART Function
- 【MicroPython】 machine.I2C Function
- 【MicroPython】 machine.SPI Function
- 【MicroPython】 rp2.StateMachine
Resources
Supporting resources
Document
- CH9120中文手册
- CH9120 Datasheet
- [https://www.waveshare.net/w/upload/7/74/CH9120_%E4%B8%B2%E5%8F%A3%E6%8E%A7%E5%88%B6%E6%8C%87%E4%BB%A4%E9%9B%86.pdf CH9120
Serial port instruction set]
Demo
Tools
Official Resources
Raspberry Pi official documents
- Raspberry Pi Pico Getting Started with MicroPython Programming (English version)
- Raspberry Pi related books download
- Pico2 Schematic diagram
- Pico2 Pinout definition
- Pico2 Getting Started
- Pico2 C SDK User Manual
- Pico2 Python SDK User Manual
- Pico2 Datasheet
- RP2350 Datasheet
- RP2350 Hardware Design Reference Manual
Raspberry Pi open source demos
Development software
FAQ
Question: Raspberry Pi Pico 2 GPIO is configured as a pull-down input, why does reading IO show a high voltage level when the pin is left unconnected?
You can refer to the RP2350-E9 section in the RP2350 Datasheet
Support
Monday-Friday (9:30-6:30) Saturday (9:30-5:30)
Email: services01@spotpear.com