


- sales/support
Google Chat:---
- sales
+86-0755-88291180
- sales01
sales@spotpear.com
- sales02
dragon_manager@163.com
- support
tech-support@spotpear.com
- CEO-Complaints
zhoujie@spotpear.com
- Only Tech-Support
WhatsApp:13246739196
- Purchase/Shipping/Refund
WhatsApp:13424403025
- HOME
- >
- ARTICLES
- >
- Common Moudle
- >
- LCD
Run Arduino Demo in spi model
Overview
- When we directly connected the SPI display module without the on-board level conversion module to the Arduino,
we found that it could not run at all.This is because the SPI module's pin can only input a 3.3V high level,
while the Arduino output has a high level of 5V.
To run successfully, there are two Method: short circuit method and external level conversion module method.
- The short-circuit method has the advantages of simple operation, short wiring, and no need for external devices.
The disadvantage is that the module generates a large amount of heat during operation.
Will affect the life of the module.
- The external level conversion module method is a normal operation, and the advantage is that the module generates
less heat and runs stably during operation, and the disadvantage is that the operation is slightly complicated.
(An external level shifting module is required) to increase the cost (additional level conversion module is required).
- In summary, it is recommended to use the external level shifting module method.
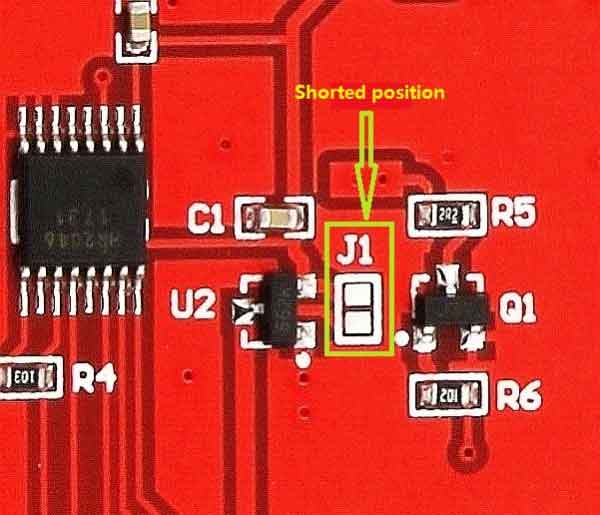
Short-Circuit Method
- The short-circuit method is to short the J1 component position (shown below) with solder on the back of the module.
After shorting, the runtime module VCC The pin must be connected to a 5V power supply (not connected to 3.3V).
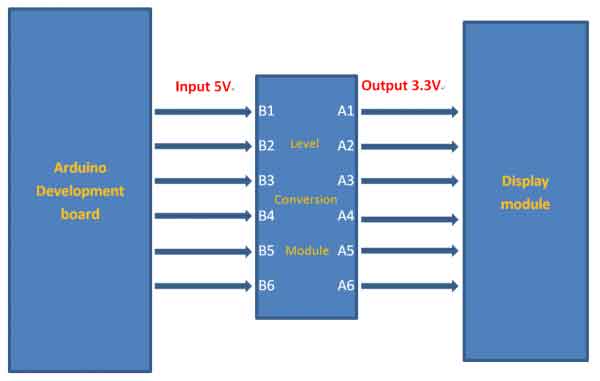
External Level Conversion Module Method
- The so-called external level conversion module method is to connect the Arduino and the display module
through an external level conversion module, so that The 5V high level of the Arduino output is converted
to 3.3V by the level conversion module and then input to the display module. As shown below: