


- sales/support
Google Chat:---
- sales
+86-0755-88291180
- sales01
sales@spotpear.com
- sales02
dragon_manager@163.com
- support
tech-support@spotpear.com
- CEO-Complaints
zhoujie@spotpear.com
- Only Tech-Support
WhatsApp:13246739196
- Purchase/Shipping/Refund
WhatsApp:13424403025
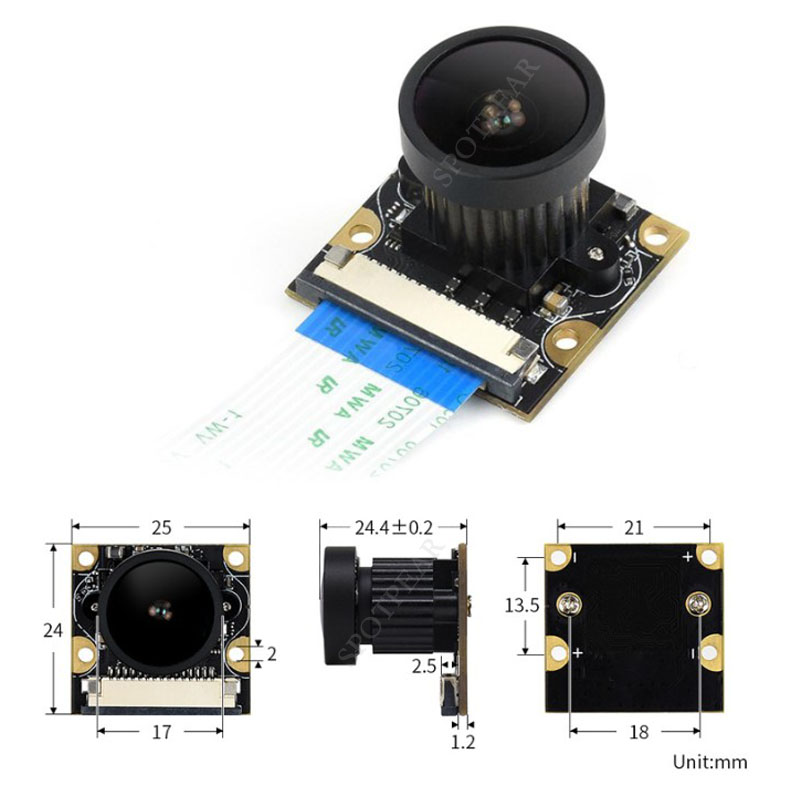
Jetson Nano IMX477-160 12.3MP Camera User Guide
Instruction
MIPI-CSI Camera, based on Sony IMX477 sensor, 1230M pixels. Supports Raspberry Pi Compute Module series and Jetson Nano developer Kit.
Specification of Lens
| Lens | 6mm Wide Angle Lens | 16mm Telephoto Lens | 25mm Telephoto Lens | 35mm Telephoto Lens | 8-50mm Zoom Lens |
| Size | 1/2" | 1" | 2/3" | 1" | 1/2.3" |
| F/No | F1.2 | F1.4-16 | F1.4-16 | F1.7-16 | F1.4 |
| Connector | CS-mount | C-mount | |||
| FoV | 63° | 1″ 44.6° × 33.6° 2/3″ 30.0° × 23.2° 1/1.8″ 24.7° × 18.6° 1/2″ 21.8° ×16.4° | 2/3" 20.2°×15.1° 1/1.8″ 16.5°×12.4° 1/2″ 14.5°×10.5° | 1″ 20.9°×15.8° 2/3″ 14.4°×10.8° 1/2″ 10.5°×7.9° | 45°-5.35° |
| BFL | 7.53mm | 17.53mm | |||
| TTL | - | 67.53mm | - | ||
| Distortion | - | 1″(-0.7%) 1/2″(-0.5%) 1/3″(-0.15%) | 0.05% | 0.35% | - |
| M.O.D. | 0.20m | 0.20m | 0.25m | 0.30m | 0.20m |
| Dimenstion | Φ30.00 × 34.00mm | Φ39.00 × 50.00mm | Φ34.00×34.00mm | Φ35.00×34.00mm | Φ40.00×68.30mm |
| Aperature | Manual | ||||
| Weight | 53g | 133.7g | 82g | 78g | 148g |
Notice
IMX477 12.3MP Camera can only support Raspberry Pi Compute Module series, it cannot be used with Raspberry Pi boards like Raspberry Pi Model 4B.
IMX477 12.3MP Camera can be used with Jetson Nano Developer Kit, if you want to use it with Jetson Nano, you need to install a driver. Please backup your OS before you install the driver because the driver is not suitable for IMX219.
Test with Jetson Nano
Hardware connection
- Connect the camera to CSI interface of Jetson Nano.Set the metal side of FFC into Heat-sink
- Connect an HDMI LCD to Jetson Nano
Software setting
- Power on Jetson Nano and open the Terminal (Ctrl+ALT+T)
- Test camera with command:
DISPLAY=:0.0 gst-launch-1.0 nvarguscamerasrc ! 'video/x-raw(memory:NVMM), width=3280, height=2464, format=(string)NV12, framerate=(fraction)20/1' ! nvoverlaysink -e
- Test dual-camera
- IF you want to test dual cameras with B01 Developer Kit.You can just add sensor-id=x to the pipeline. x can be 0 or 1.
#test video0
DISPLAY=:0.0 gst-launch-1.0 nvarguscamerasrc sensor-id=0 ! 'video/x-raw(memory:NVMM), width=3280, height=2464, format=(string)NV12, framerate=(fraction)20/1' ! nvoverlaysink -e
#test video1
DISPLAY=:0.0 gst-launch-1.0 nvarguscamerasrc sensor-id=1 ! 'video/x-raw(memory:NVMM), width=3280, height=2464, format=(string)NV12, framerate=(fraction)20/1' ! nvoverlaysink -e
Test with Compute Module
The IMX219 series can be used with Compute Module series of Raspberry Pi with carriers. And the usage are same as other Raspberry Pi cameras
Becuase of the encropytoin, the IMX219 series cameras cannot be used with Raspberry Pi board like the Raspberry Pi 4B, please note it.
- Connect the camera to Compute Module Carrier board (like Compute Module 4 PoE Board), please take care of the direction.
- Open a terminal and configure the camera
sudo raspi-config
- Select Interfacing Options -> Camera -> Yes
- Reboot
- Test the camera with command:
sudo raspistill -t 0
- For more information about commands for camera, please refer to this guides:Application guides of Raspberry Pi camera