- sales/support
Google Chat:---
- sales
+86-0755-88291180
- sales01
sales@spotpear.com
- sales02
dragon_manager@163.com
- support
tech-support@spotpear.com
- CEO-Complaints
zhoujie@spotpear.com
- Only Tech-Support
WhatsApp:13246739196
- Purchase/Shipping/Refund
WhatsApp:13424403025
- HOME
- >
- ARTICLES
- >
- Milk-V
- >
- Milk-V Duo
Milk-V Duo GPIO LED Tutorial
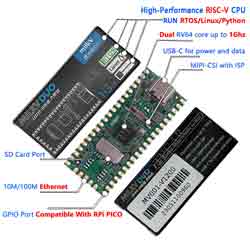
There is an onboard LED on the Milk-V duo, connected to XGPIOC24.
The default GPIO related modules have all been programmed into the kernel, and there is no need to execute the load command again.
Run GPIO read and write commands on the console or write GPIO read and write programs in kernel or user mode to perform input and output operations on GPIO.
The group number value of XGPIOC is 416, so the GPIO number is 416+24=440.
After starting Duo and entering the command line, enter the following command:
echo 440 > /sys/class/gpio/export # At this time, generate the /sys/class/gpio/gpio440 directory.
echo out > /sys/class/gpio/gpio440/direction # Reconfigure IO direction as output:
echo 1 > /sys/class/gpio/gpio440/value # Light the LED
echo 0 > /sys/class/gpio/gpio440/value # Turn off LED
echo 440 > /sys/class/gpio/unexport # Release GPIO resources
Using shell script to realize LED flashing;
The above can be used to operate the LED's on/off state in bash. Now, use a shell script to implement the LED's timed flashing function based on the above command:
Create an. sh file led_blink.sh
Use the built-in vi editor in the official provided image, as shown in the following code:
#!/bin/bash
LED=440
# Run GPIO-LED
echo $LED > /sys/class/gpio/export
# Setup GPIO-LED
echo out > /sys/class/gpio/gpio$LED/direction
# Cycle 10 times:Turn on the LED and delay for 1 second, then turn off the LED and delay for 1 second.
for i in $(seq 1 30)
do
echo 1 > /sys/class/gpio/gpio$LED/value
sleep 0.4
echo 0 > /sys/class/gpio/gpio$LED/value
sleep 0.4
done
# cleanup gpio
echo $LED > /sys/class/gpio/unexport
After writing, save and exit (:wq), you can run the script directly: /root/led_blink.sh
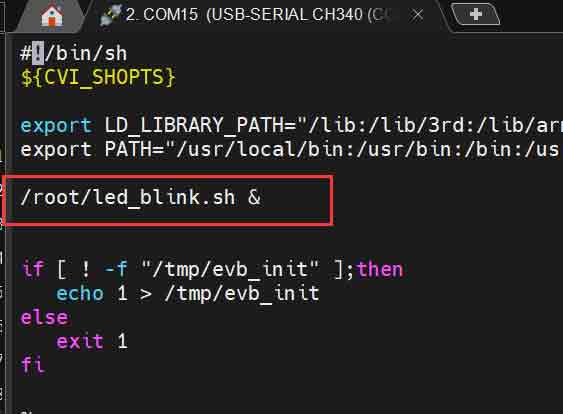
If you want the LED to flash automatically after startup (as the system's status light), you can use vi to add/root/led to the/mnt/system/auto.sh script file_ Blink.sh&; As follows:
Using c language cross-compilation to realize LED flashing;
Enter the ubuntu system of the computer and download the tool chain:
wget https://sophon-file.sophon.cn/sophon-prod-s3/drive/23/03/07/16/host-tools.tar.gz
Then decompress:
tar xvf host-tools.tar.gz
Compiler confirms:
Enter the MIlk V Duo system.,cat /proc/version

From this, it can be seen that the official Duo system image uses the riscv64-unknown-linux-musl-gcc compiler (this compiler must be specified during computer ubuntu compilation, otherwise the compiled code cannot be implemented on the Duo development board)
Writing c language code:
In the duo compilation environment of ubuntu, establish the corresponding directory and write the led_blink.c
#include <stdlib.h>
#include <stdio.h>
#include <string.h>
#include <unistd.h>
#include <fcntl.h> //define O_WRONLY and O_RDONLY
// LED Pin
#define SYSFS_GPIO_EXPORT "/sys/class/gpio/export"
#define SYSFS_GPIO_UNEXPORT "/sys/class/gpio/unexport"
#define SYSFS_GPIO_RST_PIN_VAL "440"
#define SYSFS_GPIO_RST_DIR "/sys/class/gpio/gpio440/direction"
#define SYSFS_GPIO_RST_DIR_VAL "OUT"
#define SYSFS_GPIO_RST_VAL "/sys/class/gpio/gpio440/value"
#define SYSFS_GPIO_RST_VAL_H "1"
#define SYSFS_GPIO_RST_VAL_L "0"
int main()
{
int fd;
int count = 30;
// Open the port/sys/class/gpio# echo 440 > export
fd = open(SYSFS_GPIO_EXPORT, O_WRONLY);
if (fd == -1)
{
printf("ERR: export open error.\n");
return EXIT_FAILURE;
}
write(fd, SYSFS_GPIO_RST_PIN_VAL, sizeof(SYSFS_GPIO_RST_PIN_VAL));
close(fd);
// Set the port direction/sys/class/gpio/gpio440# echo out > direction
fd = open(SYSFS_GPIO_RST_DIR, O_WRONLY);
if (fd == -1)
{
printf("ERR: direction open error.\n");
return EXIT_FAILURE;
}
write(fd, SYSFS_GPIO_RST_DIR_VAL, sizeof(SYSFS_GPIO_RST_DIR_VAL));
close(fd);
// Output reset signal: pulled high>100ns
fd = open(SYSFS_GPIO_RST_VAL, O_RDWR);
if (fd == -1)
{
printf("ERR: gpio open error.\n");
return EXIT_FAILURE;
}
while (count)
{
count--;
write(fd, SYSFS_GPIO_RST_VAL_H, sizeof(SYSFS_GPIO_RST_VAL_H));
usleep(1000000);
write(fd, SYSFS_GPIO_RST_VAL_L, sizeof(SYSFS_GPIO_RST_VAL_L));
usleep(1000000);
}
close(fd);
// Open the port/sys/class/gpio# echo 440 > unexport
fd = open(SYSFS_GPIO_UNEXPORT, O_WRONLY);
if (fd == -1)
{
printf("ERR: unexport open error.\n");
return EXIT_FAILURE;
}
write(fd, SYSFS_GPIO_RST_PIN_VAL, sizeof(SYSFS_GPIO_RST_PIN_VAL));
close(fd);
return 0;
}
Find the corresponding compiler in ubuntu.:sudo find / | grep riscv64-unknown-linux-musl-gcc

Compile and generate the executable file led_blink:sudo.
/home/jw/duo/cvi_mmf_sdk/host-tools/gcc/riscv64-linux-musl-x86_64/bin/riscv64-unknown-linux-musl-gcc -static -o led_blink led_blink.c

Using SSH to connect the LED_ Blink executable file transfer to Duo development board:
(The prerequisite is that the image you are using has the RNDIS function in order to transfer files to the Duo development board using this method; the official system image for versions above Milkv duo 20230519-1809.img comes with the RNDIS function)
sudo scp ./led_blinkv2 root@192.168.42.1:/root/

Provide executable file LED on the Duoi development board_ Bink gives sufficient permissions chmod u+x led_ Blink and execute the code
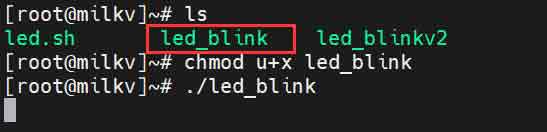
After the execution, the on-board LED light flashes.