


- sales/support
Google Chat:---
- sales
+86-0755-88291180
- sales01
sales@spotpear.com
- sales02
dragon_manager@163.com
- support
tech-support@spotpear.com
- CEO-Complaints
zhoujie@spotpear.com
- Only Tech-Support
WhatsApp:13246739196
- Purchase/Shipping/Refund
WhatsApp:13424403025
- HOME
- >
- ARTICLES
- >
- Common Moudle
- >
- ESP
ESP32 C3 0.42LCD WIFI
1. Open the arduino IDE
2. Select Chip
2.1. Click on tools
2.2. Click on board
2.3. Click on esp32 and select esp32-c3
3.Substitution code burning
#include<WiFi.h>
voidsetup()
{
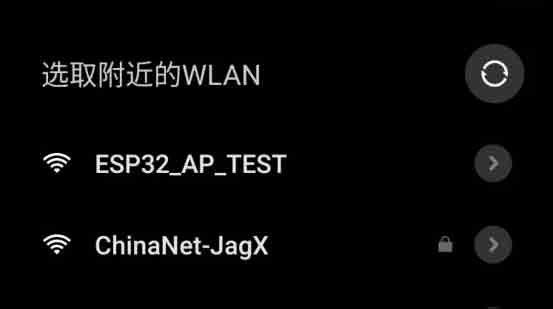
WiFi.softAP("ESP32_AP_TEST");
}
voidloop()
{
}
3.1. Copy the code into the Arduino IDE
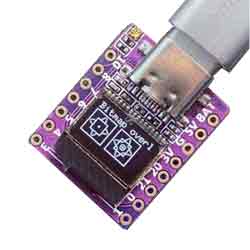
3.2. Use a type-c cable to connect the computer to the ESP 32-c3 development board. After successful connection, the serial port will be displayed in the computer management window
3.3Click on Tools in the Arduino IDE, then click on Port and select the serial port Adafruit QT ESP32-C3
3.4Click on Verify
3.5.Click on upload
3.6 The test results are as follows
TAG:
ESP32-P4-Core Board with 32MB PSRAM USB With Camera Port / Display Port
STM32 downloader
Raspberry Pi CM4
Arduino 0.96inch RGB OLED
IO BASE MINI Board
Raspberry Pi Display
ESP32 S3 Development Board 1.47 inch LCD Touch Screen 1.47inch Display 172&times;320 SD AXS5106L JD9853
SpotPear
Raspberry Pi Pico 2 W RP2350 Pico2W ARM Cortex-M33 And RISC-V Hazard3 Wi-Fi4 Bluetooth5.2 CYW43439
RS485 Bus
Raspberry Pi 5 PCIe TO Gigabit ETH USB3.2 HAT+ USB HUB
Raspberry Pi 5 Speaker
Pi5
Third-party library configuration
ESP32-S3 AI 1.54-inch e-Paper Ink Screen 1.54inch Display AIoT Development Board Deepseek
ESP32 S3 Development Board 1.91 inch AMOLED Display Screen For Arduino LVGL With SD-Port/ QMI8658C 6-Axis Sensor
Raspberry Pi 5 PCIe TO Gigabit RJ45 ETH Adapter Board (C) Driver-Free RTL8111H For Pi5
Raspberry Pi 5 Active Cooler
LCC-14
Good low light performance
TAG:
ESP32-S3N8R8 7inch LCD Display TouchScreen 800&amp;amp;amp;amp;times;480 WiFi Bluetooth CAN RS485 Sensor
Raspberry Pi 5 9layer Case
ESP32 P4 Development Board 7-inch LCD Display 1024×600 7inch Touchscreen ESP32-C6 WiFi6 AI Deepseek
SpotPear
Raspberry Pi 60GHz mmWave Radar Sensor High-Precision Human Body PCR For Arduino ESP32
Raspberry Pi Long Bar Screen
SpeedyBee F405 Mini BLS 35A FC ESC Stack Flight Controller DJI FPV Drone
ESP32-S3 AI RGB Matrix Driver Board Dual Microphone DeepSeek
2.15 inch e Paper HAT+ G E Ink Screen Display Arduino Raspberry Pi STM32
UART Serial Debug Module
Industrial USB TO RS485
MPS2.5G Raspberry Pi 5 PCIe NVME SSD 2.5G Ethernet RJ45 RTL8125 2280 2242 2230
Raspberry Pi 4 Model B
Raspberry Pi Autofocus Camera
Raspberry Pi 4 Model B
ESP32 S3 Development Board 4.3 inch LCD Capacitive Touch Screen 4.3inch Display 800×480 N16R8
USB-CAN-B
DeepSeek ESP32 S3 1.8 inch AMOLED Display TouchScreen AI Voice Programmable Watch
2.1inch Round LCD
ISX031 GMSL Camera H100 H190 Image Sensor IP67 protection rating For Jetson Orin And MAX96717 GMSL camera