


- sales/support
Google Chat:---
- sales
+86-0755-88291180
- sales01
sales@spotpear.com
- sales02
dragon_manager@163.com
- support
tech-support@spotpear.com
- CEO-Complaints
zhoujie@spotpear.com
- Only Tech-Support
WhatsApp:13246739196
- Purchase/Shipping/Refund
WhatsApp:13424403025
Raspberry Pi Pico-CAN-B User Guide
Introduction
This is a CAN module designed for Raspberry Pi Pico, enabling Pico to achieve reliable long-distance communication.
Features
- Standard Raspberry Pi Pico header, supports Raspberry Pi Pico series boards.
- Features CAN function, adopts SPI interface CAN controller MCP2515 with transceiver SIT65HVD230DR.
- Comes with online development resources and manual (Raspberry Pi Pico C/C++ and MicroPython examples).
Specifications
- Operating voltage: 3.3V~5V
- CAN controller: MCP2515
- Control interface: SPI
- CAN transceiver: SIT65HVD230DR
- Baudrate: 5K~1000Kbps
- Dimensions: 52 x 21mm
Pinout Definition

Dimensions

Pico User Guide
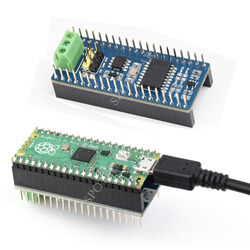
Hardware Connection
Please take care of the direction when you connect Pico, a USB port is printed to indicate. You can also check the pin of Pico and the module when connecting.
Demo Download
1. Directly download it on the Raspberry Pi: Open the Raspberry Pi and execute:
sudo apt-get install p7zip-full
cd ~
sudo wget  https://www.waveshare.com/w/upload/8/8a/Pico-CAN-B-Code.7z
7z Pico_Pico-CAN-B-Code.7z -o./Pico-CAN-B-Code.7z
cd ~/Pico-CAN-B-Code
2. Also, you can download the demo under the #Resource.
How to Use the Demo
Python
- 1. Press and hold the BOOTSET button on the Pico board, connect the pico to the USB port of the computer through the Micro USB cable, and release the button after the computer recognizes a removable hard disk (RPI-RP2).
- 2. Copy the pico_micropython_xxxxx.uf2 file in the python directory to the recognized removable disk (RPI-RP2).
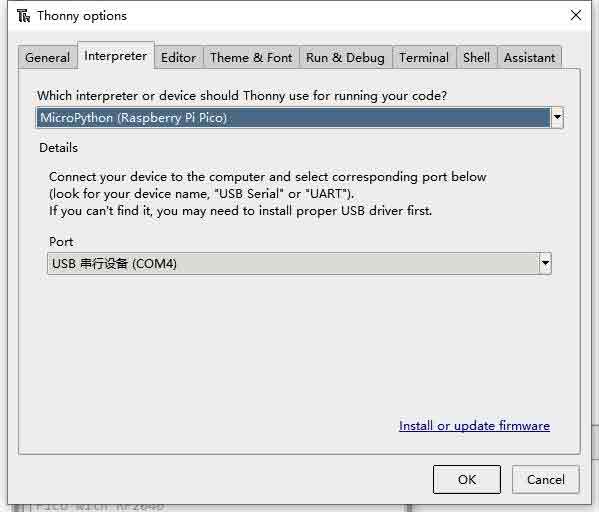
- 3. Open Thonny IDE (Note: Use the latest version of Thonny, otherwise there is no Pico support package, the latest version under Windows is v3.3.3).
- 4. Click Tools -> Settings -> Interpreter, and select Pico and the corresponding port as shown in the figure.
- 5. File -> Open -> MCP2512.py file, click to run, as shown in the following figure:

This is a transceiver demo, connect to another CAN device (A-A B-B connection), configure the frame ID 0x123, and then send 1-8 in turn.
Resource
Document
Demo
Development Software
Download Firmware
- Download MicroPython Firmware:

- Download C_Blink Firmware:

Open-source Demo
TAG:
Arduino Thermal imaging
ESP32-S3 0.85inch LCD
SpotPear
Raspberry Pi Pico 2 W RP2350 Pico2W ARM Cortex-M33 And RISC-V Hazard3 Wi-Fi4 Bluetooth5.2 CYW43439
Computer Secondary Screen
CPU Monitor Display
Raspberry Pi PICO Keyboard
ESP32 ST7789 tutorial
Rasberry Pi 5 PCIe TO MiniPCIe 4G Gigabit Ethernet RJ45 USB HUB HAT+ SIM7600G-H/EG25-G
voice module
Raspberry Pi Real time clock
XIAO RA4M1 Tiny SuperMini Board For Arduino Uno IDE For SeeedStudio R7FA4M1
Multi Protection
UGV Rover ROS2 PT AI OpenCV Robot Car MediaPipe For Jetson Orin Nano
spotpear
Modbus RTU
ESP32-S3 AI 1.54-inch e-Paper Ink Screen 1.54inch Display AIoT Development Board Deepseek
3D Display Transparent Screen
Arducam 64MP Camera
LCD1602 I2C Module PWM Adjustable backlight 3.3V/5V For Arduino/ Raspberry Pi/ Pico/ Jetson Nano/ ESP32
TAG:
Mini TOF Time-of-Flight Laser Ranging Radar Sensor Compatible RS485 with Arduino Raspberry Pi ESP32 and Pico
Raspberry Pi 7 inch CAPLCD 1280x800 Capacitive TouchScreen HDMI Type C Display Monitor Computer PC
Jetson Orin Case
Luckfox Omni3576 Rockchip RK3576 Core3576
Raspberry Pi 5 PoE HAT
DeepSeek AI Chat Box ESP32-S3 1.3 inch LCD Desktop N16R8 Development Board Display Screen Wifi Weather Station TimeClock
Sipeed NanoKVM-Pro 4K IP-KVM Remote Control Operation and Maintenance Server
Milk V Duo Module 01 Evaluation Board SG2000 512MB RISC-V Duo S
Raspberry Pi 5 IR Camera
Raspberry Pi Pico 1.28inch
Raspberry Pi Industrial 10.1 inch HMI LCD TouchScreen Display 1280x800
Raspberry Pi 5
UNO R4 Case
Raspberry Pi 8 inch DSI MIPI LCD TouchScreen Display 8inch 800x1280 For Luckfox Lyra RK3506/ESP32-P4/Luckfox Omni3576
Raspberry Pi
Raspberry Pi 5 PCIe WIFI7
Raspberry Pi 5 PCIe to SSD
RDK X5 Acrylic Case Black chassis heat dissipation holes
Raspberry Pi 5 PCIe Gigabit RJ45 ETH RTL8111H Pi5
Raspberry Pi Pico 2 RP2350 industrial 6-ch Relay RS485 isolation protection