


- sales/support
Google Chat:---
- sales
+86-0755-88291180
- sales01
sales@spotpear.com
- sales02
dragon_manager@163.com
- support
tech-support@spotpear.com
- CEO-Complaints
zhoujie@spotpear.com
- Only Tech-Support
WhatsApp:13246739196
- Purchase/Shipping/Refund
WhatsApp:13424403025
Setting up Jetson nano to boot the system from a USB Flash Disk
Introduction
Herein mainly introduces Jetson Nano modules with 16GB eMMC memory according to official nvidia tutorial. All information is subject to the official website of nvidia.
Reference Links
- https://developer.nvidia.com/embedded/learn/get-started-jetson-nano-devkit#write
- https://docs.nvidia.com/jetson/archives/l4t-archived/l4t-3261/index.html#page/Tegra%20Linux%20Driver%20Package%20Development%20Guide/flashing.html#wwpID0E01O0HA
Hardware Preparation
- Jetson Nano module, corresponding power supply and heatsink
- Ubuntu18.04 computer host
- U disk with USB interface or mobile hard disk (USB3,0 is recommended)
- a USB data cable (Micro USB interface, for transmitting data)
Software Preparation
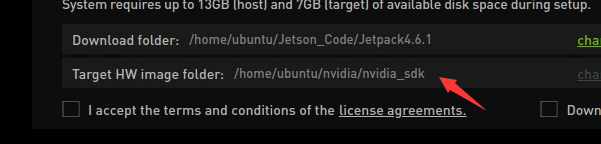
- Install SDK Manager and flash system configuration for Jetson Nano.
- Tutorial: SDKM flash Nano
- Record the address of the downloaded HW Imager during the flashing process for later.
- Connect the U disk to the nano, and check the device number of it in the nano, such as sda.
ls /dev/sd*
- Insert the U disk to the ubuntu computer.
- Check the device number of the U disk on the computer, such as sdb.
sudo lsblk -p -d | grep sd
- Note: If your U disk has been partitioned before, it is recommended to format and adjust it to a partition on another computer first.
- Format the USB drive to ext4
sudo mkfs.ext4 /dev/sdb
- Note: Please refer to your actual situation for the specific device number. Some devices may be sda or others.
- Mount U disk
sudo mount /dev/sdb /mnt
- Enter the HW Imager address and copy the rootfs.
cd <path>/Linux_for_Tegra/rootfs/
- Note: Please refer to your actual address. For example, the author's path command:
cd/home/ubuntu/nvidia/nvidia_sdk/JetPack_4.6.1_Linux_JETSON_Nano_TARGETS/Linux_for_Tegra/rootfs/
- Copy the file system to the U disk.
sudo tar -cpf - * | ( cd /mnt/ ; sudo tar -xpf - )
- After finishing the copy, unmount the U disk, (note: don't pull it out).
sudo umount /mnt
- Set up nano as recovery mode (refer to the flashing tutorial), then connect it to the ubuntu computer and input the flashing command.
cd ../
csudo ./falsh.sh jetson-nano-emmc sda
- Note: Sda should be filled in as the actual device number of the U disk recognized by nano in the first step.
- After flashing, disconnect the nano and the U disk. Insert the U disk to the Nano before powering on it, and follow the prompts to complete the configuration.
TAG:
spotpear
Computer AI Deepseek Mechanical Voice Keyboard Linux 10x0.85inch LCD Screen Customize keys + 2.01 inch Secondary Display
Milk-V Duo S eMMC version firmware burning
R7FA4 PLUS B Development Board Based on R7FA4M1AB3CFM Compatible with Arduino UNO For R4 WiFi
NV3030B
Raspberry Pi 5 PCIe to 4-CH M.2 NVMe 4-Ports SSD Board HAT Pi5 Four-Times
Raspberry Pi 3.5 inch DSI Display MIPI LCD (H) Capacitive TouchScreen 480x800
PoE Power Supply
Raspberry Pi 5 USB Audio
Serial Server
Raspberry Pi Starlight Camera IR-CUT IMX462 (A) Sensor 2MP 90 Degree
Milk-V Duo S 512MB SG2000 RISC-V
X1300 X1300-A2 Raspberry Pi 5 HDMI to CSI-2 Shield 1080P@60fps & Audio & Video Also
Raspberry Pi Pico 2 RP2350 1.28 inch Round LCD TouchScreen Development Board 240x240 Display QMI8658 6-Axis $17.9
Industrial ESP32-S3 Relay 8-Channel 8-Ch ESP32-WROOM IOT WiFi Bluetooth HAT For Arduino
Raspberry Pi 5 Serial
Jetson Nano
PC USB Monitor Screen
0.85inch Screen
ESP32 C3 Round LCD Development Board Electronic EYE 0.71 inch Display Watch Screen GC9D01 160x160
TAG:
Magnetic-Encode CF35-12 Servo
Arduino Nano ESP32
XIAO-ESP32S3 Sense Camera S3R8 Arduino MicroPython SeeedStudio
PC USB Monitor Screen
Milk V
ESP32-C5 2.8inch LCD Display Capacitive AI Development Board 240×320 2.8 inch TouchScreen
Raspberry Pi
Raspberry Pi 5 Aluminum Case
Computer Monitor Screen
SP485EN
Raspberry Pi
Modbus RTU CAN
Raspberry Pi Capacitive Touchscreen
ESP32-S3 Relay 6-Channel IOT WiFi Bluetooth RS485 Pico Protection Circuits
SpotPear
Luckfox PicoKVM Ext PCIe Expansion Board PCIe USB remote power management For Luckfox PicoKVM
Raspber Pi 5 PD Power
Top-Version Luckfox Lyra Ultra RK3506B OnBoard EMMC-8GB Mic Option WiFi6 /PoE With Audio and Display Port
Spotpear
Raspberry Pi 5