


- sales/support
Google Chat:---
- sales
+86-0755-88291180
- sales01
sales@spotpear.com
- sales02
dragon_manager@163.com
- support
tech-support@spotpear.com
- CEO-Complaints
zhoujie@spotpear.com
- Only Tech-Support
WhatsApp:13246739196
- Purchase/Shipping/Refund
WhatsApp:13424403025
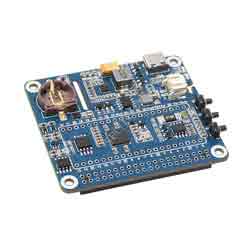
Power Management HAT (B) User Guide
Introduction
Power Management HAT(B) is a Raspberry Pi power management control board, which can provide a set of extremely powerful power management for Raspberry Pi, such as timing switches, measuring working voltage and current, etc. The load transient response function enables fast switching among multiple power supplies.
Feature
- Onboard MCU (RP2040), powerful and easy to use
- Onboard PCF8523 RTC chip, provides precise RTC information
- Onboard MP28167-A buck-boost DC chip for fast load transient response
- Protection circuits such as power supply anti-reverse, counter-current proof, etc. ensure stable and safe operating
- Standard Raspberry Pi 40PIN GPIO extension header, supports Raspberry Pi series boards
- Onboard user-defined button, can be used for Raspberry Pi start-up, safe shutdown, or other customized function
- It can detect the input power supply voltage and the working current, and it can be programmed to cut off the power supply immediately to ensure the working life of the lithium battery.
- Voltage/current monitoring circuit, monitors the Raspberry Pi operating voltage and current in real-time
Parameters
- Main chip: RP2040
- Communication interface: UART + GPIO
- Download interface: USB + SWD(Debug)
- Baud rate: default 115200bps (configurable)
- Power supply: USB/PH2.0 connector
- USB port voltage: 5V
- PH2.0 connector voltage: 3.3-4.2V (3.7V Li battery)
- Built-in circuits: battery anti-reverse, counter current proof, voltage/current monitoring
- Dimensions: 56.5mm x 65mm
- Fixed hole diameter: 3.0mm
Hardware Connection
| RP2040 GPIO | Description |
| GPIO0 | UART0_TX pin, connect to Raspberry Pi D15 pin |
| GPIO1 | UART0_RX pin, connect to Raspberry Pi D14 pin |
| GPIO6 | I2C1_SDA pin, connect to II2 SDA pin |
| GPIO7 | I2C1_SCL pin, connect to II2 SCL pin |
| GPIO19 | User key pin, generally for controlling the power switch |
| GPIO21 | RTC interruption pin, RTC chip will be pulled down when the RTC clock is triggered |
| GPIO22 | Raspberry Pi soft shutdown pin, connect to Raspberry Pi D20 pin |
| GPIO23 | Raspberry Pi run pin, connect to Raspberry Pi D21 pin |
| GPIO24 | Power control pin, when it is pulled low, the power is cut off, otherwise, the power is on |
| GPIO25 | Status LED pin, used to display the current operating status |
| GPIO29 | Input voltage acquisition hardware, the voltage here is about 1/10 of the input voltage |
User Guide
Precautions
SAFETY CAUTIONS
- Li-ion and Li-po batteries are quite unstable. They may cause fire, personal injury, or property damage if they're not properly recharged or used.
- Do not reversely connect the polarities when recharging or discharging the battery. Do not use an inferior charger/charging panel to recharge the battery.
- Do not mix use old batteries with new ones, avoid using batteries of different brands.
- When buying a Lithium battery, should always make sure the battery specification is compatible with the expansion board. *Choose batteries from the formal manufacturer, and ensure the batteries will work stably and safely by aging test.
- Lithium batteries have a limited cycle life, they will also deteriorate as time goes by. Should be replaced with new ones when the batteries reach their max cycle life or work over two years, whichever comes first.
- Should be placed carefully and properly, keep it away from inflammable and explosives articles, away from children, and avoid any safety accident caused by careless storage.
Working Principle & Demo
GPIO Protocol (Configurable Protocol)
- Based on software compilation, this protocol requires RP2040 and Raspberry Pi to run the demo.
- As the GPIO headers of RP2040 and Raspberry Pi are connected, the running state of Raspberry Pi can be detected and its shutdown can be prompted.=Working With Raspberry Pi=
Configure Pico Compile Environment
- Download the installation script.
cd ~
wget https://raw.githubusercontent.com/raspberrypi/pico-setup/master/pico_setup.sh
- Give run permission and run:
chmod +x pico_setup.sh
./pico_setup.sh
- Restart the Raspberry Pi:
sudo reboot
openocd
- Power Management HAT(B) has connected SWD (debug) to the Raspberry Pi interface, you can directly use the debug interface to download programs or debug.
- Download the library source code required for OpenOCD
cd ~/pico
sudo apt install automake autoconf build-essential texinfo libtool libftdi-dev libusb-1.0-0-
dev
- Download the OpenOCD source code.
git clone https://github.com/raspberrypi/openocd.git --recursive --branch rp2040 --depth=1
- Compile and install:
cd openocd
./bootstrap
./configure --enable-ftdi --enable-sysfsgpio --enable-bcm2835gpio
make -j3
sudo make install
TAG:
Raspberry Pi Pico 2 RP2350 0.85 inch LCD Display mini Development Board 0.85inch Screen RGB LED/SD Slot /QMI8658 Gyroscope Sensor
RS485 to Ethernet
Industrial USB TO 8CH TTL Converter USB to UART Multi Protection Circuits Multi Systems
Jetson Nano Module
Luckfox Pico Max
Raspberry Pi UGV Beast ROS2 PT AI OpenCV Robot Car MediaPipe
Raspberry Pi Pico 2 RP2350 ETH CH9120 TCP/UDP Ethernet Network For Arduino
Raspberry Pi 5 Terminal
Metal Case
0.96inch1.3inch1.44inch1.8inch LCD Display Screen Round Arduino Raspberry Pi ESP32 Pico STM32
ESP32-S3
Wireless AW CB375N 2.4G/5GHz Dual Band WiFi5 Wireless module RTL8822CE CG Bluetooth 5.0
JETSON NANO MINI Fan
Good low light performance
EyeLink-RC-S1 Industrial Edition 5.5 inch Touchscreen Camera R1M Card Recording Flight Controller FPV Drone ground station image transmission remote
Raspberry Pi 5 PCIe to M.2 Mini NVMe SSD Board (E) With Customized Active Cooler Together
D-Robotics RDK X3 Module Core MD Module Horizon Sunrise Pi ARM Cortex-A53 5Tops Size Compatible With Raspberry Pi CM4 Size
Raspberry Pi Pico 2 RP2350 Pico2 ARM Cortex-M33 And RISC-V Hazard3 520KByte 4MByte QSPI Flash
Sipeed NanoKVM-USB Finger-sized 4K USB KVM for Server/SBCs
ESP32-S3FH4R2-MINI-Tiny-Stamp-WIFI-Bluetooth5
TAG:
Arducam
ESP32-S3 Development Board 1.47 inch LCD 1.47B Display 1.47inch Screen SD 172×320 RGB LED
Grove Sensor Kit SeeedStudio-XIAO series Development boards
TTL UART To CAN Mini
Raspberry Pi 5inch Display 1024x600 HDMI Capacitive TouchScreen 5 inch LCD Mini PC Computer
Raspberry Pi 5.83 inch e-Paper link (G) Arduino Jetson Nano STM32
Raspberry Pi C792 Double HDMI to CSI-2 loop-out blikvm For pikvm Pi5 Jeston
RISC-V
XIAO-ESP32S3 Sense Camera S3R8 Arduino MicroPython SeeedStudio
SIM8260G M2 3G/4G/5G/GNSS/GPS Sub-6G PCIe M.2 Moudle For LTE-A/NSA/SA For DFOTA /VoLTE For SIMCOM
mobile phone
SpotPear
LCD Screen Driver Board
Time ornament
Raspberry Pi 5
Raspberry Pi 4 USB Audio
Raspberry Pi 5 Model - 1GB RAM
Industrial USB RS232 RS485 C UART FT232RNL 2m 3.3V 5V
Raspberry Pi AI Camera 12MP IMX500 RP2040
ESP32 S3 Development Board 2.8 inch LCD Capacitive Touch Screen 2.8inch Display 240×320 N16R8