- sales/support
Google Chat:---
- sales
+86-0755-88291180
- sales01
sales@spotpear.com
- sales02
dragon_manager@163.com
- support
tech-support@spotpear.com
- CEO-Complaints
zhoujie@spotpear.com
- sales/support
WhatsApp:13246739196
Raspberry Pi 3.2inch HDMI LCD (H) User Guide
Overview
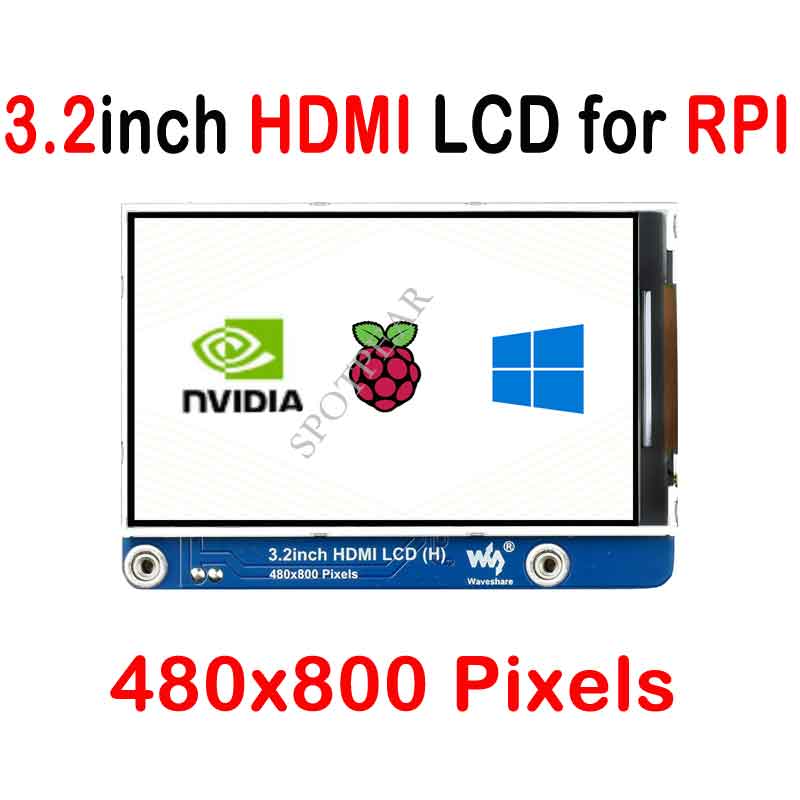
This is a 3.2inch HDMI display, 480x800 resolution, supports Raspberry Pi, Jetson Nano, and Desktop Windows PC.
Features
- 3.2inch IPS display, hardware resolution is 480x800
- Working with Raspberry Pi, support Raspbian / Ubuntu/ Kali/ Win10 IoT and the Retropie, driver free
- Working with Jetson Nano, support Ubuntu, driver free
- Working with PC, support Windows 11/10/8.1/8/7, driver free
- Backlight is adjustable
Work with Windows PC
To use with Windows PC, the display supports Windows 11, 10, 8.1, 8 and Windows 7
- Connect the Only Power interface to the USB port of PC
- Connect the Display interface to the HDMI port of PC
Note: This display is a vertical display by default, resolution is 480 x 800. You can change the orientation by software.
Work with Raspberry Pi
To use display with the Raspberry Pi, you need to configure the resolution manually.
- Download the newest image from Raspberry Pi Website
- Unzip the image archive and get the .img file.
- Format the SD card by the SDFormatter software
- User the Win32DiskImager software, write the .img file to the SD card.
- After writing, modify the config.txt file:
max_usb_current=1
hdmi_force_hotplug=1
hdmi_group=2
hdmi_mode=87
hdmi_drive=1
hdmi_timings=480 0 50 20 50 800 0 19 20 20 0 0 0 60 0 38000000 6
- Save and eject the sd card.
- Insert the SD card to Raspberry Pi
- Connect the Only Power interface to the USB port of Raspberry Pi
- Connect the Display interface to the HDMI port of Raspberry Pi
- Waiting for a moment, and the display lights and works.
Orientation
Windows PC
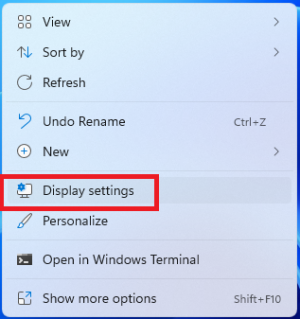
- Right-click and choose the Display setting
- Click the Identify to detect the display
- Choose the display, set the display mode to extend and change the orientation
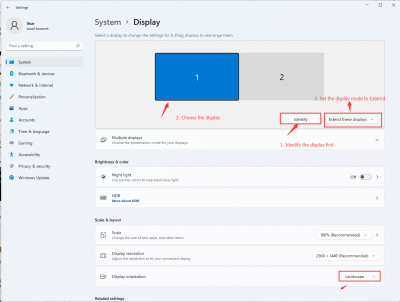
- Choose the display, set the display mode to extend and change the orientation
Raspberry Pi
- Open the Menu of Raspberry Pi
- Choose Preferences -> Screen Configuration
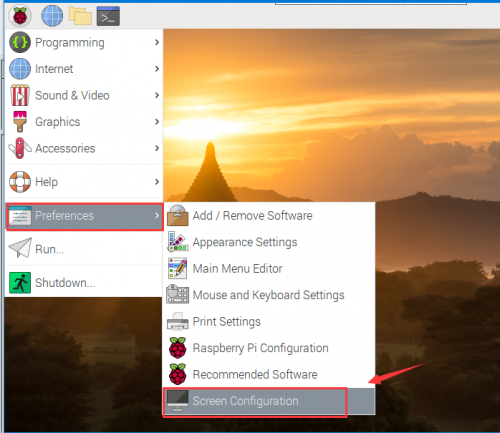
- Choose Preferences -> Screen Configuration
normal: Default orientation
Right: Rotate 90°
inverted: Rotate 180°
left: Rotate 270°
Note: If you use Raspberry Pi 4, please enable the dtverlay=vc4-fkms-V3D
Others
Control Backlight
The brightness can be adjusted by the buttons on the side。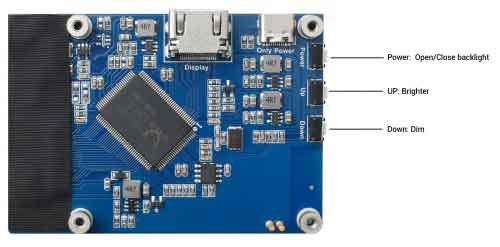
=Power saving
To disable the Power saving mode and keep the display lighting.
- Open the lightdm.conf file
sudo nano /etc/lightdm/lightdm.conf
- Modify the lightdm.conf file, find the xserver-command lin.
#xserver-command=X
Modify it to
xserver-command=X -s 0 -dpms
- -s # - disable the display saver
- dpms: diable the power saving.
- Reboot
sudo reboot
TAG:
Modbus POE ETH Relay Waveshare User Guide
ESP32 C3 Voice Robot Mini Development Board AI DeepSeek Toy Doll Core 1.28 inch 1.54inch LCD
Raspberry Pi 5 8 inch DSI LCD Captive TouchScreen MIPI Display 1280x800 Industrial One-Body Tablet PC With 5MP Front Camera
Milk-V RJ45
ESP32-S3 1.28
Raspberry Pi
Modbus-Protocol-Specification User Guide
Jetson Nano 4G module
ESP32 2 inch Capacitive TouchScreen LCD Display ST7789 CST816D 240x320 For Arduino/Raspberry Pi/Pico
Raspberry Pi RP2040 LoRa
RS485 to Ethernet
RV1106 SC3336
Raspberry Pi 5 inch DSI MIPI LCD TouchScreen Display 7inch 720x1280 For Luckfox Lyra RK3506/ESP32-P4/Luckfox Omni3576
LuckFox Pico max
DeepSeek AI Voice Chat ESP32 S3 Development Board 2.06-inch AMOLED Display 410×502 2.06inch TouchScreen Programmable Watch
Raspberry Pi 15.6 inch QLED Quantum Dot Display 1920x1080 Capacitive Touchscreen For Computer PC/Jetson/Game $167.99
AV to RGB
ESP32-S3 DeepSeek AI Box Robot Development Board N16R8 Toy Doll Option 0.71 inch Electronic Eyes
HDMI to TTL
Raspberry Pi Camera
Raspberry Pi Screen 3.2 inch LCD HDMI 3.2inch 480x800 IPS display also for other mini Computer compa
TAG:
Raspberry Pi 5 PCIe M.2 5G 4G 3G SIM8262E-M2
Banana Pi
ESP32-S3 ST7789
ESP32-S3 Industrial 8-CH Relay IOT LAN WiFi /Bluetooth /RS485 /RJ45 Ethernet /POE
Milk-V Duo Ethernet
1.5inch Display
LuckFox
Raspberry Pi 5 inch DSI Display MIPI LCD (C) Capacitive TouchScreen 1024x600
0.85 inch Screen
LuckFox
ESP32-S3 Industrial 8-CH Relay IOT LAN WiFi /Bluetooth /CAN /RJ45 Ethernet /POE
Raspberry Pi USB Camera 12MP IMX378 30fps onboard dual microphones Also For Jeston / RDK
Raspberry Pi 5 Active Cooler
Raspberry Pi Pico Display
Refractive Prism
ESP32 P4 Development Board 7-inch LCD Display 1024×600 7inch Touchscreen ESP32-C6 WiFi6 AI Deepseek
AV to TTL
0.49inch OLED Screen Display 64×32 SSD1315 Arduino Raspberry Pi ESP32 Pico STM32
Jetson Orin Nano/NX Super Developer IO Base Development Board HDMI Version For Jetson Orin Nano/NX Module
SK18 Computer AI Deepseek Voice Keyboard Linux 18x1.58inch LCD Screen Customize keys


