- sales/support
Google Chat:---
- sales
+86-0755-88291180
- sales01
sales@spotpear.com
- sales02
dragon_manager@163.com
- support
tech-support@spotpear.com
- CEO-Complaints
zhoujie@spotpear.com
- Only Tech-Support
WhatsApp:13246739196
- Purchase/Shipping/Refund
WhatsApp:13424403025
- HOME
- >
- ARTICLES
- >
- Common Moudle
- >
- LCD
2inch-Capacitive-Touch-LCD User Guide
Overview
Introduction
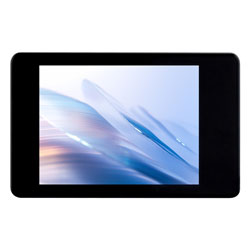
The 2inch Capacitive Touch LCD features a 240 × 320 resolution capacitive touchscreen, supporting either a 15-pin terminal interface or an 18-pin FPC slot for connection. It also provides example documentation for Raspberry Pi, ESP32, Pico, Arduino, etc.
Features
- 240×320 resolution, 262K RGB colors, clear and colorful displaying effect
- High touch screen transmittance, fast response and long lifetime
- Embedded with ST7789T3 driver chip and CST816D capacitive touch control chip, using SPI and I2C communication respectively, minimizes required IO pins
- Equipped with a TF card slot for convenient storage of more pictures, videos, music, etc
- Lead out LCD control interface, you can choose 15PIN terminal interface or 18PIN FPC slot access display screen
- Onboard level conversion chip, supports 3.3V/5V two operating levels
Interfaces
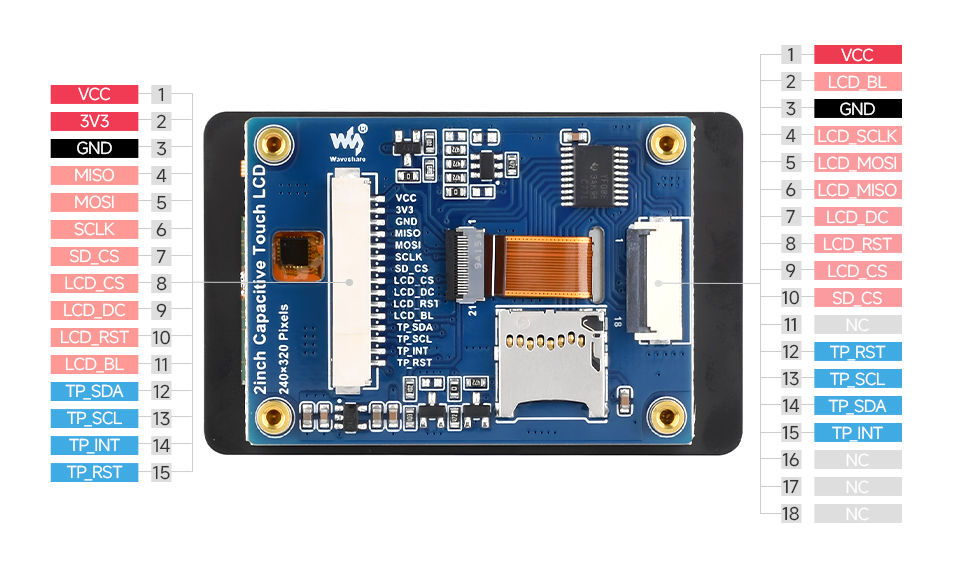
The 3V3 pin can be used as a power input or output. When used as an output, it is necessary to ensure that the VCC pin inputs 5V, and it is recommended to limit the output current to within 200mA.
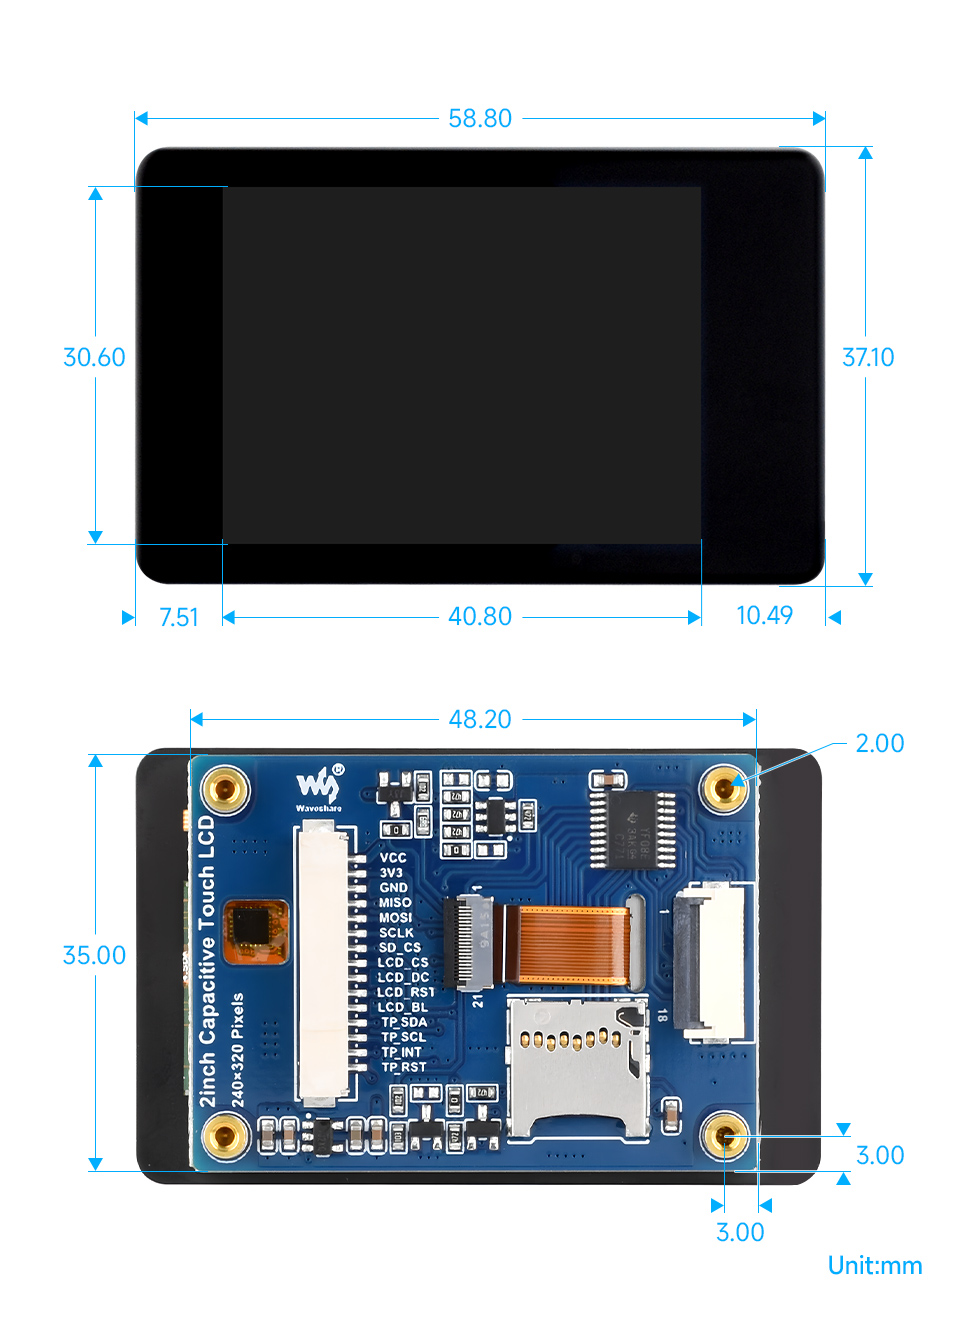
Dimensions
Specifications
(Please ensure that the supply voltage and logic voltage are consistent, otherwise, it may fail to function properly)
| Parameter Name | Parameter |
| Supply Voltage | 3.3V/5V |
| LCD Type | IPS |
| Communication Interface | Display: SPI |
| Touch: I2C | |
| Controller Chip | Display: ST7789T3 |
| Touch: CST816D | |
| Resolution | 240 (H) x 320 (V) |
| Display Size | 30.6 (H) x 40.8 (V) mm |
| Pixel Pitch | 0.1275 x 0.1275 mm |
| Dimensions | 37.1 (H) x 58.8 (V) mm |
Working with Raspberry Pi
Please note that the following example is run on Raspberry Pi 4
Hardware Connection
- 15PIN Connector
| LCD Pin | Raspberry Pi (BCM) |
| VCC | 3.3V |
| GND | GND |
| MISO | 9 |
| MOSI | 10 |
| SCLK | 11 |
| LCD_CS | 8 |
| LCD_DC | 25 |
| LCD_RST | 27 |
| LCD_BL | 18 |
| TP_SDA | 2 |
| TP_SCL | 3 |
| TP_INT | 4 |
| TP_RST | 17 |
Enable SPI & I2C Interface
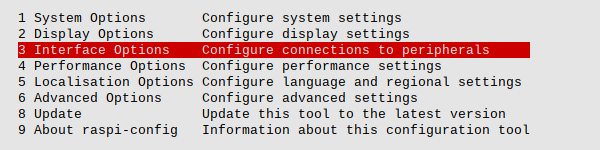
- Open the Raspberry Pi terminal and input the following commands to enter the config interface:
sudo raspi-config
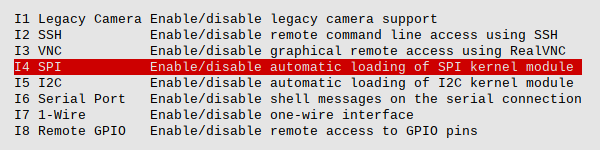
- Select Interface Options -> SPI -> Yes to enable the SPI interface

- Continue to enter the config interface:
sudo raspi-config
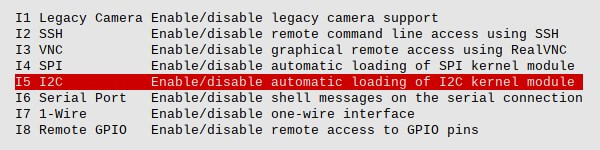
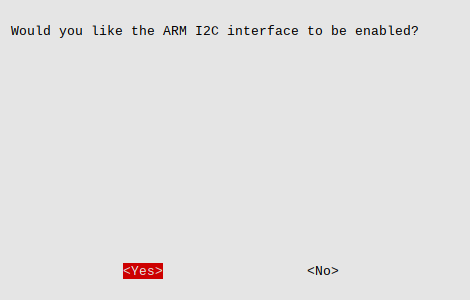
- Select Interface Options -> I2C -> Yes to enable the I2C interface

- Reboot the Raspberry Pi
sudo reboot
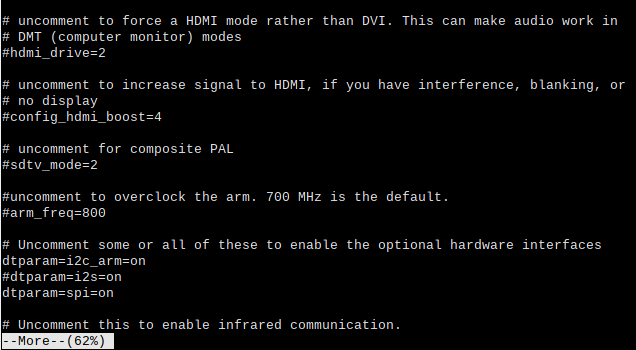
- Check /boot/config.txt, you can see "dtparam=i2c_arm=on" and "dtparam=spi=on" are written
more /boot/config.txt
- To ensure that SPI is not occupied, it is recommended that other driver overlays be temporarily turned off. You can use ls /dev/spi* to check the SPI occupancy. The terminal output /dev/spidev0.0 and /dev/spidev0.1 indicates that the SPI situation is normal
ls /dev/spi*

Python Environment
Install Libraries
- Install libraries:
sudo apt-get update
sudo apt-get install python3-pip
sudo apt-get install python3-pil
sudo apt-get install python3-numpy
sudo apt-get install python3-spidev
Demo Operations
- Download the following demo:
cd
wget https://files.waveshare.com/wiki/2inch%20Capacitive%20Touch%20LCD/2inch_Capacitive_Touch_LCD_Demo_Pi.zip
- Install decompression environment (optional, skip this step if you have used the command to unzip):
sudo apt-get install unzip
- Enter the file location, and execute the command to unzip:
unzip 2inch_Capacitive_Touch_LCD_RaspberryPi.zip -d ./2inch_Capacitive_Touch_LCD
- Enter Python file folder:
cd 2inch_Capacitive_Touch_LCD/Python
- Run the sample demo and you can see the LCD displays three pictures, and then input:
python 2inch_Capacitive_Touch_LCD.py
C Environment
Install Libraries
- Install libraries:
git clone https://github.com/WiringPi/WiringPi
cd WiringPi
./build
gpio -v
- Run gpio -v and version 2.70 will appear. If it does not appear, there is an installation error
- Download the demo file
- Enter the file directory, and run the demo
Demo Operations
- Download the demo
cd
wget https://files.waveshare.com/wiki/2inch%20Capacitive%20Touch%20LCD/2inch_Capacitive_Touch_LCD_Demo_Pi.zip
- Install decompression environment (optional, skip this step if you have used the command to unzip)
sudo apt-get install unzip
- Enter the file location, and execute the command to unzip
unzip 2inch_Capacitive_Touch_LCD_RaspberryPi.zip -d ./2inch_Capacitive_Touch_LCD
- Enter C file folder
cd 2inch_Capacitive_Touch_LCD/C
- Clean compilation files and compile again
sudo make clean
sudo make -j
- Successfully compiled, run the example demo to perform RGB refresh on the screen, and it will then enter the drawing function upon completion
sudo ./main
Working with Raspberry Pi Pico
Hardware Connection
- 15PIN connector
| LCD Pin | Raspberry Pi Pico |
| VCC | 3.3V |
| GND | GND |
| MISO | 12 |
| MOSI | 11 |
| SCLK | 10 |
| LCD_CS | 9 |
| LCD_DC | 14 |
| LCD_RST | 13 |
| LCD_BL | 15 |
| TP_SDA | 6 |
| TP_SCL | 7 |
| TP_INT | 8 |
| TP_RST | 5 |
Python Environment
Preparation
1. Install Thonny (Thonny installation package)
2. Press the "BOOTSEL" key on the Raspberry Pi Pico, and release it after powering
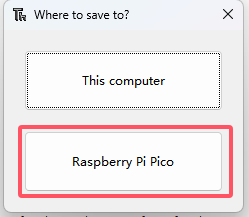
3. A new disk will appear on your computer, extract the (Raspberry Pi Pico firmware) and copy the firmware (suffix uf2) to that disk (the disk will automatically disappear if the copy is successful)
4. Open Thonny, click on "Python x.x.x" at the bottom right, and select "Configure interpreter"
5. Select "Interpreter" in the pop-up window -> select "MicroPython (Raspberry Pi Pico)" as the interpreter -> select "Auto-detect port" as the port
6.Click on "Stop", and the Shell window will show "MicroPython v1.20.0-50-g786013d46 on 2023-05-04; Raspberry Pi Pico with RP2040 Type "help()" for more information. " It means the connection is successful
The following is the procedure for points 4 and 5: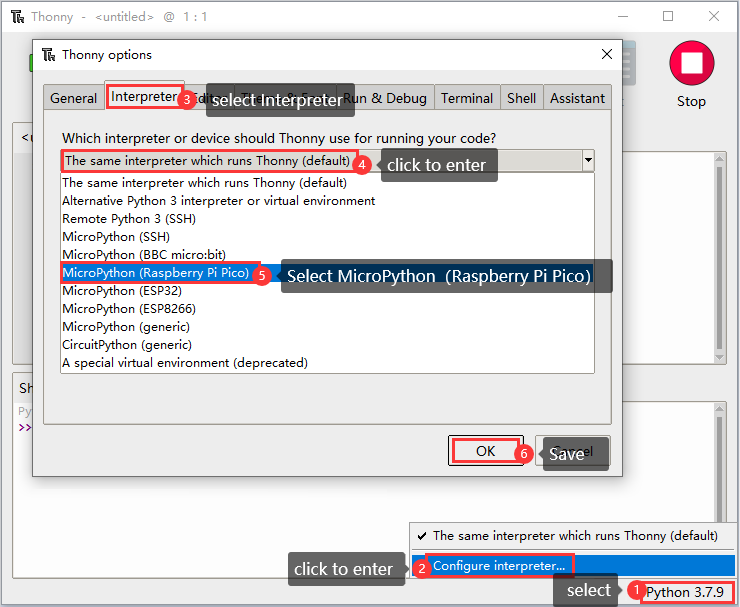
The successful connection is shown below: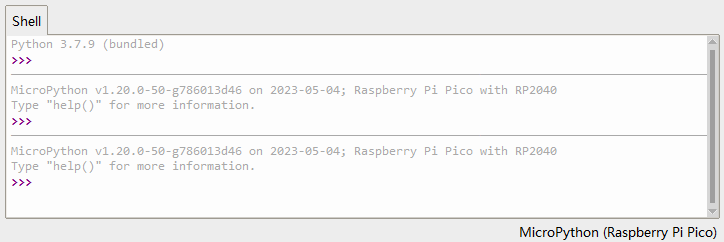
Demo
- Download the Demo.
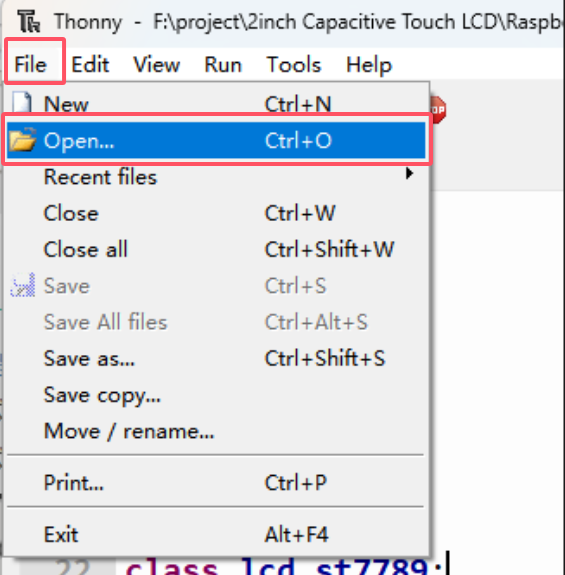
- Unzip the sample demo and open Thonny
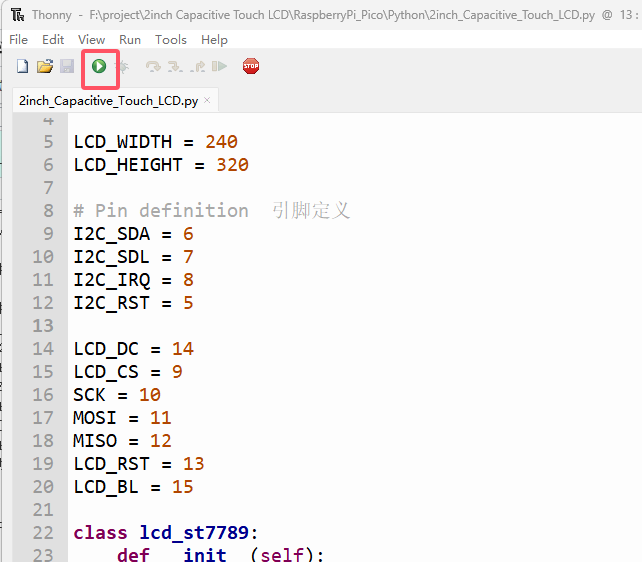
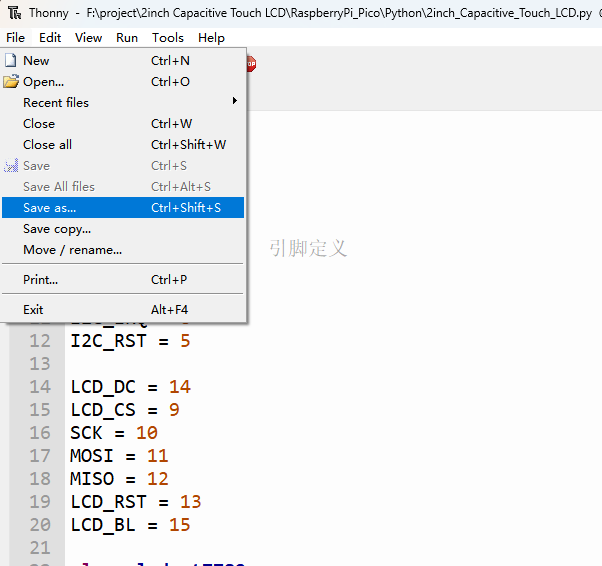
- Open the sample file, the path is: 2inch_Capacitive_Touch_LCD_Demo_Pico/Python/2inch_Capacitive_Touch_LCD.py
- Run the demo to achieve the drawing board function on the screen
- If you want to run the demo automatically at power-on, change the file name to main.py
Working with ESP32S3
Hardware Connection
- 15PIN connector
| LCD Pin | ESP32S3 |
| VCC | 3.3V |
| GND | GND |
| MISO | 42 |
| MOSI | 2 |
| SCLK | 4 |
| SD_CS | 38 |
| LCD_CS | 39 |
| LCD_DC | 41 |
| LCD_RST | 40 |
| LCD_BL | 6 |
| TP_SDA | 15 |
| TP_SCL | 7 |
| TP_INT | 17 |
| TP_RST | 16 |
Environment setup
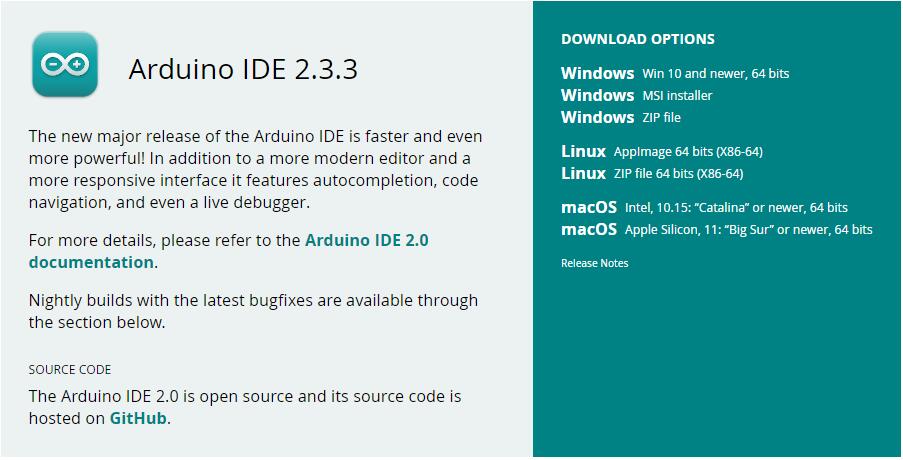
Download and install Arduino IDE
- Click to visit the Arduino official website, select the corresponding system and system bit to download.
- Run the installer and install all by default.
Install Arduino-ESP32
- To use ESP32-related motherboards in Arduino IDE, you must first install the Arduino-ESP32 Board library
- In some areas, it may not be able to Install online due to network factors, and Install offline is generally recommended
- To install the Arduino-ESP32 tutorial, please refer to Arduino board manager tutorial
- Development board offline package: Arduino-ESP32 (V3.0.2) Offline component package
Install libraries
- When installing Arduino libraries, there are usually two ways to choose from: Install online and Install offline.
For most libraries, users can easily search and install them through the online library manager of the Arduino software. However, some open-source libraries or custom libraries are not synchronized to the Arduino Library Manager, so they cannot be acquired through online searches. In this case, users can only manually install these libraries offline. - For library installation tutorial, please refer to Arduino library manager tutorial
| Library Name | Description | Library Installation Requirements |
|---|---|---|
| GFX_Library_for_Arduino | LCD driver library | Install Offline |
Run the First Arduino Demo
New Project
- Run the Arduino IDE and select
File->New Sketch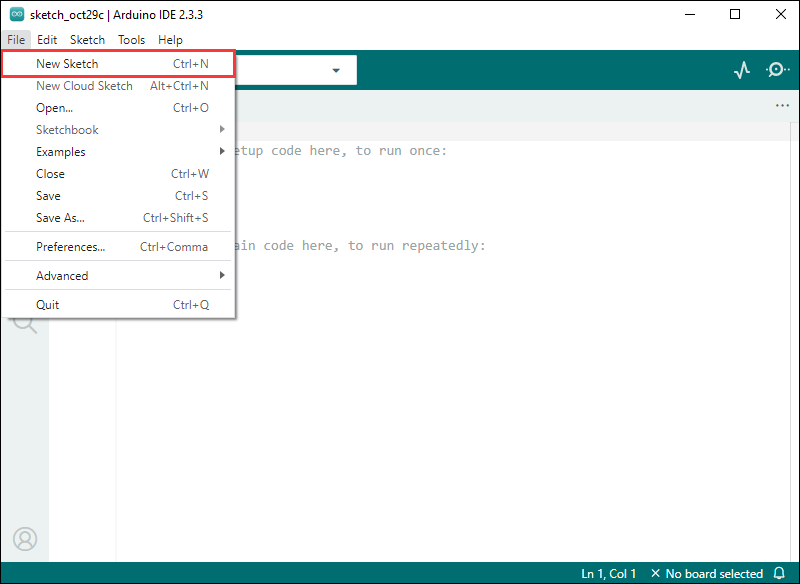
- Enter the code:
void setup() {
  // put your setup code here, to run once:
  Serial.begin(115200);
}

void loop() {
  // put your main code here, to run repeatedly:
  Serial.println("Hello, World!");
  delay(2000);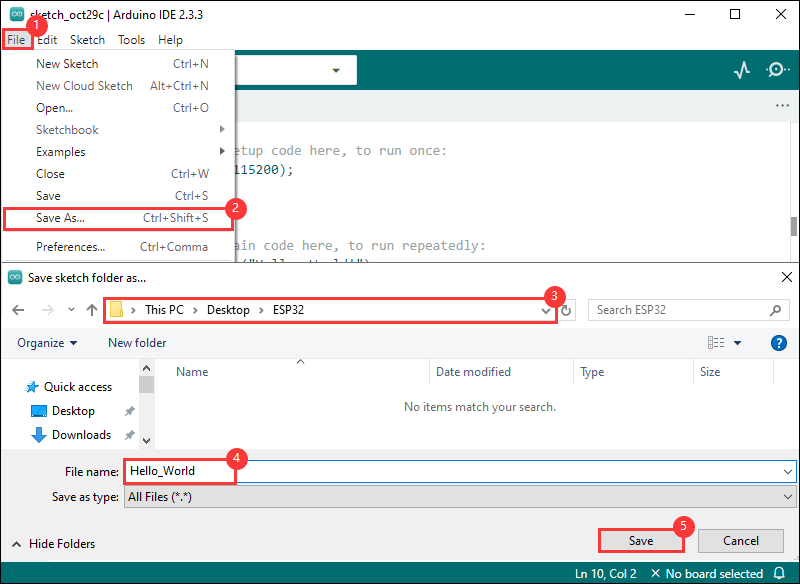
}- Save the project and select
File->Save As.... In the pop-up menu, select the path to save the project, and enter a project name, such as Hello_World, clickSave
Compile and Flash Demos
- Select the corresponding development board, take the ESP32S3 motherboard as an example:
①. Click to select the dropdown menu option Select Other Board and Port;
②. Search for the required development board model esp32s3 dev module and select;
③. Select COM Port;
④. Save the selection.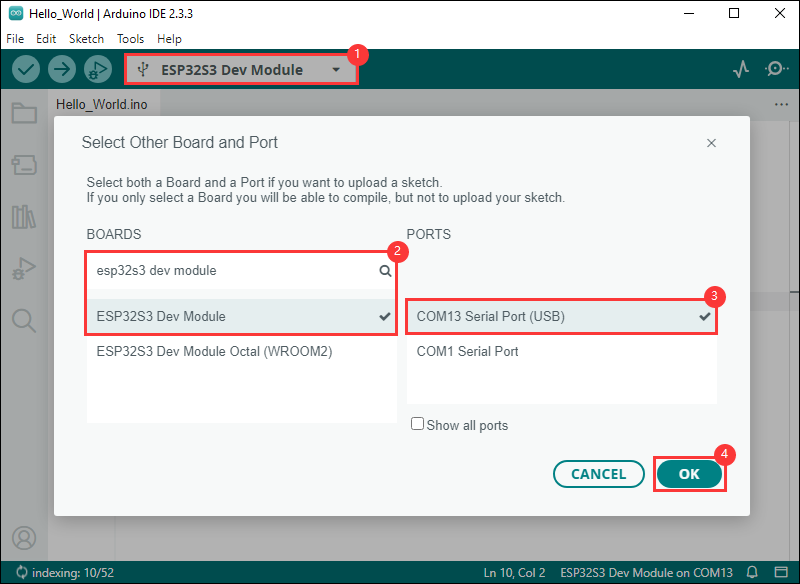
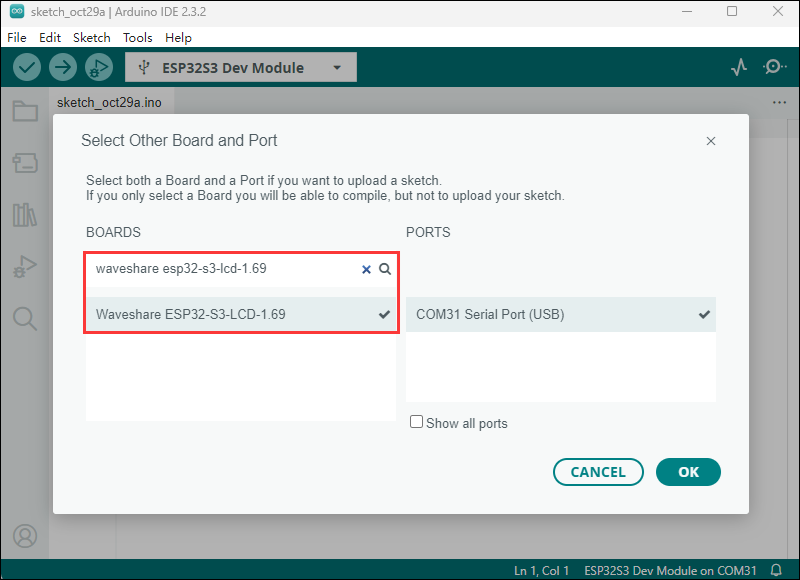
- Some development boards with specified version numbers support direct model selection, for example, "Waveshare ESP32-S3-LCD-1.69":
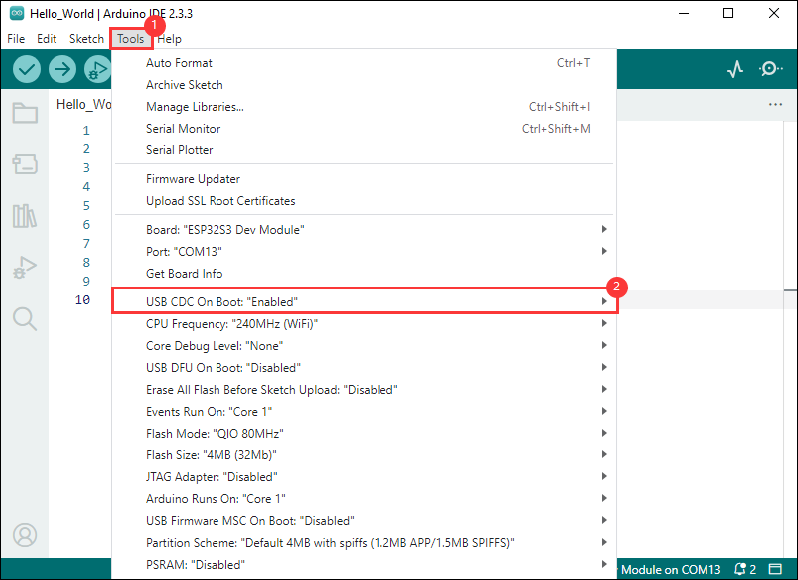
- If the ESP32S3 mainboard only has a USB port, you need to enable USB CDC, as shown in the following diagram:
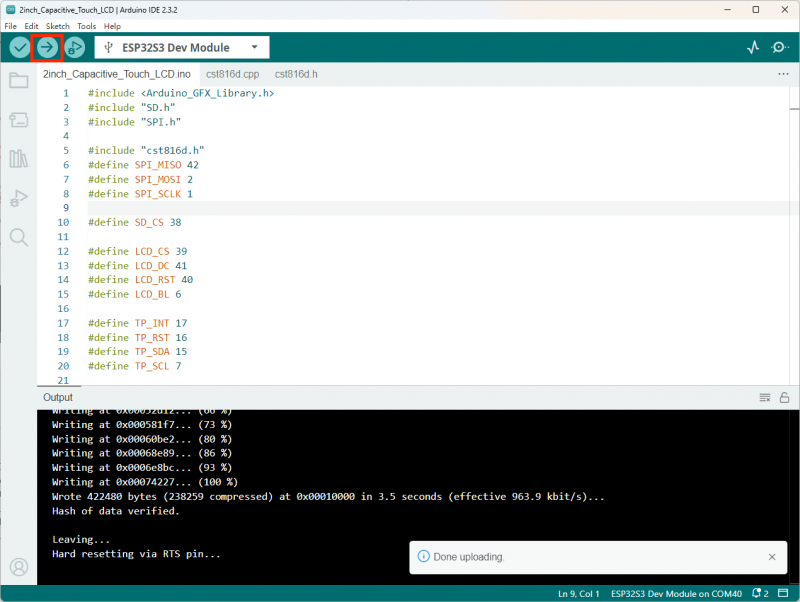
- Compile and upload the program:
①. Compile the program; ②. Compile and download the program; ③. Download successful.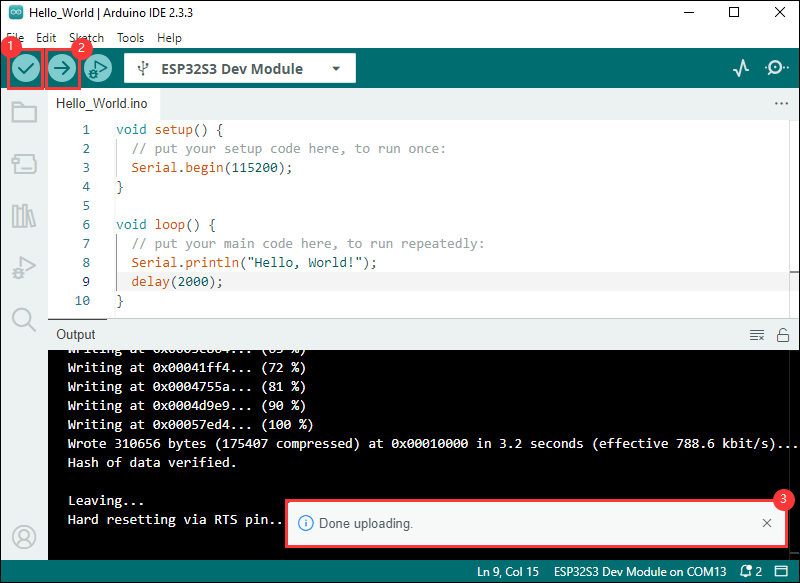
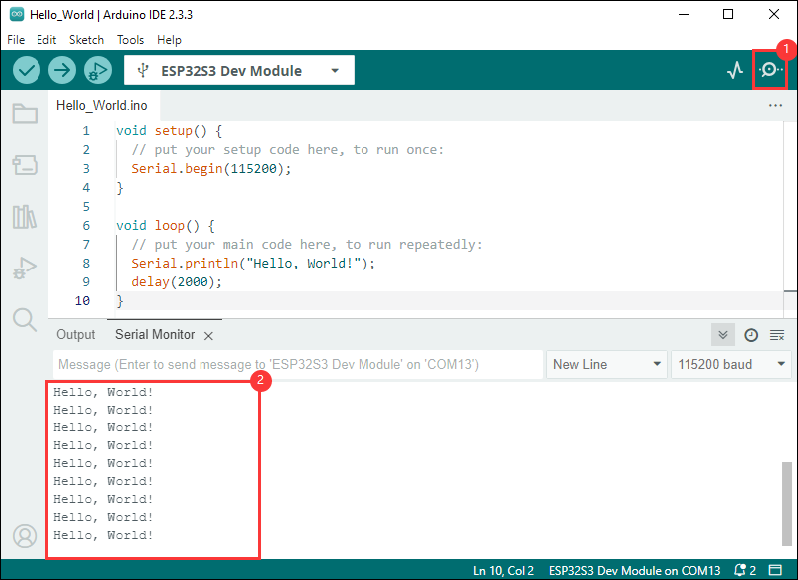
- Open the Serial Monitor window, and the demo will print "Hello World!" every 2 seconds, and the operation is as follows:
Demo
- Download the Demo and unzip it
- Open the demo 2inch_Capacitive_Touch_LCD_Demo_ESP32S3/2inch_Capacitive_Touch_LCD
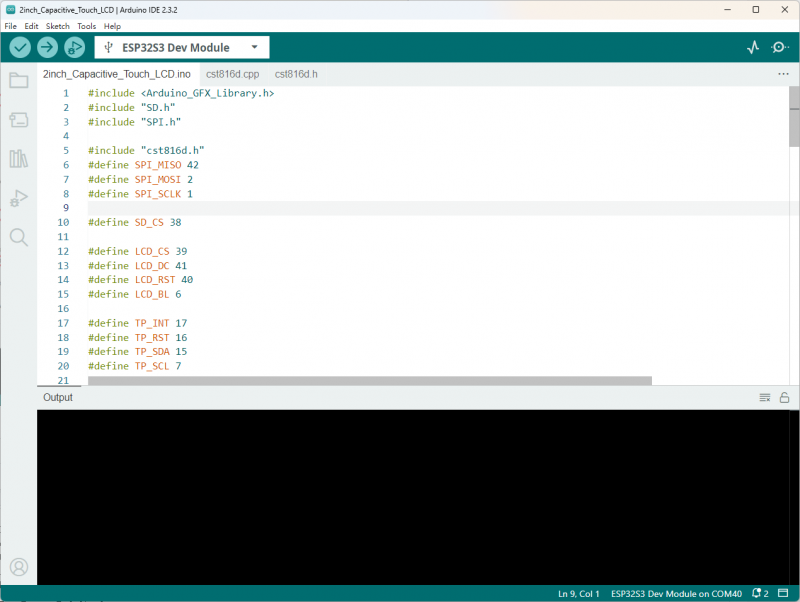
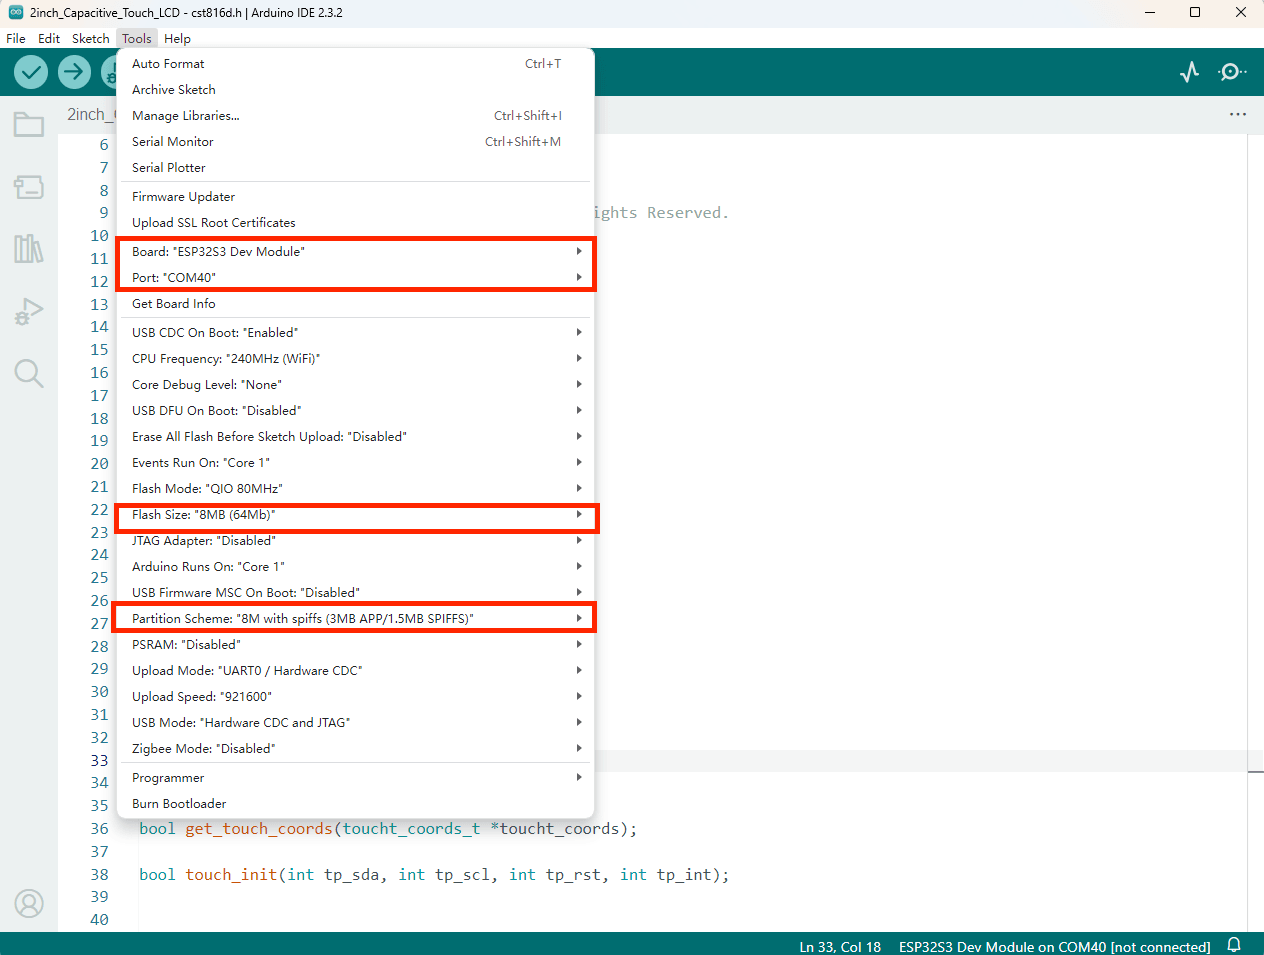
- Select the appropriate configuration based on the resources of your ESP32S3, compile and flash the demo
- Successfully flashed, and enter the drawing board function
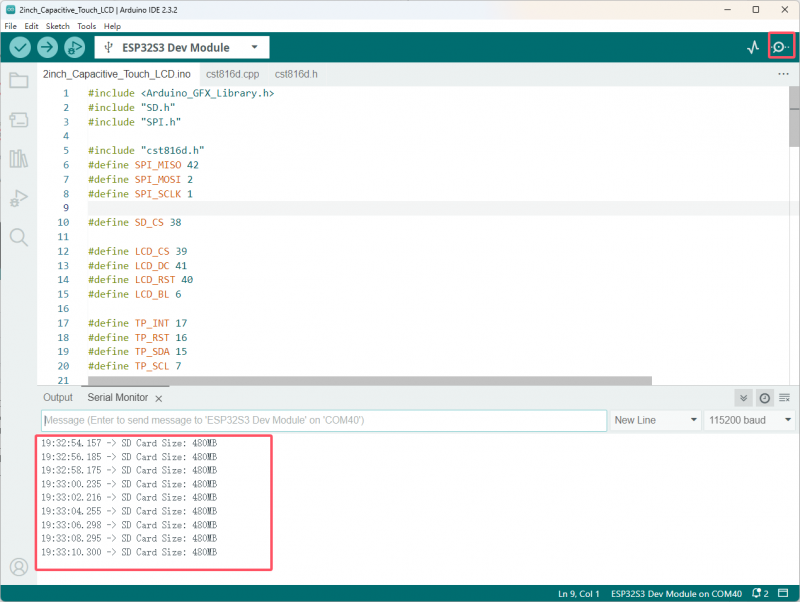
- Open Serial Monitor, you can see the printout of the TF card's capacity size
Working with Arduino UNO
Hardware connection
- 15PIN connector
| LCD Pin | Arduino |
| VCC | 5V |
| GND | GND |
| MISO | NC |
| MOSI | 11 |
| SCLK | 13 |
| LCD_CS | 10 |
| LCD_DC | 7 |
| LCD_RST | 8 |
| LCD_BL | 9 |
| TP_SDA | SDA |
| TP_SCL | SCL |
| TP_INT | 3 |
| TP_RST | 4 |
Install libraries
- When installing Arduino libraries, there are usually two ways to choose from: Install online and Install offline.
For most libraries, users can easily search and install them through the online library manager of the Arduino software. However, some open-source libraries or custom libraries are not synchronized to the Arduino Library Manager, so they cannot be acquired through online searches. In this case, users can only manually install these libraries offline. - For library installation tutorial, please refer to Arduino library manager tutorial
| Library Name | Description | Library Installation Requirements |
|---|---|---|
| GFX_Library_for_Arduino | LCD driver library | Install Offline |
Demos
- Download the Demo and unzip it
- Enter the sample demo file folder 2inch_Capacitive_Touch_LCD_Demo_Arduino/2inch_Capacitive_Touch_LCD , double click on 2inch_Capacitive_Touch_LCD.ino to open the demo
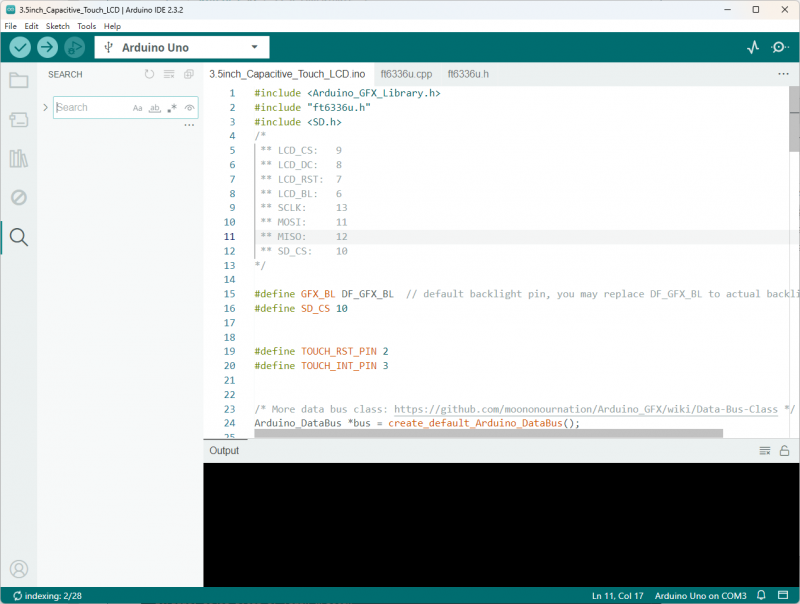
- Select the device and the port, compile and flash the demo
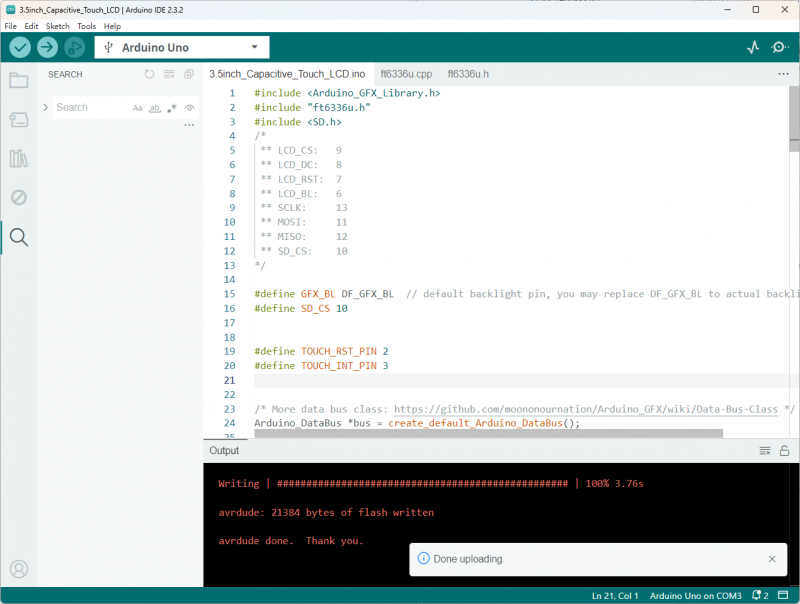
- Successfully flashed, and enter the drawing board function
Resources
Documents
Schematic Diagram
3D Model
PCBA 3D Model
Datasheet
Demos
FAQ
Question:Sample demo not working, communication failure?
Please check if the GPIO levels of the board are consistent with the product's supply voltage!
Support
Monday-Friday (9:30-6:30) Saturday (9:30-5:30)
Email: services01@spotpear.com