


- sales/support
Google Chat:---
- sales
+86-0755-88291180
- sales01
sales@spotpear.com
- sales02
dragon_manager@163.com
- support
tech-support@spotpear.com
- CEO-Complaints
zhoujie@spotpear.com
- Only Tech-Support
WhatsApp:13246739196
- Purchase/Shipping/Refund
WhatsApp:13424403025
Jetson Nano IMX219-160 IR-CUT Camera User Guide
Introduction
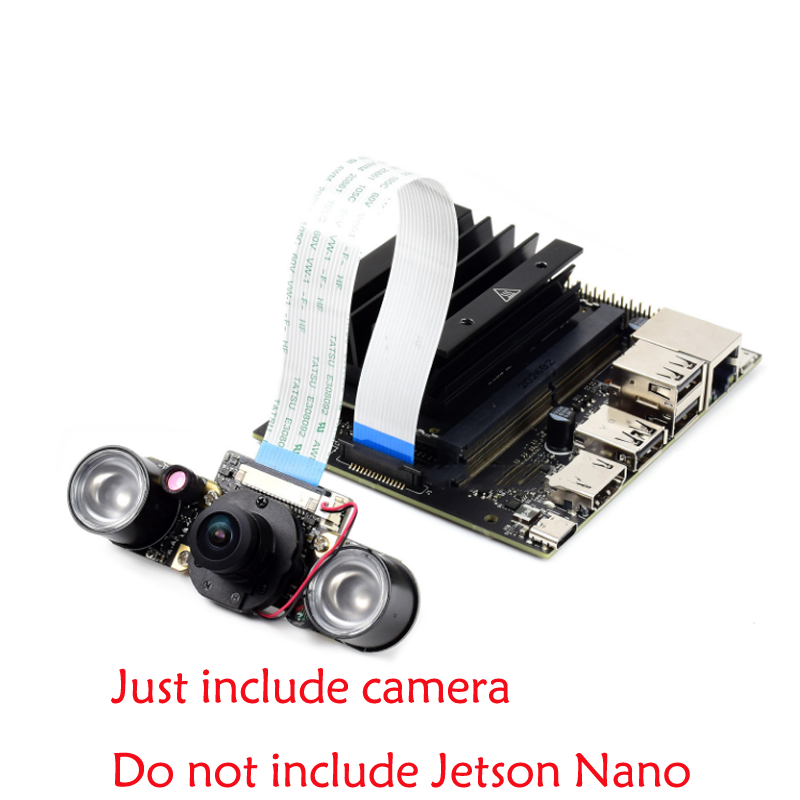
IMX219 Camera, 800 megapixels, and 160 FOV. have IR CUT Compatible with Jetson nano. You can also use it with CM3/CM3+ expansion boards like Raspberry Pi Compute Module IO board, Compute Module IO Board Plus, Compute Module POE Board of Waveshare, and the StereoPi board.
Test with Jetson Nano
Hardware connection
- Connect the camera to CSI interface of Jetson Nano.Set the metal side of FFC into Heat-sink
- Connect an HDMI LCD to Jetson Nano
Software setting
- Power on Jetson Nano and open the Terminal (Ctrl+ALT+T)
- Test camera with command:
DISPLAY=:0.0 gst-launch-1.0 nvarguscamerasrc ! 'video/x-raw(memory:NVMM), width=3280, height=2464, format=(string)NV12, framerate=(fraction)20/1' ! nvoverlaysink -e
- Test dual-camera
- IF you want to test dual cameras with B01 Developer Kit.You can just add sensor-id=x to the pipeline. x can be 0 or 1.
#test video0
DISPLAY=:0.0 gst-launch-1.0 nvarguscamerasrc sensor-id=0 ! 'video/x-raw(memory:NVMM), width=3280, height=2464, format=(string)NV12, framerate=(fraction)20/1' ! nvoverlaysink -e
#test video1
DISPLAY=:0.0 gst-launch-1.0 nvarguscamerasrc sensor-id=1 ! 'video/x-raw(memory:NVMM), width=3280, height=2464, format=(string)NV12, framerate=(fraction)20/1' ! nvoverlaysink -e
- If you find that the image captured is reddish. You can try to download .isp file and installed:
wget https://www.waveshare.com/w/upload/e/eb/Camera_overrides.tar.gz
tar zxvf Camera_overrides.tar.gz
sudo cp camera_overrides.isp /var/nvidia/nvcam/settings/
sudo chmod 664 /var/nvidia/nvcam/settings/camera_overrides.isp
sudo chown root:root /var/nvidia/nvcam/settings/camera_overrides.isp
Test with Compute Module
The IMX219 series can be used with Compute Module series of Raspberry Pi with carriers. And the usage are same as other Raspberry Pi cameras
Becuase of the encropytoin, the IMX219 series cameras cannot be used with Raspberry Pi board like the Raspberry Pi 4B, please note it.
- Connect the camera to Compute Module Carrier board (like Compute Module 4 PoE Board), please take care of the direction.
- Open a terminal and configure the camera
sudo raspi-config
- Select Interfacing Options -> Camera -> Yes
- Reboot
- Test the camera with command:
sudo raspistill -t 0
- For more information about commands for camera, please refer to this guides:Application guides of Raspberry Pi camera
Selection Guide
| Product | Pixels | Sensor | Dual Len | Infrared | Angle of View (Diagonal)(degree) | Afterture (F) | Focal Length (MM) | PCBA | Suit for |
|---|---|---|---|---|---|---|---|---|---|
| RPi Camera | 8 Mega | IMX219 | × | × | 62.2 | 2.0 | 3.04 | √ | Raspberry Pi, Jetson Nano |
| RPi NoIR Camera V2 | √ | 62.2 | 2.0 | 3.04 | √ | Raspberry Pi, Jetson Nano | |||
| IMX219-77 Camera | × | 77 | 2.0 | 2.96 | √ | Jetson Nano, CM3/3+ | |||
| IMX219-77IR | √ | 77 | 2.0 | 2.96 | √ | Jetson Nano, CM3/3+ | |||
| IMX219-120 Camera | × | 120 | 2.2 | 1.88 | √ | Jetson Nano, CM3/3+ | |||
| IMX219-160 Camera | × | 160 | 2.35 | 3.15 | √ | Jetson Nano, CM3/3+ | |||
| IMX219-160IR Camera | √ | 160 | 2.35 | 3.15 | √ | Jetson Nano, CM3/3+ | |||
| IMX219-160 IR-CUT Camera | √ | 160 | 2.7 | 3.62 | √ | Jetson Nano, CM3/3+ | |||
| IMX219-170 Camera | × | 170 | 2.0 | 0.87 | √ | Jetson Nano, CM3/3+ | |||
| IMX219-200 Camera | × | 200 | 2.0 | 3.15 | √ | Jetson Nano, CM3/3+ | |||
| IMX219-D160 | × | 160 | 2.35 | 3.15 | × | Raspberry Pi, Jetson Nano | |||
| IMX219-83 Stereo Camera | √ | × | 83 | NA | 2.6 | √ | Jetson Nano, CM3/3+ |
TAG:
Raspberry Pi Pico ST7789
NVIDIA Jetson TX2 NX Module
Raspberry Pi 12.3 inch HDMI LCD Captive TouchScreen Display 1920x720 For Jetson Series/Computer PC
ESP32-S3N8R8 7inch LCD Display TouchScreen 800×480 WiFi Bluetooth CAN RS485 Sensor
Milk V
LuckFox
Milk V
ESP32-P4-ETH RJ45 POE DSI/MIPI 10.1 inch LCD Display Touchscreen/CSI Camera/Audio Speaker AI Deepseek
Arduino 0.85inch LCD
spotpear
Raspberry Pi LCD
CAM-GC2083
Raspberry Pi 5 Heatsink
Bus Servo Adapter A
Raspberry Pi USB Camera 12MP IMX378 30fps onboard dual microphones Also For Jeston / RDK
Arduino MLX90641
ESP32-S3 MAX AI Camera 3.5inch LCD Dual MIC Development Board Display 320x480 3.5 inch TouchScreen Voice Interruption Object Recognition
Raspberry Pi 5 PCIe to M.2
Pan-Tilt Kit
USB to JTAG
TAG:
ESP32 1.9inch LCD
DeepSeek AI Voice Chat ESP32 S3 Development Board 1.8 inch AMOLED Display 368×448 1.8inch TouchScreen Programmable Watch
4.26inch
SpeedyBee Bee35 3.5 inch Frame RC FPV Drone
DeepSeek ESP32-S3 Voice Chat Robot
Raspberry Pi 5 PCIe to M.2 NVME and PCM5122 I2S DAC HIFI Expansion Board Driver-Free
RM500Q AE IoT EMBB 5G 4G 3G M.2 LTE-A/NSA SA GNSS DFOTA VoLTE Quectel
ESP32-S3 Relay 6-Channel IOT WiFi Bluetooth RS485 Pico Protection Circuits
ESP32-S3 RGB LCD N8R8 2.1 2.8 4inch Captive TouchScreen Display
ESP32 S3 N16R8 Development board 1.9 inch LCD Display 1.9inch TouchScreen 170×320 SD-Port RGB LED QMI8658 6-Axis ST7789 CST816
ESP32
Raspberry Pi AF Camera
ESP32-H2 BLE
Raspberry Pi 5 Aluminum Case
DeepSeek AI Voice Chat Robot BOX ESP32-S3 Development Board 1.28 inch Round LCD 1.28inch TouchScreen N16R8
ESP32-S3 1.28
Raspberry Pi 5 PD Trigger
ESP32 S3
Raspberry Pi 18.5 inch TypeC Monitor DisplayScreen Computer PC 1920x1080
ADXL354C Sensor