- sales/support
Google Chat:---
- sales
+86-0755-88291180
- sales01
sales@spotpear.com
- sales02
dragon_manager@163.com
- support
tech-support@spotpear.com
- CEO-Complaints
zhoujie@spotpear.com
- Only Tech-Support
WhatsApp:13246739196
- Purchase/Shipping/Refund
WhatsApp:13424403025
- HOME
- >
- ARTICLES
- >
- Jetson Series
- >
- Jetson Kits
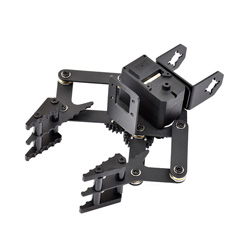
Gripper-A User Guide
Overview
Introduction
This product is a robot gripper based on the ST3215 Servo serial bus servo, with parts made of stainless steel and aluminum alloy, offering both lightness and durability, providing you with a more stable gripping experience.
The ST3215 Servo serial bus servo uses a high-precision magnetic encoder with 360° accuracy and can perform angle control within a 360° range (Note that due to the structural limitations of this product, the actual control cannot achieve a wide range of 360°). This servo can be controlled by a program and has built-in acceleration start and stop functions to make the movements smoother. Each servo has two interfaces, allowing the gripper to be connected in series with other TTL devices, and each servo can obtain information about the current angle, load, voltage, and mode, etc.
At the same time, the isolation column of the product clamp is flexible and adjustable, which can easily adapt to clamping objects of different sizes. Moreover, the gripper structure also reserves space for installing camera accessories, which can be used for secondary development by users to open visual applications.
Features
- Can be used in series to control up to 253 servos simultaneously (provided there is sufficient power supply) and obtain feedback from each servo
- 360° magnetic encoder, with a larger angle control range
- High precision, angle control accuracy up to 360°/4096
- Any angle can be set to the servo middle position
- Acceleration start-stop function, smoother motion effects
- Compact structure design, more beautiful product appearance
- Wide voltage input of 6-12.6V, can be directly powered by 2s or 3s lithium batteries
- High torque, stall torque can reach 30kg.cm@12V
Specifications
| Gripper-A gripper | |||
|---|---|---|---|
| Servo | ST3215 Servo | Stall torque | 30KG.CM |
| Baud rate | 1Mbps | No-load speed | 0.222sec/60° (45RPM)@12V |
| Position sensor resolution | 360°/4096 | ID range | 0-253 |
| Stall current | 2.7A | No-load current | 180mA |
| Operating Voltage | 9~12.6V | Weight | 232.4±5g |
| Clamping width | 0~80mm | Size | 130*160*62 (mm) |
Precautions
1. Confirm whether the operating voltage is within the specified voltage range as listed in Specifications before use.
2. Please ensure that the connections are correct and secure before use to avoid poor contact.
3. The demo we provide includes software limit settings. If you are developing it yourself, you need to pay attention to the rotation angle set for the servo to avoid conflicts between software settings and structural limitations that may cause the servo to stall and burn out.
Servo Interface and Wiring Description
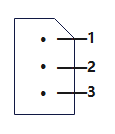
- Interface type: 5264-3P
- The matching servo cable is opposite-direction interface. If you purchase other 5264-3P interface cables yourself, be careful not to connect them in the same direction to the servo, otherwise the pins will be connected incorrectly and there is a possibility of burning out the driver board.
| No. | Name | Color | Type | Description |
|---|---|---|---|---|
| 1 | Signal/TTL | White | Signal cable | Single-wire serial Port |
| 2 | VCC | Red | Power Positive | - |
| 3 | GND | Black | Power Negative | - |
Installation Guide
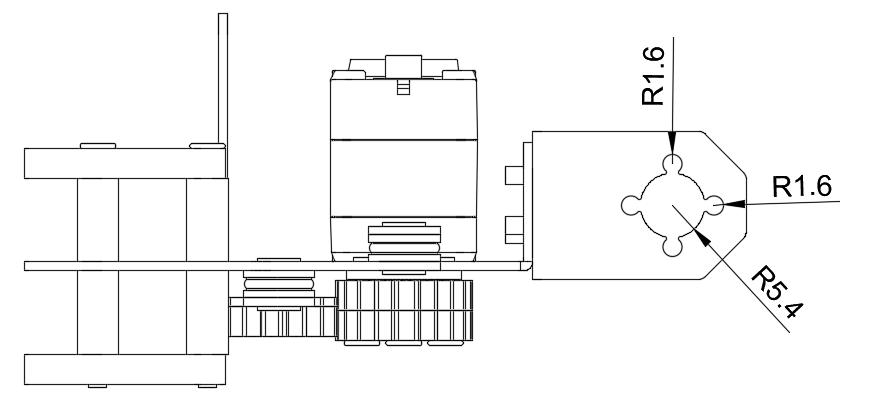
- There are mounting holes reserved for installation to other servos of the same size, the mounting holes are R1.6mm round, and can be installed with our matching silver metal flat head screws CM3*6*7.
Product Use
Demo
We provide a simple serial port debugging routine, which is based on the serial port of the ESP32 driver board. We recommend the following driver board for matching: Bus Servo Driver HAT (A); Of course, if you already have General Driver for Robots or Servo Driver with ESP32 in hand, you can also use them.
Hardware Connection
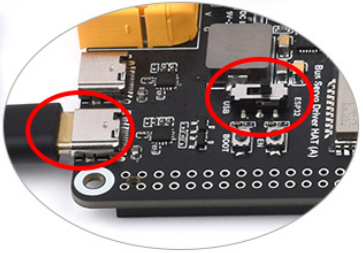
Connect the gripper via the servo cable to the 5264-3P interface on the driver board, ensure that the switch position on the driver board is set to the ESP32 position, connect the driver board to the PC computer using a USB cable, and power the driver board (see the figure below).
Software Flashing
Before testing, we need to flash the program for our driver board. The steps are as follows:
1. Click ESP32 download tool to download, unzip it after downloading, and double-click to open the "flash_download_tool_3.9.5.exe" program. After opening, two windows will pop up, we need to operate the UI interface of the download tool, and the other window will act as a terminal to show the working status of the download tool.
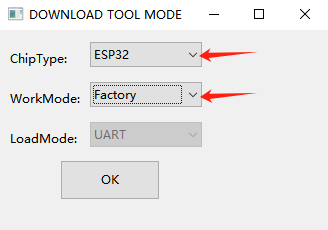
2. On the "DOWNLOAD TOOL MODE" screen, select ESP32 for Chip Type and Factory for WorkMode. (With Factory, the relative path will only be used when calling the binary, so the user does not need to manually enter the binary path, click OK after selection.)
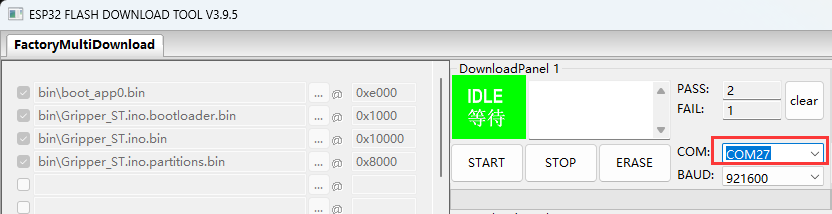
3. Enter the download tool software interface, the right side represents the ability to upload programs to 8 drive boards simultaneously. Move the switch on the Bus Servo Driver HAT (A) driver board to the ESP32 position, connect the ESP32-USB interface on the Bus Servo Driver HAT (A) driver board to the computer with a USB cable, click on "COM", and select the newly appearing COM (the new COM here is COM27); BAUD is used to set download speed, the higher the speed, the faster. ESP32 can use up to 921600.
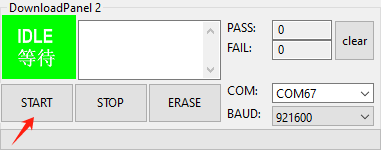
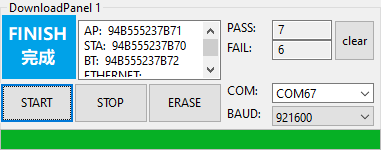
4. After selection, click "START" to start uploading the program. Once the upload is complete, "IDLE WAIT" will change to "FINISH COMPLETE". After completion, you can disconnect the USB connection between the driver board and the computer, connect the Gripper-A gripper, and follow the instructions below to control it.
Serial Port Debugging Assistant
Here introduces the use of a simple serial port debugging assistant to control the gripper:
- Download Serial port debugging assistant
- Ensure that the above program has been flashed into the driver board and that the gripper, driver board, and PC are all connected properly
- Double-click to open the cktszsss32.exe, select the USB port number, open the serial port, baud rate 115200, edit the JSON command, you need to manually add a newline character \n after the JSON instruction, or you can choose not to add "\n" and check "Add Enter"
- See below for the functional meaning of JSON commands in the demo
JSON Command Table
- {"T":121,"angle":90,"spd":100,"acc":10} —— Angle control command
- angle: The angle control range is 90°~180°;
- spd: The speed of rotation, the speed unit is steps/second. One revolution of the servo is 4096 steps, the higher the value, the faster the speed. When the speed value is 0, rotate at the maximum speed;
- acc: Acceleration at the beginning and end of the rotation. The lower the value, the smoother the start and stop. The value can be 0-254, the unit is 100 steps/sec^2. If set to 10, the speed will change according to a square acceleration of 1000 steps per second. When the acceleration value is 0, then run at the maximum acceleration.
- {"T":210,"cmd":0} —— Torque lock control command
- cmd:0 —— Disable torque lock; 1 —— Enable torque lock.
- {"T":105} —— Servo information feedback command
- {"T":112,"mode":0,"g":1000}—— Dynamic external force adaptive control command
- mode: The code for the dynamic external force adaptive switch mode.
- 0: It means that the function is disabled, and the joint cannot be manually rotated when the robotic arm is connected to the power after it is turned off.
- 1: It means that the function is enabled, and after it is enabled, using external force to rotate the robotic arm will rebound to the position before rotation.
- g: The maximum output torque limit of the gripper.
- mode: The code for the dynamic external force adaptive switch mode.
- {"T":101,"spd":100,"acc":10} —— Gripper opening command (default to the maximum clamping angle)
- spd: The speed of rotation, the speed unit is steps/second. One revolution of the servo is 4096 steps, the higher the value, the faster the speed. When the speed value is 0, rotate at the maximum speed;
- acc: Acceleration at the beginning and end of the rotation. The lower the value, the smoother the start and stop. The value can be 0-254, the unit is 100 steps/sec^2. If set to 10, the speed will change according to a square acceleration of 1000 steps per second. When the acceleration value is 0, then run at the maximum acceleration.
- {"T":102,"spd":100,"acc":10} —— Gripper clamping command (default clamping)
- spd: The speed of rotation, the speed unit is steps/second. One revolution of the servo is 4096 steps, the higher the value, the faster the speed. When the speed value is 0, rotate at the maximum speed;
- acc: Acceleration at the beginning and end of the rotation. The lower the value, the smoother the start and stop. The value can be 0-254, the unit is 100 steps/sec^2. If set to 10, the speed will change according to a square acceleration of 1000 steps per second. When the acceleration value is 0, then run at the maximum acceleration.
Resources
3D Model
Open Source Demo
Serial port debugging assistant
Support
Monday-Friday (9:30-6:30) Saturday (9:30-5:30)
Mobile: +86 13434470212
Email: services01@spotpear.com