- sales/support
Google Chat:---
- sales
+86-0755-88291180
- sales01
sales@spotpear.com
- sales02
dragon_manager@163.com
- support
tech-support@spotpear.com
- CEO-Complaints
zhoujie@spotpear.com
- Only Tech-Support
WhatsApp:13246739196
- Purchase/Shipping/Refund
WhatsApp:13424403025
Raspberry Pi 4inch DPI LCD (B) User Guide
Introduction
480x800, 4inch IPS Display for Raspberry Pi, DPI interface, 5-points capacitive touch control.
Features
- 4inch IPS Display, 480×800 hardware resolution.
- Designed for Raspberry Pi, based on Raspberry Pi 40pin GPIO interface.
- Using DPI666 interface of Raspberry Pi to drive LCD, refresh rate up to 60Hz.
- Drive capacitive touch through I2C interface of Raspberry Pi, 5-points touch, toughened glass panel, hardness up to 6H.
- Supports Raspbian and Kali systems.
- With high-fidelity speakers and 3.5mm audio output. (Note: Pi4B doesn’t support audio output temporarily)
- Two spin buttons, for backlight brightness and volume adjustment.
How to use
This LCD can support Raspbian and Kali systems.
Please download the latest version of the image on the https://www.raspberrypi.org/downloads/
1) Download the compressed file to the PC, and unzip it to get the .img file.
2) Connect the TF card to the PC, use SDFormatter.exe software to format the TF card.
3) Open the Win32DiskImager.exe software, select the system image downloaded in step 1, and click‘Write’ to write the system image.
4) After the image has finished writing, open the config.txt file in the root directory of the TF card(/boot/), add the following code at the end of config.txt, then save and quit the TF card safely.
gpio=0-9=a2
gpio=12-17=a2
gpio=20-25-=a2
dtoverlay=dpi24
enable_dpi_lcd=1
display_default_lcd=1
extra_transpose_buffer=2
dpi_group=2
dpi_mode=87
dpi_output_format=0x7f216
dpi_timings=480 0 40 48 128 800 0 13 3 15 0 0 0 60 0 52000000 6
dtoverlay=waveshare-4dpib-3b-4b
dtoverlay=waveshare-4dpib-3b
dtoverlay=waveshare-4dpib-4b
Note: For Raspberry Pi 4, you need to comment out dtoverlay=vc4-fkms-V3D.
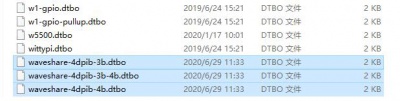
5)Download the File:4DPIB DTBO.zip and extract 3 dtbo files. Copy these three files to the overlays directory (/boot/overlays/), as shown in the following figure:
6) Save and quit the TF card safely, and insert the TF card into the Raspberry Pi.
7) Insert the 4inch DPI LCD (B) into the 40PIN GPIO interface of the Raspberry Pi, power on the Raspberry Pi, and wait for about ten seconds to display normally.
Rotation(Working with Raspberry Pi)
Display Rotating
Add this statement in the config.txt file (the config file is located in the root directory of the TF card, which is named /boot):
display_rotate=1 #1:90;2: 180; 3: 270
And then restart the Raspberry Pi after saving.
sudo reboot
Touch Rotating
After the display is rotated, the position of touch is incorrect because the touch doesn’t change with the display angle. So the touch also needs to be modified.
1.Install libinput.
sudo apt-get install xserver-xorg-input-libinput
If the system you installed is Ubuntu or Jetson Nano. The installation code is:
sudo apt install xserver-xorg-input-synaptics
2.Create the xorg.conf.d directory under /etc/X11/ (if the directory already exists, proceed directly to step 3).
sudo mkdir /etc/X11/xorg.conf.d
3.Copy the 40-libinput-conf file to the directory you created just now.
sudo cp /usr/share/X11/xorg.conf.d/40-libinput.conf /etc/X11/xorg.conf.d/
4.Edit this file.
sudo nano /etc/X11/xorg.conf.d/40-libinput.conf
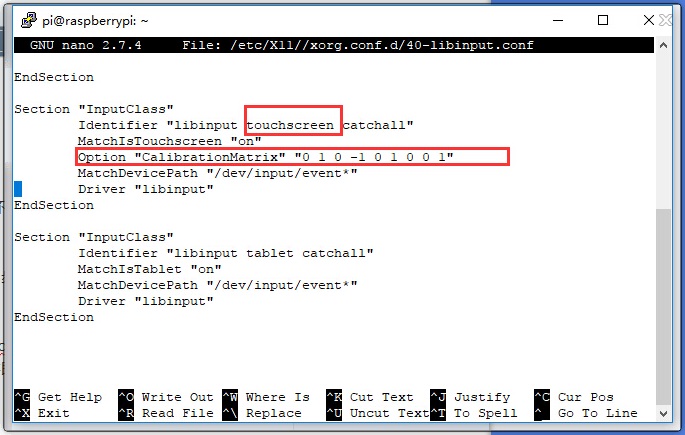
Find the part of the touchscreen, add the following statement inside, and then save the file.
Option "CalibrationMatrix" "0 1 0 -1 0 1 0 0 1"
Similar to the picture below:
5. save and reboot your Pi
sudo reboot
After completing these steps. The LCD could rotate 90 degrees both display and touch function.
Note:
90 degree: Option "CalibrationMatrix" "0 1 0 -1 0 1 0 0 1"
180 degree: Option "CalibrationMatrix" "-1 0 1 0 -1 1 0 0 1"
270 degree: Option "CalibrationMatrix" "0 -1 1 1 0 0 0 0 1"
Audio output
1. Modify /boot/config.txt
- If you are using pi4 or later, add the following code at the end of config.txt:
- dtoverlay=audremap,pins_18_19
- If you are using pi3b + or earlier, add the following code at the end of config.txt:
- gpio=18=a5
- dtoverlay=pwm
- Modify /etc/rc.local and add the following code before exit 0 of rc.local:
- sudo raspi-gpio set 18 a5
- After restart, it can output sound normally. Test audio can be installed and used by using Mplayer tool and running the following code:
- apt-get install mplayer
- mplayer xxx.mp3
Note: If there is no sound, you can try the following two solutions:
1. Turn the Volume adjustment knob.
2. Check whether the audio output is normal,please run the following code:
- sudo raspi-config
Choose Advanced Options -> Audio -> 1 Force 3.5mm ('headphone') jack
Knob introduction
- Backlight: Adjust the screen brightness.
- Volume: Adjust the speaker volume.
Others
Disable power saving.
If you want to keep the display turning on all the time, you can disable the power saving function.
Modify file lightdm.conf
sudo nano /etc/lightdm/lightdm.conf
Find the [SeatDefaults] option and uncomment the line"xserver-command", modify it as below:
#xserver-command=X
Modify this code to
xserver-command=X -s 0 -dpms
- -s # –Disable the display protecting.
- dpms Disable power saving.
Reboot
sudo reboot
Turn on/off HDMI output
You can use the following commands to disable/enable the displaying.
vcgencmd display_power 0
vcgencmd display_power 1