- sales/support
Google Chat:---
- sales
+86-0755-88291180
- sales01
sales@spotpear.com
- sales02
dragon_manager@163.com
- support
tech-support@spotpear.com
- CEO-Complaints
zhoujie@spotpear.com
- sales/support
WhatsApp:13246739196
Raspberry Pi DVK512 User Guide
Introduction
Raspberry Pi Expansion/Evaluation Board, features various interfaces
Basic operations
System image file programming
Download newest Rapsbian image from Raspberry Pi web site.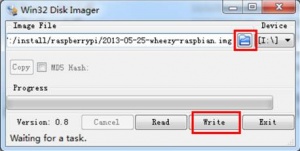
Programming the system image file with Win32DiskImager.exe
Format your TF card with the SDFormatter.exe.
- Notices: The capability of TF card in used here should be more than 4GB. In this operation, a TF card reader is also required, which has to be purchased separately.
Start the Win32DiskImager.exe, and select the system image file copied into your PC, then, click the button Write to program the system image file.
Serial debugging environment deploying
Connect your PC to the UART TO USB interface on DVK512 via a mini USB cable;
- Notices: The USB part of the UART TO USB interface applied by DVK512 is a mini USB interface, while the one on Raspberry Pi board is a micro USB interface. Please take a note.
Install the cp2102_driver;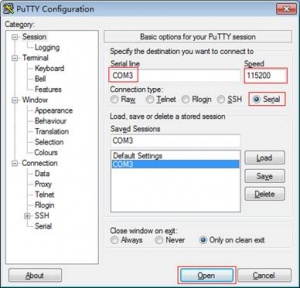
PuTTY settings
Start the software PuTTY.exe, and configure the following parameters:
- Serial line: it is used to select corresponding serial port. The serial port in used can be check by Device Manager.
- Speed: it is used to set the Baud rate: 115200.
- Connection type: this option should be set to Serial.
- And then, click the button Open.
After the system is started up, you should input following information: User name: pi and Password: raspberry. Then, you can enter the serial terminal to communicate with the Raspberry Pi.
- Notices: In this document, the software PuTTY is always used to control the Raspberry Pi via serial port communication, unless otherwise specified. When a serial port is used for Raspberry Pi terminal debugging, it cannot service as a common serial port any more, since it is occupied by system debugging function.
DVK512 and expansion function Demos
Before performing any operations described in this section, you should connect DVK512 to RPi with onboard pin headers, unless otherwise specified.
Installing the libraries required
Before using the DVK512 programs, you shall install the the bcm2835, wiringPi and python libraries to the RPi to add the additional APIs, and configure the settings to start up the core drivers of I2C, SPI and UART after the libraries installed. For more detailed information about the installation and configuration of the RPI library functions, please refer to Libraries Installation for RPi. Of course, we have provided a system image file with the libraries installed as well. In case that you don’t want to reinstall the libraries, you can program this ready-to-use system image file to your Raspberry Pi board. You can find the API source code in the directory /home/pi/DVK512 only if using the ready-to-use system image. Note: Each demo should be run under the corresponding directory, e.g. to use the bcm2835 demo of the LED, execute the command:
pi@raspberrypi ~/DVK512/LED/bcm2835 $ sudo ./led
This means that, you should first enter the path ~/DVK512/LED/bcm2835 than execute the command sudo ./led (./led is a compiled executable file).
The sudo means that the command is executed by a super user. The sudo is not required If you log in as a root user, e.g.
root@raspberrypi:/home/pi/DVK512/LED/bcm2835# ./led
Unless otherwise specified, the following demos are pre-compiled to executable files which can be run directly. If you intend to compile the C program of bcm2835, wiringPi, sysfs, etc. then please enter the demo directory and execute the command make to compile the program while the command make clean to remove the executable files. For example:
pi@raspberrypi ~/DVK512/LED/bcm2835 $ make clean
rm led
pi@raspberrypi ~/DVK512/LED/bcm2835 $ make
gcc -Wall led.c -o led -lbcm2835
Python program can be run directly without compilations, e.g.
pi@raspberrypi ~/DVK512/LED/python $ sudo python led.py
LED Demo
bcm2835 program:
- Enter the Linux terminal, and run the following commands:
pi@raspberrypi ~/DVK512/LED/bcm2835 $ sudo ./led
- The 4 LEDs will light up one by one.
- Press the keys Ctrl+C to end the demo.
wiringPi program:
- Enter the Linux terminal, and run the following commands:
pi@raspberrypi ~/DVK512/LED/wiringPi $ sudo ./led
- The 4 LEDs will light up one by one.
- Press the keys Ctrl+C to end the program.
Python program:
- Enter the Linux terminal, and run the following commands:
pi@raspberrypi ~/DVK512/LED/python $ sudo python led.py
- The 4 LEDs will light up one by one.
- Press the keys Ctrl+C to end the program.
shell program:
- Turn on LED0 by this command:
pi@raspberrypi ~/DVK512/LED/shell $ sudo ./LED.sh 26 1
- Turn off LED0 by this command:
pi@raspberrypi ~/DVK512/LED/shell $ sudo ./LED.sh 26 0
Key Demo
bcm2835 program:
- Enter the Linux terminal, and run the following commands:
pi@raspberrypi ~/DVK512/KEY/bcm2835 $ sudo ./key
- The terminal will show whether there is key-press.
- Press the keys Ctrl+C to end the program.
wiringPi program:
- Enter the Linux terminal, and run the following commands:
pi@raspberrypi ~/DVK512/KEY/bcm2835 $ sudo ./key
- The terminal will show whether there is key-press.
- Press the keys Ctrl+C to end the program.
Python program:
- Enter the Linux terminal, and run the following commands:
pi@raspberrypi ~/DVK512/KEY/bcm2835 $ sudo ./key
- The terminal will show whether there is key-press.
- Press the keys Ctrl+C to end the program.
8-channel Logic Level Convertor Demo
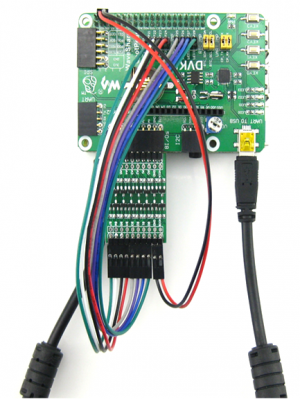
The connection between Logic Level Converter and DVK512
Connect the 8-channel Logic Level Converter to the onboard 8I/Os interface. (Notices: The VCCA pin header on the Logic Level Converter should be connected to the 3V3 pin header of the 8I/Os connector on DVK512). Pin relationships between Logic Level Converter and DVK512:
Logic Level Converter DVK512 VCCB 5V GND GND B0 LED0 B1 LED2 B3 LED3 B4 KEY0 B5 KEY1 B6 KEY2 B7 DEY3
Enter the terminal, and execute corresponding commands:
bcm2835 program:
pi@raspberrypi ~/DVK512/Logic-Converter/bcm2835 $ sudo ./Logic_Converter
wringPi program:
pi@raspberrypi ~/DVK512/Logic-Converter/wiringPi $ sudo ./Logic_Converter
python program:
pi@raspberrypi ~/DVK512/Logic-Converter/python $ sudo python Logic_Converter.py
- Press the KEY0-KEY3 on the DVK512, and the relative LED will light up.
- Press the keys Ctrl+C to end the demo.
Joystick Demo
Connect the Mix Board to the 8I/Os interface. Enter the terminal, and execute corresponding commands:
bcm2835 program:
pi@raspberrypi ~/DVK512/JOYSTICK/bcm2835 $ sudo ./joystick
wringPi program:
pi@raspberrypi ~/DVK512/JOYSTICK/wiringPi $ sudo ./joystick
python program:
pi@raspberrypi ~/DVK512/JOYSTICK/python $ sudo python joystick.py
Press or move the joystick, the terminal will show the action.
Buzzer and PWM
Connect the Mix Board to the 8I/Os interface. Enter the terminal, and execute corresponding commands:
wringPi program:
pi@raspberrypi ~/DVK512/Buzzer_PWM/wiringPi $ sudo ./Buzzer
python program:
pi@raspberrypi ~/DVK512/Buzzer_PWM/python $ sudo python buzzer.py
The buzzer on the Mix Board will buzz in 4 seconds.
Press the keys Ctrl+C to end the program.
DS18B20 Demo
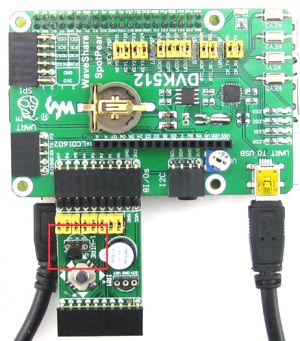
Inserting the DS18B20 to the ON-WIRE interface on Mix Board
Connect the Mix Board to the 8I/Os interface.
Insert the DS18B20 to the ON-WIRE interface on Mix Board.

Enter the terminal, and execute corresponding commands:
sysfs program:
pi@raspberrypi ~/DVK512/DS18B20/fs $ sudo ./ds18b20
python program:
pi@raspberrypi ~/DVK512/DS18B20/python $ sudo python ds18b20.py
The terminal will display the current temperature information.

Infrared remote control
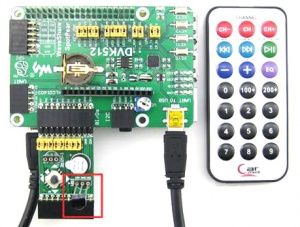
Connecting the infrared receiver to the IRM interface on Mix Board
Connect the Mix Board to the 8I/Os interface.
Connect the infrared receiver to the IRM interface on Mix Board.
Notices: The infrared receiver should be placed according to the shape of the icon shown on the IRM interface of Mix Board.

Terminal displays the key pressed on the infrared remote controller
Enter the terminal, and execute corresponding commands:
bcm2835 program:
pi@raspberrypi ~/DVK512/IRM/bcm2835 $ sudo ./irm
wiringPi program:
pi@raspberrypi ~/DVK512/IRM/wiringPi $ sudo ./irm
python program:
pi@raspberrypi ~/DVK512/IRM/python $ sudo python irm.py
Press any key on the infrared remote controller provided by Waveshare. The terminal will display the decoded infrared signal in hexadecimal format.
Press the keys Ctrl+C to end the demo.

Terminal displays the key pressed on the infrared remote controller
LCD1602 (Purchased Separately) Demo
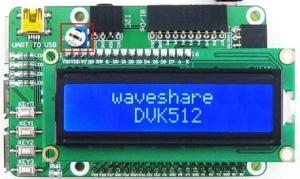
Inserting the LCD1602 into the LCD1602 interface on DVK512
Insert the LCD1602 into the LCD1602 interface on DVK512.
Enter the Linux terminal, and run the following commands:
pi@raspberrypi ~/DVK512/LCD1602 $ sudo ./lcd1602
LCD1602 will display relative information. If there is nothing shown, please adjust the potentiometer on the LCD1602. The red box in Figure 11 shows the position of the potentiometer.
PCF8563 RTC Demo
Set the jumpers on DVK512:
- Connect RTC_SDA to SDA
- Connect RTC_SCL to SCL
Install i2c-tools. If you have not installed i2c-tools yet, please enter the terminal, and input: root@ raspberrypi:/# apt-get install i2c-tools
Enter the Linux terminal, and run the following commands:
root@ raspberrypi:/# i2cdetect –y 1
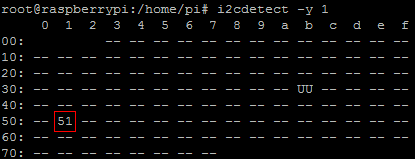
PCF8563 is detected by Raspberry Pi
Then, you will see the device address of PCF8563 connected to Raspberry Pi module. Here, the device address of PCF8563 is 51, indicating that the PCF8563 is detected by Raspberry Pi.
Enter the terminal, and execute corresponding commands:
bcm2835 program:
pi@raspberrypi ~/DVK512/PCF8563/bcm2835 $ sudo ./pcf8563
wiringPi program:
pi@raspberrypi ~/DVK512/PCF8563/wiringPi $ sudo ./pcf8563
python program:
pi@raspberrypi ~/DVK512/PCF8563/python $ sudo ./pcf8563.py
Time of PCF8563 will be shown on the terminal.
PCF8591 AD Demo
Connect the PCF8591 module to the I2C interface on DVK512.
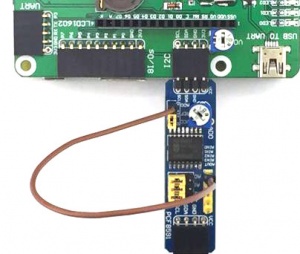
Connecting the pins AIN0 and AD0 together
Connect the pins AIN0 and AD0 on the PCF8591 together via a cable.
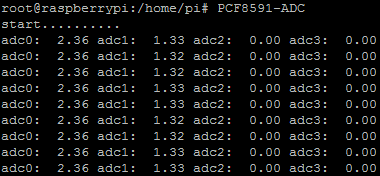
Displaying the AD values read from ADC0-ADC3
Enter the terminal, and execute corresponding commands:
bcm2835 program:
pi@raspberrypi ~/DVK512/PCF8591/ADC/bcm2835 $ sudo ./pcf8591
wiringPi program:
pi@raspberrypi ~/DVK512/PCF8591/ADC/wiringPi $ sudo ./pcf8591
python program:
pi@raspberrypi ~/DVK512/PCF8591/ADC/python $ sudo python pcf8591.py
The terminal will display the AD values read from ADC0-ADC3 (corresponding to the pins AIN0-AIN3 on PCF8591).

Connecting the pins AIN0 and AD0 together
Connect the pins AIN0 and AD0 on the PCF8591 together via a cable.

Displaying the AD values read from ADC0-ADC3
PCF8591 DA Demo
Connect the PCF8591 module to the I2C interface on DVK512.
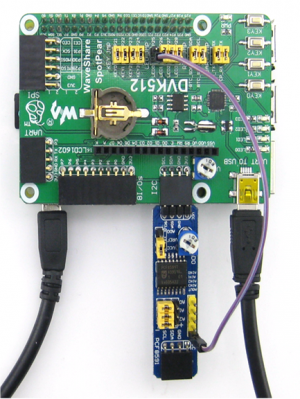
Connecting the Pin AOUT on PCF8591 to the LED pin header on DVK512
Connect the Pin AOUT on PCF8591 to the LED pin header on DVK512.
Enter the terminal, and execute corresponding commands:
bcm2835 program:
pi@raspberrypi ~/DVK512/PCF8591/DAC/bcm2835 $ sudo ./pcf8591
wiringPi program:
pi@raspberrypi ~/DVK512/PCF8591/DAC/wiringPi $ sudo ./pcf8591
python program:
pi@raspberrypi ~/DVK512/PCF8591/DAC/python $ sudo python pcf8591.py
The digital conversion value is displayed in the terminal. And the brightness of the LED indicator on DVK512 will change with the level variation on the pin AOUT.

Connecting the Pin AOUT on PCF8591 to the LED pin header on DVK512
The digital conversion value is displayed in the terminal. And the brightness of the LED indicator on DVK512 will change with the level variation on the pin AOUT.
Acceleration of Gravity and Magnetic Sensors LSM303DLHC

Relative values read from acceleration of gravity and magnetic sensor
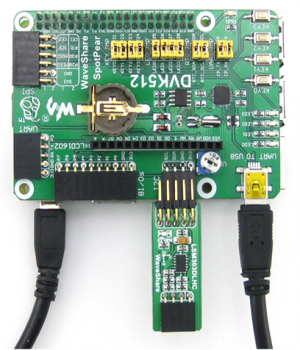
Connecting the LSM303DLHC module to the I2C interface on DVK512
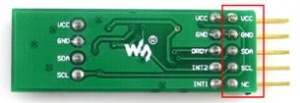
LSM303DLHC module has two rows of pins, and the one connected to DVK512 contains the pins SDA and SCL.
Connect the LSM303DLHC module to the I2C interface on DVK512.
Notices: LSM303DLHC module has two rows of pins, and the one connected to DVK512 contains the pins SDA and SCL.
Enter the terminal, and execute corresponding commands:
bcm2835 program:
pi@raspberrypi ~/DVK512/LSM303DLHC/bcm2835 $ sudo ./LSM303DLHC
wiringPi program:
pi@raspberrypi ~/DVK512/LSM303DLHC/wiringPi $ sudo ./LSM303DLHC
python program:
pi@raspberrypi ~/DVK512/LSM303DLHC/python $ sudo python LSM303DLHC.py
The terminal will display the relative values read from acceleration of gravity and magnetic sensor.
Angular rate Sensor L3G4200D
Connect the L3G4200D to the SPI interface on DVK512.

Angular velocity values
Enter the terminal, and execute corresponding commands:
bcm2835 program:
pi@raspberrypi ~/DVK512/L3G4200D/bcm2835 $ sudo ./L3G4200D
wiringPi program:
pi@raspberrypi ~/DVK512/L3G4200D/wiringPi $ sudo ./L3G4200D
python program:
pi@raspberrypi ~/DVK512/L3G4200D/python $ sudo python L3G4200D.py
The terminal will display the angular velocity values in three factors of x axis, y axis and z axis, respectively.

Angular velocity values
UART Demo
Note: The Serial Port of Raspberry pi is used for terminal debugging by default, so for using UART function, the Serial terminal debugging function needs to be closed.
Connect the onboard UART TO USB port to a PC via a mini USB cable.
Enter the terminal, and execute corresponding commands:
wiringPi program: pi@raspberrypi ~/DVK512/UART/wiringPi $ sudo ./UART
python program: pi@raspberrypi ~/DVK512/UART/python $ sudo ./uart.py
Run Serial monitor software, choose a corresponding COM port and set the baud rate as 115200. The field sent by the software will be sent back and shown on the software.
GPS (Purchased Separately) Demo
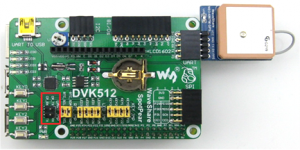
Removing the jumper wire from UART JMP for GPS Demo
In the default boot mode of the system image provided by Waveshare, the serial port works as terminal debugging output. In order to control peripherals via serial port communication, you should input corresponding commands on the terminal to disable the debugging function of the serial port.
sudo raspi-config
Choose Advanced Options -> Serial –>no to disable the debugging function of the serial port.
Once the debugging function of the serial port is disabled, you cannot access the Pi using Serial port but you can re-enable the debugging function by raspi-config.
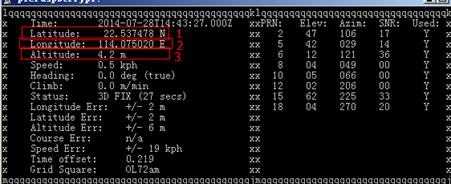
GPS position information
Insert a GPS module into the UART interface on DVK512, and remove the jumper wire from UART JMP.
Enter the terminal, and input the following commands to set the Baud rate (The Baud rate will be restored to the default value: 115200, after the system rebooted).
root@raspberrypi:/# stty -F /dev/ttyAMA0 38400
root@raspberrypi:/# gpsd /dev/ttyAMA0 -F /var/run/gpsd.sock
Enter the terminal and input the following command to open the GPS software provided by the Linux system:
root@raspberrypi:/# cgps -s
The terminal will display relative GPS position information.
Open the terminal of Raspberry Pi and install libraries as guides below

GPS position information


