


- sales/support
Google Chat:---
- sales
+86-0755-88291180
- sales01
sales@spotpear.com
- sales02
dragon_manager@163.com
- support
tech-support@spotpear.com
- CEO-Complaints
zhoujie@spotpear.com
- Only Tech-Support
WhatsApp:13246739196
- Purchase/Shipping/Refund
WhatsApp:13424403025
Raspberry Pi SIM7080G Cat-M/NB-IoT HAT User Guide
Document
Related Resources
Tools
Introduction
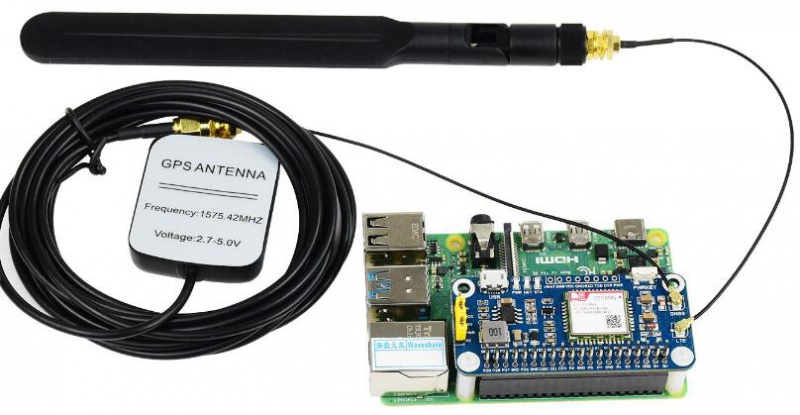
NB-IoT/Cat-M(eMTC)/GNSS HAT for Raspberry Pi, Based on SIM7080G, Globally Applicable
Features
- Standard Raspberry Pi 40PIN GPIO extension header, supports Raspberry Pi series boards
- Supports communication protocols such as TCP/UDP/HTTP/HTTPS/TLS/DTLS/PING/LWM2M/COAP/MQTT
- Supports GNSS positioning (GPS, GLONASS, BeiDou, and Galileo)
- Onboard USB interface, to test AT Commands, get GPS positioning data, and so on
- Breakout UART control pins, to connect with host boards like Arduino/STM32
- Onboard voltage translator, 3.3V by default, allows being switched to 5V via onboard jumper
- SIM card slot, supports ONLY 1.8V SIM card (3V SIM card is not available)
- 3x LED indicators, easy to monitor the working status
- Baudrate: 300~3686400 bps
- Common baudrate auto-negotiation: 9600/19200/38400/57600/115200 bps
User Guide
Testing it in Windows PC
- 1. Hardware connection and driver installation
- Before testing, you should prepare
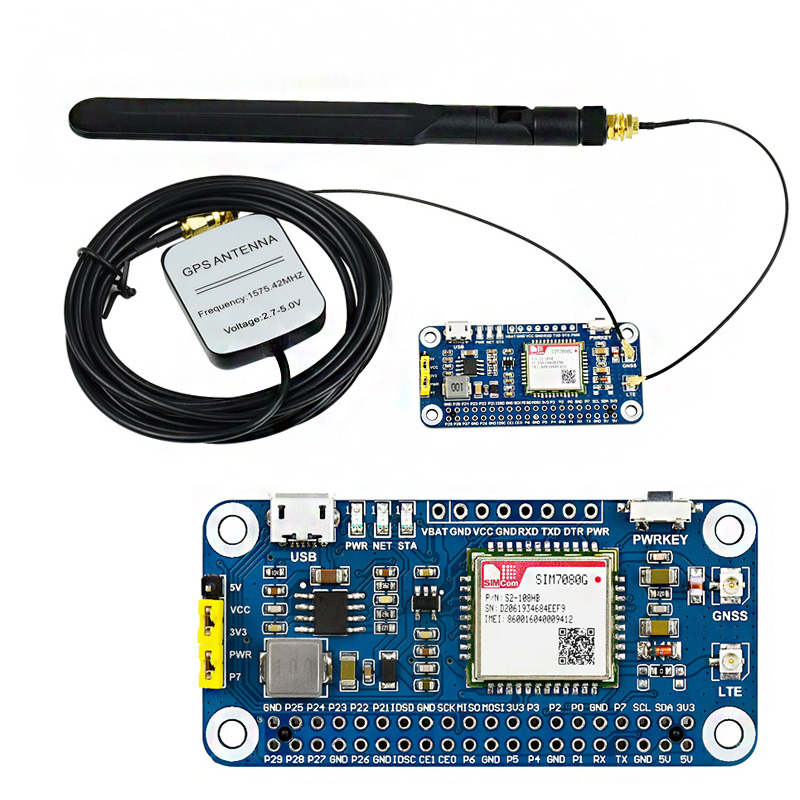
- A Micro USB cable
- LTE and GPS Antennas
- The SIM7080G Cat-M/NB-IoT HAT
- An NB-IoT SIM card.
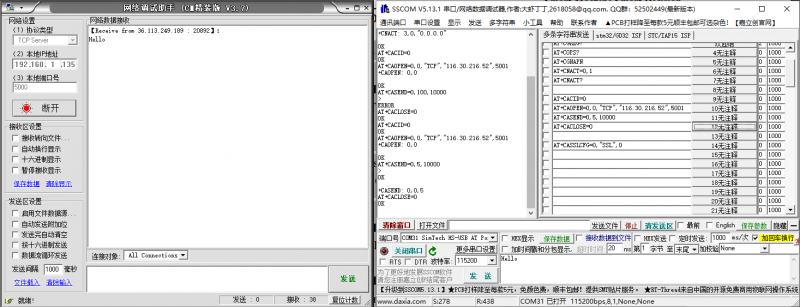
- Insert the SIM card into the SIM7080 board, connect the LTE antenna and the GPS antenna. Connect the micro USB of SIM7080G board to PC by USB cable.
- Hold the PWRKEY button for about 1s to power on the module. After powering on, the STA indicator lights on, NET indicator quick-blinks firstly and then slow-blinks.
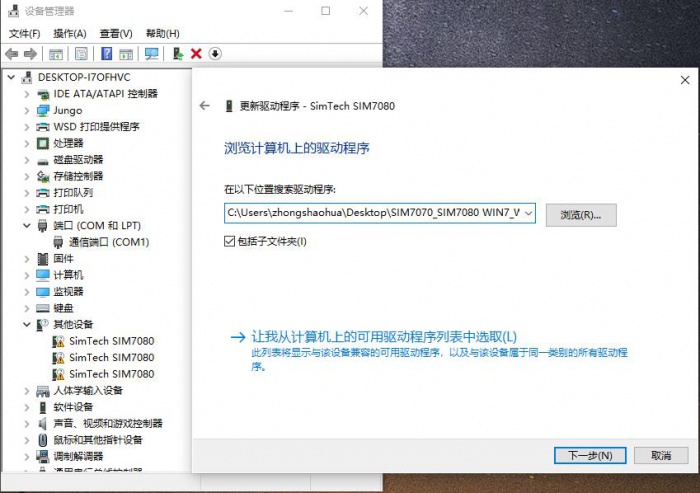
- Download the driver file, unzip it. Then update the driver by Devices Manager
- Generally, the SIM7080G will be recognized by PC with three USB ports. To update the driver, you can right-click the USB port and update it with the driver downloaded
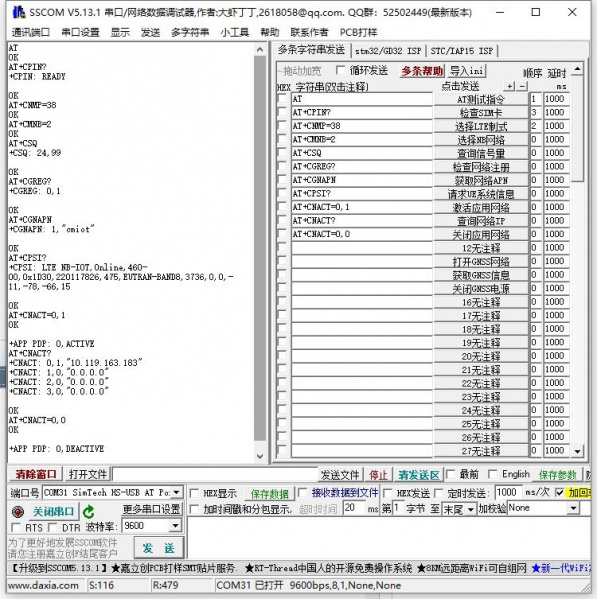
- AT Port COM31 is the one used as the communication port. We will use it to test the SIM7080G board.
Note: The SIM7080G modules support global networks. The time to log in the network is different among different areas. And to use the SIM7080G, you should first confirm that LTE-M or LTE-NB network are available in the local area.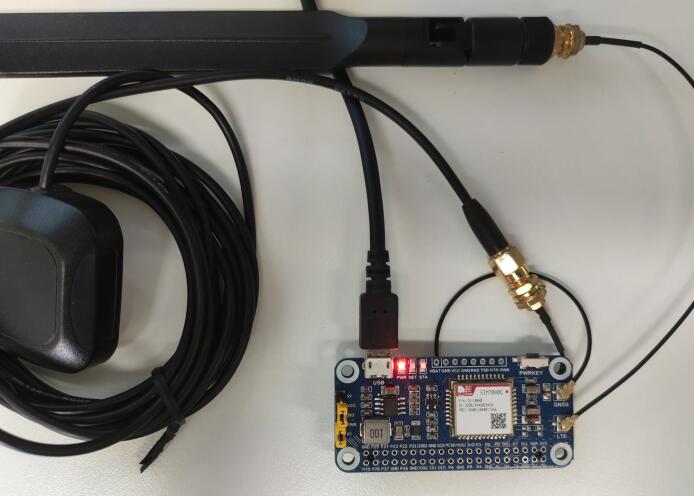
For more information about the AT commands, you can refer to SIM7080 Series_AT Command Manual_V1.01
| Command | Descriotion | Return |
|---|---|---|
| AT | Test command | OK |
| AT+CPIN? | Check SIM card | OK |
| AT+CNMP=38 | Choose LTE mode | OK |
| AT+CMNB=2 | Choose NB network | OK |
| AT+CSQ | Check signal intensity | OK |
| AT+CGREG? | Check netwok status | OK |
| AT+CGNAPN | Query APN | OK |
| AT+CPSI? | Request UE system information | OK |
| AT+CNACT=0,1 | activate application network | OK |
| AT+CNACT? | Check network IP | OK |
| AT+CNCAT=0,0 | Close application network | OK |
- 3. Test MQTT
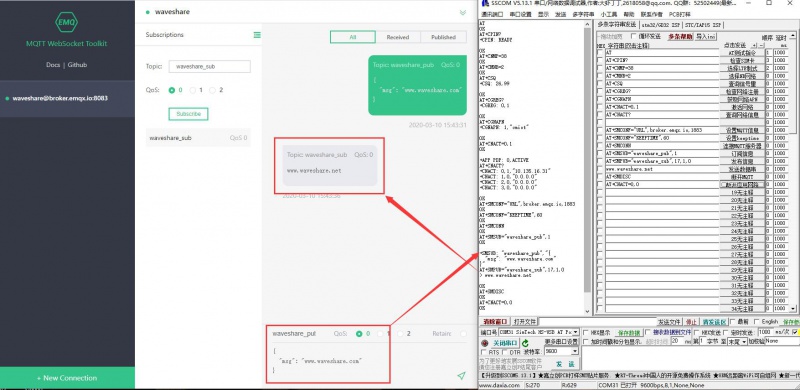
For more information about the MQTT, please refer to SIM7080 Series_MQTT(S)_Application Note_V1.00
Please test Web by clicking here. Please check the TCP port and domain name when testing, for details, please refer to here
| Command | Description | Return |
|---|---|---|
| AT+SHCONF | Setting HTTPS(S) | OK |
| AT+SHSSL | Select SSL setting | OK |
| AT+SHBOD | Set Body | OK |
| AT+SHAHEAD | Add Head | OK |
| AT+SHPARA | Set HTTP(S) Para | OK |
| AT+SHCPARA | Clear HTTP(S) Para | OK |
| AT+SHCHEAD | Clear Head | OK |
| AT+SHSTATE | Query HTTP(S) connecting status | OK |
| AT+SHREQ | Set respond type | OK |
| AT+SHREAD | Queru respond data | OK |
| AT+SHDISC | Disconnect HTTP(S) | OK |
- 3. Test TCP
- 4. Test GNSS
For more information, please refer to Series_TCPUDP(S)_Application Note_V1.00
When testing GNSS, you should set the GPS antenna in the open area. You can also use u-center software for locating.
| Commands | Description | Return |
|---|---|---|
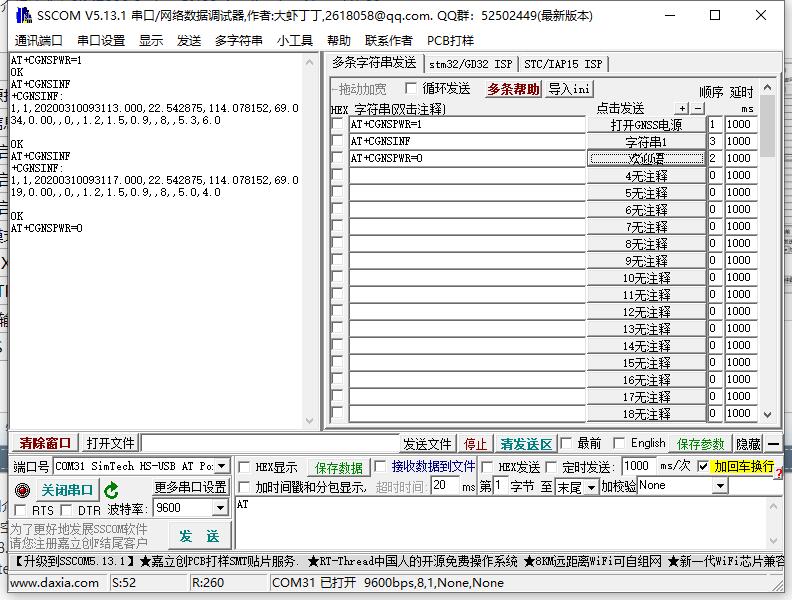
| AT+CGNSPWR | Open/close GNSS power | OK |
| AT+CGNSINF | GNSS information | OK |
| AT+CGNSCOLD | GNSS cold starting | OK |
| AT+CGNSWRAM | GNSS warm starting | OK |
| AT+CGNSHOT | GNSS hot starting | OK |
| AT+CGNSMOD | GNSS workign mode setting | OK |
| AT+CGNSXTRA | Open GNSS XTRA | OK |
| AT+CGNSCPY | Copyt GNSS XTRA file | OK |
| AT+SGNSCFG | GNSS NMEA output setting | OK |
| AT+SGNSCMD | AT port output GNSS NMEA data | OK |
Use it with Raspberry Pi
- Initialize IO and install software
The PWRKEY pin is connected to P7 (wiringPi number) of Raspberry Pi by jumper. To let the SIM7080G board work normally, you should firstly initialize P7 pin. Download codes and run by the following commands.
 sudo apt-get update
wget -P ~/Documents/ http://www.waveshare.net/w/upload/0/02/SIM7080G_Cat_M_NB_IoT_HAT_Code.7z
sudo apt-get install p7zip
cd ~/Documents
sudo p7zip --uncompress SIM7080G_Cat_M_NB_IoT_HAT_Demo_Code.7z
sh ~/Documents/SIM7080G_Cat_M_NB_IoT_HAT_Demo_Code/pi_gpio_init.sh
sudo pip install RPi.GPIO
sudo apt-get install python-serial
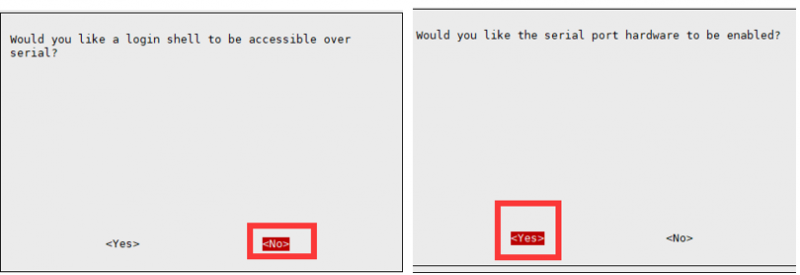
- Enbale UART and hardware connection
Open raspi-config by following commands, and choose Interfacing Options -> Serial, close login sheel and open the hardware serial port.
sudo rapsi-config
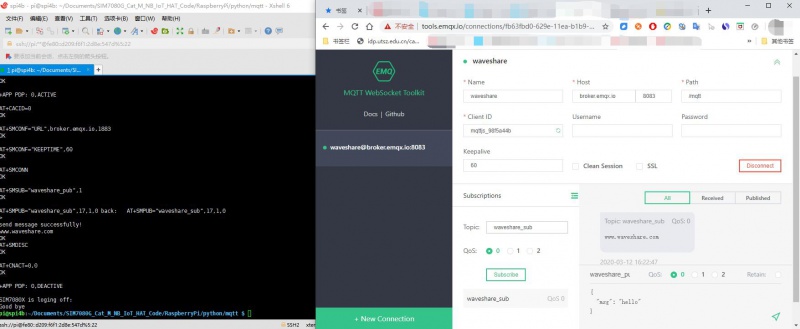
The python codes is provided for MQTT function
cd ~/Documents/SIM7080G_Cat_M_NB_IoT_HAT_Demo_Code/python/mqtt
sudo python mqtt.py
Use it with STM32
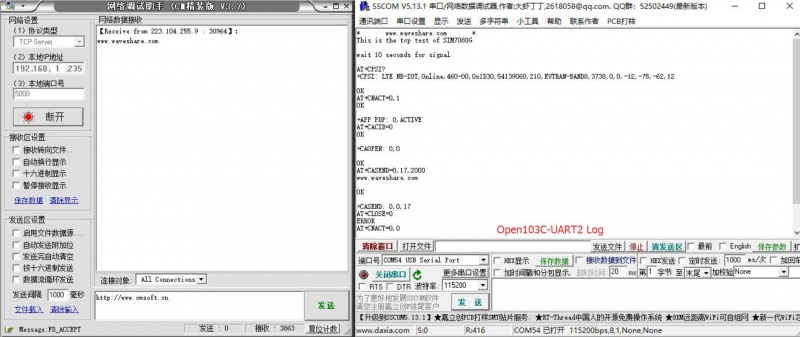
The demo codes provided is based on Waveshare Open103C, it is use for TCP connecting.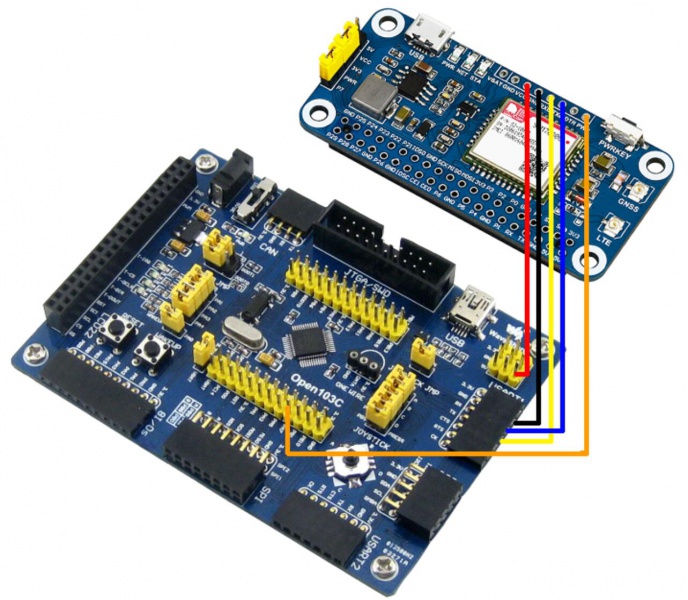
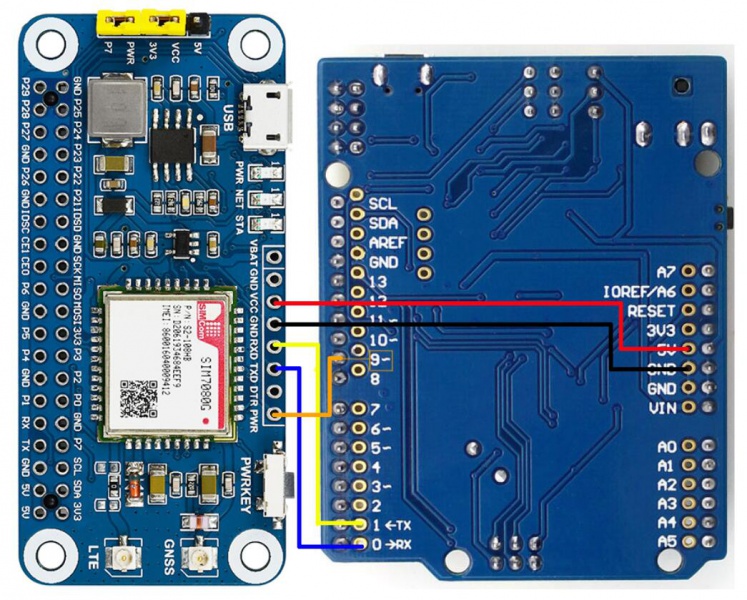
Use it with Arduino
The demo codes provide is based on Arduino UNO. The D10 (RX) and D11 (TX) is used for software serial.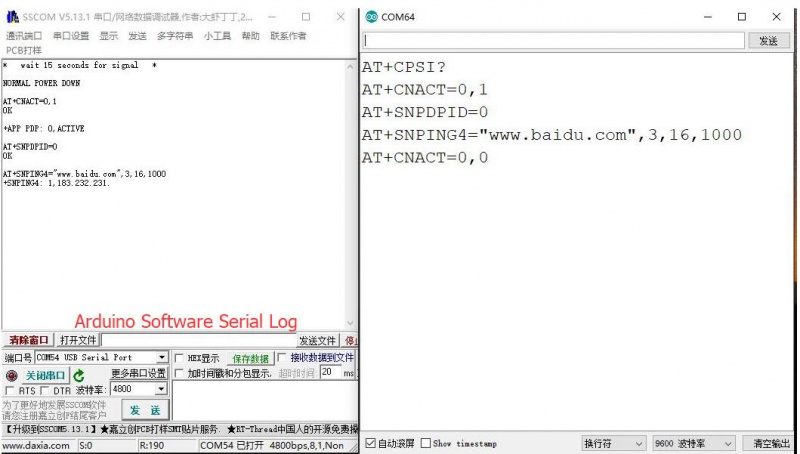