


- sales/support
Google Chat:---
- sales
+86-0755-88291180
- sales01
sales@spotpear.com
- sales02
dragon_manager@163.com
- support
tech-support@spotpear.com
- CEO-Complaints
zhoujie@spotpear.com
- Only Tech-Support
WhatsApp:13246739196
- Purchase/Shipping/Refund
WhatsApp:13424403025
- HOME
- >
- ARTICLES
- >
- Common Moudle
- >
- Sensors
Laser-450nm-5W User Guide
Introduction
Laser-450nm-5W is a high-precision laser module with a wavelength of 450nm, which belongs to the blue spectrum. This module features a high-precision laser head with a true output power of 4.5W. It adopts brand new imported glass lenses and laser diodes, with long lifespan and good stability
Features
- Support engraving on a variety of materials, such as stainless steel, acrylic, wood boards, leaves, etc.
- Spot compression technology, which enhances the energy density and focusing effect of laser beams
- Adjustable lens with flexible focus adjustment according to working distance, making it easy to achieve the optimal spot size
Specifications
| Laser-450nm-5W | |||
|---|---|---|---|
| Operating Voltage | 12V DC | Control Signal Voltage | 2.5V~5V DC |
| Control Mode | PWM modulation | Response Frequency | <2KHz |
| Spot Mode | Dot | Focal Length | 50±1mm / Adjustable |
| Operating Temperature | 0℃~35℃ | Spot Size | <40×400μm |
Precautions
1. Confirm whether the operating voltage is within the specified voltage range as listed in Specifications before use.
2. Ensure that the module is used within the specified ambient temperature range (0℃~35℃).
3. Please ensure that the connections are correct and secure before use to avoid poor contact.
4. Do not touch the laser emission end during use to avoid injury.
5. The laser beam may heat up or ignite certain materials, please ensure that there are no flammable materials in the operating area.
6. The laser can cause harm to eyes and skin, please ensure the beam is not directly pointed at humans or animals.
Product Usage
1. The product uses a PWM modulation system, please follow the interface definition for correct wiring to avoid damage to the device.
2. Check if the power voltage meets the product requirements. After connecting the power, make sure the switch is turned off before proceeding to the next step.
3. The laser supports adjustable focal length design, which can flexibly adjust the spot size according to the working distance.
4. Hold the laser head and rotate it clockwise or counterclockwise gently to adjust the focal length.
5. During the adjustment process, observe the shape and size of the target spot until the optimal focusing effect is achieved.
6. It is recommended to perform the focusing operation at low power to avoid strong light from injuring the eyes.
Pinout Definition
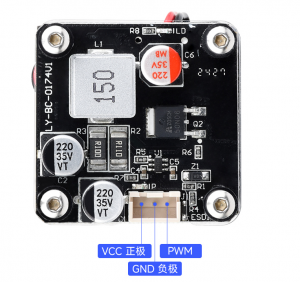
- Interface type: XH 2.54-3P
Resource
Demo
Support
Monday-Friday (9:30-6:30) Saturday (9:30-5:30)
Email: services01@spotpear.com
