


- sales/support
Google Chat:---
- sales
+86-0755-88291180
- sales01
sales@spotpear.com
- sales02
dragon_manager@163.com
- support
tech-support@spotpear.com
- CEO-Complaints
zhoujie@spotpear.com
- Only Tech-Support
WhatsApp:13246739196
- Purchase/Shipping/Refund
WhatsApp:13424403025
- HOME
- >
- ARTICLES
- >
- Common Moudle
- >
- LCD
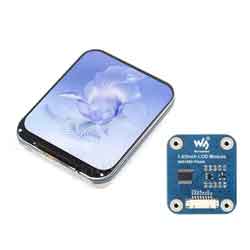
Displaying a new image on 1.83inch LCD Module
【Step 1 Software 】
[] Custom pictures
Supports JPG BMP ico (PNG is not supported)
【STEP 2 Operation steps】
[] Adjust custom pictures
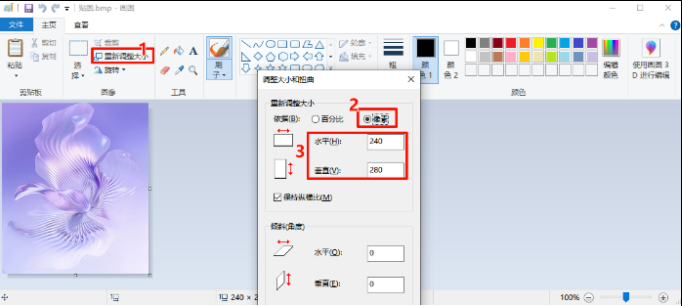
Resizes the image to the desired display size, making sure the image is not larger than the
display sizes
[] Image2Lcd software settings
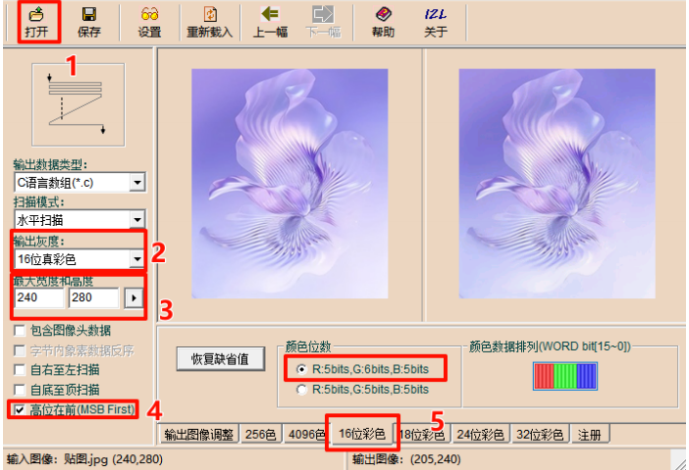
For example, if LCD _ 1in83 displays a full-screen picture (resolution 240 X 280): 1. Open Custom
Picture 2. Select Output Grayscale 3. Set the maximum width and height 4. Select MSB First 5.
Select 16-bit color (RGB 565)
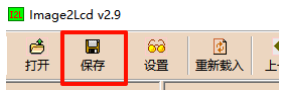
[] Generate the.c file and add it to the project
Click the Save button to save the.c file locally
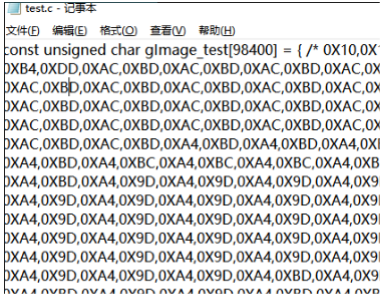
Open the image. CPP! In the corresponding project folder

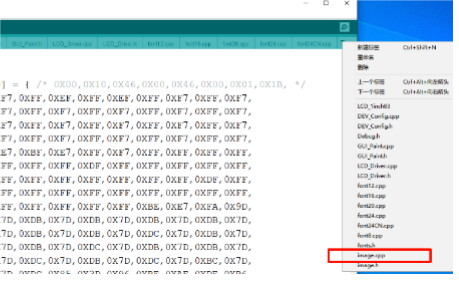
Add the array generated by the picture to it
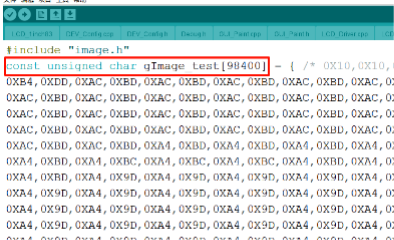
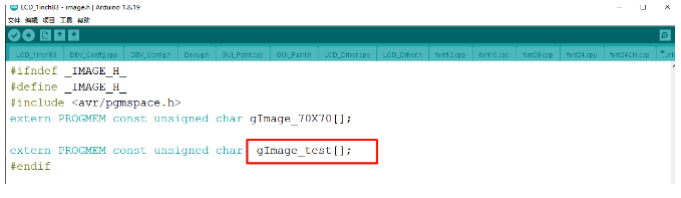
Open the image. H to add the variable declaration
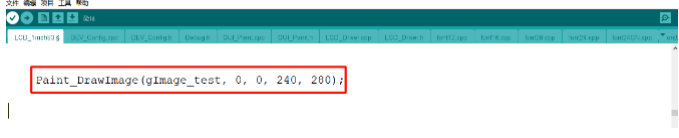
Use API to call image display in the application
TAG:
Sipeed RISCV LicheeRV Nano Super-Mini SG2002 AI RAM-256MB
ESP32-S3 1.28inch Round LCD Display Screen Module Development Board GC9A01A QMI8658A With Case
ESP32-S3 1.28
Jetson RTL8822CE 5GHz WiFi Wireless Bluetooth5 Card NGFF-M.2 RTL8822CE-CG Core
Jetson Nano Expansion Board
ESP32-S3 Industrial 8-CH Relay IOT LAN WiFi /Bluetooth /CAN /RJ45 Ethernet /POE
ESP32-S3 LCD
Industrial Modbus RTU 8 ch Relay Module
Raspberry Pi HQ Camera Official Original High Quality For M12 Lenses 12.3MP IMX477 Sensor
Arduino Board Managers Tutorial User Guide
ESP32 S3 N16R8 Development board 1.9 inch LCD Display 1.9inch TouchScreen 170×320 SD-Port RGB LED QMI8658 6-Axis ST7789 CST816
Product Tutorial Catalog How to use host device
RS232/485/422 To CAN
ESP32-S3 LCD Driver Board RGB/SPI N8R8 For 2.1/2.8/4inch Captive TouchScreen Display Round
ESP32-S3 SIM7670G 4G Development Board With Camera LTE Cat-1/4G/GNSS/GPS Global Band Portable WIFI
Sipeed NanoKVM-USB Finger-sized 4K USB KVM for Server/SBCs
Raspberry Pi 5 Official Original AI Kit Hailo8l 13Tops/26Tops PCIe M.2 HAT+ Board For Pi5
Spotpear
Raspberry Pi 8.8 inch DSI MIPI Display LCD Capacitive TouchScreen 480x1920
Modbus POE ETH Relay Waveshare User Guide
TAG:
ESP32-S3 1.28inch
Raspberry Pi Pico 2 RP2350 0.85 inch LCD Display Development Board
Metal Flat Key Shaft Flange Plate A Serial Bus Servo
Spotpear
IMX462
LuckFox
Raspberry Pi Pico 2 RP2350 CAN Onboard XL2515 CAN Controller RP2350A
Milk V Duo
JETSON NANO Expansion Board
Jetson Orin NX SUPER 8GB/16GB 117TOPS/157TOPS Dual Ethernet AI Development Board
MLX90641
RP2040-PiZero
Raspber Pi 5 Original Power
5.79inch e Paper Black-White display 792x272 Arduino Raspberry Pi Jetson Nano STM32
Raspberry Pi 7 inch DSI MIPI LCD Display 720x1280 Luckfox Lyra RK3506 ESP32-P4 Omni3576
MP2.5GD Raspberry Pi 5 PCIe Dual 2.5G Double Ethernet Pi5 RTL8125
Industrial RS232 to RS485
Raspberry Pi 4 Camera
Top-Version Luckfox Lyra Ultra RK3506B OnBoard EMMC-8GB Mic Option WiFi6 /PoE With Audio and Display Port
100X Industrial Microscope Lens C/CS Mount Raspberry Pi HQ Camera Global Shutter