


- sales/support
Google Chat:---
- sales
+86-0755-88291180
- sales01
sales@spotpear.com
- sales02
dragon_manager@163.com
- support
tech-support@spotpear.com
- CEO-Complaints
zhoujie@spotpear.com
- Only Tech-Support
WhatsApp:13246739196
- Purchase/Shipping/Refund
WhatsApp:13424403025
- HOME
- >
- ARTICLES
- >
- Common Moudle
- >
- ESP
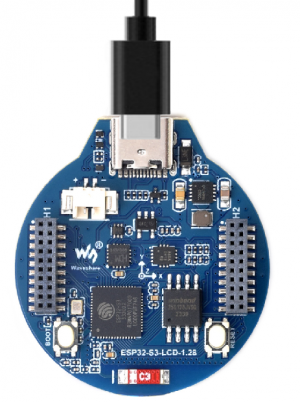
ESP32-S3-LCD-1.28-B User Guide
Overview
Introduction
ESP32-S3-LCD-1.28 is a low-cost, high-performance MCU board designed by Waveshare. It features peripherals such as a 1.28-inch LCD screen, a lithium-ion battery charging chip, a six-axis IMU sensor (three-axis accelerometer and three-axis gyroscope), and the ESP32-S3R2, a system-on-chip (SoC) that integrates low-power Wi-Fi and BLE 5.0, as well as external 16MB Flash and 2MB PSRAM. The hardware encryption accelerator, RNG, HMAC, and digital signature modules within the Soc can meet the security requirements of the Internet of Things. A variety of low-power operating states meet the power consumption requirements of application scenarios such as the Internet of Things (IoT), mobile devices, wearable electronic devices, and smart homes.
Features
- Equipped with high-performance Xtensa® 32-bit LX7 dual-core processor, up to 240 MHz main frequency
- Supports 2.4GHz Wi-Fi (802.11 b/g/n) and Bluetooth® 5 (BLE), with onboard antenna
- Built in 512KB SRAM and 384KB ROM, with onboard 2MB PSRAM and an external 16MB Flash
- Using Type-C interface, keeping up with the trend of the times, no need to entangle the front and back plugging
- Onboard 1.28inch LCD display, round IPS panel, 240×240 resolution, 65K color
- Onboard QMI8658 6-axis IMU (3-axis accelerometer and 3-axis gyroscope) for detecting motion gesture
- Onboard 3.7V lithium battery recharge/discharge header and adapting most GPIO headers
- Supports flexible clock, module power supply independent setting and other controls to realize low power consumption in different scenarios
- Integrated with USB serial port full-speed controller, GPIO pins allow flexibly configuring various peripheral functions
Onboard Resources
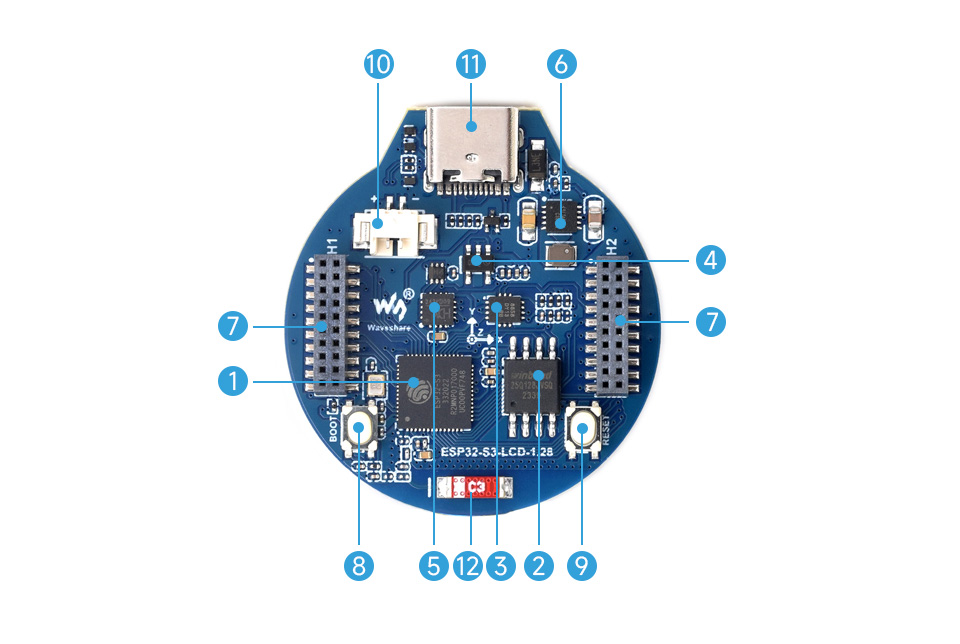
1. ESP32-S3R2 2. W25Q128JVSIQ 3. QMI8658 4. ME6217C33M5G 5. CH343P 6. ETA6096 |
8. BOOT button 9. RESET button 10. MX1.25 Lithium battery interface 11. USB Type-C interface 12. 2.4G ceramic antenna |
Interfaces
- Type-C interface : The development board uses the CH343P chip to convert USB to UART, and connects the UART_TXD (GPIO43) and UART_RXD (GPIO44) of ESP32-S3 for firmware flashing and log printing. With the integrated automatic download circuit, it directly downloads the firmware upon connecting the Type-C cable.
- 1.27mm pitch headers: The development board leads out most GPIOs for external connection, the GPIOs can be configured for I2C, SPI and other peripheral functions, and the VSYS can directly input 5V to power the development board.
- LCD interface : The development board has a 1.28-inch screen with 4-wire SPI communication on board, the SPI rate can be increased to 80MHz, and the touch uses I2C communication (the development board uses GPIO2 to control the brightness of the backlight, and two MOS tube control switch contacts are also drawn out around the battery holder, which are connected to GPIO4 and GPIO5 respectively, and can be used to solder small current devices such as vibration motors, etc.. For details, please refer to Schematic diagram)
- I2C interface : The ESP32-S3 provides multi-channel hardware I2C, currently using GPIO6 (SDA) and GPIO7 (SCL) pins for the I2C bus. The QMI8658 six-axis inertial measurement unit and LCD touch control chip are mounted on the board. For details, please refer to Schematic diagram
- MX1.25 connector : The GPIO1 of the development board is used for measuring the battery voltage pin. The battery voltage is connected to GPIO1 through a voltage divider consisting of 200K and 100K in series. The ESP32-S3 series has 2 12Bit SAR ADC measurement units. In the source code, the conversion formula to voltage is 3.3 / (1<<12) * 3 * AD_Value.
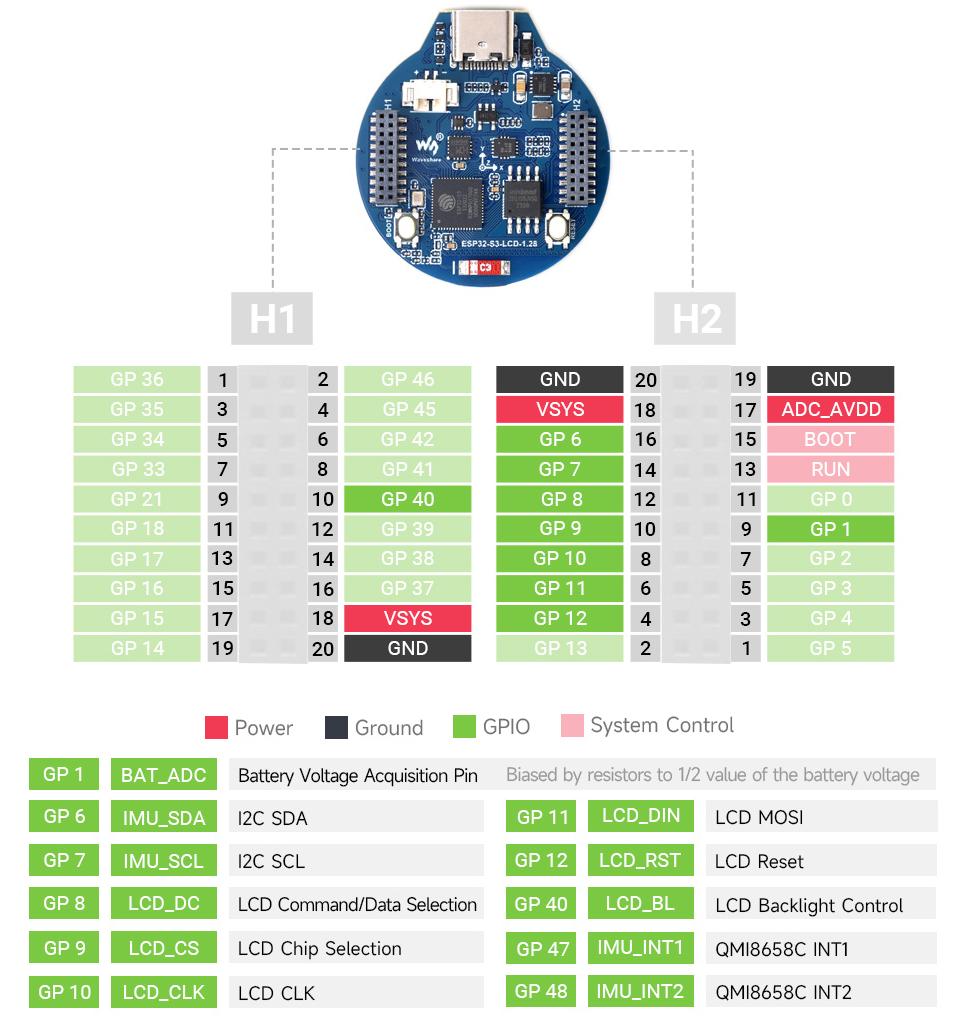
| ESP32-S3R2 | LCD | MX1.25 | QMI8658 | other |
| GPIO0 | BOOT0 | |||
| GPIO1 | ADC | |||
| GPIO5 | TP_INT | |||
| GPIO6 | SDA | |||
| GPIO7 | SCL | |||
| GPIO8 | LCD_DC | |||
| GPIO9 | LCD_CS | |||
| GPIO10 | LCD_CLK | |||
| GPIO11 | LCD_MOSI | |||
| GPIO12 | LCD_RST | |||
| GPIO40 | LCD_BL | |||
| GPIO47 | INT1 | |||
| GPIO48 | INT2 |
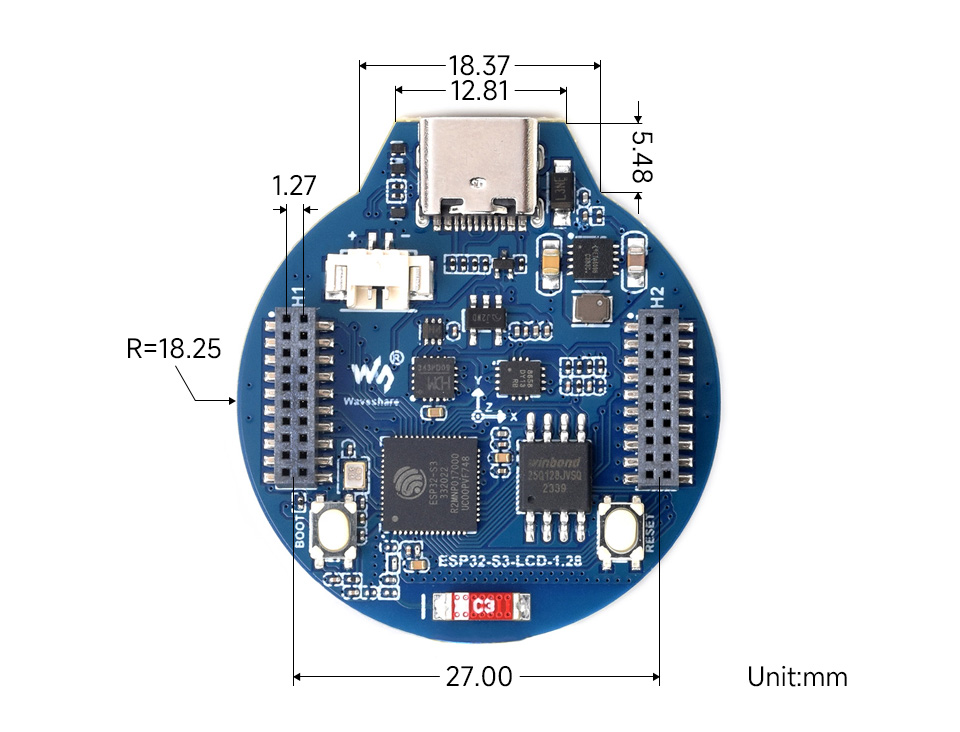
Dimensions
Specifications
| LCD parameters | |||
| Display chip | GC9A01A | Display interface | SPI |
| Resolution | 240(H)RGB x 240(V) | Display size | Φ32.4mm |
| Display panel | IPS | Pixel size | 0.135(H) x 0.135(V) (mm) |
| IMU parameters | |||
| Sensor name | QMI8658 | ||
| Accelerometer characteristics | Resolution: 16 bits Range (optional): ±2, ±4, ±8, ±16g | ||
| Gyroscope characteristics | Resolution: 16 bits Range (optional): ±16, ±32, ±64, ±128, ±256, ±512, ±1024, ±2048°/sec | ||
Version Description
Usage Instructions
ESP32-S3-LCD-1.28 currently provides two development tools and frameworks, Arduino IDE and MicroPython, providing flexible development options, you can choose the right development tool according to your project needs and personal habits.
Development Tools
| Arduino IDEArduino IDE is an open source electronic prototyping platform, convenient and flexible, easy to get started. After a simple learning, you can start to develop quickly. At the same time, Arduino has a large global user community, providing an abundance of open source code, project examples and tutorials, as well as rich library resources, encapsulating complex functions, allowing developers to quickly implement various functions. |
| MicroPythonMicropython is a full implementation of the Python 3 programming language that runs directly on embedded hardware such as ESP32, Raspberry Pi Pico, etc. You can run Python scripts directly on the board through REPL, which is very suitable for rapid prototyping. |

Arduino and MicroPython are suitable for beginners and non-professionals because they are easy to learn and quick to get started.
Components Preparation
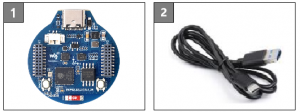
- ESP32-S3-LCD-1.28 x1
- USB cable (Type-A to Type-C) x 1
Working with Arduino
This chapter introduces setting up the Arduino environment, including the Arduino IDE, management of ESP32 boards, installation of related libraries, program compilation and downloading, as well as testing demos. It aims to help users master the development board and facilitate secondary development.

Environment Setup
Download and install Arduino IDE
- Click to visit the Arduino official website, select the corresponding system and system bit to download

- Run the installer and install all by default
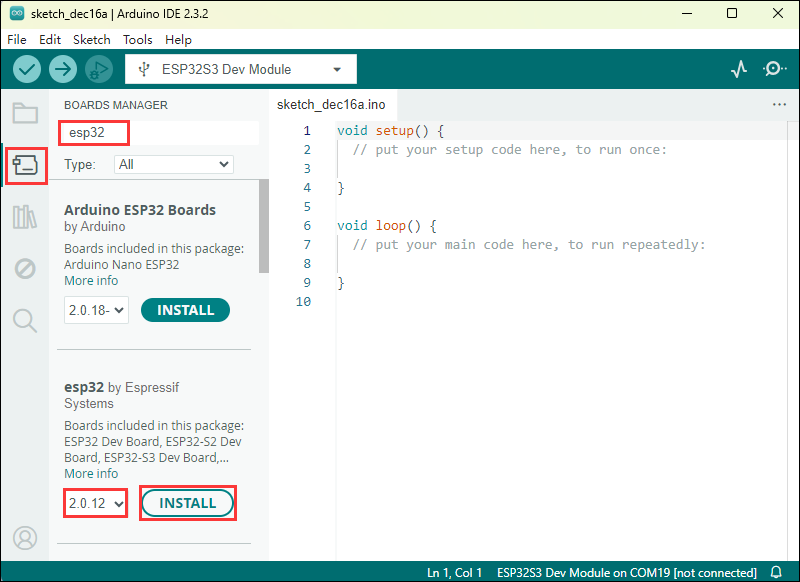
Install ESP32 development board
- Regarding ESP32-related motherboards used with the Arduino IDE, the esp32 by Espressif Systems library must be installed first.
- According to Board installation requirement, it is generally recommended to use Install Online. If online installation fails, use Install Offline
- For the installation tutorial, please refer to Arduino board manager tutorial
- esp32 by Espressif Systems development board comes with an offline package. Click here to download: esp32_package_2.0.12_arduino offline package
| Board name | Board installation requirement | Version number requirement |
|---|---|---|
| esp32 by Espressif Systems | "Install Offline" / "Install Online" | 2.0.12 |
Install library
- When installing Arduino libraries, there are usually two ways to choose from: Install online and Install offline. If the library installation requires offline installation, you must use the provided library file
For most libraries, users can easily search and install them through the online library manager of the Arduino software. However, some open-source libraries or custom libraries are not synchronized to the Arduino Library Manager, so they cannot be acquired through online searches. In this case, users can only manually install these libraries offline. - For library installation tutorial, please refer to Arduino library manager tutorial
- ESP32-S3-LCD-1.28 library file is stored in the sample program, click here to jump: ESP32-S3-LCD-1.28 Demo
| Library Name | Description | Version | Library Installation Requirement |
|---|---|---|---|
| LVGL | Graphical library | v8.3.10 | "Install Offline" |
| TFT_eSPI | LCD library | v2.5.34 | "Install Offline" |
| TFT_eSPI_Setups | Custom library | -- | "Install Offline" |
Run the First Arduino Demo
New Project
- Run the Arduino IDE and select
File->New Sketch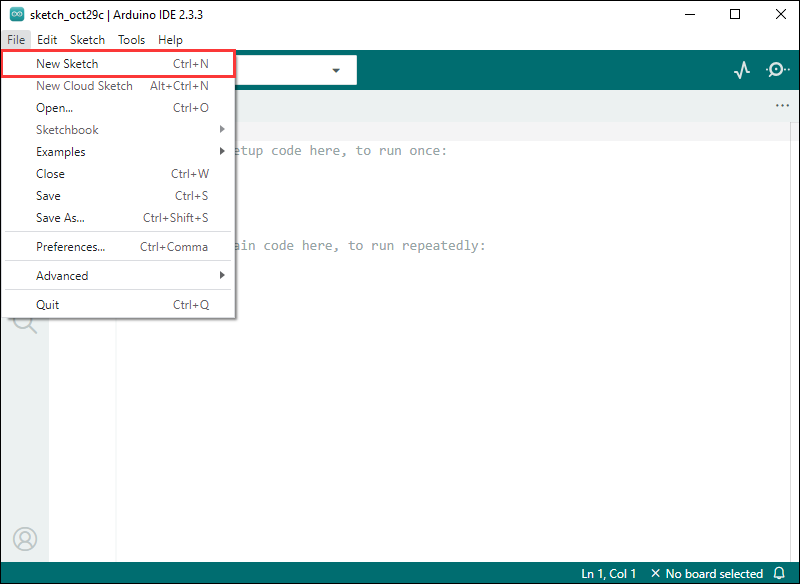
- Enter the code:
void setup() {
  // put your setup code here, to run once:
  Serial.begin(115200);
}

void loop() {
  // put your main code here, to run repeatedly:
  Serial.println("Hello, World!");
  delay(2000);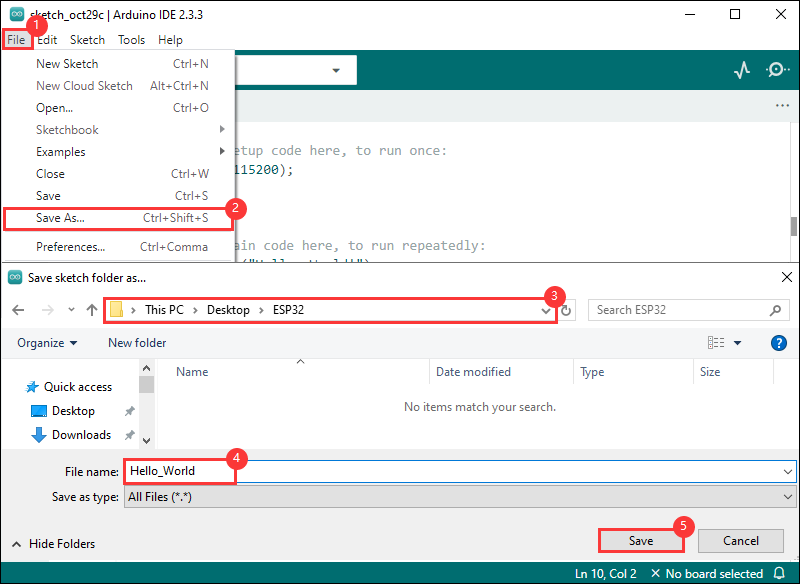
}- Save the project and select
File->Save As.... In the pop-up menu, select the path to save the project, and enter a project name, such as Hello_World, clickSave
Compile and Flash Demos
- Select the corresponding development board, take the ESP32S3 motherboard as an example:
①. Click to select the dropdown menu option Select Other Board and Port;
②. Search for the required development board model esp32s3 dev module and select;
③. Select COM Port;
④. Save the selection.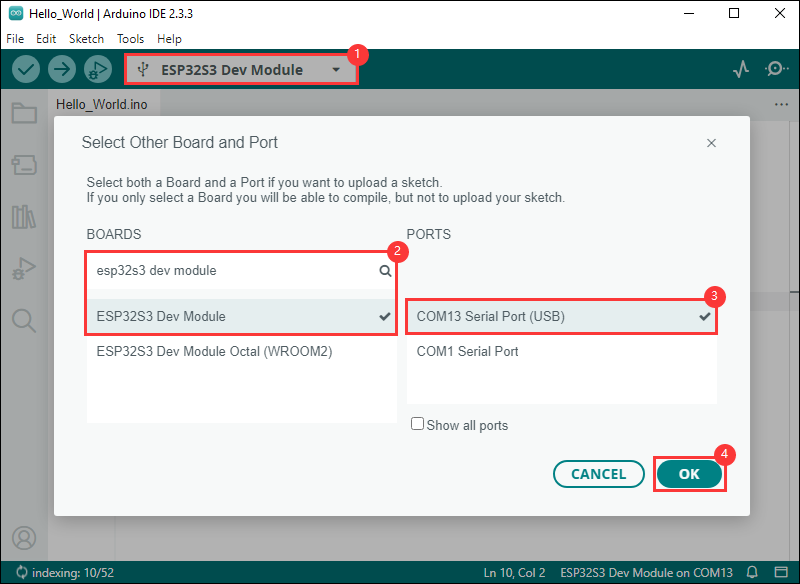
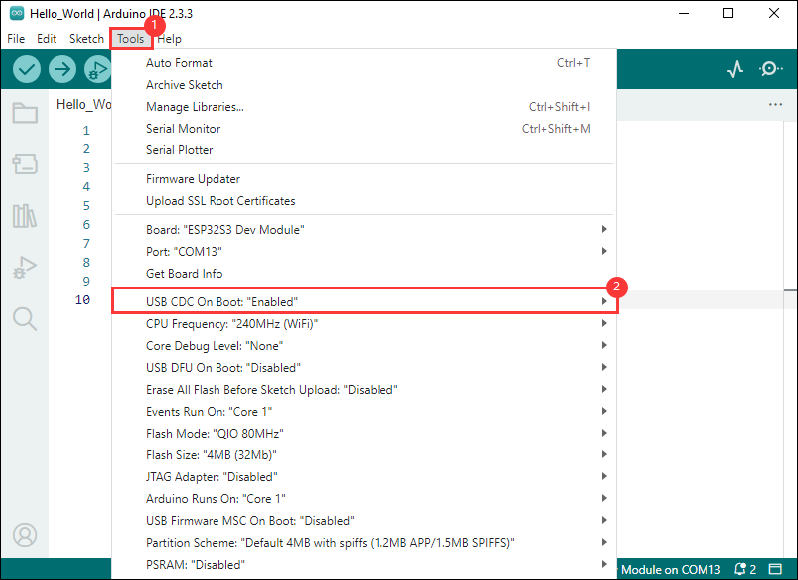
- If the ESP32S3 mainboard only has a USB port, you need to enable USB CDC, as shown in the following diagram:
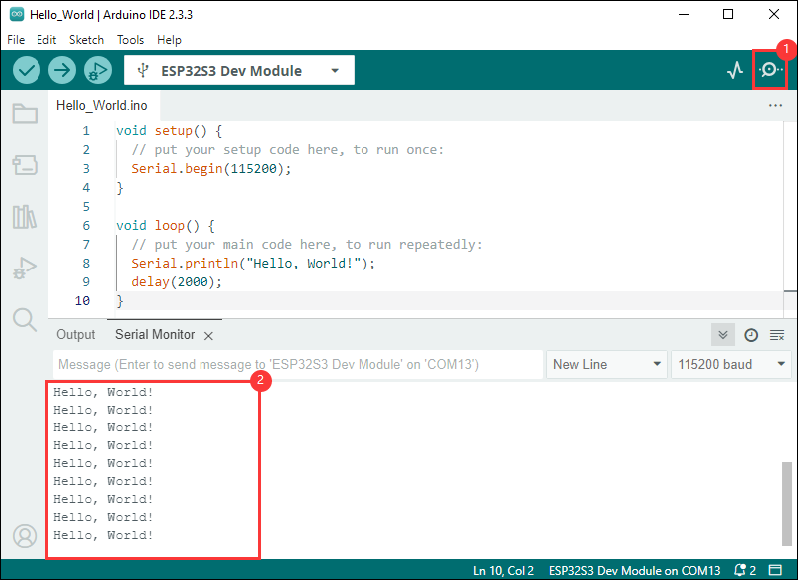
- Compile and upload the program:
①. Compile the program; ②. Compile and download the program; ③. Download successful.
- Open the Serial Monitor window, and the demo will print "Hello World!" every 2 seconds, and the operation is as follows:
Demo

| Demo | Basic Description | Dependency Library |
|---|---|---|
| ESP32-S3-LCD-1.28-Test | Test onboard device functionality | --- |
| LVGL_Arduino | Display LVGL benchmark, music, etc | LVGL, TFT_eSPI , TFT_eSPI_Setups |
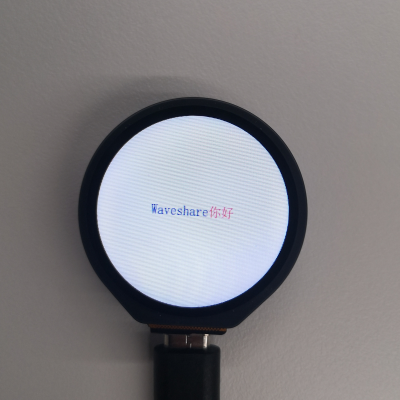
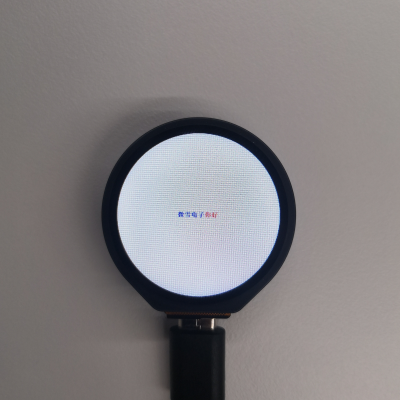
| LVGL_Chinese_Font | Display the 1000 built-in Chinese character fonts of LVGL | LVGL, TFT_eSPI, TFT_eSPI_Setups |
| LVGL_Chinese_7500_Char | Display the 7500 built-in Chinese character fonts of LVGL | LVGL, TFT_eSPI, TFT_eSPI_Setups |
Arduino project parameter setting
ESP32-S3-LCD-1.28-Test
Demo description
- This demo is used to test the use of screens, six-axis sensors, BAT
Hardware connection
- Connect the development board to the computer

Code analysis
- setup()
- Initialize the serial port and set the baud rate to 115200
- Initialize the external PSRAM (if available) and allocate memory space for the image
- Initialize the LCD display, including setting it to horizontal display mode, clearing the screen to white, creating a new image cache, and setting the relevant parameters
- Perform a series of graphic drawing operations, including drawing points, lines, rectangles, circles, numbers, strings, and more, and display the image on the LCD
- Read the data from the QMI8658 sensor and display it on the LCD. First, use
Paint_Clear(WHITE)to clear the image cache, then redraw the graphics and display the sensor data and the voltage value after ADC conversion
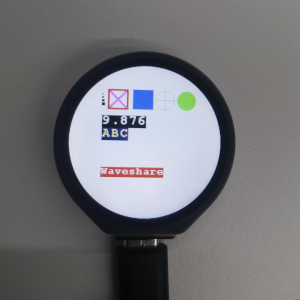
Result demonstration
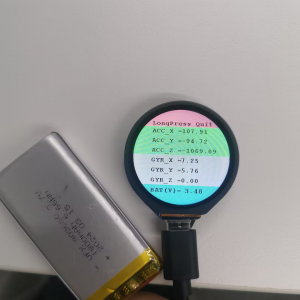
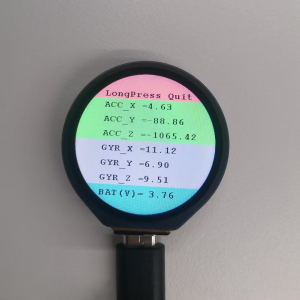
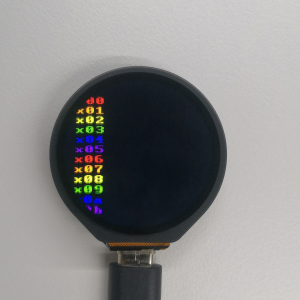
- After power-on, the screen first displays white, red, green, and blue colors in intervals of 2 seconds to check for any light leaks and black spots. If the screen is too fast to see clearly, please press the RESET button to restart the process
- Then enter the sensor test session, after the color display, the sensor data will be displayed on the screen, the ACC_X, ACC_Y and ACC_Z values will change with the angular deflection of the device, and the GYR_X, GYR_Y, and GYR_Z values will change with the change of the acceleration of the device
- Connect a 3.7V lithium battery at this moment. Under normal circumstances, the BAT (V) value will decrease
- Flash the code directly, the LCD screen is shown in the figure
- If an error occurs, ensure that the ESP32 development board version is 2.0.12

LVGL_Arduino
Demo description
- The demo is used to display LVGL benchmark, music, etc
Hardware connection
- Connect the development board to the computer
Code analysis
- void my_disp_flush(): Refreshes the image data from the LVGL to the TFT display. It receives LVGL display driver structure pointers, display area, and color data pointers as parameters
- First calculates the width
wand the heighthof the area to be refreshed, this is done by obtaining the difference in coordinates of the input display area and adding 1 - Next call
tft.startWrite()to start writing data to the TFT display, and then usetft.setAddrWindowto set the display area of the TFT display to the area specified by the incomingarea - Then call
tft.pushColorsto push the color data (the color data pointing to thecolor_pis converted to theuint16_ttype) to the TFT display for display, where thew * hparameter indicates the number of pixels to be pushed,trueindicates that a data transfer completion operation is performed after the push operation is completed - Finally, call
lv_disp_flush_ready(disp_drv)to notify LVGL of the completion of the refresh so that LVGL can proceed with subsequent operations
- First calculates the width
- setup(): Responsible for initializing serial communication, LVGL library, TFT display, and setting up LVGL display drivers, etc.
- First initialize the serial port communication, set the baud rate to 115200, and print the version information of LVGL and Arduino
- Initialize the LVGL library, initialize the TFT display, set it to horizontal display and flip, initialize the LVGL display buffer and display driver, register the
my_disp_flushfunction as the LVGL refresh callback function - Create a LVGL image object and set the image source to
test1_240_240_4 - Create two timers, one to periodically increase the time ticks of LVGL, and the other to periodically execute the
example_increase_rebootfunction - Finally print "Setup done" to indicate that the setup is complete
Result demonstration
- If an error occurs, ensure that the ESP32 development board version is 2.0.12

LVGL_Chinese_Font
Demo description
- The demo is used to display 1000 commonly used Chinese fonts built into LVGL
Hardware connection
- Connect the development board to the computer
Code analysis
- my_disp_flush()
- This function is the refresh callback function for the LVGL display drive
- Calculate the width w and height h to be refreshed based on the input display area parameter area
- Call the relevant functions of the TFT display:
tft.startWrite()、tft.setAddrWindow()andtft.pushColors()to write the color data color_p from the LVGL to a specific area of the TFT display - Finally call
lv_disp_flush_ready()to notify LVGL that the refresh is complete
Result demonstration
- If an error occurs, ensure that the ESP32 development board version is 2.0.12

LVGL_Chinese_7500_Char
Demo description
- The demo is used to display 7500 Chinese fonts of LVGL, the font file is large, and the download of the firmware takes a long time
Hardware connection
- Connect the development board to the computer
Code analysis
- setup()
- First activate serial port communication, set the baud rate to 115200, and prepare for potential serial port debugging
- Initialize LVGL (Light and Versatile Graphics Library), including setting the version information output, and registering the log print callback function (if log functionality is enabled)
- Initialize the TFT display
tftandtouchsensor, including setting the rotation direction of the display and possible touch calibration data - Initialize the LVGL display buffer
draw_bufand display driverdisp_drv, set the display resolution, refresh callback function, etc., and register the display driver with LVGL - Initialize the input device driver
indev_drv, set it to the pointer type and specify the touch read callback function, and then register the input device driver - Create a label
label, set the text font, text content (supporting text color recreation), and display it centrally on the screen - You can optionally call LVGL's demo or demonstration functions to demonstrate different functional effects
- loop()
- Call
lv_timer_handler()function to let the LVGL graphics library handle its internal scheduled tasks and events - Use the
delay(5)function to introduce a small delay to avoid excessive CPU usage by the demo
- Call
Result demonstration
- If an error occurs, ensure that the ESP32 development board version is 2.0.12
Working with MicroPython
This section focuses on setting up the MicroPython development environment, primarily covering firmware flashing, installation, and the use of Thonny. For the installation part of Thonny, detailed explanations of the installation steps and usage instructions are provided, offering comprehensive and clear guidance for developers to build a MicroPython development environment.
Environment Setup
Download and install Thonny
- Open the download page of Thonny official website and select the corresponding system and system bit to download
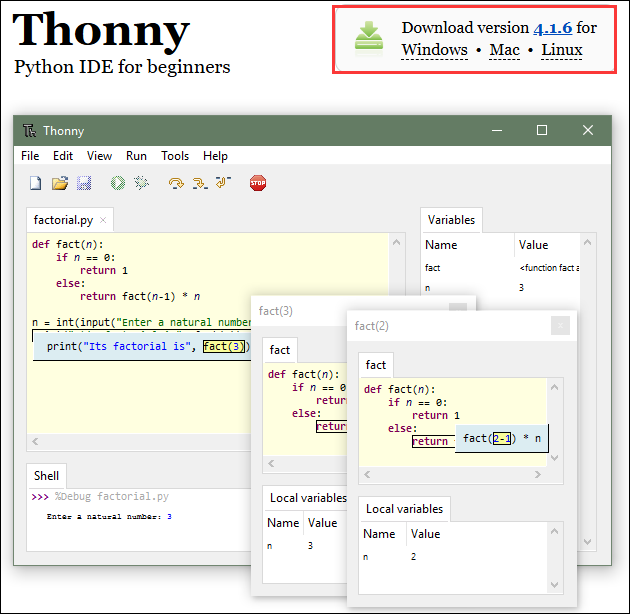
- Select the appropriate system and version, for example, with a 64-bit Windows, the mouse needs to be moved to the Windows section to display the corresponding information, then click to Download and Install
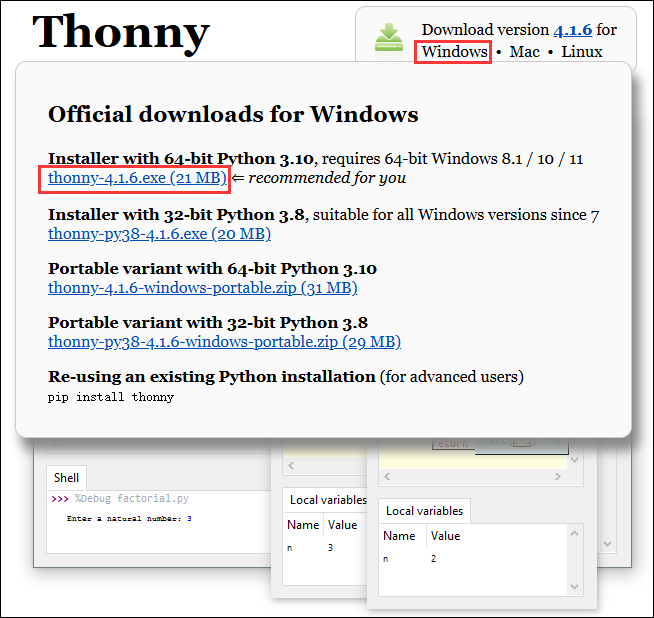
- The rest can be installed by default
Flash the firmware
- Currently, the development board is developed using customized firmware, which is available in ESP32-S3-LCD-1.28 demo, the firmware is merged into a single file, note that the download address is the 0x00 location
- Firmware path:
...\ESP32-S3-LCD-1.28-Demo\Firmware\MicroPython-bin
- For a tutorial on flashing firmware, please refer to Flash Firmware Flashing and Erasing tutorial
- The bin file in the factory-bin folder is a file for testing the onboard function, and there is no need to flash it here
Thonny Usage
Select the development board and model
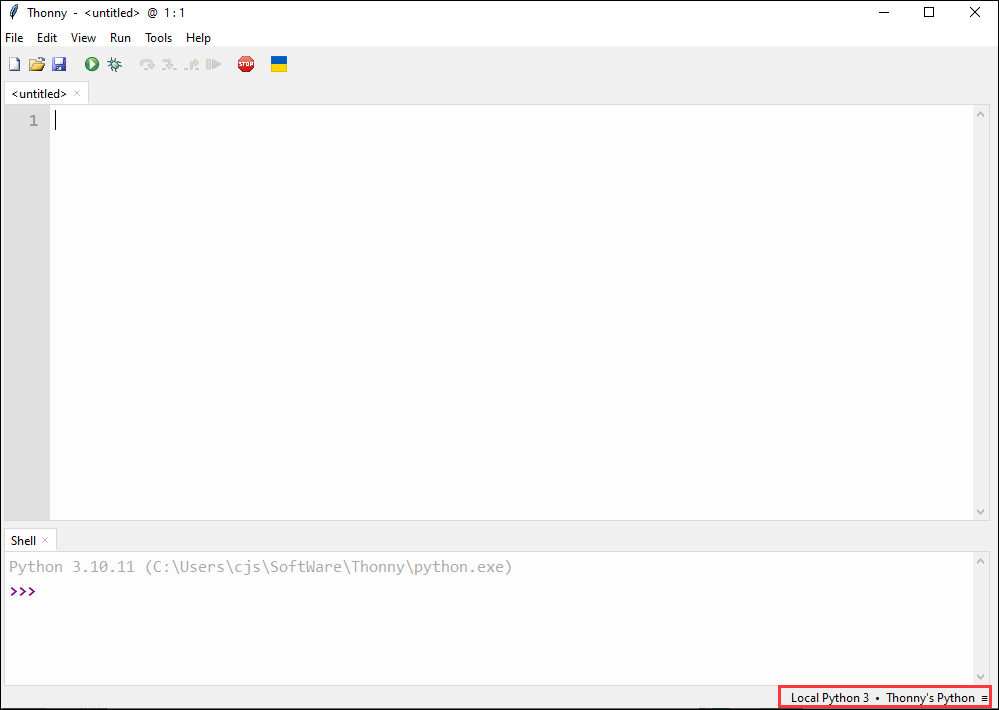
- Download and install the latest Thonny IDE, then open Thonny IDE -> Configure interpreter..., as shown in the following image
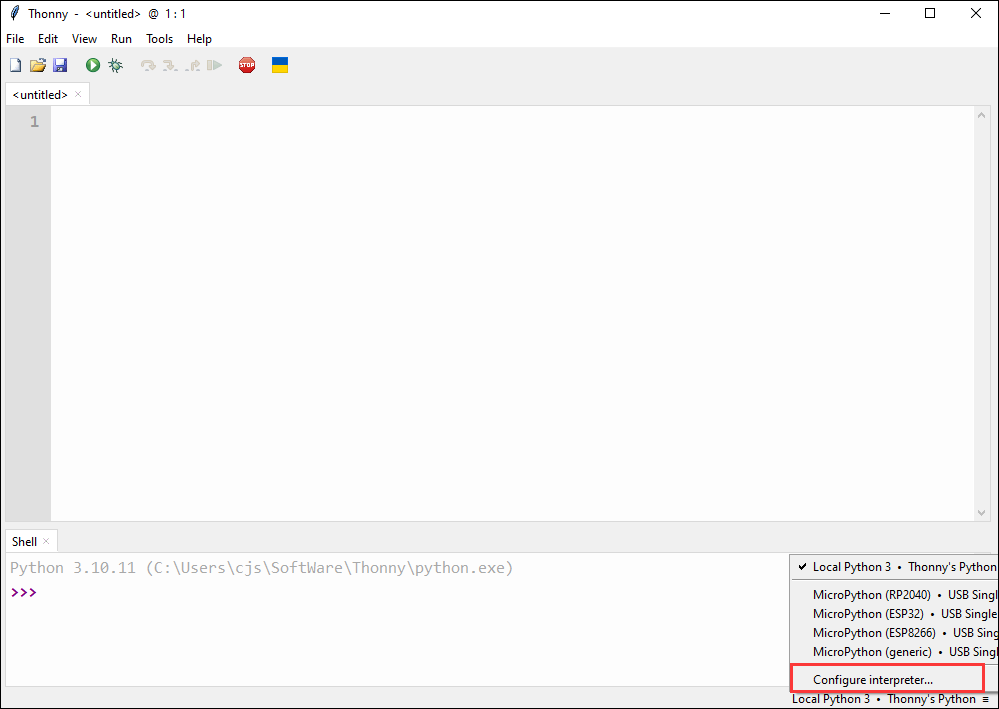
- Select ESP32 and the corresponding COM port
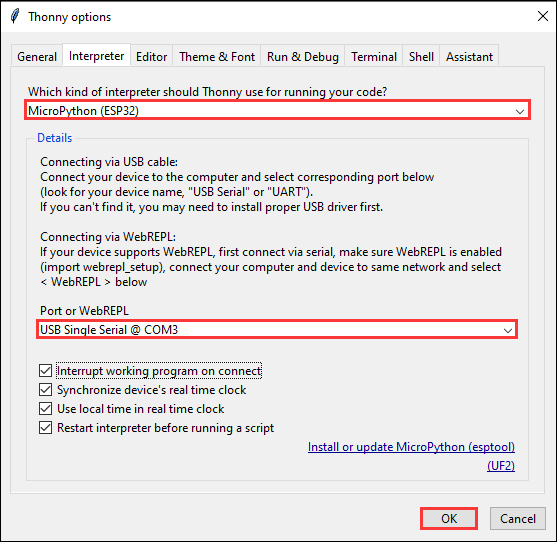
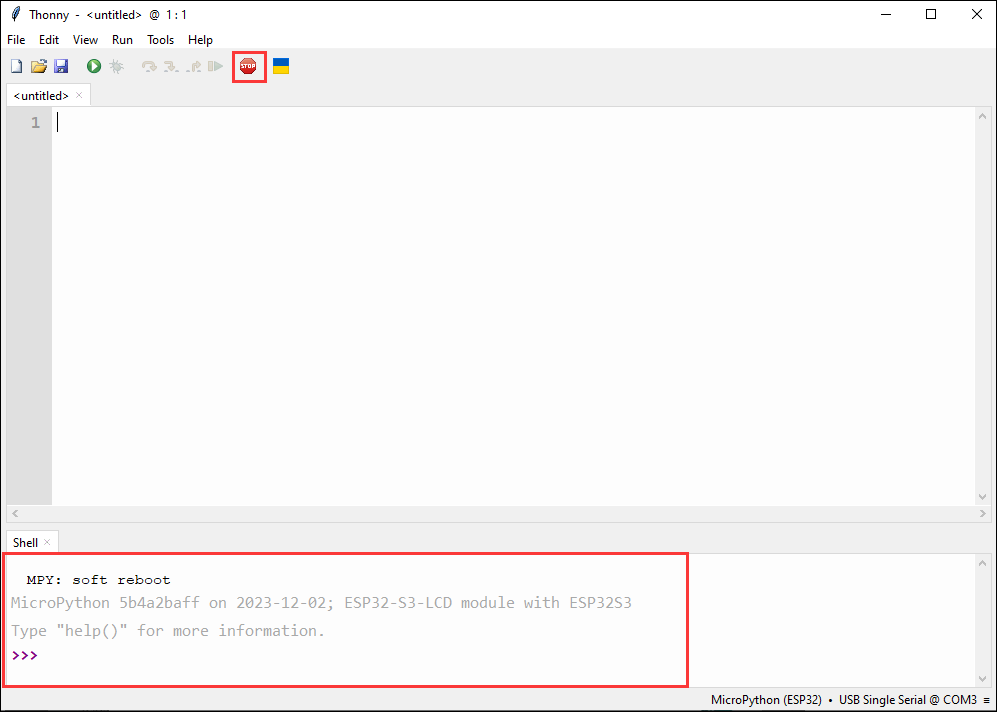
- Click this button to see the output statement in the shell, which indicates that the development board firmware has been successfully utilized
Upload demo
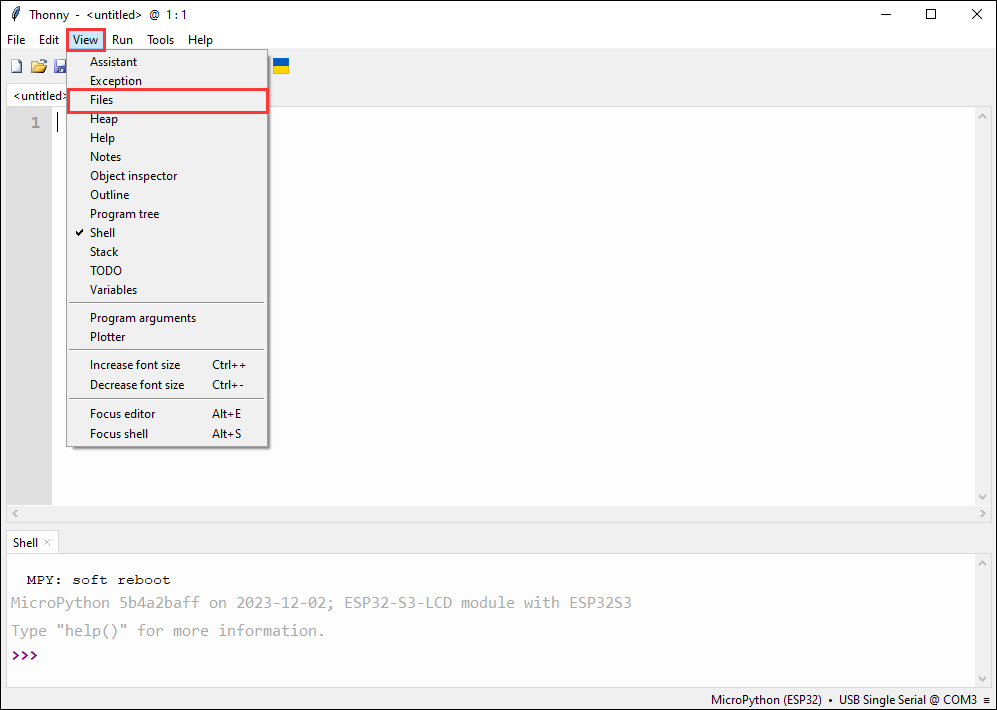
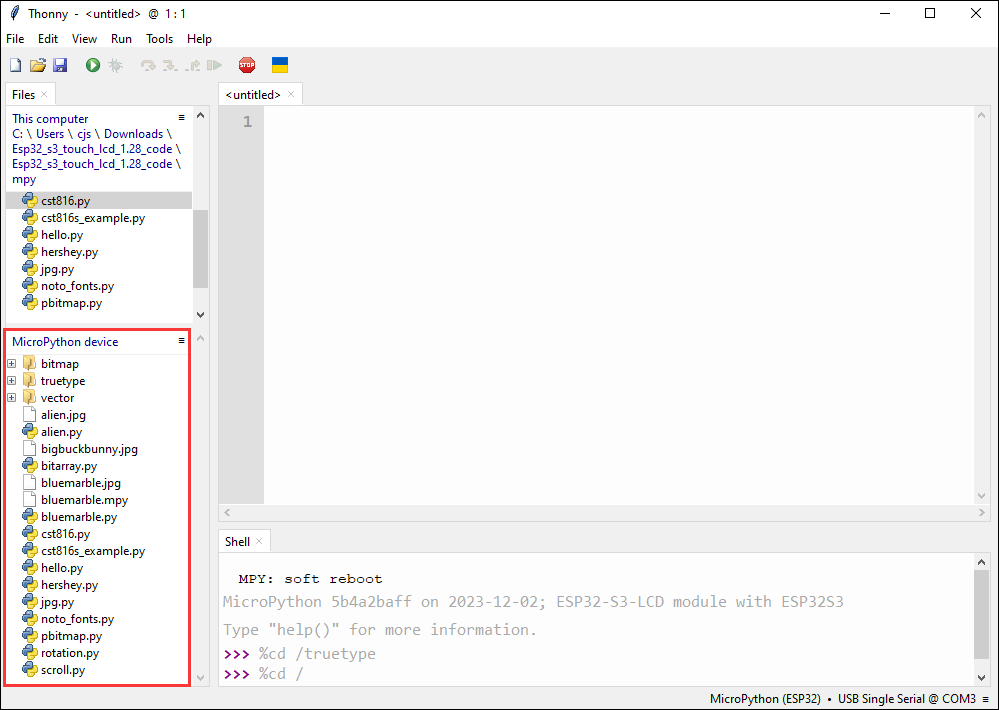
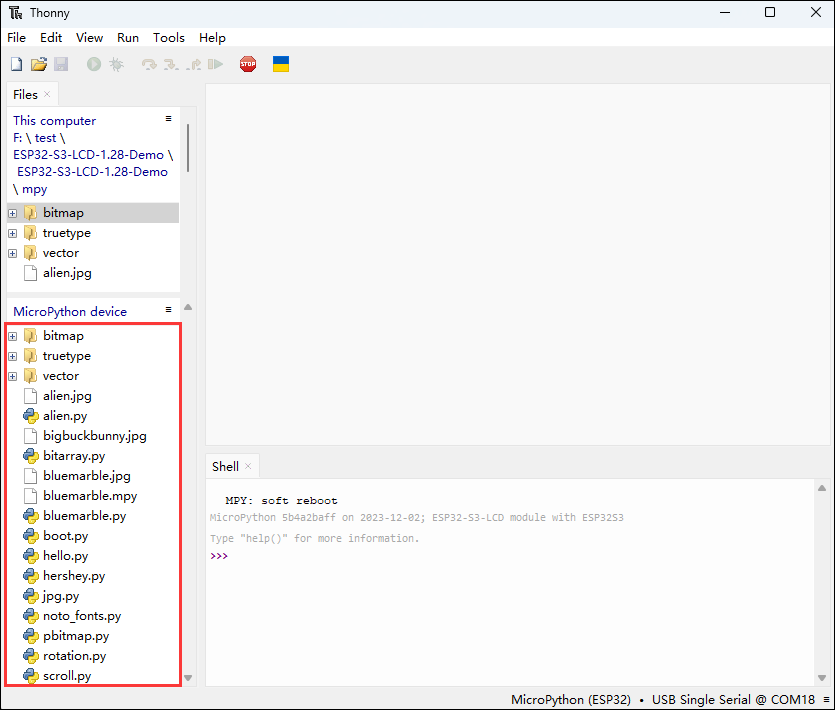
- How to find the desired demo, if there is no Files column at the beginning, we can find it in the View
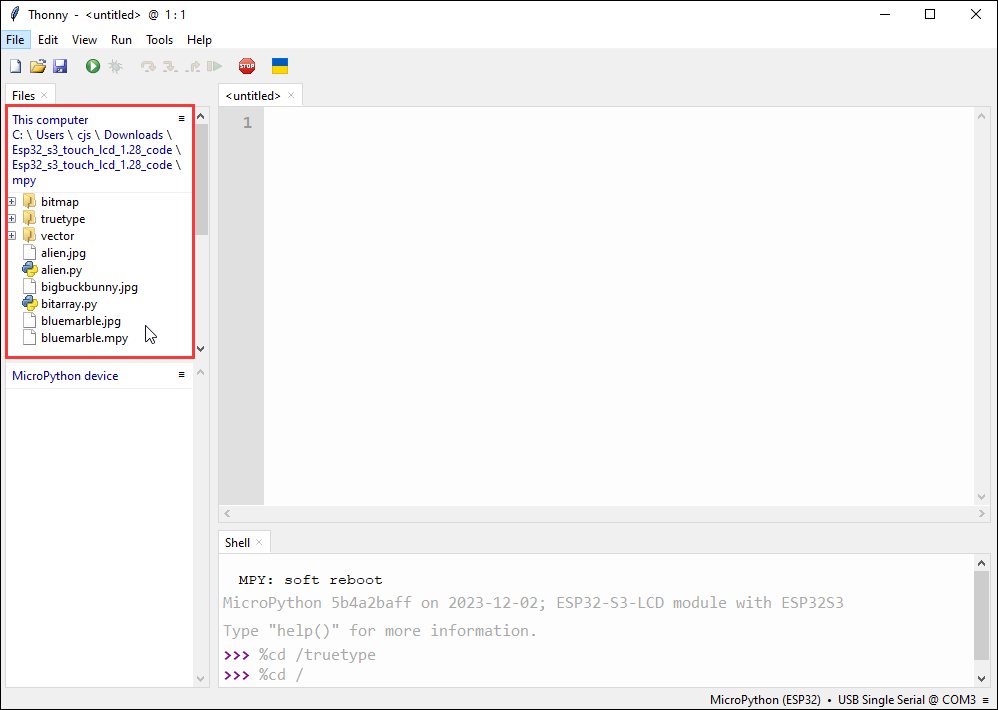
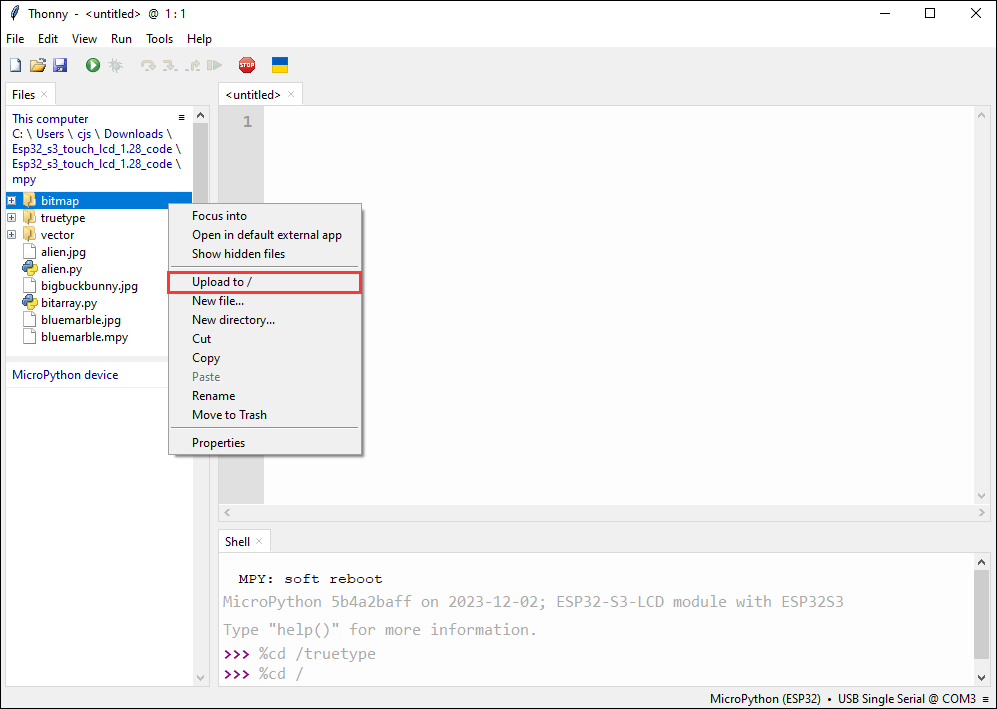
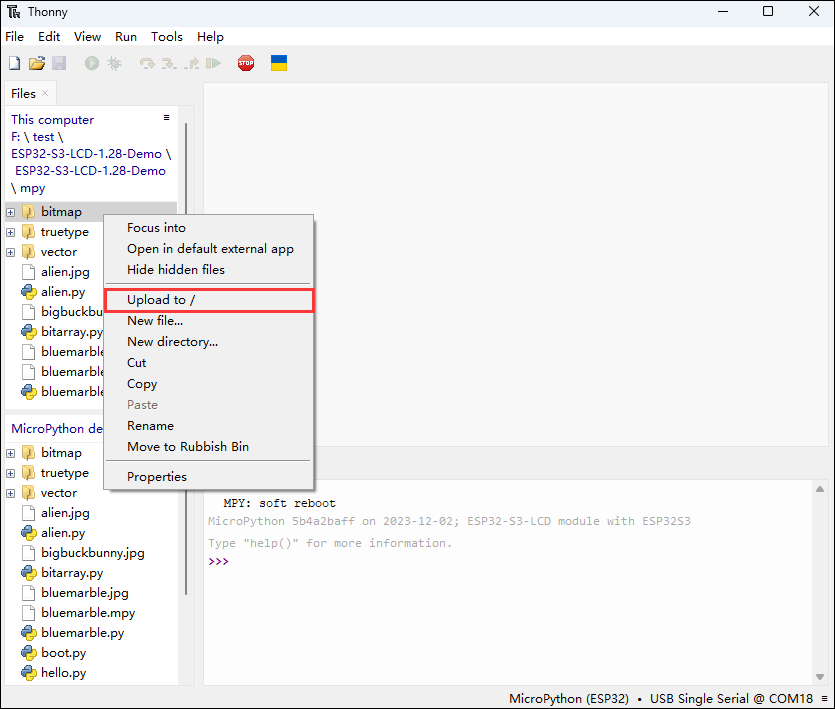
- Upload the local file to the development board, select the file, right-click with the mouse, find "Upload to/", and then download
- The following is the interface where all downloads are completed, the downloaded file must be consistent with the file in the red box, otherwise it may fail to run
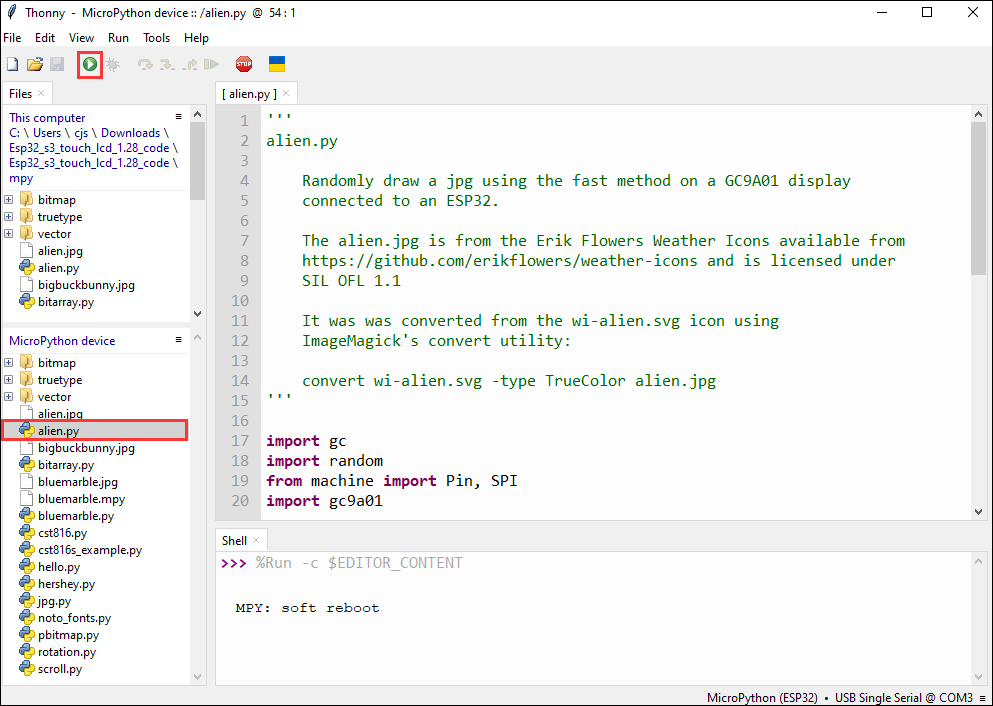
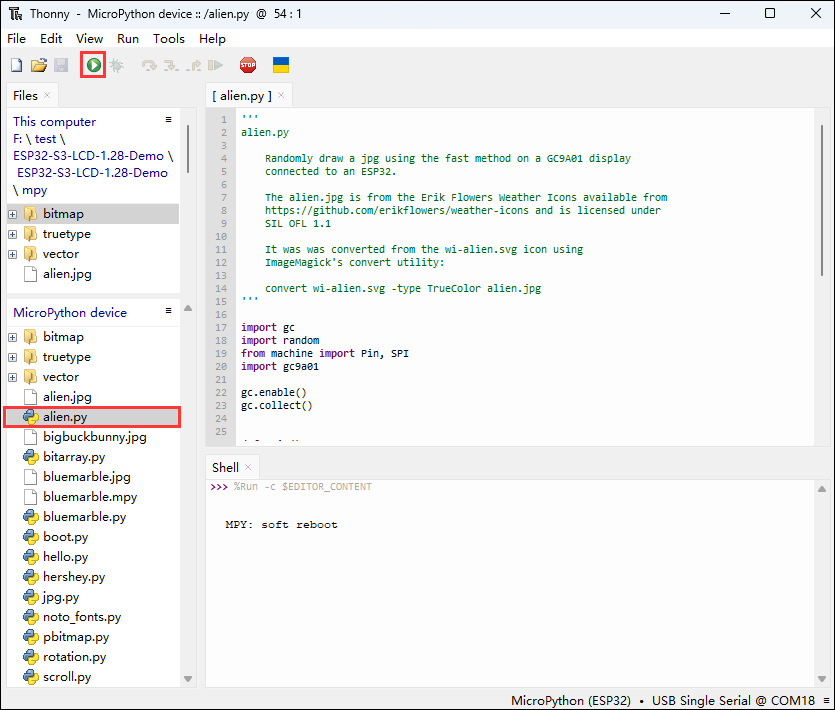
- Select the file with the .py suffix, and click the green button to flash and run
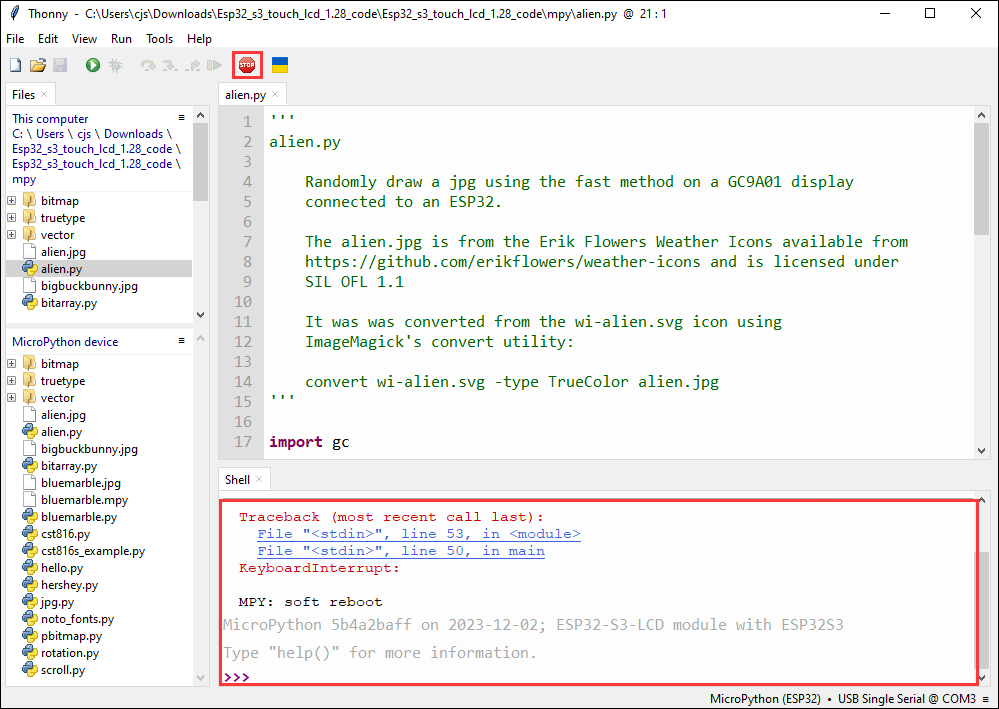
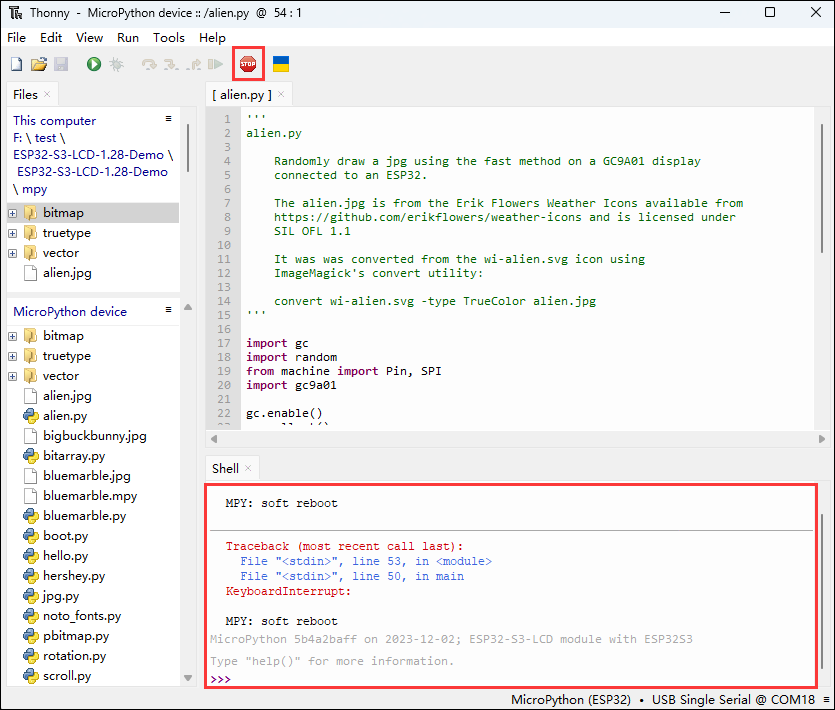
- When running another file, first click the red stop button, so that the other file can run normally
Demo

| Demo | Basic Description |
|---|---|
| alien.py | Display the "alien.jpg" image randomly |
| bitarray.py | Create and display animation of the Pac-Man sprite in multiple random locations |
| hello.py | Randomly display different colors of "Hello!" text, and you can switch different rotation angles by looping |
| hershey.py | Loop through different greetings |
| jpg.py | Alternate between two JPEG images |
| noto_fonts.py | Displays the names of three different fonts |
| pbitmap.py | Display a precompiled bitmap image |
| rotation.py | Cycle through the text display at different rotation values |
| scroll.py | Implement smooth scrolling of characters on the display screen |
Upload demo and special demos
Upload demo
- Upload the local file to the development board, select the file, right-click with the mouse, find "Upload to/", and then download
- The following is the interface where all downloads are completed, the downloaded file must be consistent with the file in the red box, otherwise it may fail to run
- Select the file with the .py suffix, and click the green button to flash and run (the operation figure is as follows)
- When running another file, first click the red stop button, so that the other file can run normally
Upload special demos
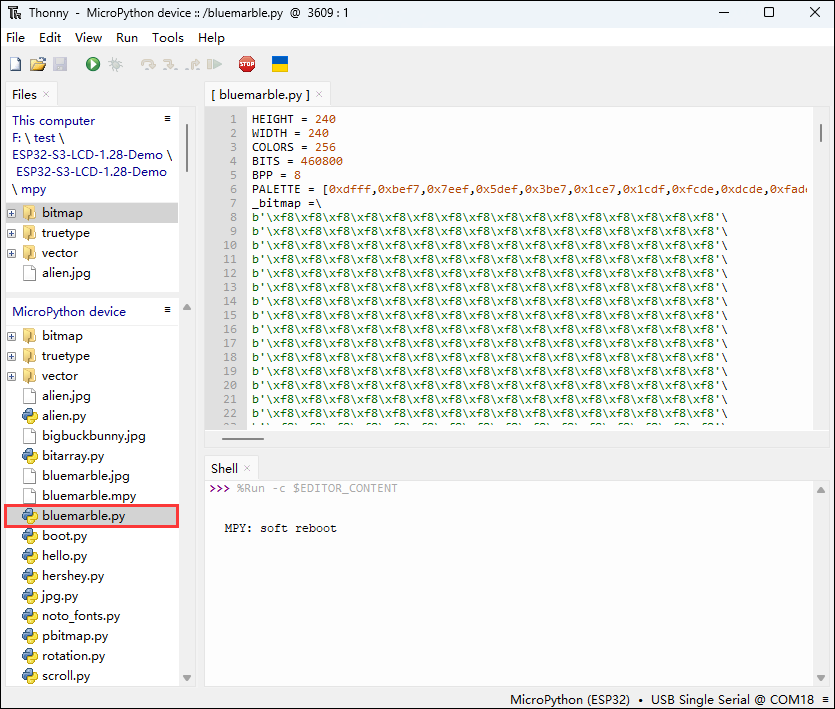
- In the given demo, the boot.py is an automatically generated blank file, and the bluenarble.py stores images, nothing will happen if you run the file
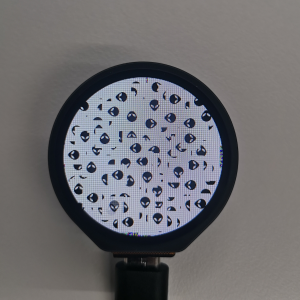
alien.py
Demo description
- This demo is used to randomly display the "alien.jpg" image on a specific display
Hardware connection
- Connect the development board to the computer
Code analysis
- GC9A01(): The importance of the GC9A01 constructor is to establish the hardware connection, set the initial parameters, and create an operable display object that lays the foundation for subsequent display operations
spi_interface: Establish SPI communication with the display screenwidthandheight: Set the display resolutionreset_pin: Connect various control pins of the display screenrotation: Set the initial rotation angle
Result demonstration
- LCD screen display
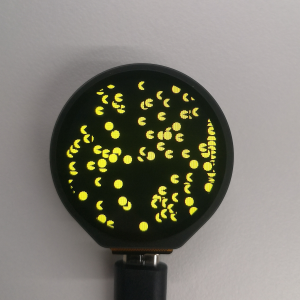
bitarray.py
Demo description
- The demo creates and displays multiple animations of the Pac-Man sprite in random locations on a specific display
Hardware connection
- Connect the development board to the computer
Code analysis
- pacman class move method: Responsible for updating the status of the Pac-Man sprite to move and animate it on the screen
- First increase the current number of steps of the sprite, and then make sure that the number of steps loops within the specified range of
SPRITE_STEPSby taking the conversion, corresponding to different animation frames or states of the sprite - Then, move the sprite's position in the horizontal direction. When the sprite's horizontal position reaches a specific value of 302, reset the step count. This is done to trigger a specific animation state or behavior. Finally, the conversion operation is used to ensure that the horizontal position of the sprite cycles within a certain range to avoid exceeding the display area
- First increase the current number of steps of the sprite, and then make sure that the number of steps loops within the specified range of
- tft.map_bitarray_to_rgb565
tft.map_bitarray_to_rgb565function selects bitmap data from theSPRITE_BITMAPSbased on the current steps of the sprite, converts it into an RGB565 format buffer namedsprite. At the same time, the width of the sprite, as well as the foreground and background colors, were specified
- tft.blit_buffer
tft.blit_bufferfunction draws the converted buffer to a specific location on the display screen, which is determined by the current coordinates of the sprite and specifies its width and height
Result demonstration
- LCD screen display
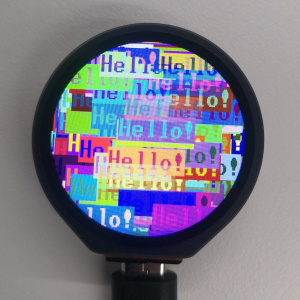
hello.py
Demo description
- The demo randomly displays different colors of "Hello!" text on a specific display, and different rotation angles can be switched by cycling
Hardware connection
- Connect the development board to the computer
Code analysis
- tft.text: Draw the text "Hello!" on the display
- Using the specified font, the position of the text is determined within the range of the display by random numbers, and the foreground and background colors are determined by the randomly generated RGB565 color values
- while True : Implement the dynamic effect of random display of "Hello!" text at different rotation angles
- By using an infinite loop and iterating through four rotation angles, set the display rotation angle, clear the screen, calculate the text display range, and cyclically call the
tft.textfunction to display text at random positions in random colors
- By using an infinite loop and iterating through four rotation angles, set the display rotation angle, clear the screen, calculate the text display range, and cyclically call the
Result demonstration
- LCD screen display
hershey.py
Demo description
- The demo loops through different greetings on a specific display
Hardware connection
- Connect the development board to the computer
Code analysis
- main: The loop section of the function that cycles through different fonts, colors, and greetings on the display
- Move the display position line by line, get the next color, font, and greeting, clear the previous line and draw new content, reset the line position when it exceeds a certain range, add a delay to control the display speed
- cycle : Create an object that can be iterated over in a loop
- Accept parameters. If iterable, loop directly. If a single element, convert it into an iterable list and loop, facilitating the convenient looping of color, font, and greeting lists
Result demonstration
- LCD screen display
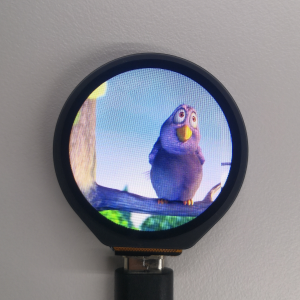
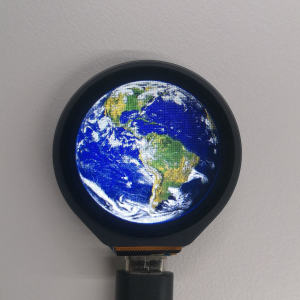
jpg.py
Demo description
- This demo alternates displaying two JPEG images on a specific display
Hardware connection
- Connect the development board to the computer
Code analysis
- main: The loop section of the function that cycles through different fonts, colors, and greetings on the display
- Iterate through the list of image filenames, call the
tft.jpgfunction to display the image in a slower way at a specific location, and wait 5 seconds
- Iterate through the list of image filenames, call the
- tft.jpg : Display the specified JPEG picture on the display
- Read, decode picture files and draw to display screen, determine display position and mode according to incoming parameters
Result demonstration
- LCD screen display

noto_fonts.py
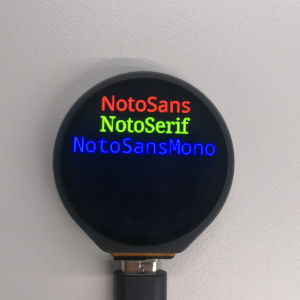
Demo description
- The demo displays the names of three different fonts (NotoSans, NotoSerif, NotoSansMono) on a specific display, and these font names are shown in the center on separate lines
Hardware connection
- Connect the development board to the computer
Code analysis
- main: The main entrance of the demo, which initializes the display and displays three font names
- Create a display object and initialize it, fill the background in black, and call the center function to display the three font names in turn
- center : Display a given string in the center of the display in the specified font
- Get the screen width, calculate the width of the string, if it is less than the screen width, calculate the coordinates for horizontal centering, otherwise for left alignment. Finally, display the string at the specified location
Result demonstration
- LCD screen display
pbitmap.py
Demo description
- This demo displays a pre-compiled bitmap image on a specific display
Hardware connection
- Connect the development board to the computer
Code analysis
- main: The main entrance of the demo, which initializes the display and displays the bitmap
- Create a display object, fill it with a black background after initialization, and call
tft.pbitmapto display the image in the pre-compiled bitmap module
- Create a display object, fill it with a black background after initialization, and call
tft.pbitmap: Display pre-compiled bitmap on the screen
- Read the bitmap data and draw it to the display, and determine the display position based on the incoming parameters
Result demonstration
- LCD screen display
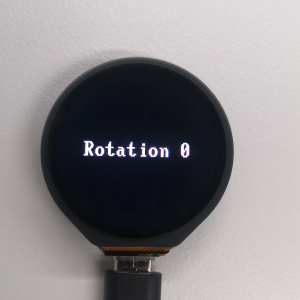
rotation.py
Demo description
- The demo loops through the text display at different rotation values on a specific display
Hardware connection
- Connect the development board to the computer
Code analysis
- main: The main entrance of the demo, which initializes the display and loops through the text display at different rotation values
- Create a display object and initialize it, set different rotation values in turn in the loop, clear the screen and display the text with the rotation value information and wait for observation
- tft.rotation: Set the display rotation angle
- Adjust the display orientation according to the incoming parameters
Result demonstration
- LCD screen display
scroll.py
Demo description
- This demo implements a smooth scrolling display of characters on a specific display
Hardware connection
- Connect the development board to the computer
Code analysis
- main: The main entrance of the demo, which initializes the display, sets the color, and scrolls through the characters
- Create a display object, set up a color generator to get the foreground color, set the scroll area after initializing the display, clear the top row in the loop, display characters on the new line and update the color and character values, set the scroll address for scrolling and control the speed
- cycle : Create an object that can be iterated over in a loop
- Accept parameters. If iterable, loop directly. If a single element, convert it into an iterable list and loop
Result demonstration
- LCD screen display
Flash Firmware Flashing and Erasing
- The current demo provides test firmware, which can be used to test whether the onboard device functions properly by directly flashing the test firmware
- bin file path:
...\ESP32-S3-LCD-1.28-Demo\Firmware\factory-bin
Resources
Schematic diagram
Project diagrams
Demo
Application Examples
Datasheets
ESP32-S3
Other components
Software tools
Arduino
Thonny
Firmware flashing tool
Other resource link
FAQ
Question: After the module downloads the demo and re-downloads it, why sometimes it can't connect to the serial port or the flashing fails?
- Click the Reset button for more than 1 second, wait for the PC to re-recognize the device and then download again
- Long press the BOOT button, press RESET at the same time, then release RESET, then release the BOOT button, at this time the module can enter the download mode, which can solve most of the problems that can not be downloaded.
Question: Why does the module keep resetting and flicker when viewed the recognition status from the device manager?
It may be due to Flash blank and the USB port is not stable, you can long-press the BOOT button, press RESET at the same time, and then release RESET, and then release the BOOT button, at this time the module can enter the download mode to flash the firmware (demo) to solve the situation.
Question: How to deal with the first compilation of the program being extremely slow?
- It's normal for the first compilation to be slow, just be patient
Question: What should I do if I can't find the AppData folder?
- Some AppData folders are hidden by default and can be set to show.
- English system: Explorer->View->Check "Hidden items"
- Chinese system: File Explorer -> View -> Display -> Check "Hidden Items"
Question: How do I check the COM port I use?
- Windows system:
①View through Device Manager: Press the Windows + R keys to open the "Run" dialog box; input devmgmt.msc and press Enter to open the Device Manager; expand the "Ports (COM and LPT)" section, where all COM ports and their current statuses will be listed.
②Use the command prompt to view: Open the Command Prompt (CMD), enter the "mode" command, which will display status information for all COM ports.
③Check hardware connections: If you have already connected external devices to the COM port, the device usually occupies a port number, which can be determined by checking the connected hardware.
- Linux system:
①Use the dmesg command to view: Open the terminal.
①Use the ls command to view: Enter ls /dev/ttyS* or ls /dev/ttyUSB* to list all serial port devices.
③Use the setserial command to view: Enter setserial -g /dev/ttyS* to view the configuration information of all serial port devices.
Question: Why does the program flashing fail when using a MAC device?
- Install MAC Driver and flash again.
Question: What is the screen driver?
GC9A01A
Question: What battery does ESP32-S3-LCD-1.28 use to power it?
MX1.25 2P connector, for 3.7V battery, supports charging and discharging
Support
Monday-Friday (9:30-6:30) Saturday (9:30-5:30)
Email: services01@spotpear.com
[Tutorial Navigation]
- Overview
- Version Description
- Usage Instructions
- Working with Arduino
- Working with MicroPython
- Flash Firmware Flashing and Erasing
- Resources
- Schematic diagram
- Project diagrams
- Demo
- Application Examples
- Datasheets
- Software tools
- Other resource link
- FAQ
- Question: After the module downloads the demo and re-downloads it, why sometimes it can't connect to the serial port or the flashing fails?
- Question: Why does the module keep resetting and flicker when viewed the recognition status from the device manager?
- Question: How to deal with the first compilation of the program being extremely slow?
- Question: What should I do if I can't find the AppData folder?
- Question: How do I check the COM port I use?
- Question: Why does the program flashing fail when using a MAC device?
- Question: What is the screen driver?
- Question: What battery does ESP32-S3-LCD-1.28 use to power it?
- Support