- sales/support
Google Chat:---
- sales
+86-0755-88291180
- sales01
sales@spotpear.com
- sales02
dragon_manager@163.com
- support
tech-support@spotpear.com
- CEO-Complaints
zhoujie@spotpear.com
- Only Tech-Support
WhatsApp:13246739196
- Purchase/Shipping/Refund
WhatsApp:13424403025
Raspberry Pi CM4 PCIe-TO-SATA-4P User Guide
Overview
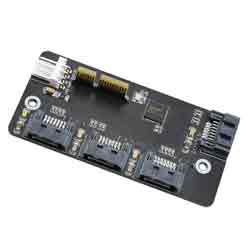
PCIe to 4-channel SATA expansion card, support PCIe Gen3 x1, the maximum speed of a single channel is 6Gbps.
Feature
- Supports single-channel PCI Express.
- Four power-saving modes of L0s/L1/L23/L3.
- Supports L1 sub-state deep power-saving mode.
- Supports SRIS, AER, LTR.
- Supports SATA LED.
- Supports NCQ and AHCI SPEC 1.4.
- Four SATA3.0 (6Gbps) ports.
- Supports port multiplier command-based switching.
- Supports SATA Partial/Dormancy power management.
- Does not support direct access to the PC motherboard.
- Supporting 5V and 12V SATA HDDs (2.5" and 3.5" HDDs), but it does not support M.2 interface.
Precaution
- Compute Module 4 PoE 4G Board or Compute Module 4 PoE 4G Board does not require an additional power supply.
- The module does not need a driver when using the latest Raspberry Pi OS. If you use the old Raspberry Pi OS or other systems, you may need a driver.
- This module is for PCIe Gen 3 × 1 expansion, and the single-channel SATA supports 6Gbps. Note that the Raspberry Pi CM4 adopts PCIe Gen 2 with a limited speed of 5Gbps.
- The module is powered by 12V. When 12V cannot be provided, it can also be powered by 5V.
- As the power provided will affect PCIe, you must make sure that the main board will be in normal operation with 5V.
How To Use
Connection & Driver
Connection as shown in the following figure: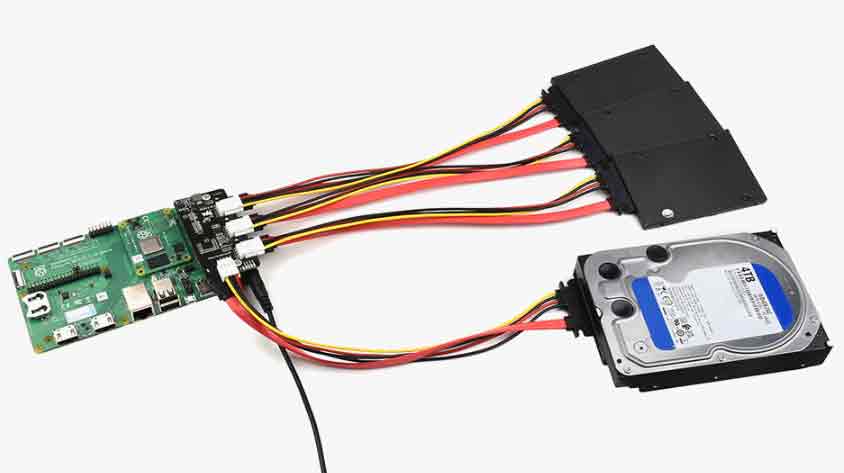
The module does not need a driver when using the latest Raspberry Pi OS. If it is not the latest Raspberry Pi OS or other systems, it is very likely that a driver needs to be added.
For older versions of Raspberry Pi OS, please execute "sudo apt upgrade -y", and you can click to see more PCIE tests.
Usage
After the SATA hard disk is connected, you can check the connection through the onboard LED.
When powered, 5 LEDs (4 status LEDs and 1 power indicator) are on.
Please wait for the CM4 to be turned on, the LED corresponding to the SATA after identifying the device will be on, and the LED corresponding to the SATA interface that is not connected will be off.
Wait for the startup to complete and enter the system.
The commands for checking the disk:
#All the following commands are only tested on Raspberry Pi OS
#Check the disk status
lsblk
#Disk partition can use fdisk tool
#Format can use mkfs.xxxx tool
#mount
sudo mount
#uninstall
sudo umount
Test dd tool.
#Enter the mounting directory and execute as follows
# release memory
sudo sh -c "sync && echo 3 > /proc/sys/vm/drop_caches"
#Write
dd if=/dev/zero of=./test_write count=2000 bs=1024k
#read
dd if=./test_write of=/dev/null count=2000 bs=1024k